Introduction
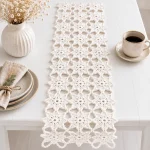
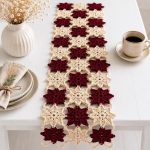
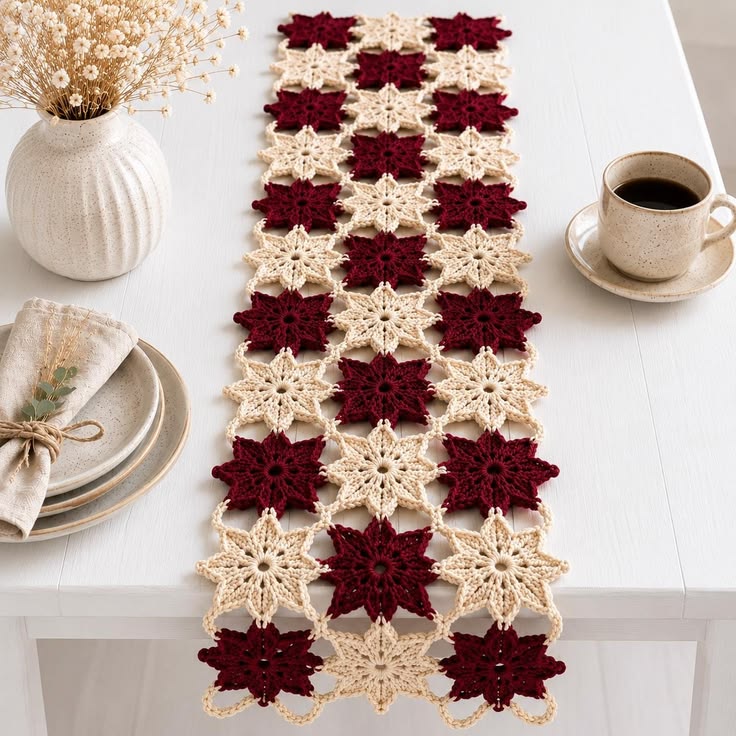
Alternating eight-point stars turn this narrow runner into a geometric lattice instead of a conventional solid table covering. This crochet star table runner pattern combines burgundy and warm cream motifs with open chain joins that leave the tabletop visible between them. Worked in cotton or a cotton-blend yarn, the photo-adapted design measures approximately 35–40 cm wide and can be extended to almost any table length by adding complete motif rows.
The Design: What Makes This Crochet Star Runner Different
The runner is built from individual eight-point motifs rather than crocheted as one long rectangle. That construction makes length adjustment simple: additional motif rows can be added without changing the star pattern itself. Burgundy and cream stars alternate through three vertical columns, creating a checkerboard effect while preserving a restricted two-color palette.
Each star has an open center, eight narrow textured sections and sharply defined outer points. Small chain arches connect neighboring tips, producing the open diamond-shaped spaces visible between motifs. The same chains form decorative loops along the long edges and at both ends.
The most common failure occurs when motif points are joined at inconsistent heights. Even a small mismatch accumulates down the runner and can twist the outer edges. Block every star to one measurement before assembly.
Project Info at a Glance
| Skill Level | Construction | Approx. Width | Hook | Best For |
|---|---|---|---|---|
| Intermediate | Joined eight-point motifs | 35–40 cm | 3.5–4 mm | Dining table, console, sideboard |
The dimensions are practical estimates for reproducing the proportions shown in the reference image. Yarn thickness, hook size, blocking and the number of motif rows will determine the final measurement.
Materials and Tools
Yarn
- Warm cream DK-weight cotton or cotton-blend yarn — approximately 180–230 g for a medium-length runner.
- Deep burgundy DK-weight cotton or cotton-blend yarn — approximately 180–230 g.
Tools
- 3.5 mm crochet hook for a firm motif
- 4 mm crochet hook if additional drape is required
- Yarn needle
- Scissors
- Locking stitch markers
- Tape measure
- Blocking mats
- Rust-resistant pins
Abbreviations
- MR — magic ring
- ch — chain
- sl st — slip stitch
- sc — single crochet
- hdc — half double crochet
- dc — double crochet
- tr — treble crochet
- dtr — double treble crochet
- sp — space
- st / sts — stitch / stitches
Crochet Star Table Runner Pattern
The runner in the photograph uses three motifs across. Burgundy and cream alternate both vertically and horizontally. A runner approximately 150 cm long may require roughly 27–33 stars depending on the blocked diameter of each motif.
Make one test star first. Block it, measure from point to opposite point, then calculate the final number of rows.
Eight-Point Crochet Star Motif
Make in either burgundy or cream.
Round 1: Center Ring
Make an MR.
R1: Ch 3, work 15 dc into MR. Join with sl st to top of beginning ch-3. (16 dc)
Pull the ring firmly enough to define the center while leaving the small opening visible.
Round 2: Eight Sections
R2: Ch 1, sc in same st, ch 3, skip 1 st, sc in next st. Repeat from *ch 3, skip 1 st, sc in next st* around.
Join with sl st.
You should have 8 ch-3 spaces.
Round 3: Building the Star Bases
Sl st into the first ch-3 sp.
R3: In each ch-3 sp work:
Sc, hdc, 3 dc, hdc, sc.
Repeat in all eight spaces.
Join with sl st.
At this stage the motif resembles an eight-petal flower rather than a pointed star.
Round 4: Separating the Eight Points
Sl st to the center dc of the first petal.
R4: Ch 5, sl st into the center dc of the next petal.
Repeat around.
Join with sl st.
You should now have 8 ch-5 spaces positioned behind the petals.
Round 5: Forming the Star Points
Sl st into the first ch-5 sp.
In the first space work:
Sc, hdc, dc, tr, dtr, ch 3, sl st in first ch, dtr, tr, dc, hdc, sc.
This creates one pointed section.
Repeat the same sequence in all eight ch-5 spaces.
Join with sl st.
Fasten off if the star will be sewn together later.
Optional Textured Final Round
The reference motifs have visibly defined point edges. A surface round can strengthen that outline.
Join the same color at the valley between two points.
Work sl st or loose sc along the first side of the point.
At the tip work:
Sc, ch 2, sc into the ch-3 tip space.
Continue down the second side.
Work one sl st into the valley.
Repeat around all eight points.
Fasten off.
Blocking the First Star
Blocking determines whether the finished runner develops straight sides.
Place the completed motif on a blocking mat.
Pin all eight points at equal distances from the center.
Measure horizontally and vertically.
A DK-weight star made with a 3.5–4 mm hook may finish at approximately 10–12 cm from point to opposite point.
Record the measurement from the first motif and block every remaining star to the same dimensions.
Color Layout
Use three stars across each row.
Row A: Burgundy — Cream — Burgundy.
Row B: Cream — Burgundy — Cream.
Repeat Rows A and B for the full runner length.
This alternating arrangement prevents any uninterrupted vertical stripe of one color.
Planning the Runner Length
Measure the table before making all motifs.
A runner generally looks balanced when it either stops well inside the table ends or hangs evenly beyond both ends.
For a runner that stays on top of the table, subtract approximately 25–40 cm from the total table length.
For an overhanging version, add approximately 20–30 cm to the table length.
Divide the required length by the effective height of one joined motif row.
Round to a complete row.
Joining the Stars
The open connections between stars are a major part of this design. Avoid sewing complete motif edges together.
Lay the first three motifs in their final color sequence.
Place the stars so corresponding points face one another.
Thread a yarn needle with matching or cream yarn.
Sew the two facing tip spaces together with two or three secure passes.
Move to the neighboring pair and repeat.
Only the selected star points should meet. The spaces between them remain open.
Chain-Join Method
For a more decorative connection, use crochet rather than sewing.
Join cream yarn to the tip of the first star.
Ch 4.
Sl st into the corresponding point of the neighboring motif.
Ch 4.
Return to the original point and sl st.
Fasten off securely.
This creates a small open connector between the two stars.
Joining Horizontal Motif Rows
Complete each three-star row first.
Lay the next row beneath it.
The points of the lower motifs should align with the spaces and points of the row above.
Pin the complete row before making permanent joins.
Connect corresponding star points using the same chain or sewn method.
Check the width after every two rows.
If the sides begin moving inward, the joining chains are too short. If the runner develops waves, the connections are too long.
Open Diamond Connections
The photographed runner contains open geometric spaces between neighboring stars.
After four motifs meet around one central opening, join cream yarn to one inner-facing point.
Ch 5, sl st into the next motif point, ch 5, sl st into the third point, ch 5, sl st into the fourth point, ch 5.
Join to the beginning.
The four chains create an open diamond or rounded square between motifs.
Keep these connector chains consistent throughout the runner.
Long Edge Loops
The sides in the reference image remain open rather than receiving a heavy solid border.
Join cream yarn to an outward-facing star tip.
Ch 8.
Sl st into the next available outward-facing point.
Repeat along the long edge.
The loops should lie flat against the table rather than pulling the star tips inward.
If necessary, increase to ch 9 or ch 10 after testing the first two loops.
Decorative End Loops
The short ends can carry slightly larger chain arches.
Join cream yarn at one outer point.
Ch 10–12.
Sl st into the neighboring point.
Repeat across the three end motifs.
Mirror the same sequence at the opposite end.
The finished loops should be symmetrical when the runner is laid flat.
Alternative Join-As-You-Go Method
Experienced motif crocheters can join the stars during the final round.
Complete the first star normally.
On the second motif, work Round 5 until reaching a point that will touch the first star.
At the tip, replace the middle chain of the ch-3 picot with a sl st through the corresponding tip of the completed motif.
Finish the point and continue around.
Repeat at every required connection.
This method reduces sewing but requires the complete color layout to be planned before the second star is finished.
Making a Burgundy Star
The stitch construction remains identical for both colors.
Use deep burgundy for the center ring through the final point round.
Do not change to cream at the edge of individual stars.
The strong single-color motif is what produces the clear alternating pattern.
Making a Cream Star
Follow the same five-round star pattern using warm cream yarn.
Compare each finished motif against the blocked reference star.
Cream yarn can sometimes appear slightly larger if its twist or fiber content differs from the burgundy yarn, even when both yarn labels list the same weight.
Change hook size by 0.25–0.5 mm if one color consistently produces larger motifs.
Keeping All Eight Points Equal
Count every point sequence.
The tallest stitch must remain centered.
Each side of the point should mirror the other:
sc → hdc → dc → tr → dtr → tip → dtr → tr → dc → hdc → sc.
If one tall stitch is omitted, the point will lean toward the shorter side.
Correct the mistake before beginning the next point.
Sharper Star Tips
For sharper points, replace the ch-3 tip with:
Ch 2, sl st in second ch from hook.
For a more decorative point, use:
Ch 3, sl st in first ch.
The second version is slightly wider and resembles the tips visible in the reference image.
Making the Runner Wider
Add complete motif columns.
A four-column runner should continue the alternating color sequence rather than duplicating neighboring colors.
For example:
Row A: Burgundy — Cream — Burgundy — Cream.
Row B: Cream — Burgundy — Cream — Burgundy.
Do not enlarge the individual stars simply to gain width. Larger motifs alter the open spaces and can make the points difficult to block evenly.
Making the Runner Narrower
A two-column version works well for a console or narrow sideboard.
Alternate:
Row A: Burgundy — Cream.
Row B: Cream — Burgundy.
Use the same open chain loops along both long edges.
A single-column version can also be made as a narrow dresser scarf or decorative shelf strip.
Using Mercerized Cotton
Mercerized cotton produces crisp points and strong stitch definition. It also responds well to blocking, making it suitable for a geometric table runner.
A softer cotton blend creates more drape but may require additional pinning at each star point.
Acrylic yarn can be used, although the final fabric may not hold sharply blocked points as readily as cotton.
Changing the Color Palette
Burgundy and cream create the strong contrast shown in the photograph.
For a Christmas version, replace burgundy with deep red and retain cream.
A neutral runner can combine oatmeal and dark brown.
For autumn tables, use rust and natural ivory.
Navy and cream create a less seasonal version suitable for year-round dining decor.
Keep the two colors clearly different in value if the alternating checkerboard layout is important.
Optional Solid Center
The reference stars have visible center openings.
For a closed center, begin with 8 sc in MR rather than 16 dc.
Increase to 16 stitches in the following round, then begin the eight-section construction.
This adds one round and produces a denser central circle.
Use the same center style for every motif in the runner.
Assembly
- Crochet one complete eight-point star, block it carefully and record its final point-to-point measurement.
- Make the required number of burgundy and cream stars, maintaining the same yarn weight, hook size and point sequence.
- Block every motif to the reference measurement, pinning all eight points before allowing the pieces to dry completely.
- Arrange three stars across each row and alternate burgundy and cream so neighboring motifs do not share the same color.
- Join the three motifs within each horizontal row at corresponding points while keeping the spaces between stars open.
- Position consecutive rows beneath one another and pin several rows together before making the vertical joins.
- Add the open chain connectors between inner-facing star points to create consistent geometric spaces throughout the runner.
- Work matching cream chain loops along both long edges without pulling the outer star points toward the center.
- Add slightly larger decorative loops at both short ends and compare the two ends for matching length and symmetry.
- Weave in every yarn tail, complete a final blocking and measure the finished runner before placing it on the table.
The completed runner should lie flat with clearly separated stars, consistent open spaces and straight parallel long edges.
How to Prevent the Runner From Twisting
Twisting usually begins during assembly rather than while individual stars are being crocheted.
Block every motif first.
Lay at least three complete rows on a flat surface.
Measure the distance between the outermost points on both sides.
Pin the motifs before joining.
After each new row is attached, place the runner flat again.
Correct any pulling immediately rather than waiting until all motifs have been assembled.
How to Correct Wavy Edges
Excessively long edge chains create waves.
Remove the affected loop and reduce it by one or two chains.
If several loops are already complete, compare their lengths before changing all of them.
A chain arch that looks correct while stretched may become loose after blocking.
The loop should rest naturally between neighboring points without visible tension.
How to Correct Pulled-In Edges
If the long edges curve toward the center, the connector chains are too short.
Increase the side loops by one or two chains.
Check the joins between motif rows as well.
Very tight internal connections can narrow the complete runner even when the edge loops are correctly sized.
Using the Pattern for Placemats
A smaller arrangement can be converted into a matching placemat.
Make six stars arranged in two rows of three.
Alternate burgundy and cream.
Join them using the same chain connectors.
Add open loops around the perimeter.
Block the finished piece into a rectangle.
Make additional placemats using the same color sequence for a coordinated dining set.
Using the Motifs for Coasters
One star can function as a decorative coaster when worked in cotton yarn.
For a smaller coaster, use sport-weight cotton and a 3 mm hook.
Block each point carefully.
A single motif also works as a hanging ornament when a chain loop is added to one point.
Using the Motifs for a Table Centerpiece
Arrange nine stars in a three-by-three square.
Alternate the two colors.
Connect the points using the same open chain method.
Add a narrow loop border around all four sides.
This creates a matching centerpiece without changing the individual star instructions.
7 Technical Tips for the Crochet Star Table Runner
- Block every star to within approximately 5 mm of the reference measurement. Small size differences become visible when three motifs must align across every row.
- Count all eight ch-3 spaces after Round 2. An incorrect space count produces seven or nine points and cannot be corrected cleanly in the final round.
- Keep the tallest dtr centered in every star point. Moving it one stitch to either side makes the point visibly lean.
- Test a 4–5 chain internal connector before assembling the full runner. A connector that is even 1 cm too short can gradually pull the long edges inward.
- Pin at least three motif rows before permanent joining. Joining one loose row at a time makes it harder to detect a developing diagonal shift.
- Measure both long edges after every four joined rows. A difference greater than approximately 1 cm indicates inconsistent joining tension or motif size.
- Weave tails through at least 4 cm of dense stitches. Star points and chain joins receive more movement than a solid table runner, so short tails can work loose during washing or blocking.
Final Blocking
Soak or dampen the runner according to the selected yarn’s care instructions.
Support the entire piece when lifting it because wet cotton can stretch.
Lay the runner on blocking mats.
Pin the four outer corners first.
Measure the width at the beginning, middle and end.
Adjust until the two long sides are parallel.
Pin individual star points only where necessary.
Shape all edge loops to matching curves.
Allow the runner to dry completely before removing any pins.
Care and Storage
Follow the care directions supplied with the chosen yarn. Cotton runners can often be washed gently, but the open joins should not be subjected to aggressive agitation.
Dry flat and reshape the star points while damp.
For storage, roll the runner around a clean cardboard tube or fold it loosely along the spaces between motif rows.
Avoid placing heavy objects directly over the pointed motifs for extended periods because repeated compression can flatten the blocked star shape.
Conclusion
Make and block one star before committing to the full motif count because that measurement controls both the width and length of the runner. Alternate burgundy and cream through three columns, join only selected points and preserve the open chain spaces between neighboring motifs. Check the width frequently during assembly; consistent connectors are as important as consistent stars. Finish with cream chain loops along the sides and slightly larger arches at both ends. Save this crochet star table runner pattern to Pinterest and share the finished runner on Instagram with #CrochetStarTableRunner. Would you keep the burgundy-and-cream palette or replace burgundy with forest green for a different seasonal table?