Introduction
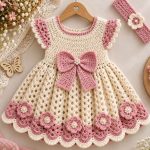
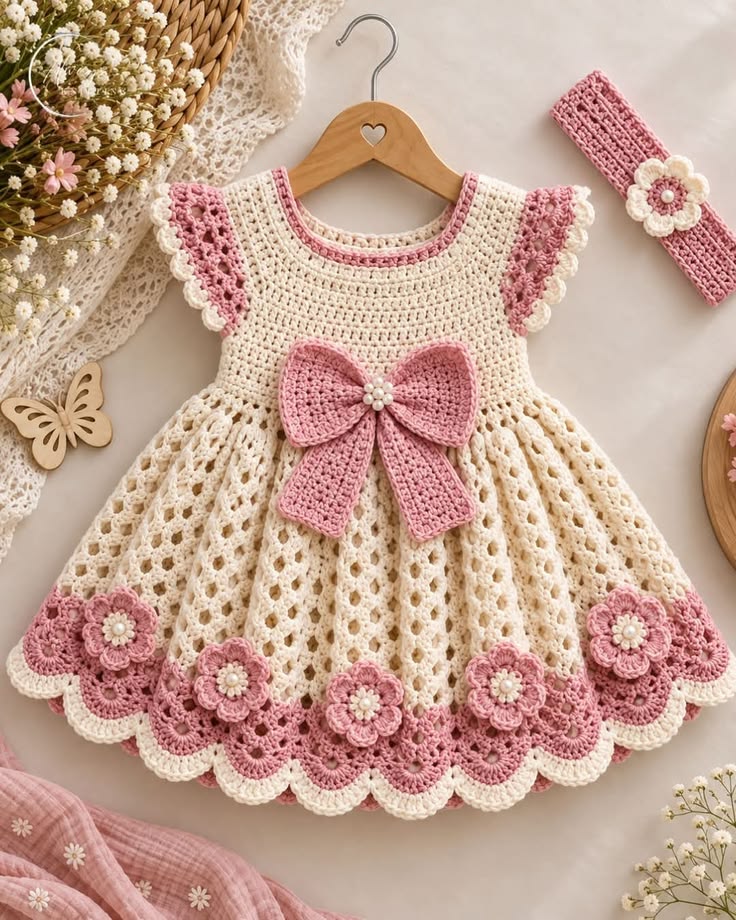
A five-petal flower border circling the skirt changes this dress from a basic crochet yoke into a coordinated floral set. This crochet baby dress pattern combines an ivory bodice, pink sleeve bands, an openwork flared skirt, dimensional flowers, a large waist bow and matching headband. The photo-adapted instructions are written for approximately 12–18 months, with sizing notes included for adjusting the chest and skirt length.
The Design: What Makes This Crochet Baby Dress Different
The dress uses three distinct structures. A dense round yoke gives the neckline and shoulders enough stability to support the skirt, while the lower section changes to open lace so the fabric can expand without becoming excessively heavy. Pink shell bands define the cap sleeves and repeat again around the hem.
The oversized bow is attached at the center waist rather than incorporated into the structural stitches. That choice allows the dress to retain its shape even if the bow is removed. Dimensional flowers are concentrated around the lower skirt, where their weight has less effect on the neckline.
The main construction error is adding skirt increases too quickly. Excess increases produce ripples rather than a controlled flare, so expansion should be distributed gradually across several rounds.
Project Info at a Glance
| Skill Level | Approx. Size | Finished Chest | Dress Length | Hook |
|---|---|---|---|---|
| Intermediate | 12–18 months | Approx. 52–55 cm | Approx. 45–48 cm | 3.5–4 mm |
The measurements are practical estimates for recreating the proportions visible in the photograph. Always compare the bodice against the intended child’s actual chest measurement before beginning the skirt.
Materials and Tools
Yarn
- Warm ivory DK-weight cotton or cotton-blend yarn — approximately 300–350 g for the bodice, skirt, flower accents and edging.
- Dusty pink DK-weight yarn — approximately 130–170 g for sleeve bands, bow, flowers, neckline and hem.
- Small amount of ivory yarn — reserved for flower petals and headband flower.
Tools
- 3.5 mm crochet hook for the bodice and flowers
- 4 mm crochet hook for the skirt if a softer drape is required
- Yarn needle
- Locking stitch markers
- Scissors
- Tape measure
- Small buttons for an optional back opening
Safety note: The pearl-like centers visible in the reference image are decorative. For baby and toddler clothing, embroidered or tightly crocheted centers are the safer choice because loose beads can become a choking hazard.
Abbreviations
- MR — magic ring
- ch — chain
- sl st — slip stitch
- sc — single crochet
- hdc — half double crochet
- dc — double crochet
- tr — treble crochet
- inc — increase
- sp — space
- st / sts — stitch / stitches
Crochet Baby Dress Pattern
The dress is worked from the neckline downward. The yoke begins as a flat opening, then the front and back are joined below the armholes. The skirt continues in rounds.
Ivory Round Yoke
Yarn: warm ivory DK weight. Hook: 3.5 mm.
Foundation: Ch 72 loosely.
Do not join unless the neckline passes comfortably over the child’s head. A short back opening is preferable when the neckline is close fitting.
Row 1: Dc in fourth ch from hook and in each ch across. Turn.
Row 2: Ch 3, dc across, increasing evenly by working 2 dc into approximately every sixth stitch.
Row 3: Ch 3, dc across, placing increases evenly around the yoke rather than directly above the previous increases.
Row 4: Repeat Row 3.
Row 5: Dc across with sufficient evenly spaced increases for the yoke to lie flat.
Rows 6–8: Continue in dc, increasing only where required to maintain a flat semicircular yoke.
At this stage, check the yoke depth. For the photographed proportion, aim for approximately 11–13 cm from neckline to underarm.
Pink Neckline Band
Join dusty pink yarn around the neckline.
Round 1: Sc evenly around.
Round 2: Ch 1, sc in each st around.
Fasten off.
Switch back to ivory for the main bodice.
Dividing the Yoke for Sleeves
Lay the yoke flat.
Use stitch markers to divide the final yoke row into four areas:
- Front
- First sleeve
- Back
- Second sleeve
A practical starting distribution is approximately 30 percent front, 20 percent each sleeve and 30 percent back.
Adjust the exact counts so both sleeves contain the same number of stitches.
Joining Below the Armholes
Work across the front section.
Ch 4–6 for the first underarm.
Skip the first sleeve stitches.
Continue across the back.
Ch the same number for the second underarm.
Skip the second sleeve.
Join to the beginning of the round.
The dress is now worked in continuous joined rounds around the torso.
Upper Bodice
Round 1: Ch 3 and dc in every stitch and underarm chain around. Join.
Rounds 2–6: Ch 3, dc in each st around. Join.
Continue until the bodice reaches approximately 18–20 cm from the shoulder, or until it reaches the intended high-waist position.
Do not add unnecessary increases through this section. The bodice should remain relatively straight before the skirt begins.
Pink Cap Sleeve Band — Make 2
Join pink yarn at the center of one underarm.
Round 1: Sc evenly around the armhole.
Round 2: *Skip 1 st, 5 dc in next st, skip 1 st, sl st in next st.* Repeat around.
Fasten off.
Join ivory yarn.
Round 3: Work sc around the shell edges, placing a small ch-2 picot at the center of each shell.
Fasten off.
Repeat for the second sleeve.
Starting the Flared Lace Skirt
Switch to the 4 mm hook if additional drape is desired.
Join ivory yarn at the waist.
Round 1: Ch 3 and dc around, increasing evenly approximately every fifth or sixth stitch.
Round 2: Ch 4, skip 1 st, dc in next st, *ch 1, skip 1 st, dc in next st*. Repeat around.
Round 3: Ch 3, dc in same sp, ch 1, 2 dc in next ch-1 sp; repeat around.
Round 4: Sl st into first ch-1 sp. Ch 3, dc in same sp, ch 2, 2 dc in next sp; repeat around.
The repeating open spaces begin the vertical lace columns visible in the skirt.
Main Openwork Skirt Repeat
Round 5: In each ch-2 sp work 2 dc, ch 2, 2 dc.
Round 6: Sl st to first ch-2 sp. Work 2 dc, ch 2, 2 dc in every ch-2 sp around.
Rounds 7–10: Repeat Round 6.
At selected intervals, increase the skirt by working two shell groups into one evenly spaced ch-2 space.
Distribute approximately 6–8 increases around an increase round.
Do not place increases directly above one another.
Second Skirt Section
Rounds 11–18: Continue the shell repeat without increasing unless additional circumference is required.
Round 19: Add another set of 6–8 evenly spaced shell increases.
Rounds 20–28: Continue the established lace repeat.
Measure the skirt from the waist.
For a 12–18 month dress, aim for approximately 25–28 cm of skirt length before the decorative border.
Preparing the Pink Hem
Switch to dusty pink.
Round 1: Work 2 dc into each ch-2 space around.
Round 2: Ch 1, sc in each st around.
Round 3: *Skip 2 sts, 7 dc in next st, skip 2 sts, sl st in next st.* Repeat around.
The seven-dc groups form the broad pink scallops visible near the lower edge.
Ivory Outer Scallop
Join ivory yarn.
Work around each pink scallop as follows:
Sc in first dc, hdc in next, dc in next 3 sts, hdc in next, sc in last dc.
At the center dc, add:
Ch 2, sl st in second ch from hook.
Continue around the entire skirt.
Fasten off and weave in the tail.
Large Pink Waist Bow
The bow is made from separate pieces so its shape can be adjusted before attachment.
Left Bow Loop
Yarn: dusty pink. Hook: 3.5 mm.
Foundation: Ch 18.
Row 1: Hdc in second ch and across. Turn. (17)
Rows 2–12: Ch 1, hdc across. Turn. (17)
Fasten off with a long sewing tail.
Right Bow Loop
Repeat the left loop instructions.
Bow Tail — Make 2
Foundation: Ch 13.
Row 1: Hdc in second ch and across. (12)
Rows 2–20: Ch 1, hdc across.
For the final two rows, decrease one stitch at each edge to create a tapered end.
Fasten off.
Shaping the Bow
Fold each rectangular loop so its short ends meet at the center back.
Sew the ends together.
Pinch the center of both loops.
Place them side by side.
Position the two tails behind the loops, angled slightly outward.
Wrap a narrow pink crochet strip around the center several times and stitch it at the back.
The finished bow should measure approximately 16–19 cm wide.
Attaching the Bow
Position the bow at the center front where the bodice meets the skirt.
Sew through the center wrap first.
Add hidden stitches at the inner edge of each bow loop.
Attach the upper 2–3 cm of each tail to the skirt.
Leave the remaining tail length free so it lies over the lace rather than becoming completely flat.
Large Pink Skirt Flower — Make 5
Yarn: dusty pink.
R1: 10 sc in MR. Join. (10)
R2: *Ch 3, skip 1 st, sl st in next.* Repeat to create five loops.
R3: In each loop work sc, hdc, 3 dc, hdc, sc.
For a second petal layer, work behind the first petals.
R4: Create five ch-5 spaces around the back of the flower.
R5: In each space work sc, hdc, 5 dc, hdc, sc.
Fasten off with a 25 cm sewing tail.
Safe Flower Centers
Instead of attaching pearl beads to children’s clothing, crochet or embroider the center.
With ivory yarn, work 6 sc in MR.
Pull the ring closed.
Fasten off with a long tail.
Sew this small ivory circle firmly into the center of the pink flower.
Add several tiny yellow embroidery stitches if additional contrast is wanted.
Placing the Skirt Flowers
Arrange five flowers around the lower section before sewing.
Place one at center front.
Position two additional flowers approximately 12–16 cm to either side.
Continue around the skirt with balanced spacing.
Keep the flowers above the final ivory scallop so their lower petals do not extend beyond the hem.
Sew through the center and the lowest petal layer at several points.
Matching Crochet Headband
The headband repeats the pink-and-ivory palette without duplicating the full complexity of the dress.
Yarn: dusty pink.
Foundation: Ch to the required head circumference minus approximately 2–3 cm for stretch.
For a 12–18 month size, begin by testing approximately 44–46 cm of finished circumference against the intended child rather than relying only on age.
Join carefully without twisting.
Round 1: Ch 2, hdc in every ch. Join.
Rounds 2–5: Ch 2, hdc around. Join.
Fasten off.
The finished band should measure approximately 4–5 cm wide.
Headband Flower
With pink yarn:
R1: 5 sc in MR. Join. (5)
R2: In each st work sl st, ch 3, 2 dc, ch 3, sl st.
Fasten off.
Join ivory behind the pink petals.
Create five ch-5 spaces.
In each space work:
Sc, hdc, 4 dc, hdc, sc.
Fasten off.
Add a securely crocheted center rather than a detachable bead.
Sew the flower to the headband through its center and petal bases.
Optional Back Opening
If the neckline does not comfortably pass over the child’s head, leave the first 6–8 cm of the yoke open at center back.
After completing the bodice, join ivory yarn at the lower edge of the opening.
Work one row of sc up one side, around the neckline and down the opposite side.
On one side, create two small chain loops sized to the chosen buttons.
Attach buttons securely on the opposite side.
For very young children, use a construction that keeps closures inaccessible during unsupervised wear.
Adjusting the Dress for 6–12 Months
Reduce the neckline foundation by approximately 6–8 chains.
Work one fewer yoke increase row if the required armhole depth is reached early.
Aim for a finished chest circumference of approximately 48–51 cm, allowing comfortable wearing ease.
Shorten the skirt by approximately 3–5 cm.
Reduce the large bow to about 14–16 cm wide so it remains proportional to the smaller bodice.
Adjusting the Dress for 18–24 Months
Add approximately 6–10 foundation chains to the neckline.
Continue the yoke until the armhole depth reaches the intended child comfortably.
Increase the bodice circumference before dividing for the sleeves if additional room is required.
Add approximately 3–5 cm to the skirt length.
The flower size can remain unchanged; increase spacing rather than enlarging every motif.
Adjusting the Skirt Fullness
The lace skirt should spread visibly without forming a rigid circle.
For less fullness, omit one of the scheduled increase rounds.
For more fullness, add 6–8 evenly spaced shell increases approximately halfway down the skirt.
Do not increase every round.
If the skirt edge begins to ripple while it is lying flat, stop increasing and work several rounds even.
Keeping the Lace Columns Vertical
Place each new shell into the ch-2 space of the shell directly below it.
When an increase is needed, add the extra shell only at marked locations.
Move the increase points on subsequent increase rounds.
Stacking all increases in the same columns produces visible wedges and interrupts the balanced flare.
Making the Dress Less Dimensional
The large bow and layered skirt flowers are decorative components and can be simplified for everyday wear.
Replace the two-layer flowers with single-layer five-petal flowers.
Make a flatter bow using one rectangular strip.
Leave the skirt lace and scalloped hem unchanged.
This reduces bulk while preserving the pink-and-ivory structure of the design.
Assembly
- Complete the ivory round yoke, check the neckline opening and divide the final yoke row evenly into front, back and two sleeve sections.
- Join below both armholes, work the straight upper bodice and stop at the intended high-waist position.
- Add the pink sleeve shells and ivory picot details, checking that both armholes have matching circumference and trim placement.
- Work the ivory openwork skirt downward, distributing increase rounds gradually until the required flare and length are reached.
- Add the broad pink lower scallops followed by the ivory outer edging and block the dress before attaching dimensional decorations.
- Construct the large pink bow, position it at center front and secure the center, inner loops and upper portions of both tails.
- Crochet five layered pink flowers with safe yarn centers and distribute them evenly around the lower skirt.
- Make the pink headband to the required circumference and attach the two-color flower securely through its center and lower petals.
- Weave all yarn tails through several centimeters of dense stitches and inspect every attached motif for loose ends or openings.
- Lay the complete set flat, reshape the skirt shells, bow and flowers, then verify the actual neckline, chest and headband measurements before wear.
The finished set should have a stable upper bodice, a flexible flared skirt and decorative pieces that remain firmly attached during normal handling.
How to Keep the Bow From Drooping
The center attachment alone is not enough for a bow of this size.
First sew the center wrap firmly to the waist.
Next place one hidden stitch approximately 2–3 cm from the inner edge of each loop.
Attach the top of each tail separately.
Do not sew around the complete bow perimeter because the loops need a small amount of lift.
If cotton yarn produces a particularly heavy bow, make each loop two rows shorter.
How to Attach Flowers to an Openwork Skirt
A flower sewn to only one lace chain can pull that chain out of shape.
Position each flower so its center overlaps a denser shell or intersection.
Pass the sewing yarn through at least two neighboring structural points.
Secure the center first.
Add hidden stitches beneath two or three outer petals.
After attachment, hold the dress by the waist and check whether any flower tilts downward.
7 Technical Tips for This Crochet Baby Dress
- Measure the neckline before completing the yoke. If the opening is too small to pass comfortably over the head, add a 6–8 cm back opening instead of stretching the finished crochet.
- Keep both armholes within approximately 0.5 cm of each other. Unequal sleeve divisions make one side of the yoke sit lower than the other.
- Add only 6–8 skirt increases on a scheduled increase round. Too many increases in one round produce waves that remain visible beneath the scalloped hem.
- Leave approximately 12–16 cm between major skirt flowers. Crowding the motifs hides the lace columns and adds unnecessary weight to the lower edge.
- Anchor the bow at more than one point. A center-only attachment allows a 16–19 cm bow to rotate or droop during wear.
- Check the headband circumference on the intended child. Age-based sizing alone can produce a band that is too tight or too loose.
- Use crocheted or embroidered flower centers for young children. Decorative beads and imitation pearls can detach, so they should not be relied on for a baby or toddler version.
Blocking the Dress
Block the main dress before attaching the bow and flowers.
Lay the garment flat.
Measure from the neckline center to the hem.
Arrange the skirt into an even circle or semicircle without stretching individual lace openings.
Shape the pink scallops individually.
Allow the dress to dry completely.
Attach the dimensional motifs only after the measurements have stabilized.
Care
Follow the washing directions for the selected yarn. A cotton or cotton-blend dress may become considerably heavier when wet, so support the complete garment when transferring it after washing.
Use a mesh laundry bag if machine washing is permitted by the yarn label.
Dry flat to protect the lace skirt and bow.
Reshape the scallops and flower petals while damp.
Inspect all appliqués and closures before each use on a young child.
Conclusion
Begin with the yoke and confirm the neckline, chest and armhole measurements before committing to the decorative sections. Build the skirt with controlled increase rounds so the lace expands gradually, then complete the pink-and-ivory scalloped hem before attaching the bow and flowers. Secure every dimensional motif through multiple structural stitches, particularly when making the set for a baby or toddler. Finish the matching headband only after measuring the intended wearer. Save this crochet baby dress pattern to Pinterest and share the finished set on Instagram with #PinkBowCrochetDress. Would you keep the five pink hem flowers or alternate pink and ivory blossoms around the skirt?