Introduction
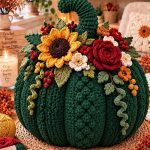
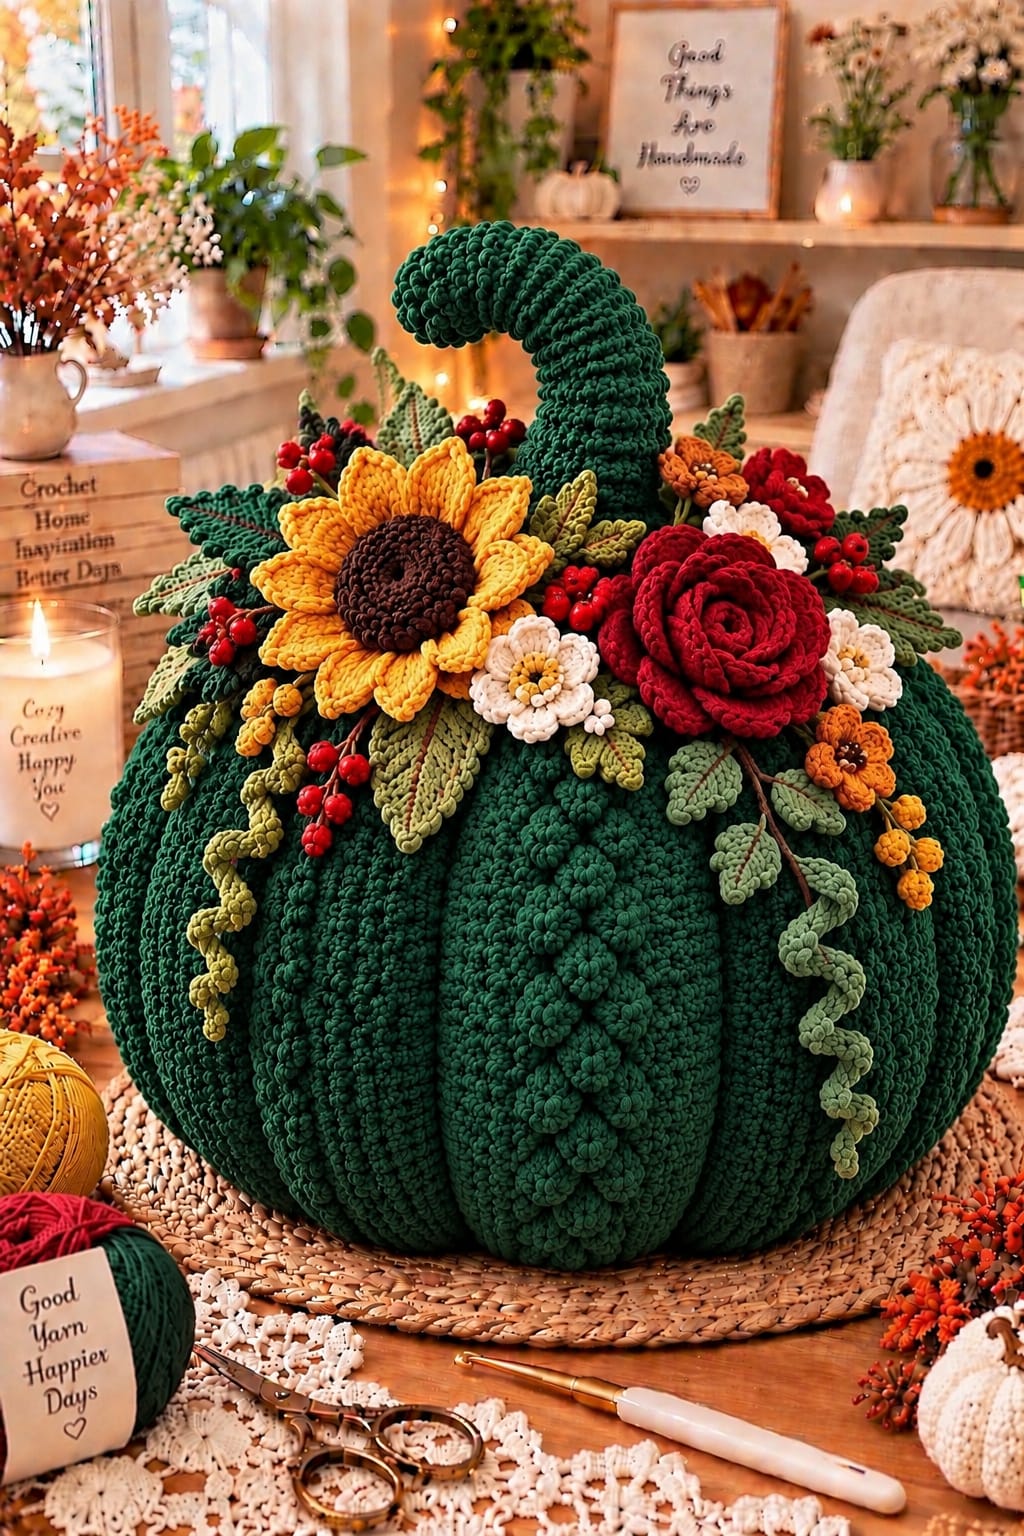
A pumpkin this dark green needs pronounced vertical ribs or its oversized body reads as a plain sphere beneath the floral crown. This giant green crochet pumpkin pattern combines a deeply sculpted body, curved stem, sunflower, burgundy rose, cream flowers, berries, leaves and corkscrew vines. Super-bulky yarn builds the pumpkin efficiently, while smaller hooks produce the detailed botanical decorations. The finished piece is intended as a large autumn centerpiece.
The Design: What Makes This Green Crochet Pumpkin Different
The body uses a broad ribbed construction with additional external shaping to produce deep valleys. That combination matters at this scale. Ribbing alone creates texture, but a heavily stuffed pumpkin needs stronger compression to maintain distinct lobes.
The second structural decision is the oversized curved stem. Its lower section is wide enough to support the botanical crown, while reduced rounds create a narrower upper section that can bend without folding sharply.
The floral arrangement is intentionally asymmetrical. A large yellow sunflower occupies the left side, while a dimensional burgundy rose balances it on the right. Cream flowers, red berries and mixed green leaves connect the two focal pieces. The most common failure is covering too much of the body with foliage. Keep the lower two-thirds of the pumpkin visible so the ribbed construction remains dominant.
Project Info at a Glance
| Skill Level | Construction | Approx. Finished Size | Hooks | Best For |
|---|---|---|---|---|
| Intermediate / Advanced | Ribbed stuffed body with applied motifs | Approx. 40–45 cm wide; 50–55 cm high with stem | 8 mm body; 3.5–5 mm flowers | Large fall centerpiece and seasonal display |
The measurements are practical estimates for the photo-adapted design. Yarn thickness, ribbing gauge, stuffing density and shaping tension can change the finished dimensions.
Materials and Tools
Yarn
- Deep forest green super-bulky yarn — approximately 650–900 g for the pumpkin body and stem.
- Golden yellow worsted yarn — approximately 50–70 g for the sunflower and small accent flowers.
- Dark brown worsted yarn — approximately 20–30 g for the sunflower center.
- Burgundy worsted yarn — approximately 70–100 g for the large rose and small flowers.
- Cream worsted yarn — approximately 30–50 g for small flowers.
- Olive green worsted yarn — approximately 60–90 g for large leaves and vines.
- Sage green worsted yarn — approximately 40–60 g for secondary leaves.
- Red yarn — approximately 20–30 g for berry clusters.
Tools
- 8 mm crochet hook for the pumpkin body and stem
- 5 mm crochet hook for the sunflower
- 4 mm crochet hook for the rose and large leaves
- 3.5 mm crochet hook for berries and small flowers
- Polyester fiberfill
- Long doll or upholstery needle
- Yarn needles
- Locking stitch markers
- Scissors
- Tape measure
- Blocking mat and pins
Abbreviations
- MR — magic ring
- ch — chain
- sl st — slip stitch
- sc — single crochet
- hdc — half double crochet
- dc — double crochet
- tr — treble crochet
- inc — increase
- dec — decrease
- BLO — back loop only
- st / sts — stitch / stitches
For stuffed details, an invisible decrease can be made through the front loops of the next two stitches before completing one single crochet through both loops.
Giant Green Crochet Pumpkin Pattern
The pumpkin body is worked as one ribbed rectangle. The short ends are joined to form a tube, the openings are gathered, and long shaping strands create the deep lobes.
Forest Green Pumpkin Body
Yarn: forest green super bulky.
Foundation: Ch 43.
Row 1: Hdc in second ch from hook and in every remaining ch. Turn. (42)
Row 2: Ch 1. Hdc BLO in every st across. Turn. (42)
Rows 3–84: Repeat Row 2. (42)
Do not stretch the panel while measuring. The ribbed rectangle should be substantially wider than it is tall because its long edge becomes the pumpkin circumference.
If the panel does not wrap into a broad pumpkin shape after 84 rows, continue working additional rows in pairs.
Joining the Body
Bring Row 1 and the final row together with right sides facing.
Sl st through corresponding stitches or row-end loops to form a tube.
Keep the seam approximately as flexible as the surrounding ribbing.
Fasten off with a 120 cm tail.
Closing the Bottom
Thread the long tail onto a large yarn needle.
Pass the yarn through the row ends around one opening of the tube.
Catch each raised rib so the gathering remains evenly distributed.
Pull gradually until the opening closes.
Pass the needle across the center several times and secure the yarn.
Turn the gathered opening downward.
Stuffing the Pumpkin Body
Add fiberfill around the outer circumference first.
Rotate the body frequently while stuffing. Push equal amounts into neighboring sections instead of completing one side before moving to the other.
Keep the central core slightly softer.
A rigidly packed center resists compression and makes the final shaping strands less effective.
Continue until the pumpkin supports its own broad rounded form.
Leave the crown accessible for the stem.
Closing the Crown
Thread a second long strand of forest green yarn through the upper row ends.
Pull until the opening measures approximately 6–8 cm.
Do not close it completely.
The lower section of the stem will be inserted into this opening after the pumpkin has been sculpted.
Sculpting Eight Deep Pumpkin Lobes
Cut eight long strands of strong forest green yarn. Each strand should be at least twice the pumpkin circumference plus approximately 50 cm.
Mark eight evenly spaced positions around the crown.
Thread the first shaping strand onto a long needle.
Pass through the bottom center and bring the needle out at the crown.
Carry the strand down the exterior inside a ribbed valley.
Return through the bottom center and crown.
Pull until the body compresses and a deep vertical groove appears.
Repeat around the pumpkin.
Tighten opposite grooves in pairs rather than completing adjacent grooves consecutively. This keeps the body centered.
Secure the shaping yarn inside the crown.
Raised Floral Texture on the Pumpkin Body
The photographed pumpkin includes a vertical trail of small raised green motifs on the front lobe.
These can be added after sculpting.
Small Green Texture Flower
Make approximately 8–12.
Round 1: 6 sc in MR. Join. (6)
Round 2: In each st work sl st, ch 2, 2 hdc, ch 2, sl st.
Fasten off with a 15 cm tail.
Arrange the motifs vertically along one front rib.
Sew only through the center so the petal edges remain raised.
Tall Curved Green Stem
Yarn: forest green super bulky.
R1: 6 sc in MR. (6)
R2: Inc ×6. (12)
R3: (1 sc, inc) ×6. (18)
R4: BLO sc around. (18)
R5–R12: Sc around. (18)
R13: (1 sc, dec) ×6. (12)
R14–R30: Sc around. (12)
Begin stuffing firmly.
R31: (2 sc, dec) ×3. (9)
R32–R45: Sc around. (9)
Reduce the stuffing density through these rounds.
R46: (1 sc, dec) ×3. (6)
R47–R54: Sc around. (6)
Fasten off and close.
Curve the upper third gradually while the stuffing remains movable.
Attaching the Stem
Insert approximately 8–10 cm of the stem into the crown opening.
Add fiberfill around the base to eliminate empty pockets.
Pull the crown gathering yarn firmly around the stem.
Sew through the lower stem and pumpkin body at several points.
The base must remain upright before the flower arrangement is attached. Correct any movement now rather than relying on the foliage to support the stem.
Large Crochet Sunflower
Make 1 using brown and golden yellow.
Brown Sunflower Center
R1: 6 sc in MR. (6)
R2: Inc ×6. (12)
R3: (1 sc, inc) ×6. (18)
R4: (2 sc, inc) ×6. (24)
R5: (3 sc, inc) ×6. (30)
R6: (4 sc, inc) ×6. (36)
R7: Sc around. (36)
Fasten off.
First Sunflower Petal Layer
Join golden yellow yarn to the outer edge.
Petal: Ch 10.
Starting in second ch from hook work:
Sl st, sc, hdc, dc, tr, tr, dc, hdc, sc.
Sl st into the next available center stitch.
Repeat around, spacing the petals evenly.
Second Sunflower Petal Layer
Join yellow yarn behind the first layer.
Work the same petal construction, but begin with ch 11.
Position each second-layer petal between two front petals.
Fasten off with a 50 cm sewing tail.
Large Burgundy Crochet Rose
Make 1.
Rose Center
R1: 6 sc in MR. Join. (6)
R2: Inc ×6. Join. (12)
Inner Petals
Create six ch-3 spaces around the center.
In each space work:
Sc, hdc, 3 dc, hdc, sc.
Second Petal Layer
Working behind the inner petals, create six ch-5 spaces.
In each space work:
Sc, hdc, 2 dc, 3 tr, 2 dc, hdc, sc.
Third Petal Layer
Create eight ch-6 spaces behind the previous layer.
In each space work:
Sc, hdc, 3 dc, 4 tr, 3 dc, hdc, sc.
Outer Petal Layer
Create ten ch-7 spaces.
In each space work:
Sc, hdc, 3 dc, 5 tr, 3 dc, hdc, sc.
Fasten off with a 60 cm sewing tail.
Turn the innermost petals upward and allow the final layer to spread more broadly.
Cream Five-Petal Flowers
Make approximately 4–6.
R1: 10 sc in MR. Join. (10)
R2: *Ch 3, skip 1 st, sl st in next.* Repeat around to create five loops.
R3: In each loop work sc, hdc, 3 dc, hdc, sc.
Fasten off with a 20 cm tail.
Flower Center
Use golden yellow yarn.
Work several compact surface stitches or French knots in the center.
Keep the yellow area smaller than the surrounding cream petals.
Small Orange Flowers
Make approximately 3–5.
R1: 6 sc in MR. Join. (6)
R2: In each st work sl st, ch 3, 2 dc, ch 3, sl st.
Fasten off with a long sewing tail.
Add a small brown center with embroidery stitches.
Small Burgundy Flowers
Make approximately 2–4 if additional color balance is needed.
Use the same construction as the small orange flowers.
Keep these motifs smaller than the cream flowers so the large burgundy rose remains the dominant red element.
Large Olive Leaf
Make approximately 8–12.
Foundation: Ch 19.
Starting in second ch from hook work:
Sl st, sc, hdc, dc, dc, tr, tr, tr, tr, dc, dc, hdc, hdc, sc, sc, sl st.
At the tip work:
Ch 3, sl st in first ch.
Rotate and mirror the stitch sequence along the unused side of the foundation chain.
Sl st at the base.
Fasten off with a 30 cm sewing tail.
Leaf Vein
Using brown or darker olive yarn, surface-stitch from the leaf base to the tip.
Add three or four short diagonal stitches on each side of the center line.
Do not pull these stitches tightly enough to fold the leaf.
Sage Green Leaf
Make approximately 8–10.
Foundation: Ch 13.
Beginning in second ch work:
Sl st, sc, hdc, dc, tr, tr, dc, dc, hdc, sc, sc, sl st.
Work a ch-2 picot at the tip.
Rotate and mirror the sequence along the opposite side.
Fasten off with a 20 cm tail.
Red Crochet Berries
Make approximately 20–30.
R1: 6 sc in MR. (6)
R2: Inc ×6. (12)
R3: Sc around. (12)
Add a small amount of stuffing.
R4: Dec ×6. (6)
Fasten off and close.
Leave a 15 cm sewing tail.
Berry Clusters
Group three to five berries together.
Use short lengths of brown or dark green yarn to form stems.
Attach the berries at different heights instead of creating a flat cluster.
Make approximately five to seven clusters.
Olive Corkscrew Vine
Make 2–3.
Foundation: Ch 55.
Starting in second ch from hook, work 3 sc in every chain.
The repeated increases create the spiral automatically.
Fasten off with a 30 cm tail.
For a shorter curl, begin with 35–45 chains.
Sage Corkscrew Vine
Make 1–2.
Ch 60.
Work 2 sc in the first chain, then alternate 2 sc and 3 sc in the remaining chains.
This produces a slightly looser spiral than the olive vine.
Fasten off with a long sewing tail.
Planning the Floral Crown
Complete all large motifs before sewing them to the pumpkin.
Place the sunflower to the left of the stem. Angle its petals outward so the flower does not sit directly in front of the stem.
Position the burgundy rose to the right and slightly lower.
Slide the largest olive leaves beneath both flowers.
Add sage leaves through the middle and outer portions of the arrangement.
Place cream flowers between the sunflower and rose, where their pale color separates the two saturated focal colors.
Use orange flowers near the outer edges.
Fill the remaining small spaces with red berry clusters.
Assembly
- Complete the forest green ribbed body, close the bottom, stuff it evenly and sculpt eight pronounced vertical lobes.
- Insert the curved green stem into the crown and secure its lower 8–10 cm before attaching any botanical motifs.
- Pin the sunflower slightly left of the stem and the burgundy rose to the right, keeping the two flowers at different heights.
- Arrange the largest olive leaves behind both focal flowers so at least one-third of every leaf remains visible.
- Add the sage leaves, cream flowers and smaller orange or burgundy flowers through the remaining crown area.
- Position the red berry clusters between flowers and foliage, concentrating them near the upper and outer portions of the arrangement.
- Sew the leaves first, followed by the sunflower, rose, secondary flowers and berry clusters.
- Attach the corkscrew vines beneath the floral crown and allow two or three curls to descend across separate pumpkin lobes.
- Sew the small green texture flowers vertically down one front lobe without covering the neighboring sculpted valleys.
- Weave every tail into dense stitches, reshape the pumpkin ribs and test the stem and heavy flowers for movement.
The finished centerpiece should show a dense botanical crown while leaving most of the forest green body exposed.
Attaching the Sunflower Securely
The sunflower needs several attachment points because its broad petals create leverage against the pumpkin surface.
Sew through the brown center at approximately four to six positions.
Add two hidden stitches through the bases of opposite yellow petals if the flower still moves.
Do not sew the outer half of the petals flat.
After attachment, the petals should remain individually visible from the front and side.
Attaching the Burgundy Rose
Pin the rose before sewing and inspect it from the front.
Attach the lowest petal layer at approximately six to eight points.
Keep the upper petal layers free.
Pass the needle into dense pumpkin stitches rather than around one external shaping strand.
A correctly attached rose should not rotate when the pumpkin is tilted slightly.
Keeping the Large Pumpkin Round
Large stuffed pieces can develop a flat side when left on a table during construction.
Rotate the body frequently while stuffing and assembling.
Check the circumference before tightening the shaping strands.
If one side is flatter, move some fiberfill into that area from the center opening.
Do not compensate by tightening the neighboring sculpting grooves excessively. That creates uneven lobe widths rather than correcting the underlying stuffing problem.
Adjusting the Pumpkin Size
The foundation chain controls the approximate height of the body, while the number of ribbed rows controls circumference.
For a smaller centerpiece, begin with approximately 31–35 chains and work 60–68 rows.
For an extra-large display, begin with approximately 47–51 chains and continue the panel until its length produces the desired circumference.
Maintain a broad width-to-height ratio. Increasing height without adding enough ribbed rows creates a tall oval instead of the low, substantial pumpkin shown in the image.
Adjusting the Stem Curve
The stem should begin curving above the floral crown rather than directly at the pumpkin surface.
Stuff the lower 12–15 cm firmly.
Use progressively less filling toward the top.
Bend the upper third over several centimeters instead of folding it at one round.
If the curve slowly straightens, add several hidden stitches through the inside of the bend to hold the desired shape.
Alternative Color Palettes
Forest green provides a strong background for yellow, burgundy, cream and red.
For a darker autumn arrangement, replace the cream flowers with rust and use mustard instead of bright sunflower yellow.
A botanical version can use olive and sage foliage with cream roses and muted gold flowers.
For a Christmas transition piece, retain the green pumpkin but replace the sunflower with a red poinsettia and increase the number of berry clusters.
Keep one light flower color in the crown when using several dark shades. The pale motifs separate neighboring foliage and improve the readability of the arrangement.
7 Technical Tips for a Giant Green Crochet Pumpkin
- Keep all body rows at 42 stitches. Missing one stitch in repeated ribbing gradually shortens an edge and makes the final joining seam diagonal.
- Leave the central stuffing slightly compressible. A rigid center prevents the crown and bottom from drawing together when the eight shaping strands are tightened.
- Mark eight valleys before sculpting. Unequal spacing creates one narrow lobe and one oversized lobe that remain visible even after the flowers are attached.
- Stuff the lower stem firmly for 12–15 cm. Soft stuffing at the base allows the tall curved stem to lean under its own weight.
- Attach the large rose at six to eight points. A single center stitch allows the heavy layered flower to rotate against the pumpkin.
- Leave at least one-third of every major leaf visible. Leaves pushed completely beneath the sunflower or rose add bulk without contributing to the botanical outline.
- Limit the front to two or three long vines. Too many spirals obscure the vertical ribbing and the raised green flower trail on the body.
Display and Storage
Place the finished pumpkin on a broad, stable surface capable of supporting the entire base.
Lift it from underneath rather than by the stem or flower crown.
For storage, protect the sunflower and rose from compression. Do not place another seasonal decoration directly on top of the pumpkin.
If the body becomes slightly flattened, redistribute the fiberfill by hand before the next display period.
Spot cleaning is more practical than full immersion for an oversized stuffed centerpiece. Follow the care instructions supplied with the selected yarn.
Conclusion
Build the oversized body before deciding the final dimensions of the floral crown. The deep forest green ribbing needs eight evenly tensioned shaping lines, a compressible center and a firmly anchored stem to maintain the photographed silhouette. Position the sunflower and burgundy rose first, then use olive leaves, cream flowers, berries and smaller accents to connect them. Finish with only a few cascading vines so the lower ribbing remains visible. Save this giant green crochet pumpkin pattern to Pinterest and share the finished centerpiece on Instagram with #GreenCrochetPumpkin. Would you keep the yellow sunflower as the main focal flower or replace it with a cream rose?