Introduction
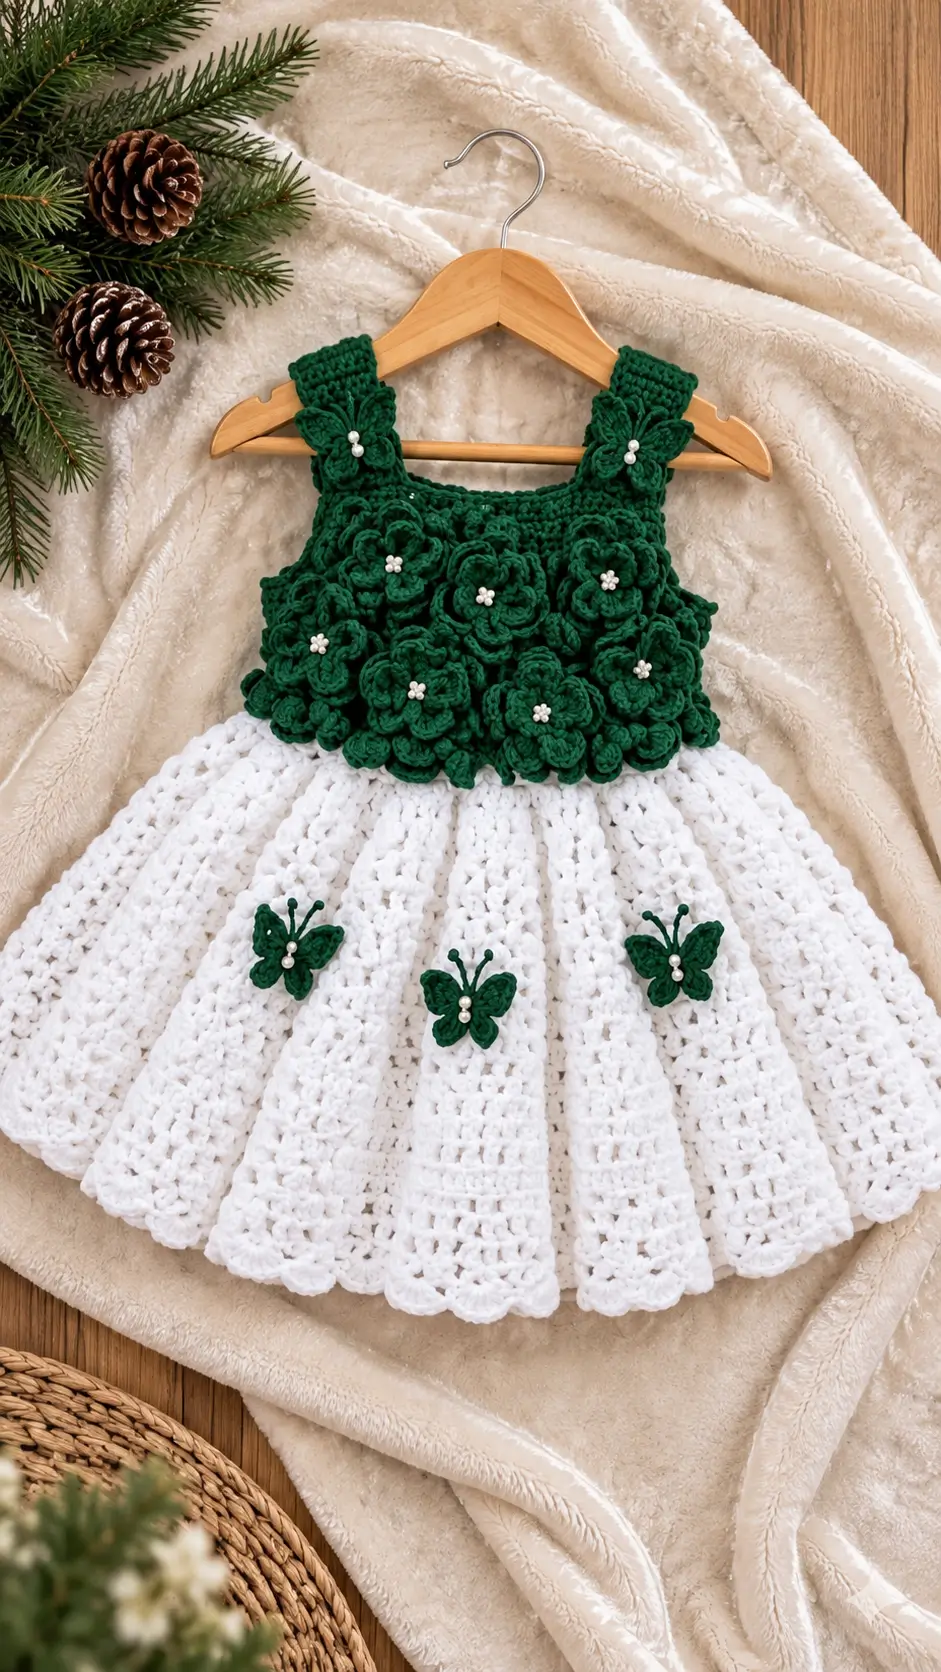
Five green butterflies and a dense arrangement of raised flowers distinguish this dress from a conventional crochet sundress. This crochet flower girl dress pattern combines a structured emerald bodice, a white flared skirt, and separately attached floral decorations. The proposed sample uses DK yarn and a 5 mm hook, with a target length of approximately 50 cm. Intermediate crochet skills are recommended. The separate appliqués make decoration placement adjustable before final stitching.
The Design: What Makes This Floral Dress Different
The first structural decision is to separate the bodice from the decorative flowers. A firm foundation supports the raised petals, while the floral crochet bodice retains enough flexibility for dressing and movement. Attaching the flowers after constructing the garment also makes it possible to distribute their weight across several stitches.
The second decision concerns the skirt. A white crochet skirt needs sufficient expansion at the waist to create fullness without adding excessive bulk beneath the bodice. Controlled increases establish the circumference, while openwork rows reduce fabric density.
Finally, the crochet butterfly appliqué motifs are positioned on the straps and lower skirt, rather than clustered exclusively around the neckline. This spreads the decoration across the garment.
A common mistake is sewing heavy floral motifs to loose openwork stitches. The resulting fabric can stretch unevenly. Attach each flower through stable stitches and distribute its anchoring points.
Project Info at a Glance
| Specification | Proposed Sample |
|---|---|
| Skill Level | Intermediate |
| Estimated Working Time | 15–25 hours, untested |
| Target Age Range | Approximately 2–4 years; fit by measurement |
| Target Dress Length | 50 cm |
| Crochet Hook | 5 mm, subject to gauge |
| Yarn | DK / 8-ply |
| Construction | Two bodice panels, straps, skirt, sewn appliqués |
| Best For | Flower girl outfits, formal portraits, special-event garments |
These are design targets, not measurements verified from the photograph.
Materials and Tools
Yarn
- Emerald green DK yarn — 100–150 g: Suggested option: smooth cotton or cotton-blend DK yarn, such as Paintbox Yarns Cotton DK.
- White DK yarn — 200–250 g: Use the same yarn family to maintain consistent stitch definition.
- Extra green yarn — approximately 10 g: Reserve for butterfly antennae, finishing, and sewing.
Yarn quantities are provisional allowances. A larger chest measurement, longer skirt, or additional flowers will increase consumption.
Cotton-blend yarn gives raised flowers defined edges and helps maintain consistent petal shapes. Acrylic blends can also work, but the finished skirt may have different stretch and drape.
Tools
- 5 mm crochet hook for the main garment
- 3.5–4 mm crochet hook for smaller appliqués, if required
- Locking stitch markers
- Blunt tapestry needle
- Scissors
- Flexible measuring tape
- Rustproof pins
- Suitable garment fastenings if a back opening is needed
- Optional pearl-like embellishments for adult-only display garments
Child safety: For a dress intended for a young child, omit small detachable beads and use white embroidered French knots instead. Avoid loose antennae, dangling cords, or insecure fastenings.
Gauge and Sizing Before You Begin
Work a swatch using the main hook and yarn. For the proposed sample, use a planning gauge of 15 single crochet stitches and 16 single crochet rows per 10 cm.
This gauge is a construction target, not a tested result. Wash and dry the swatch according to the yarn label, then measure the central area without stretching it.
For a target finished chest circumference of 60 cm at 1.5 stitches per centimeter, approximately 90 stitches are needed around the body, or 45 stitches per panel before seam allowances.
The sample therefore uses two 45-stitch bodice panels. Adjust the number of stitches to match the child’s actual chest measurement and the measured gauge.
The garment needs sufficient ease to pass over the shoulders or a properly constructed back opening. Do not rely on age labels alone.
Abbreviations
| Abbreviation | Meaning |
|---|---|
| MR | Magic ring |
| ch | Chain |
| sc | Single crochet |
| hdc | Half double crochet |
| dc | Double crochet |
| tr | Treble crochet |
| inc | Increase |
| dec | Decrease |
| sl st | Slip stitch |
| BLO | Back loop only |
| st / sts | Stitch / stitches |
| rep | Repeat |
| RS / WS | Right side / wrong side |
| FO | Fasten off |
An invisible decrease works through the front loops of two adjacent stitches before completing one single crochet, reducing visible gaps.
Pattern — Step by Step
Use US crochet terminology throughout. The bodice is worked in rows; the skirt is worked in joined rounds. Decorative motifs are made separately.
Part 1: Emerald Green Front Bodice (Make 1)
Yarn: Emerald green DK.
Foundation: Ch 46.
- R1: Sc in second chain from hook and each remaining chain. (45)
- R2–R18: Ch 1, turn, sc across. (45 stitches per row)
Fasten off, leaving a 25 cm sewing tail.
At the proposed row gauge, the panel measures approximately 11.25 cm high. Measure the child’s shoulder-to-waist distance and add rows if necessary.
Part 2: Emerald Green Back Bodice (Make 1)
Repeat the front bodice foundation and R1–R18, maintaining 45 stitches per row.
Fasten off with a 25 cm tail.
Place the two panels with right sides facing. Join the side seams using mattress stitch, leaving the top edges open.
The finished circumference will be slightly reduced by the seam allowance. For a fitted garment, provide a suitable back opening if needed for dressing.
Part 3: Shoulder Straps (Make 2)
Yarn: Emerald green DK.
Foundation: Ch 11.
- R1: Sc in second chain from hook and across. (10)
- R2–R14: Ch 1, turn, sc across. (10 stitches per row)
Fasten off, leaving a 20 cm sewing tail.
Position each strap approximately five stitches inward from its corresponding side edge. Pin the straps to the front and back, check their lengths on the intended wearer, and sew securely.
Part 4: White Flared Skirt (Make 1)
Yarn: White DK.
Turn the bodice right side out and join white yarn to the bottom edge. The sample begins with 90 evenly distributed waist stitches.
- R1: Sc evenly around the waist. Join. (90)
- R2: Ch 2, dc in each stitch around. Join. (90)
- R3: Repeat (2 dc, 2 dc in next stitch) around. Join. (120)
- R4: Dc in each stitch around. Join. (120)
- R5: Repeat (3 dc, 2 dc in next stitch) around. Join. (150)
- R6: Dc in each stitch around. Join. (150)
- R7: Repeat (4 dc, 2 dc in next stitch) around. Join. (180)
- R8: Dc in each stitch around. Join. (180)
- R9: Repeat (5 dc, 2 dc in next stitch) around. Join. (210)
- R10: Dc in each stitch around. Join. (210)
- R11: Repeat (6 dc, 2 dc in next stitch) around. Join. (240)
- R12: Dc in each stitch around. Join. (240)
- R13: Repeat (dc in next stitch, ch 1, skip 1 stitch) around. Join. (120 dc + 120 chain spaces)
- R14: Dc in each dc and each chain space around. Join. (240)
- R15: Repeat R13. (120 dc + 120 chain spaces)
- R16: Repeat R14. (240)
- R17: Repeat R13. (120 dc + 120 chain spaces)
- R18: Repeat R14. (240)
- R19: Repeat R13. (120 dc + 120 chain spaces)
- R20: Repeat R14. (240)
- R21: Repeat R13. (120 dc + 120 chain spaces)
- R22: Repeat R14. (240)
- R23: Repeat R13. (120 dc + 120 chain spaces)
- R24: Repeat R14. (240)
- R25: Repeat R13. (120 dc + 120 chain spaces)
- R26: Repeat R14. (240)
- R27: Repeat R13. (120 dc + 120 chain spaces)
- R28: Repeat R14. (240)
- R29: Repeat R13. (120 dc + 120 chain spaces)
- R30: Repeat R14. (240)
Continue alternating the openwork and solid rounds until the skirt reaches the required length, ending on a solid round.
Stitch-count note: Starting chains do not count as stitches. Each openwork round contains 120 double crochets and 120 chain spaces, maintaining 240 working positions.
Part 5: Scalloped Skirt Hem
Yarn: White DK.
Work the hem on a final solid round containing 240 stitches.
- R1: Repeat (skip 1 stitch, 5 dc in next stitch, skip 1 stitch, sl st in next stitch) 60 times. (60 scallops)
Fasten off. Weave the end through several stitches on the wrong side.
Check that the scallops lie flat and adjust edge tension if the fabric ripples excessively.
Part 6: Layered Crochet Flowers (Make 9–12)
Yarn: Emerald green DK.
Each flower uses a six-part center and two layers of petals.
- R1: 6 sc in MR. Join with sl st. (6)
- R2: Inc in every stitch. Join. (12)
- R3: Working in front loops only, repeat (sl st in next stitch, ch 2, 3 dc in next stitch, ch 2) six times. Join. (6 front petals)
- R4: Attach yarn to an unused back loop from R2. Repeat (sl st in next available back loop, ch 3, 4 tr in next available back loop, ch 3) six times. Join. (6 back petals)
Fasten off, leaving a 20 cm tail.
Make nine flowers first and position them across the bodice. Add more if the coverage appears sparse.
For visual variety, use a smaller hook on selected motifs or change the number of tall stitches in individual petals.
Arrange the flowers in a staggered formation to create a continuous floral surface.
Part 7: Butterfly Appliqués (Make 5)
Yarn: Emerald green DK.
Each butterfly consists of two upper wings, two lower wings, and a narrow central body.
Upper Wings (Make 2 per Butterfly)
- R1: 6 sc in MR. (6)
- R2: Inc ×6. (12)
- R3: Repeat (sc, inc) six times. (18)
Fasten off, leaving a sewing tail.
Lower Wings (Make 2 per Butterfly)
- R1: 6 sc in MR. (6)
- R2: Inc ×6. (12)
Fasten off, leaving a sewing tail.
Butterfly Body
Ch 8, then sc in the second chain from the hook and each remaining chain. (7)
Fasten off with a 15 cm tail.
Arrange the upper wings diagonally above the lower wings. Overlap their inner edges slightly and sew the four circles together.
Place the body vertically over the joining area and stitch it through all four wings.
Use two short embroidered green lines for antennae, securing the ends on the wrong side.
Make two butterflies for the shoulder straps and three for the white skirt.
Part 8: White Flower Centers (Make 9–12)
Yarn: White DK.
Use embroidered French knots for wearable child garments.
Bring the needle through the flower center, wrap the yarn twice around the needle, and return it immediately beside the entry point.
Repeat three times to form a compact cluster.
Embroidered centers are preferable to detachable beads on garments intended for young children.
Part 9: Butterfly Centers (Make 5)
Yarn: White DK.
Add two small French knots vertically along the body of each butterfly.
Keep the stitches close together so the white markings remain visible without distorting the green wings.
Part 10: Optional Raised Skirt Detailing
The reference dress includes vertical ridges running down the white skirt.
To approximate this effect, mark six or twelve evenly spaced lines from the waist toward the hem.
Surface crochet a chain along each line, attaching it through the solid double crochet rounds.
Keep the surface chains relaxed to preserve the skirt’s flare.
This detail is optional because the exact stitch construction in the reference photograph cannot be determined from the image alone.
Assembly — 10 Steps
- Prepare the bodice. Lay the front and back panels flat and confirm their widths match before completing the side seams.
- Complete the garment foundation. Sew the side seams and check the finished chest circumference against the intended wearer.
- Attach the straps. Pin each strap at matching front and back positions, check the shoulder length, and sew through several rows.
- Check the neckline. Verify that the opening is large enough for dressing, or finish the planned back opening and fastenings.
- Inspect the skirt join. Check that all 90 waist stitches are attached evenly and that the skirt hangs without twisting.
- Arrange the flowers. Position the largest flowers near the center of the bodice and distribute smaller motifs toward the sides.
- Sew the flowers. Anchor each flower through its center and at least two petal-base points to prevent rotation.
- Attach the butterflies. Place two at the shoulder straps and three across the white skirt, with enough separation to keep each motif visible.
- Add embroidered centers. Stitch the white flower centers and butterfly markings, securing all yarn ends on the wrong side.
- Finish the garment. Weave in remaining tails, inspect seams and attachments, wash according to the yarn label, and dry flat to the intended measurements.
The completed sample consists of a fitted green bodice, an expanding white skirt, raised floral appliqués, and five butterfly decorations.
7 Technical Tips for a Better Crochet Dress
- Prevent stitch-count drift. Place a marker at the start of each skirt round and at every 30-stitch interval. Missing an increase can make one side of the skirt narrower.
- Avoid a stretched neckline. Measure the upper bodice edge before and after adding flowers. If the neckline grows by more than approximately 1 cm during handling, inspect the tension and attachment points.
- Control flower weight. Attach each raised flower at a minimum of three locations rather than only through its center. A single attachment point allows the motif to rotate and can distort the bodice.
- Check butterfly symmetry. Measure each butterfly’s distance from the waist seam instead of estimating placement by sight. The three skirt motifs should follow a deliberate spacing pattern.
- Prevent loose surface ridges. Keep surface crochet chains slightly relaxed when adding the optional vertical detailing. Tight chains shorten the skirt locally and create unwanted puckering.
- Test the scalloped edge. Count exactly 60 scallops across a 240-stitch final round. An incorrect four-stitch repeat can leave an incomplete scallop at the join.
- Secure every yarn tail. Weave each finishing tail through approximately 5 cm of stable stitches, then reverse direction where the fabric allows. Loose tails near the shoulder straps and skirt hem can work free during laundering.
Conclusion
This dress combines a measured bodice, controlled skirt increases, layered floral motifs, and separately constructed butterflies. The crochet flower girl dress pattern can be adapted by changing the chest circumference, shoulder-strap length, skirt depth, and number of flowers. Before making a final version, complete a gauge swatch and test the fit of the undecorated garment. That check is particularly important because raised flowers add weight to the upper section. Record the finished dimensions and yarn consumption for future sizes. Share a photograph of the completed project on Pinterest or Instagram using #FloralButterflyCrochetDress. Which flower arrangement works better for the emerald bodice: nine larger flowers or twelve smaller overlapping motifs?
Pattern note: This is an original photo-inspired design draft. Gauge, sizing, yarn consumption, and complete construction have not been sample-tested. Make a test garment and verify the fit before relying on these instructions for a finished child’s dress.









