Introduction
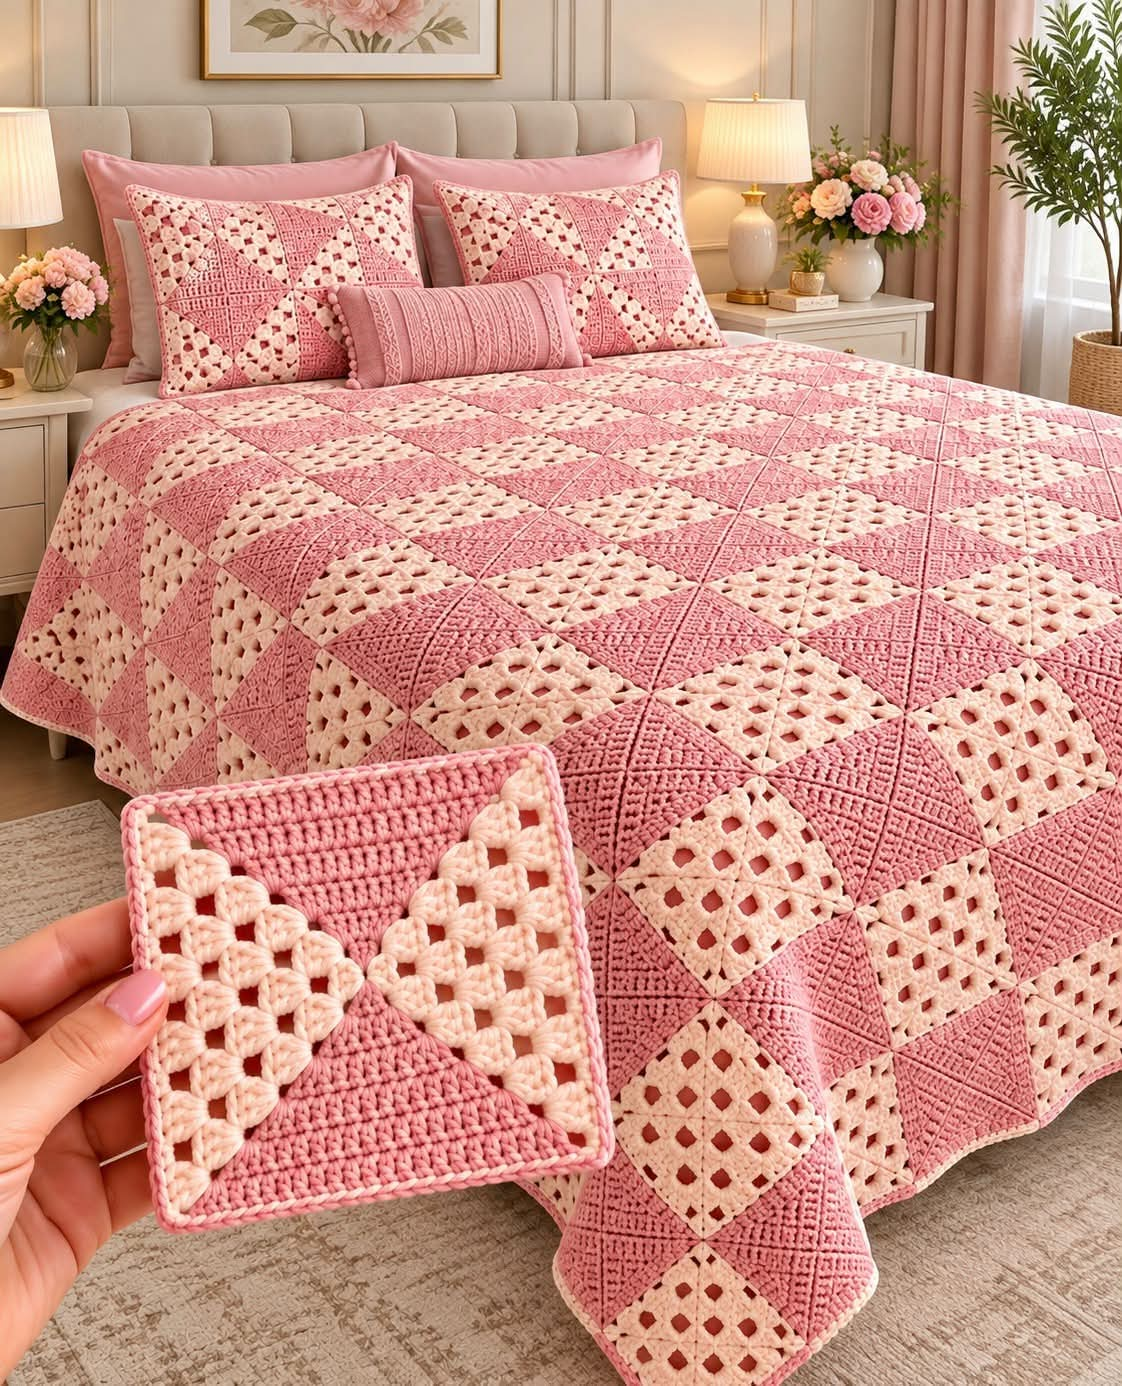
Four diagonal color divisions have to meet at one point for this crochet block to read like a quilt pinwheel instead of an ordinary granny square. This quilt granny square crochet blanket pattern combines solid dusty-pink sections with open cream granny sections. Using DK yarn and a 4 mm hook, the modular squares can be rotated into diamonds, pinwheels, diagonal bands, pillows, throws, or a full bedspread.
The Design: What Makes This Crochet Quilt Different
The photographed bedspread relies on geometry rather than a central flower. Each square contains contrasting triangular areas: dense pink crochet provides visual weight, while cream granny clusters create regularly spaced openings. Rotating adjacent blocks changes the larger pattern without requiring a different motif.
The construction also creates two textures inside one two-color granny square. Solid sections use continuous double crochet, while open sections depend on three-double-crochet clusters and chain spaces. Narrow pink edging gives every block a defined boundary before assembly.
The main technical problem is diagonal tension. If the cream granny section grows more loosely than the pink solid section, the square twists along the color boundary. Both halves must reach identical corners and finish with equal outside dimensions before joining.
Project Information
| Detail | Specification |
|---|---|
| Skill Level | Intermediate |
| Technique | Half-solid and half-granny geometric squares |
| Yarn Weight | DK / light worsted |
| Hook | 4.0 mm |
| Colors | Dusty pink and warm cream |
| Target Square Size | Approx. 15 × 15 cm after blocking |
| Construction | Individual two-color squares rotated and joined |
| Best For | Bedspreads, throws, baby blankets and cushion covers |
The 4 mm hook and DK yarn combination is documented for published granny-square blankets. A current diagonal granny-square pattern also documents a finished 15 × 15 cm block, although that particular version uses worsted yarn and a 6 mm hook. Treat 15 cm as the design target here and confirm it from a blocked sample before calculating the blanket.
Materials and Tools
Yarn
- Dusty pink DK yarn — main solid sections, seams and edging
- Warm cream DK yarn — open granny sections
For a bed-size project, calculate yarn from a sample rather than relying on a fixed estimate. Make one complete block, weave in the ends, weigh it, and multiply that weight by the required number of squares. Add approximately 15–20 percent for joining, border rounds, swatching, and gauge variation.
Tools
- 4.0 mm crochet hook
- Tapestry needle
- Scissors
- Locking stitch markers
- Flexible measuring tape
- Blocking mats
- Rustproof pins
Abbreviations
- MR — magic ring
- ch — chain
- sc — single crochet
- hdc — half double crochet
- dc — double crochet
- sl st — slip stitch
- sp — space
- st/sts — stitch/stitches
- RS — right side
- WS — wrong side
All instructions use US crochet terminology. Keep color-change loops close to the height of the surrounding stitches; an oversized loop creates a visible gap along the diagonal division.
Pink and Cream Quilt Granny Square Pattern
The photographed motif appears more complex than a standard diagonal two-color granny square because it combines open and dense triangular textures. The following construction recreates that visual principle as an original photo-inspired block.
Round 1: Establish the Four Corners
Begin with dusty pink.
Make an MR.
Ch 3. Work 2 dc into the ring.
Ch 2.
Work 3 dc into the ring.
Ch 2 and change to cream.
With cream, work 3 dc into the ring.
Ch 2.
Work 3 dc into the ring.
Ch 2 and join to the top of the beginning ch-3.
You now have four corners, with two adjacent sections in pink and two in cream.
Round 2: Pink Solid Half
Turn the work.
With pink, move into the first pink corner space.
Ch 3 and work 1 dc in the same corner.
Dc across the existing pink stitches.
At the outer pink corner work:
(2 dc, ch 2, 2 dc)
Continue in dc across the second pink side.
At the diagonal transition, work 2 dc and change to cream on the final pull-through.
Round 2: Cream Open Half
With cream, ch 2.
Work 3 dc into the same transition corner.
Ch 1.
Work a 3-dc group into the next available space.
At the cream outer corner work:
(3 dc, ch 2, 3 dc)
Ch 1 and work the corresponding granny cluster on the second cream side.
Finish at the second diagonal transition.
Join and turn.
Round 3: Expand the Solid Pink Triangle
With pink, ch 3.
Work dc into each pink stitch until the first outer corner.
In that corner work:
(2 dc, ch 2, 2 dc)
Dc across the next pink side.
At the diagonal color boundary, keep the final pink stitch snug and change to cream.
The solid half should remain dense with no intentional chain openings except at the corner.
Round 3: Expand the Cream Granny Triangle
With cream, work 3 dc into the first available granny space.
Ch 1.
Continue working 3-dc clusters into the spaces across the cream section.
At the outer cream corner work:
(3 dc, ch 2, 3 dc)
Continue with 3-dc groups and ch-1 spaces until reaching the second color boundary.
Join and turn.
Round 4
Repeat the established construction.
Across the pink half, work dc into every stitch and maintain:
(2 dc, ch 2, 2 dc)
at the pink outer corner.
Across the cream half, work 3-dc groups separated by ch 1.
Maintain:
(3 dc, ch 2, 3 dc)
at the cream outer corner.
Change colors only at the two diagonal transition points.
Round 5
Repeat Round 4, increasing naturally at the corners.
The solid pink section should now show a broad triangular field, while the cream section should contain a clearly visible open granny lattice.
Lay the block flat before continuing.
If the pink half pulls inward, loosen the dc tension slightly. If the cream half ripples, reduce the chain-space tension rather than removing required clusters.
Round 6
Continue the same pink and cream sequence for one additional round.
Check the four sides with a measuring tape.
All four outside edges should match before the finishing round is added.
Pink Finishing Round
Use dusty pink.
Join pink yarn in any corner.
Ch 1.
Sc evenly across the first side.
At the corner work:
(2 sc, ch 2, 2 sc)
Repeat across all four sides.
Join with a sl st.
Fasten off and leave a 20 cm tail if the square will be sewn rather than slip-stitch joined.
Block the motif to approximately 15 × 15 cm.
Alternative Half-and-Half Granny Construction
A documented method for making two-color diagonal squares works both colors in rounds while dropping and picking up each yarn at the color boundary. This avoids constructing two separate triangles and joining them afterward.
The technique is useful for this blanket because every block needs a crisp diagonal line. It also reduces the number of yarn tails compared with fastening off at every color change.
Turn the work after each round if using this approach. Alternating direction positions the dropped yarn where it is needed for the following round and helps control diagonal tension.
Making the Cream Section More Open
The reference image uses pronounced openings in the cream triangles. Increase that effect by retaining ch-1 spaces between all 3-dc groups.
Do not add chain spaces inside the solid pink section.
This difference in stitch density is what makes the square look quilted rather than simply divided into two colors.
For a lighter bedspread, use ch 2 between cream granny clusters. Make that change consistently across every cream section because inconsistent chain lengths change the finished block dimensions.
Creating the Pinwheel Layout
Four blocks create one of the strongest secondary patterns in the bedspread.
- Place the first square with its pink section pointing toward the center.
- Rotate the second square 90 degrees clockwise.
- Rotate the third square another 90 degrees.
- Rotate the fourth square so all four pink triangles meet around the same center.
- Check that the cream sections now form the contrasting outer corners.
- Measure the four-block unit before joining.
- Pin neighboring edges at both corners and the midpoint.
- Join the first pair of squares.
- Join the second pair and connect the two halves.
- Inspect the central intersection before continuing with the next unit.
The completed unit should produce a rotating pink pinwheel surrounded by cream openwork.
Reverse Pinwheel Unit
For the opposite effect, rotate the blocks so the cream granny sections meet in the center.
This produces an open cream pinwheel surrounded by denser pink sections.
Alternating standard and reverse pinwheels across the bedspread creates the quilt-like rhythm visible in the reference image.
The blocks themselves remain identical. Only their orientation changes.
Diamond Layout
The same motifs can form diagonal diamonds rather than pinwheels.
Arrange two pink triangles tip to tip.
Place matching blocks above and below them so four diagonal edges define a larger diamond.
Repeat the arrangement horizontally.
This layout works particularly well for a table runner or narrow throw because the eye follows the diamonds along the length of the project.
How Many Squares Are Needed?
Calculate the final count from the actual blocked square. The table below assumes a 15 cm motif and does not include the outer border.
| Layout | Squares | Approximate Motif Area |
|---|---|---|
| 6 × 8 | 48 | 90 × 120 cm |
| 8 × 10 | 80 | 120 × 150 cm |
| 10 × 12 | 120 | 150 × 180 cm |
| 12 × 14 | 168 | 180 × 210 cm |
| 12 × 16 | 192 | 180 × 240 cm |
For a bedspread with generous side overhang, measure the mattress plus the required drop before choosing the final grid.
Calculating Yarn for the Blanket
Complete one fully edged block using the exact yarn and hook intended for the blanket.
Weave in every end and weigh the dry square on a digital kitchen scale.
If one block weighs 25 g and the design requires 168 squares, the motifs alone require approximately 4,200 g of yarn.
Add yarn for seams and the border. A 15–20 percent reserve also covers swatching and differences between individual blocks.
For a two-color project, weigh the pink and cream yarn before and after making one sample if a precise color breakdown is required.
Joining the Granny Squares
The photographed bedspread has narrow pink lines separating its blocks. A flat pink seam reproduces that appearance.
Slip-Stitch Join
Place two blocked squares side by side with the right sides facing upward.
Join dusty-pink yarn at the first corner.
Insert the hook through corresponding outer loops on both squares.
Work one relaxed slip stitch.
Continue through matching loops along the entire edge.
Do not pull the seam tighter than the original square edge.
Join individual squares into horizontal rows, then connect the completed rows.
Keeping the Central Junction Flat
Four corners meet at many points across this blanket. Those intersections can become bulky if every square carries a thick knot or several woven tails into the same location.
Move finishing tails away from the corners whenever possible.
At a four-square intersection, join the seams cleanly through the existing corner spaces rather than adding multiple decorative stitches.
Lay the blanket flat after every few joined rows.
If the junction rises above the surrounding fabric, reduce bulk before adding the next panel.
Pink and Cream Crochet Pillow Cover
The pillow covers in the image repeat the same quilt geometry on a smaller scale.
For a 45 cm cushion using 15 cm blocks, arrange nine motifs in a 3 × 3 layout.
Rotate the blocks so the diagonal divisions form a central pinwheel or diamond.
Join with dusty-pink yarn.
Add one round of sc around the complete front panel.
For the back, make two overlapping rectangular crochet panels or attach the motif front to a removable fabric cushion cover.
Measure the finished front before constructing the back because joining can change the dimensions slightly.
Simple Pink Blanket Border
The photographed blanket uses a narrow edge rather than a deep lace border. That choice keeps attention on the internal quilt geometry.
Border Round 1
Use cream.
Join yarn at any outer corner.
Work sc evenly around the entire blanket.
At each corner work:
(2 sc, ch 2, 2 sc)
Border Round 2
Change to dusty pink.
Ch 2.
Work hdc in each stitch around.
At each corner work:
(2 hdc, ch 2, 2 hdc)
Border Round 3
Continue with pink.
Work one sc into each stitch.
At every corner work:
(sc, ch 2, sc)
Join, fasten off, and weave the tail through the back of the border.
7 Technical Tips for Quilt Granny Squares
- Block every motif to the same dimensions. A 5 mm difference per square becomes a 6 cm discrepancy across a row of twelve blocks.
- Mark the two diagonal color-change points. Moving either transition by one stitch shifts the dividing line and breaks the larger pinwheel pattern.
- Compare the solid and open sections after every round. Loose cream chain spaces can make one half grow faster and produce a twisted square.
- Keep joining slip stitches relaxed. A seam finishing 1 cm shorter than the blocked edge creates puckering when several rows are connected.
- Photograph the complete layout before joining. One block rotated 90 degrees changes the pinwheel or diamond sequence even though the square itself is correct.
- Keep corner tails away from four-block intersections. Several yarn ends woven through the same 2 cm area can create a hard raised junction.
- Weigh one finished block before purchasing bedspread quantities. Multiplying its actual weight by 120–192 motifs produces a more useful estimate than calculating from an unblocked swatch.
How to Keep the Diagonal Line Clean
The color boundary is the defining feature of this pink and cream crochet blanket. Change colors during the final pull-through of the stitch immediately before the new section.
Do not knot the two colors together at every transition.
If both yarns remain attached, drop the inactive strand and pick it up when the next section begins. Avoid pulling the resting yarn tightly across the back because it can shorten the diagonal.
After completing each round, lay the block on a flat surface and inspect the color division. Correct tension problems immediately rather than expecting blocking to repair a severely distorted diagonal.
Choosing Yarn for a Bedspread
DK yarn keeps a large modular blanket lighter than many heavier worsted alternatives. A published 2024 granny-square bedspread pattern specifies DK yarn with a 4 mm hook, making that combination a useful technical reference for this project.
Cotton gives the geometric blocks crisp stitch definition but becomes heavy in a full bedspread. Acrylic reduces overall weight and generally dries faster. Cotton-acrylic blends provide an intermediate option.
Whatever fiber is selected, use the same yarn line for both pink and cream whenever possible. Different fibers or substantially different yarn thicknesses can make the two halves of a block behave differently during washing and blocking.
Blocking the Completed Blanket
Individual blocking should do most of the dimensional correction before assembly.
After the final border is complete, a light overall blocking can align the outer perimeter and joining seams.
Follow the yarn manufacturer’s care directions.
Support a wet bedspread across its full width when moving it because several kilograms of saturated crochet can stretch the seams.
Lay the blanket flat and align the diagonal pattern while damp.
Check that the outside corners form right angles and that the border does not ripple.
Allow the project to dry fully before placing it on the bed.
Conclusion
This quilt granny square crochet blanket pattern gets its visual complexity from rotation rather than dozens of different motifs. Make one pink-and-cream block first, block it to the target dimensions, then rotate identical squares to create pinwheels, diamonds, and diagonal bands. The critical next step is recording the finished square size and weight before purchasing bedspread quantities; those two measurements determine both the motif count and yarn requirement.
Save the finished layout to Pinterest or share the completed bedspread on Instagram with #PinkQuiltGrannyBlanket. Before joining the first row, photograph the full arrangement for reference. Would you place the solid pink triangles at the center of each pinwheel, or rotate the blocks so the open cream sections meet instead?









