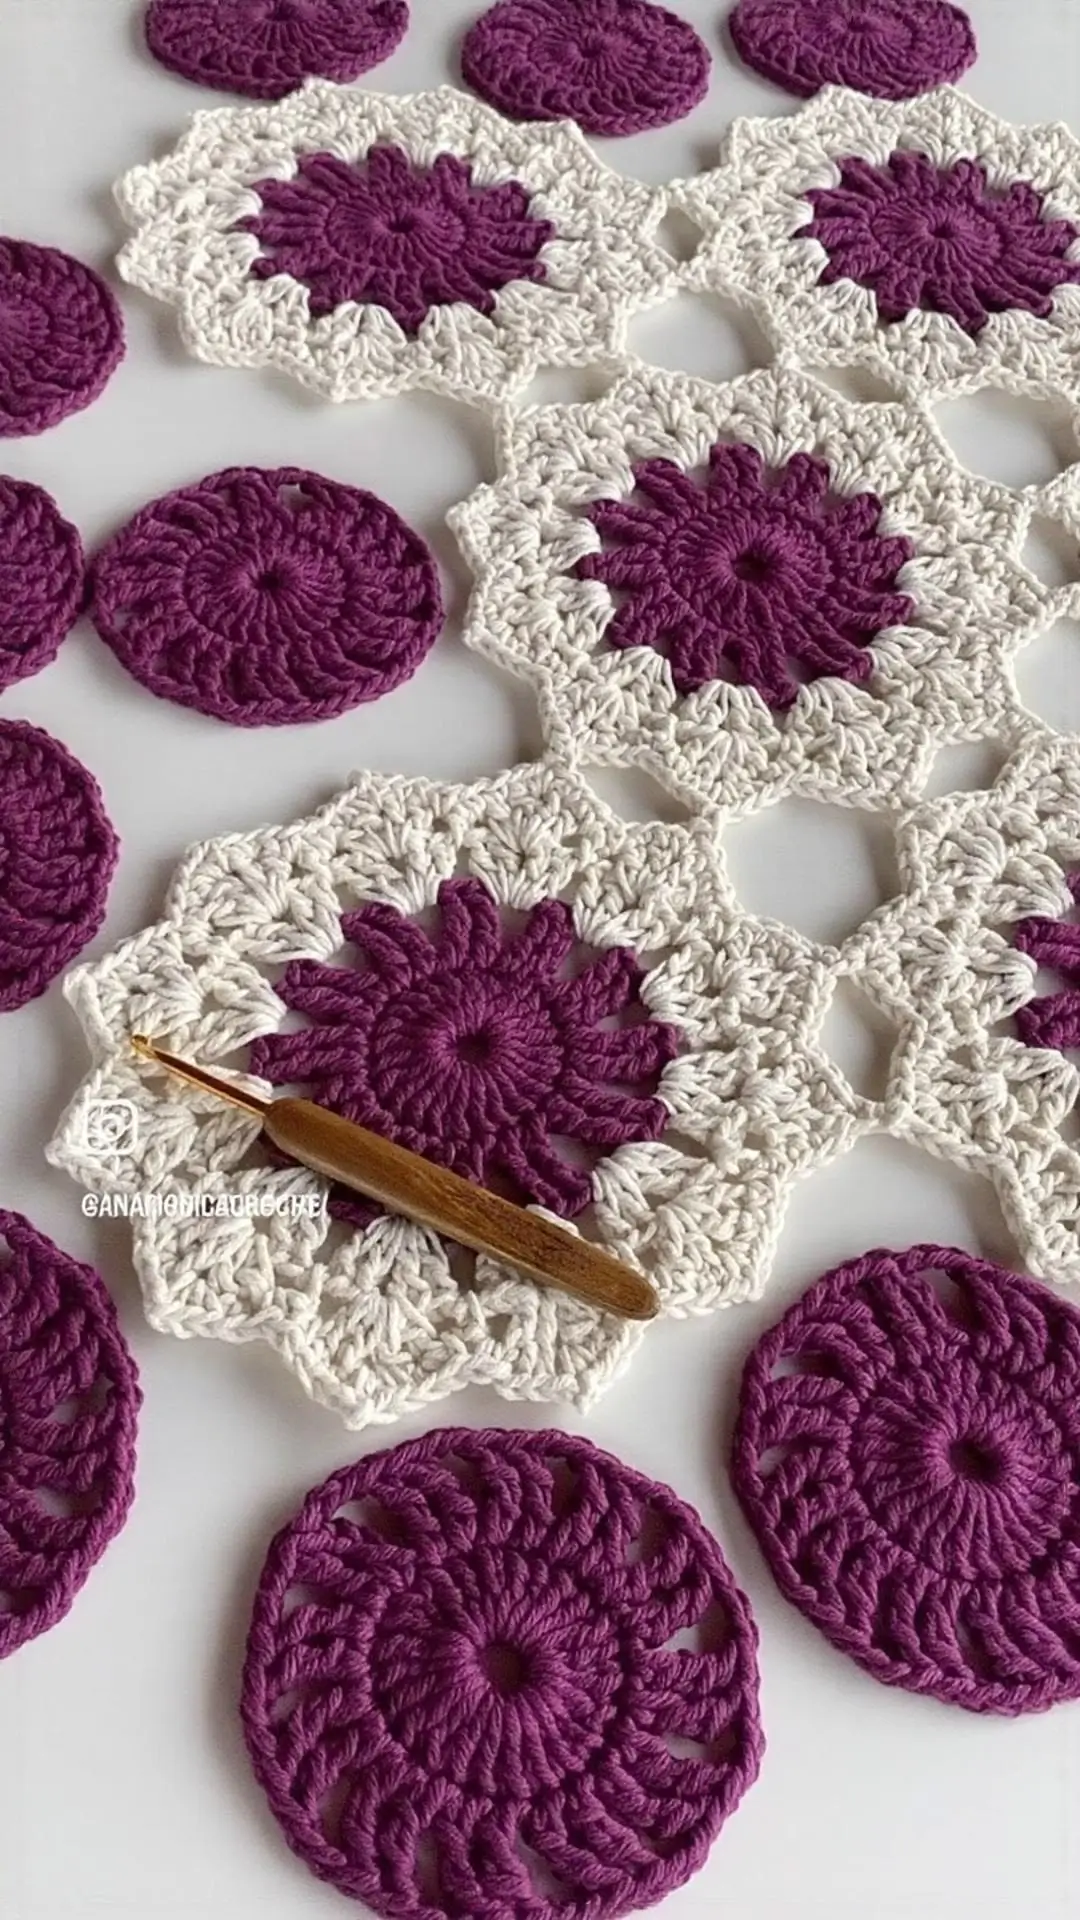
This crochet flower granny square pattern features a raised plum-purple floral center framed by an ivory openwork square. The design combines tall crochet stitches, textured petals, and chain spaces to create a dimensional motif suitable for blankets, cushion covers, table runners, and decorative bags. This intermediate-level project uses DK or worsted cotton yarn and a 3.5–4 mm crochet hook.
The Design: What Makes This Flower Granny Square Different?
The defining feature of this crochet flower granny square is the contrast between its circular flower center and geometric outer border. The purple center contains radiating stitches that create the appearance of narrow petals emerging from a central ring.
The ivory border changes the shape from circular to square. Groups of taller stitches fill the spaces around the flower, while chain openings keep the fabric flexible.
Unlike a traditional solid granny square, this textured floral crochet motif depends on controlled stitch height and consistent spacing. If the outer stitches are too short, the corners pull inward. Excessively tall stitches can produce wavy edges.
The purple flower and cream border can be worked separately in stages, making the design suitable for larger projects assembled from repeated motifs.
Project Information at a Glance
| Feature | Details |
|---|---|
| Skill level | Intermediate |
| Estimated time | 45–75 minutes per square |
| Estimated finished size | 12–16 cm after blocking |
| Suggested hook | 3.5–4 mm |
| Yarn | DK or worsted cotton |
| Construction | Joined rounds |
| Best for | Blankets, cushions, bags, table runners |
Measurements, time, and yarn requirements are planning estimates. The photographed motif has not been measured, and the instructions below have not been sample-tested.
Materials and Tools
Yarn
- Plum purple cotton yarn – DK or worsted weight – approximately 12–18 g per motif.
- Ivory cotton yarn – matching yarn weight – approximately 15–22 g per motif.
A smooth cotton yarn provides stitch definition for the raised flower center. Choose yarns with similar thickness and fiber content so that the border and center respond consistently to blocking.
Suitable yarn ranges include cotton DK yarn and medium-weight cotton yarn. Yarn quantities depend on the final dimensions, stitch height, and individual tension.
Tools
- 3.5–4 mm crochet hook
- Stitch markers
- Yarn needle
- Sharp scissors
- Measuring tape
- Blocking mat and rust-resistant pins
Crochet Abbreviations
This pattern uses US crochet terminology.
- MR: Magic ring
- ch: Chain
- sl st: Slip stitch
- sc: Single crochet
- hdc: Half double crochet
- dc: Double crochet
- tr: Treble crochet
- sp: Space
- st: Stitch
- rep: Repeat
- RS: Right side
- BLO: Back loop only
Invisible decreases are commonly used in amigurumi but are not required for this flat floral motif.
Crochet Flower Granny Square Pattern – Step by Step
The following instructions create a raised flower with a square outer frame inspired by the photograph. This is an original approximation rather than an exact stitch-for-stitch reconstruction.
Work in joined rounds unless otherwise stated. A beginning chain may count as a stitch where indicated.
Part 1: Crochet the Purple Flower Center
Yarn: Plum purple.
Round 1: Make a magic ring. Ch 3 (counts as first dc), work 11 dc into the ring. Pull the ring closed and join with a sl st to the top of the beginning ch-3. (12 dc)
Round 2: Ch 3 (counts as first dc), work 1 dc into the same stitch. Work 2 dc in each remaining stitch around. Join with a sl st. (24 dc)
Round 3: Ch 3 (counts as first dc), dc in the same stitch, dc in the next stitch. Repeat [2 dc in next stitch, 1 dc in next stitch] around, omitting the initial stitches already worked. Join. (36 dc)
The completed center should form a relatively flat disc. If the center cups significantly, check that every increase has been worked and that the hook size is appropriate for the yarn.
Part 2: Create the Raised Purple Petals
Round 4: Ch 1, sc in the first stitch. Repeat [ch 5, skip 2 stitches, sc in next stitch] around, using the first sc as the final anchor when needed. Join. (12 ch-5 loops)
Round 5: Sl st into the first ch-5 space. Work [sc, hdc, 3 dc, hdc, sc] into each ch-5 space around. Join with a sl st to the first sc. (12 petal groups)
Fasten off the purple yarn, leaving a 15 cm tail for weaving.
The petal groups form a raised ring around the circular center. The petals may be gently shaped with the fingers, but they should not be stretched individually before the square border is complete.
Part 3: Establish the Ivory Border
Yarn: Ivory.
Round 6: With the right side facing, join ivory yarn in the center dc of any petal. Ch 1 and sc in the same stitch. Repeat [ch 3, sc in the center dc of the next petal] around, ending with ch 3 and a sl st to the first sc. (12 sc anchors and 12 ch-3 spaces)
This round establishes a framework around the flower. Work the ivory stitches without compressing the purple petals.
Part 4: Transform the Flower Into a Square
Round 7: Sl st into the first ch-3 space. Ch 3 (counts as dc), work 2 dc in the same space.
Work the following sequence around:
- In the next ch-3 space, work 3 dc.
- In the next ch-3 space, work (3 dc, ch 2, 3 dc) to form a corner.
- Work 3 dc in each of the next two ch-3 spaces.
- Repeat the corner placement and intervening groups around the remaining spaces.
To distribute the corners evenly, place one corner in every third ch-3 space, beginning with the third space. The other eight spaces receive one 3-dc group each. Join to the top of the beginning ch-3. (48 dc and four ch-2 corner spaces)
Round 8: Ch 3 (counts as dc), then work 1 dc in each dc along the side. In each corner ch-2 space, work (2 dc, ch 2, 2 dc). Continue around, working 1 dc in each dc and repeating the corner treatment. Join. (64 dc and four ch-2 corner spaces)
Round 9: Ch 1, sc in each dc around. In every corner ch-2 space, work (2 sc, ch 2, 2 sc). Join with a sl st. (80 sc and four ch-2 corner spaces)
Fasten off, leaving a 15 cm tail.
This border creates a more solid square than the highly openwork edging visible in the photograph. For a lacier appearance, replace selected groups of stitches along the sides with chain spaces in a separately tested variation.
How to Maintain the Square Shape
The transition from a circular flower to a square border requires balanced corner placement. Four corners must divide the circumference into equal sections.
In this design, the ivory foundation has twelve chain spaces. Positioning corners at every third space creates four equal sections.
Each subsequent border round adds stitches at the corners. This extra fabric accommodates the increased perimeter without forcing the sides to curve inward.
Check the shape after completing Round 7. Place the motif on a flat surface without stretching it. The corners should point outward and the four sides should have approximately equal lengths.
If one side appears shorter, inspect the stitch count before proceeding. A missing group in the first ivory round will affect the placement of the following rounds.
How to Join Multiple Crochet Flower Squares
Once the motifs are complete, they can be connected into larger projects. Choose a joining technique according to the amount of flexibility and visual separation required.
Whip Stitch Joining
Place two squares together with the right sides facing. Thread a yarn needle with ivory yarn and sew through corresponding edge stitches.
Maintain even tension throughout the seam. Tight stitches may cause the joined squares to fold, while loose stitches can leave visible gaps.
Slip Stitch Joining
Position the squares with the wrong sides facing each other. Insert the crochet hook through corresponding edge loops and work slip stitches across the seam.
This method produces a defined joining ridge. It is suitable for decorative cushions and projects where visible seam lines are part of the design.
Single Crochet Joining
Hold the squares together and work one single crochet through corresponding edge stitches. Keep the stitch count consistent on both pieces.
A single crochet seam is more prominent than a sewn seam and can add structure to blankets or bags.
Assembly and Finishing
- Complete the purple center and all twelve raised petals.
- Fasten off the purple yarn and secure the yarn tail temporarily.
- Attach the ivory yarn to begin the surrounding framework.
- Complete the four-corner square border.
- Check the stitch counts and compare the four sides.
- Weave the purple yarn tail through several stitches on the wrong side.
- Weave the ivory tail through the border stitches without pulling the edge inward.
- Lightly dampen the motif or use an appropriate blocking method for the yarn fiber.
- Pin the square to the intended dimensions, keeping the corners evenly spaced.
- Allow the motif to dry completely before removing the pins or joining it to other squares.
The finished motif consists of a raised purple flower attached to a square ivory crochet border.
7 Technical Tips for Better Crochet Flower Squares
- Mark the first stitch. Missing the beginning stitch can shift the petal placement and create uneven spacing. Move the marker at the start of every round.
- Check the center after Round 3. The center should contain 36 double crochet stitches. A missing increase changes the number of available petal anchors.
- Maintain consistent petal loops. Each petal foundation uses a chain-5 loop. Shortened chains may cause the petals to curl toward the center.
- Check the corner distribution. The first ivory foundation contains twelve chain spaces. Place the four corners three spaces apart to prevent asymmetry.
- Avoid excessive tension. Tight slip stitches can compress the join between the flower and border. Use the same hook and consistent yarn tension throughout the motif.
- Pin before joining. Unblocked motifs may differ by several millimeters. Align all four corners and compare side measurements before sewing multiple squares together.
- Secure the yarn tails. Weave each tail through approximately 5–7 cm of stitches on the wrong side. Reverse direction at least once to reduce the risk of the ends working loose.
Common Crochet Problems and Solutions
Why Is My Flower Center Curling?
Curling usually indicates that the fabric does not have enough width for its circumference, or that the stitches are being worked too tightly.
Count the stitches at the end of each round. The center should contain 12, 24, and 36 double crochet stitches after the first three rounds.
If the stitch counts are correct but the center still cups, try a slightly larger hook and compare the result.
Why Are the Petals Uneven?
Uneven petals can result from inconsistent chain tension, missing anchor stitches, or accidental changes in stitch height.
Each petal should contain the same seven-stitch sequence: one single crochet, one half double crochet, three double crochet stitches, one half double crochet, and one single crochet.
Check the center stitch of each petal before beginning the ivory border.
Why Is the Ivory Border Wavy?
Waving occurs when the outer rounds contain more fabric than the inner rounds can support.
Check that the four corner groups are placed correctly and that no additional stitches have been inserted along the sides.
Blocking can correct minor irregularities but cannot reliably correct a significant stitch-count error.
Why Are the Corners Rounded?
Rounded corners may result from missing corner chains or insufficient increases.
Each corner in Round 8 contains two double crochet stitches, two chains, and two more double crochet stitches.
Mark all four corners if the stitch groups become difficult to identify.
Choosing Colors for a Floral Granny Square
The photographed design uses a dark purple center and a pale ivory border. This combination separates the textured flower from the surrounding geometric frame.
A darker flower center creates a defined focal point. The lighter border makes the open spaces more visible and helps individual motifs appear connected when assembled into a larger piece.
Alternative color combinations include:
- Terracotta flowers with cream borders.
- Mustard yellow flowers with warm white borders.
- Sage green flowers with natural cotton borders.
- Dusty rose flowers with pale beige borders.
- Navy blue flowers with light gray borders.
When changing colors, maintain the same yarn weight for both sections. Differences in yarn thickness can alter the size of the center and the shape of the square.
Project Ideas Using Floral Granny Squares
Crochet Blanket
Arrange repeated squares into rows and columns. For example, a blanket containing 8 columns and 10 rows requires 80 motifs.
At a finished square width of 14 cm, the unbordered arrangement would measure approximately 112 × 140 cm before accounting for seams, additional edging, and changes caused by blocking.
Decorative Cushion Cover
Combine nine squares into a three-by-three panel. If each square measures 14 cm, the resulting panel will measure approximately 42 × 42 cm before joining allowances.
Make a matching back panel or attach the floral panel to a suitable fabric backing.
Table Runner
Arrange the squares in two or three columns to create a narrow decorative runner. Use cotton yarn for clearly defined stitches and a fabric that can be washed according to the yarn label.
Handmade Crochet Bag
Join several motifs into front and back panels. Add reinforced handles and consider a fabric lining if the bag will carry small objects.
Openwork stitches may stretch under weight, so a lining can help support the finished structure.
Frequently Asked Questions
Is This Crochet Flower Granny Square Suitable for Beginners?
The pattern is better suited to crocheters familiar with working in rounds, counting stitches, and making double crochet groups. A confident beginner can practice the circular flower center before attempting the square border.
Can I Use Acrylic Yarn Instead of Cotton?
Yes. Acrylic yarn can be used if its thickness is appropriate for the hook. However, acrylic and cotton may produce different stitch definition, drape, and blocking results.
How Many Squares Do I Need for a Blanket?
The number depends on the finished dimensions of each square and the intended blanket size. Divide the planned width and length by the measured size of a blocked motif, then round to whole rows and columns.
Can I Make the Flower Granny Square Larger?
Yes. Additional border rounds can increase the dimensions. Work evenly along the sides and add suitable corner increases in each round to maintain the square shape.
Should I Block Every Granny Square?
Blocking is recommended when multiple squares must align accurately. It helps standardize dimensions and makes joining more consistent, particularly when the motif contains openwork stitches.
Conclusion
This floral motif combines a circular purple center, raised crochet petals, and an ivory square border. Its construction provides a practical way to practice joined rounds, stitch groups, corner increases, and motif finishing. Before producing a large project, make one complete sample and measure it after blocking. Record the hook size, yarn weight, finished dimensions, and yarn consumption so that additional squares remain consistent.
The crochet flower granny square pattern can then be repeated for a blanket, cushion cover, table runner, or decorative bag. Share a photograph of your finished sample on Pinterest or Instagram using #CrochetFlowerGrannySquare.
Would you keep the plum-purple center and ivory border, or change the flower color while retaining the same square frame?









