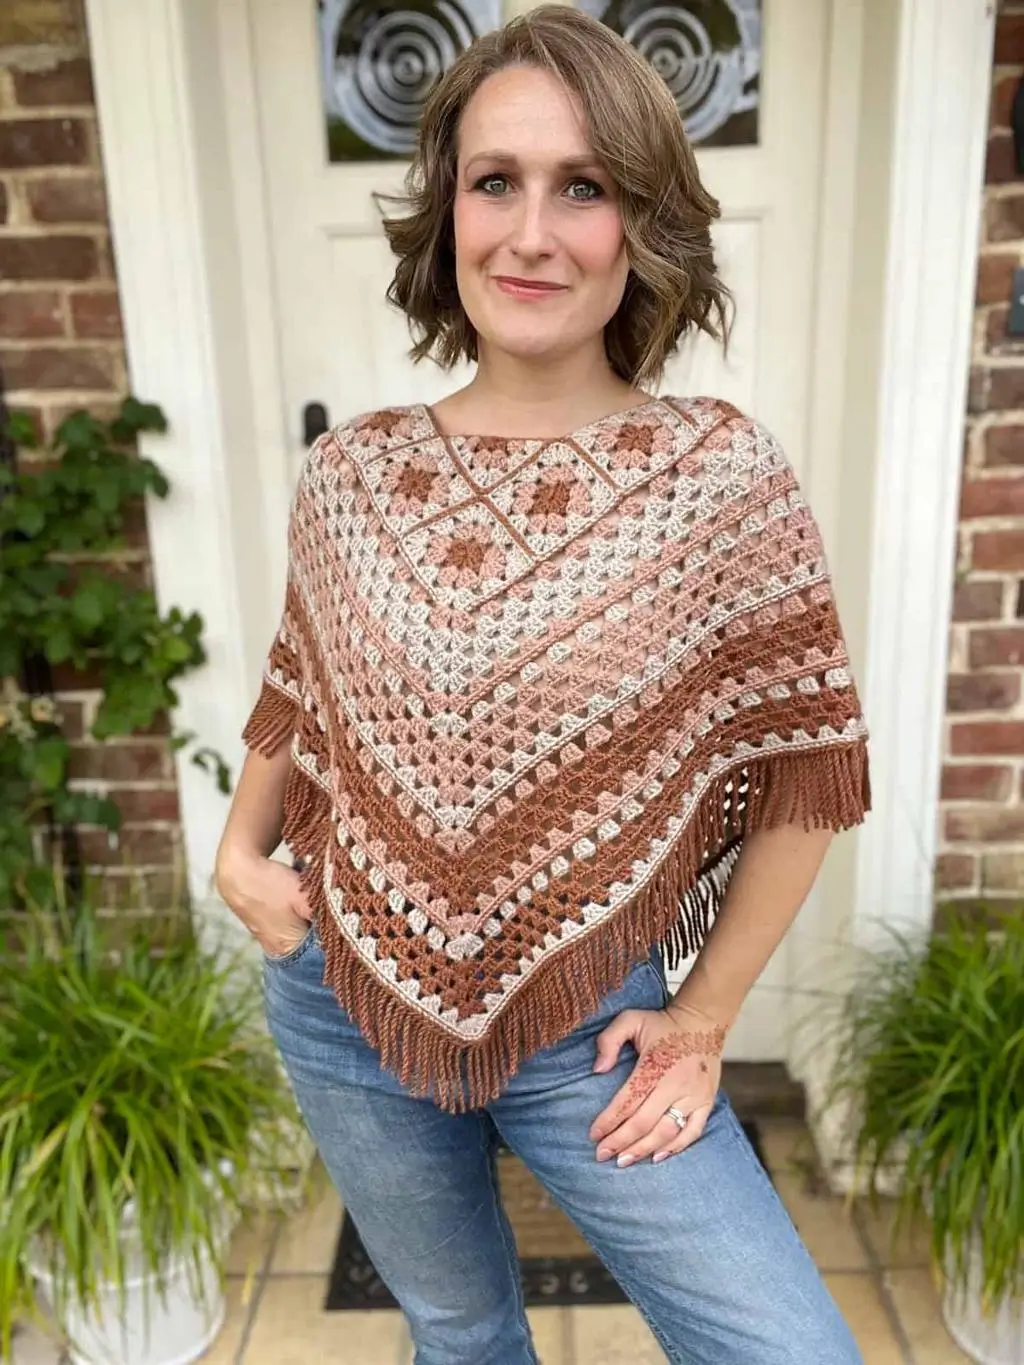
The pointed front of this poncho only works when the neckline squares and lower granny rows share the same diagonal geometry. This floral granny square crochet poncho pattern uses flower-centered motifs around the shoulders, open granny-stitch sections through the body, and a deep V-shaped lower edge finished with fringe. A palette of dusty rose, cream, blush, and warm brown emphasizes the construction without hiding the stitch pattern.
The Design: What Makes This Crochet Poncho Different
The garment combines two crochet structures. Small floral granny squares form the decorative upper yoke, while expanding granny-stitch rows create most of the poncho body. That combination keeps the neckline controlled while allowing the lower section to widen naturally over the shoulders and torso.
The front and back are worked with central increase points. Those increases produce the long triangular tips visible at the center front and center back. Narrow solid rounds between groups of open granny rows add definition and help control stretch.
The photographed version also uses long brown fringe along the lower edges. Fringe adds visual weight, so it should be attached only after the poncho has been blocked and the final dimensions have been checked.
Project Information at a Glance
| Skill Level | Construction | Target Length | Hook | Yarn Weight |
|---|---|---|---|---|
| Intermediate | Floral yoke + granny-stitch body | Approx. 60–70 cm without fringe | 4.5–5 mm | Worsted #4 |
The measurements in this pattern are project targets. Fit the neckline and shoulder section to the wearer before extending the body.
Materials and Tools
Yarn
- Warm Cream — Worsted #4 — approximately 350–450 g
- Dusty Rose — Worsted #4 — approximately 250–350 g
- Blush Pink — Worsted #4 — approximately 150–250 g
- Warm Brown — Worsted #4 — approximately 300–400 g including fringe
For an adult medium-length poncho, plan approximately 1100–1400 g total. Actual consumption depends on garment length, neckline circumference, fringe density, and yarn construction.
Tools
- 4.5–5 mm crochet hook
- Yarn needle
- Scissors
- Measuring tape
- Locking stitch markers
- Blocking mats and pins
Abbreviations
- ch — chain
- sc — single crochet
- hdc — half double crochet
- dc — double crochet
- sl st — slip stitch
- sp — space
- st/sts — stitch/stitches
- RS — right side
- WS — wrong side
In this pattern, a granny cluster means 3 dc worked into the same chain space unless another instruction is given.
Gauge and Fit
Make one complete floral granny square before beginning the garment. After light blocking, aim for approximately 10–12 cm per square.
The square measurement controls the neckline. Eight 11 cm motifs, for example, do not simply create an 88 cm neck opening because the motifs are arranged around the shoulders at angles. Assemble the yoke temporarily with removable markers before completing permanent seams.
The neckline should pass comfortably over the head without becoming wide enough to slide toward the shoulder.
Color Arrangement
A photo-inspired sequence uses four coordinated neutrals and muted pinks:
- Warm brown for selected flower centers and lower body sections
- Dusty rose for flower petals and stripe sections
- Blush for secondary rows
- Cream for contrast and visual separation
Do not change color on every row. Groups of two or three related rounds produce broader stripes and keep the garment from becoming visually fragmented.
Floral Granny Square
Make enough motifs to surround the neckline. Start with 8 squares as a practical adult fitting sample. Depending on square size and required neckline circumference, the final yoke may need more or fewer motifs.
Round 1 — Flower Center
With warm brown, make a magic ring.
Ch 3, work 11 dc into the ring.
Join with sl st to the top of the beginning ch-3. (12 dc)
Fasten off.
Round 2 — First Petal Round
Join dusty rose in any stitch.
Ch 3, work 2 dc in the same stitch.
Ch 1.
Skip the next stitch.
Work 3 dc in the following stitch, ch 1.
Repeat around.
Join with sl st. You should have 6 petal clusters.
Round 3 — Expanding the Flower
Join blush in any ch-1 space.
Work:
(3 dc, ch 2, 3 dc) in the same space.
In the next ch-1 space work 3 dc, ch 1.
Alternate the larger and smaller groups around so the circular flower begins preparing for four structural corners.
Fasten off.
Squaring the Flower
The flower must become a stable four-corner motif before it is used in the neckline.
Square Round 1
Join cream at one of four evenly distributed corner positions.
At each corner work:
(3 dc, ch 2, 3 dc)
Between corners, work granny clusters into the available spaces, using ch 1 between groups where needed.
Repeat around and join.
Square Round 2
Sl st into the nearest space.
Ch 3.
Work one granny cluster into each side space.
At every corner work:
(3 dc, ch 2, 3 dc)
Join and fasten off.
Final Definition Round
Join dusty rose or brown.
Work sc evenly around the square.
In each corner ch-2 space work:
(sc, ch 1, sc)
Fasten off and block the motif to the target size.
Preparing the Floral Yoke
Arrange the completed squares around the shoulders before joining them.
The upper edge forms the neckline. The lower edges become attachment points for the granny-stitch body.
For the angular appearance in the image, rotate selected squares so their corners point toward the neck and lower body. This produces the diamond-like geometry across the upper chest.
Pin or temporarily join all motifs before sewing.
Joining the Granny Squares
Use dusty rose or warm brown for visible decorative seams.
Place two squares with the RS facing upward.
Join through corresponding edge stitches using sl st or sc.
Keep the joining tension slightly looser than the square edges. A tight seam will pull the yoke upward and distort the neckline.
Continue until the motifs form a complete shoulder ring.
Stabilizing the Neckline
Join dusty rose at the back neckline.
Neck Round 1
Work sc evenly around the entire opening.
At valleys between motifs, use sc decreases where necessary rather than adding extra stitches.
Neck Round 2
Ch 1.
Work hdc in every stitch around.
Join with sl st.
Neck Round 3
Work one final round of sc.
Try the yoke on before proceeding. The neckline must lie flat against the upper chest and back.
Preparing the Lower Yoke Edge
Join cream along the lower edge of the assembled floral section.
Work sc evenly around, placing stitches into square edges and corner spaces.
Mark four important positions:
- Center front
- Right side
- Center back
- Left side
The front and back markers control the pointed poncho shape. Side markers help you check symmetry but do not require the same increase rate.
Starting the Granny-Stitch Body
Body Round 1
Join cream at the center back.
Ch 3.
Work granny clusters evenly around the lower yoke edge.
At the center front marker work:
(3 dc, ch 2, 3 dc)
Repeat the same increase at the center back.
Continue around and join.
Body Round 2
Sl st into the first space.
Ch 3.
Work 3 dc into each space around.
At the center front ch-2 space work:
(3 dc, ch 2, 3 dc)
Repeat at center back.
Join.
Body Rounds 3–6
Repeat Body Round 2.
Maintain both central increases directly above the previous increase points.
These stacked increases create the long triangular front and back.
First Color Section
Change to blush.
Work 2 rounds in the established granny pattern.
Change to dusty rose and work another 2 rounds.
Change to cream for 1 round.
Continue making the center-front and center-back increases on every round.
Decorative Solid Ridge
After several granny rounds, add a narrow structural line similar to the defined stripes visible in the garment.
With dusty rose:
Ch 1.
Work sc around, placing stitches evenly across the granny clusters and chain spaces.
At the center-front point work:
(sc, ch 2, sc)
Repeat at center back.
On the next round, work hdc around with the same center increases.
This creates a narrow solid band before returning to open granny stitches.
Second Granny Section
Change to cream.
Work granny clusters into the spaces created by the previous round.
Continue for 3–5 rounds.
Change to blush and work another 2–3 rounds.
Use warm brown for the following section.
Keep both central increase points aligned vertically.
Building the Lower Poncho
Continue alternating open granny sections and narrow solid definition rounds.
A balanced color sequence can be:
- Cream — 3 rounds
- Blush — 2 rounds
- Dusty rose — 3 rounds
- Cream — 1 definition round
- Warm brown — 3 rounds
- Dusty rose — 2 rounds
- Cream — 2 rounds
- Warm brown — 3–4 rounds
Repeat or modify the sequence until the poncho reaches the required length.
Checking the Pointed Shape
Lay the garment flat every four or five rounds.
The center-front increase should form a clean downward point. The center-back point should match it.
If the point begins curling upward, the increase area needs slightly more space. Increase the center chain from ch 2 to ch 3 for the next few rounds.
If the center becomes excessively loose, return to ch 2.
Do not add random increases along the sides. They can turn the poncho into a circular cape and remove the strong triangular silhouette.
Length Adjustment
| Style | Approximate Shoulder-to-Point Length |
|---|---|
| Short Poncho | 50–55 cm |
| Standard Poncho | 60–65 cm |
| Long Poncho | 68–75 cm |
Measure the garment on the intended wearer. Body height and shoulder width change where the front point finishes.
Lower Edging
Finish the final granny section with warm brown.
Edging Round 1
Work sc evenly around the entire lower edge.
At the front and back points work:
(sc, ch 2, sc)
Edging Round 2
Work hdc around.
Repeat the same corner treatment at both points.
Edging Round 3
Work one final sc round.
Fasten off.
Adding the Fringe
Cut warm-brown yarn into lengths approximately 24–30 cm.
Each finished fringe will be roughly half the cut length after folding and attaching.
For each fringe unit:
- Hold 2–3 strands together.
- Fold them in half.
- Insert the hook through a lower-edge stitch or space.
- Pull the folded center through.
- Pass the loose ends through the loop.
- Pull the knot firmly against the edge.
Space the fringe approximately 1.5–2.5 cm apart.
Attach all fringe before trimming. Hang the poncho for several hours, then cut the ends to an even finished length of approximately 10–14 cm.
Optional Fringe-Free Version
For a cleaner lower edge, omit the fringe and add a narrow shell border.
After the final sc round, work:
Skip 2 sts, 5 dc in next st, skip 2 sts, sc in next st.
Repeat around while maintaining the front and back points.
This variation produces a decorative edge with less movement and less added weight.
Adjusting the Poncho Width
Do not size this garment by simply adding more body rounds. Additional rounds increase both length and circumference.
For a wider upper body, increase the size or number of neckline motifs before starting the body.
For a smaller fit, use smaller motifs or a lighter yarn and hook.
Once the floral yoke fits correctly, the repeated center increases will provide the lower-body ease.
Suggested Size Guide
| Fit Range | Suggested Yoke Approach | Target Length |
|---|---|---|
| XS–S | Smaller 9–10 cm motifs | 55–62 cm |
| M–L | 10–12 cm motifs | 60–68 cm |
| XL–2XL | Increase yoke circumference before body | 65–72 cm |
| 3XL+ | Fit yoke directly to shoulder measurement | 68–75+ cm |
These are construction targets rather than standardized garment measurements. Always fit the assembled yoke before committing to the body.
Alternative Colorways
Autumn Version
Use rust, pumpkin, olive, cream, and chocolate brown.
Neutral Version
Combine ivory, oatmeal, camel, taupe, and espresso.
Blue Version
Use navy, denim, dusty blue, pale gray, and cream.
Vintage Rose Version
Combine burgundy, antique rose, blush, warm cream, and cocoa.
Yarn Estimation Method
The most accurate method is to weigh a completed section.
Make and block one floral square, then weigh it. Multiply that weight by the final number of yoke motifs.
Next, work approximately 10 cm of the body pattern and weigh the yarn consumed. Use that measurement to estimate the remaining body length.
Calculate fringe separately because dense fringe can consume several hundred grams of yarn.
Add approximately 10% to the calculated total for swatching, color changes, tails, and adjustments.
Assembly
- Make one floral granny square, block it, and confirm the finished dimensions.
- Crochet the remaining yoke motifs using the same hook and tension.
- Arrange the motifs around the shoulders and temporarily pin the neckline before permanent joining.
- Join the floral squares and check that the completed yoke passes over the head comfortably.
- Work the stabilizing neckline rounds and correct any loose valleys between motifs.
- Establish the lower yoke edge and mark the exact center front and center back.
- Crochet the granny-stitch body while maintaining the two central increase points on every round.
- Continue the cream, blush, dusty-rose, and brown sections until the required length is reached.
- Add the lower structural border, block the garment, and allow it to dry completely.
- Attach the brown fringe evenly along the lower edge, allow it to hang, then trim it to a uniform length.
The completed poncho should have a stable floral neckline, symmetrical front and back points, open draping sides, and an even fringe line.
7 Technical Tips
- The neckline becomes too wide: this usually appears after the motifs are joined. Reduce excess circumference with evenly distributed sc decreases rather than pulling the joining seams tighter.
- The floral squares differ in size: a variation greater than about 5 mm becomes visible around the neckline. Block every motif to the same dimensions before assembly.
- The front point shifts sideways: the center increase has moved by one space. Keep a locking marker inside the center-front ch-2 space and move it upward after every round.
- The poncho becomes circular instead of pointed: too many increases are being added away from the center points. Keep the primary increases at center front and center back unless fitting shows that additional shoulder shaping is required.
- The solid stripe pulls inward: sc or hdc rows are tighter than the granny rounds. Increase hook size by 0.5 mm for the solid round or consciously lengthen each working loop.
- The lower edge stretches after adding fringe: the fringe units are too dense or heavy. Keep spacing near 1.5–2.5 cm and block the garment before deciding the final fringe density.
- The color changes create visible bumps: complete the final yarn-over of the previous stitch with the new color. Weave tails horizontally through at least 5–7 cm of matching-color fabric instead of knotting them at the edge.
Blocking and Final Measurements
Before attaching fringe, lay the poncho flat on blocking mats.
Align the neckline first. Next, position the center-front and center-back points so they fall on the same axis.
Measure from the shoulder line to each point. The difference between front and back should remain small unless an intentionally longer front or back was planned.
Shape the granny sections without aggressively stretching the open spaces. Allow the garment to dry fully before removing the pins.
Care
Follow the washing instructions supplied with the chosen yarn. A large worsted-weight poncho can become heavy when wet, so support the fabric rather than lifting it from one shoulder or point.
Dry flat whenever the fiber requires it. Comb or straighten the fringe with your fingers after washing and trim only if individual strands have shifted significantly.
Conclusion
The floral granny square crochet poncho pattern depends on three measurements: consistent floral squares, a fitted neckline circumference, and accurately aligned front and back increases. Make the upper motifs first, test the complete yoke on the wearer, then extend the body with alternating granny sections and narrow structural stripes. Add fringe only after blocking so its weight does not interfere with shaping. For the next step, crochet and measure one flower square before calculating the rest of the yoke. Save the finished project to Pinterest or share your color arrangement on Instagram with #FloralGrannyPoncho. Would you keep the dusty rose and brown palette shown here, or replace the brown sections with a darker burgundy?









