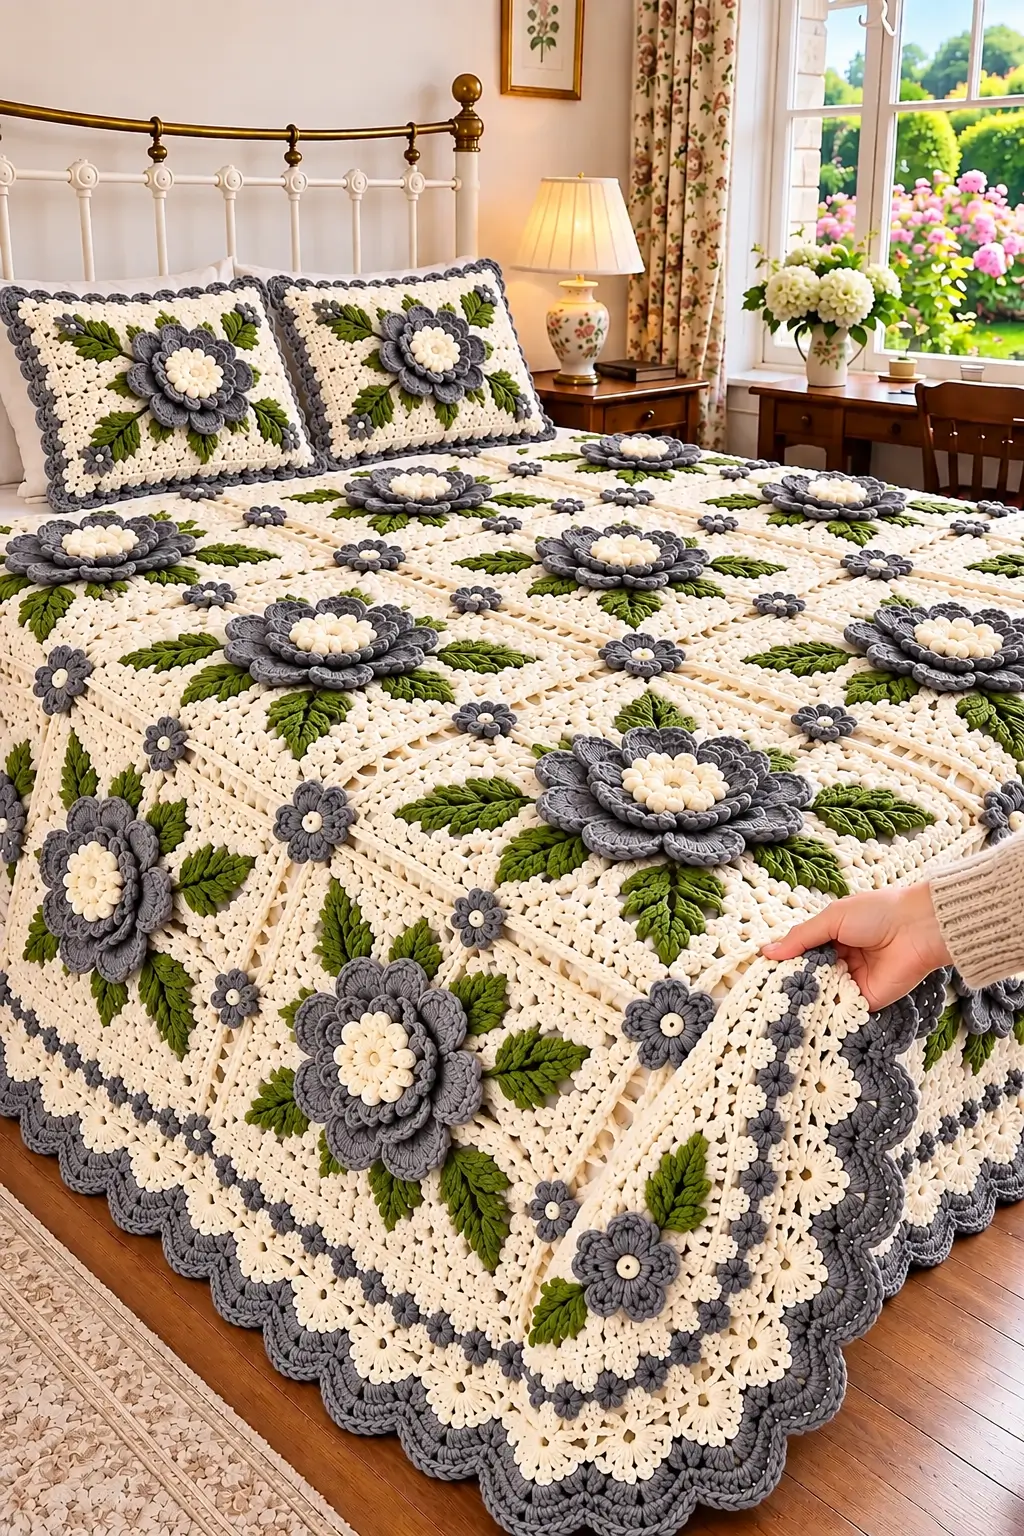
The raised gray flowers on this bedspread need a flat structural base beneath them; otherwise the weight of the petals pulls the cream squares toward their centers. This 3D gray flower crochet bedspread pattern combines large layered flowers, ivory textured centers, green crochet leaves, small connector blossoms, and cream openwork squares. The project is designed for intermediate crocheters and can be resized by changing the number of completed motifs.
The Design: What Makes This Flower Bedspread Different
The bedspread is built around contrast between a relatively flat cream background and heavily raised botanical elements. Each principal square carries one large gray flower with an ivory center. Green leaves extend from the flower toward the corners, visually connecting neighboring motifs without making the joining seams bulky.
Small gray flowers sit near selected intersections. These secondary motifs hide otherwise plain joining points and repeat the charcoal-gray color across the cream background.
The outer border is deliberately broader than the internal square frames. Cream openwork rounds transition into gray scallops, giving the finished bedspread enough visual weight around the perimeter to balance the dimensional flowers. A common construction mistake is attaching the large flowers before joining the squares. Join and block the cream foundation first, then sew on the raised elements.
Project Information at a Glance
| Skill Level | Construction | Target Square Size | Hook | Yarn Weight |
|---|---|---|---|---|
| Intermediate | Modular squares with appliqués | Approx. 20–22 cm | 4.5–5 mm | Worsted #4 |
The dimensions are project targets rather than measurements taken directly from the photograph. Make and block one complete foundation square before calculating the final bedspread dimensions.
Materials and Tools
Yarn
- Warm Ivory/Cream — Worsted #4 — main background, joining, flower centers, and border
- Charcoal Gray — Worsted #4 — large petals, small flowers, and outer border
- Olive Green — Worsted #4 — leaves
- Optional Dark Olive — Worsted #4 — leaf veins and additional definition
Yarn quantities depend heavily on mattress size and the number of dimensional flowers. Weighing a completed master square is more reliable than purchasing yarn from a fixed gram estimate.
Tools
- 4.5–5 mm crochet hook
- Yarn needle
- Scissors
- Stitch markers
- Measuring tape
- Blocking mats
- Rust-resistant blocking pins
Abbreviations
- MR — magic ring
- ch — chain
- sc — single crochet
- hdc — half double crochet
- dc — double crochet
- tr — treble crochet
- sl st — slip stitch
- sp — space
- st/sts — stitch/stitches
- BLO — back loop only
- FLO — front loop only
Gauge and Master Square
Work one complete cream foundation square before making the full set. Block it to approximately 20–22 cm.
The exact stitch gauge is less important than motif consistency. A difference of 1 cm multiplied across eight or ten motifs can substantially distort the final bedspread.
Measure the square horizontally, vertically, and across both diagonals. The two diagonal measurements should remain within approximately 5 mm of each other after blocking.
Part 1: Cream Foundation Square
The dimensional flower is added later. Begin with the structural square.
Round 1
With cream, make an MR.
Ch 3, work 2 dc into the ring, ch 2.
Repeat (3 dc, ch 2) three more times.
Join with sl st.
You now have four granny clusters and four corner spaces.
Round 2
Sl st into the first corner.
Ch 3, 2 dc, ch 2, 3 dc in the same corner.
Ch 1.
In each remaining corner work:
(3 dc, ch 2, 3 dc), ch 1.
Join.
Round 3
Work (3 dc, ch 2, 3 dc) in every corner.
Work 3 dc in each side ch-1 space.
Use ch 1 between granny clusters.
Join.
Round 4
Repeat the established granny-square structure.
Each side now gains another 3-dc group while the four corners remain clearly defined.
Round 5 — Openwork Definition
At each corner work:
(2 dc, ch 3, 2 dc)
Across each side work:
ch 2, skip the next suitable stitch group, sc in the next space.
Repeat across the side, adjusting the final repeat so all four sides contain the same number of open spaces.
Round 6 — Cream Fans
In each ch-2 side space work 3 dc.
At every corner work:
(3 dc, ch 2, 3 dc)
Join.
Round 7 — Structural Round
Ch 1.
Work sc evenly around.
At each corner work:
(sc, ch 2, sc)
Join.
Round 8 — Raised Frame
Work hdc around the square.
At each corner work:
(2 hdc, ch 2, 2 hdc)
Fasten off.
Block the square to the target dimensions before proceeding.
Part 2: Large Ivory Flower Center
The center is made separately so it can sit above the gray petals.
Round 1
With ivory, make an MR.
Work 10 sc into the ring.
Join. (10 sts)
Round 2
Work 2 sc in every stitch around.
Join. (20 sts)
Round 3
Work BLO sc in every stitch.
Join. (20 sts)
Round 4 — Textured Center
Work one small puff or bobble into each alternate stitch, with sc between the textured stitches.
Keep the round slightly cupped rather than stretching it flat.
Round 5
Work sc evenly around the outside edge.
Fasten off, leaving a 25 cm sewing tail.
Part 3: Inner Gray Petal Layer
The photographed flower has substantial depth, so use multiple petal layers rather than one flat daisy round.
With charcoal gray, make an MR.
Foundation Round
Work 12 sc into the ring.
Join. (12 sts)
Petal Round
In the first stitch work:
sl st, ch 5.
Working back along the chain, use graduated stitch heights to form the petal:
sc, hdc, 2 dc.
Anchor the petal into the next foundation stitch.
Repeat around to create 6 compact petals.
Fasten off.
Part 4: Middle Gray Petal Layer
Join gray behind the first petal layer.
Create 8 evenly distributed chain spaces around the foundation.
Use approximately ch 7 for each space.
Into each chain loop work:
sc, hdc, 2 dc, 2 tr, 2 dc, hdc, sc.
Repeat for all 8 petals.
The petals should overlap slightly at their bases while the tips remain separate.
Part 5: Outer Gray Petal Layer
The outer petals produce most of the flower diameter.
Join gray behind the middle layer.
Create 8 evenly spaced ch-9 loops.
Into each loop work:
sc, hdc, 2 dc, 3 tr, 2 dc, hdc, sc.
If the petal curls excessively, increase the loop to ch 10. If it spreads too flat, reduce it to ch 8.
Fasten off.
Shaping the Large Flower
Layer the three gray petal sections with the largest petals underneath.
Rotate each layer slightly so the upper petals fall between the petals below rather than directly on top of them.
Place the ivory center over the middle.
Sew through only the central 3–4 cm of the flower. Do not sew the petal tips to the background.
A finished large flower should measure approximately 13–16 cm across, depending on yarn and tension.
Part 6: Crochet Green Leaves
Make approximately 6–8 leaves for each large floral square, or reduce the number for a cleaner layout.
Leaf Foundation
With olive green, ch 11.
First Side
Starting in the second chain from the hook, work:
sc, hdc, dc, dc, tr, tr, dc, dc, hdc, sc.
Ch 2 at the tip.
Second Side
Working along the opposite side of the foundation chain, mirror the stitch sequence:
sc, hdc, dc, dc, tr, tr, dc, dc, hdc, sc.
Join at the base.
Leaf Definition
Work a loose round of sc around the leaf.
At the tip work:
(sc, ch 2, sc)
Fasten off with a 20 cm tail.
Optional Raised Leaf Vein
Join dark olive at the base of the leaf.
Surface sl st along the original foundation chain toward the tip.
Fasten off.
This creates the raised central vein visible in heavily textured botanical crochet.
Arranging the Leaves
Position the leaves behind the large flower before sewing anything permanently.
A balanced arrangement uses pairs pointing diagonally toward the four corners.
Allow the leaf tips to extend beyond the flower while keeping them at least 2 cm away from the square joining edge.
Sew each leaf through its center vein and base. Leave the outer edges relatively free for stronger dimensional relief.
Attaching the Main Flower
Place the assembled gray flower over the leaf bases.
Center it carefully on the cream square.
Sew around the flower’s central foundation, not around the outer petals.
Check the square from the back. Avoid carrying long sewing strands across open spaces because those strands remain visible through the cream lace.
Part 7: Small Gray Connector Flowers
The image uses small gray blossoms at selected intersections between the larger floral blocks.
Round 1
With cream, make an MR.
Work 6 sc into the ring.
Join.
Round 2
Change to gray.
In each stitch work:
(sl st, ch 3, 2 dc, ch 3, sl st)
Repeat around to create 6 small petals.
Fasten off with a long sewing tail.
Finished diameter should be approximately 4–5 cm.
Making the Required Number of Squares
Once the master square is complete, use its blocked measurement to calculate the bedspread.
If the blocked square measures 21 cm, the approximate foundation dimensions are:
| Layout | Approximate Size Before Border |
|---|---|
| 6 × 8 squares | 126 × 168 cm |
| 7 × 9 squares | 147 × 189 cm |
| 8 × 10 squares | 168 × 210 cm |
| 9 × 11 squares | 189 × 231 cm |
| 10 × 12 squares | 210 × 252 cm |
The final border adds additional width and length.
Planning the Floral Layout
You do not need to place a large flower on every square.
For a layout closer to the photographed design, alternate heavily decorated squares with simpler cream sections. This creates breathing space around the raised flowers and reduces the total weight of the bedspread.
One useful repeating layout is:
| Large Flower | Small Connector | Large Flower |
| Small Connector | Large Flower | Small Connector |
| Large Flower | Small Connector | Large Flower |
Repeat or offset the arrangement across the bedspread.
Joining the Foundation Squares
Join all structural squares before attaching the dimensional flowers whenever possible.
Place two squares with the right sides facing upward.
Using cream yarn, work a relaxed sl-stitch join through corresponding edge loops.
Continue across the complete row.
Join all horizontal rows first, then complete the vertical seams.
The joining yarn should never be tighter than the blocked square edge.
Alternative Flat Join
For less visible seams, place the squares with right sides together.
Whipstitch through matching edge loops using cream yarn.
Open the joined squares after every 8–10 cm of stitching to check that the seam lies flat.
This method is useful when the large flowers already provide enough surface texture.
Adding the Flowers After Joining
Lay the joined cream foundation flat.
Mark the planned large-flower positions with removable stitch markers.
Sew on the leaves first.
Add the gray flowers second.
Attach the small connector blossoms last.
This sequence prevents dimensional pieces from becoming trapped inside joining seams.
Outer Cream Border
Border Round 1
Join cream at any outer corner.
Work sc evenly around the entire bedspread.
At each corner work:
(sc, ch 2, sc)
Keep all four sides balanced.
Border Round 2
Work hdc around.
At each corner work:
(2 hdc, ch 2, 2 hdc)
Border Round 3 — Openwork
Work:
sc, ch 3, skip 2 sts
Repeat around.
Adjust the final repeat slightly before each corner rather than forcing an uneven space.
Border Round 4
Work 3 dc into each ch-3 space.
At the corners work enough additional stitches to keep the border flat.
Decorative Gray Border
Change to charcoal gray.
Gray Round 1
Work sc around the complete perimeter.
Gray Round 2
Work hdc in every stitch.
Use additional stitches at the four corners as required for a flat 90-degree turn.
Gray Scallop Round
Work:
skip 2 sts, 6 dc in next st, skip 2 sts, sc in next st.
Repeat around.
Before completing each corner, check the available stitch count. Corners may require a larger 7–9 dc shell to turn without cupping.
Optional Cream Picot Detail
For additional contrast, join cream around the gray scallops.
Work sc across each shell.
At the center of each shell work:
ch 3, sl st into the first chain.
Continue around.
This creates a small cream picot on the gray edge.
Matching Crochet Pillow Sham
The pillow covers in the image repeat the same large flower and leaf arrangement used on the bedspread.
For a decorative pillow approximately 45 × 45 cm, make a front panel from four 21–22 cm foundation squares or create one larger square using additional cream rounds.
Position one large gray flower in the center.
Arrange green leaves diagonally toward the corners.
Add small gray blossoms where needed.
Pillow Back
For a practical removable cover, crochet two overlapping cream rectangles in hdc.
Each rectangle should cover approximately two-thirds of the pillow height.
Overlap the rectangles by 8–12 cm.
Join the front and back panels with sc around the outer edge.
Add a narrow gray scalloped border to coordinate with the bedspread.
Calculating Yarn More Accurately
Because the dimensional flowers use substantially more yarn than a flat granny square, calculate consumption from a completed sample.
Weigh:
- One cream foundation square
- One complete gray flower
- One green leaf
- One small connector flower
Multiply each measurement by the number required for the chosen layout.
Then add the estimated yarn for joining and border.
Add approximately 10–15% to the total for tails, swatching, tension differences, and repairs.
Reducing the Weight
A bedspread covered with three-dimensional flowers can become heavy. There are several ways to reduce total weight without changing the overall appearance.
Use large flowers on alternate squares rather than every square. Place the small connector blossoms between them.
You can also work the cream background in DK #3 yarn while keeping the decorative elements in a compatible light worsted yarn. Test the combination first because different fiber structures can behave differently after washing.
Another option is to reduce the outer gray flower from three petal layers to two.
Alternative Colorways
Dusty Rose Garden
Replace gray with dusty rose and use sage leaves with warm ivory backgrounds.
Blue Botanical
Use denim blue flowers, pale cream centers, and muted eucalyptus-green leaves.
Burgundy Version
Combine burgundy petals, oatmeal centers, forest-green leaves, and cream squares.
Monochrome Version
Work the background, centers, petals, and leaves in shades of ivory, beige, taupe, and warm gray. Texture becomes the primary design element instead of color contrast.
Assembly
- Crochet one cream foundation square, block it, and record its exact finished width and both diagonal measurements.
- Make the required number of cream squares with the same hook and tension.
- Join the foundation squares into rows, then connect the rows to create the complete bedspread base.
- Block the joined foundation before adding dimensional decorations.
- Crochet and position the olive-green leaves, keeping their tips at least 2 cm away from structural seams.
- Assemble each large gray flower from its layered petals and ivory center, then sew it over the leaf bases.
- Make the small gray connector flowers and attach them at selected square intersections.
- Work the cream structural border around the complete bedspread, checking all four corners for flatness.
- Add the charcoal-gray scalloped outer border and any optional cream picot detailing.
- Weave in all remaining tails, complete the final blocking, and allow the bedspread to dry flat before placing it on the bed.
The finished piece should have a flat cream foundation, stable joining lines, raised flowers with free petal edges, clearly shaped green leaves, and an outer border that lies flat without pulling the corners inward.
7 Technical Tips
- Square distortion: block every foundation motif to the same 20–22 cm target before joining. A difference greater than approximately 5 mm becomes increasingly visible across a large grid.
- Flowers pulling the background inward: sew only through the central 3–4 cm of each large flower. Stitching around the outer petals transfers their weight directly to the cream lace and creates puckering.
- Leaves disappearing under the petals: allow approximately one-third to one-half of each leaf to extend beyond the flower. Pin the complete arrangement before sewing the first leaf.
- Uneven flower height: use the same chain-loop length for every petal in a given layer. A difference of even one chain can noticeably change the diameter of an eight-petal round.
- Joining seams becoming shorter than the squares: relaxed slip stitches should match the natural length of the blocked edges. Stop after approximately 10 cm of joining and compare the seam against the unjoined edge.
- Border ruffling: too many stitches are being added around the perimeter. If the first cream border round waves while lying flat, remove stitches before adding decorative shells.
- Gray scallops cupping at the corners: a normal side shell may not contain enough stitches to turn 90 degrees. Increase the corner shell to approximately 7–9 dc and block the test corner before repeating it around the bedspread.
Care and Blocking
Follow the washing instructions for the selected yarn. Large dimensional crochet pieces become substantially heavier when wet, so support the entire bedspread during washing and transfer.
Lay the piece flat and shape the square grid first. Arrange the outer border next.
While the crochet is still damp, lift and separate the gray petal layers with your fingers. Shape the green leaves so their points remain visible around each flower.
Avoid pressing the dimensional flowers under heavy objects. Their relief is an intentional part of the construction.
Conclusion
The 3D gray flower crochet bedspread pattern works best when the decorative elements are treated separately from the structural grid. Begin with one 20–22 cm cream square, block it accurately, and use that measurement to calculate the complete bedspread before producing dozens of motifs. Join and block the background first; then add the green leaves, layered gray flowers, ivory centers, and small connector blossoms. Finish with the broad cream-and-gray border only after checking that the main grid lies flat. Save the layout to Pinterest or share the completed color arrangement on Instagram with #GrayFlowerCrochetBedspread. Would you keep the olive-green leaves shown here, or change them to sage for a softer gray-and-cream palette?









