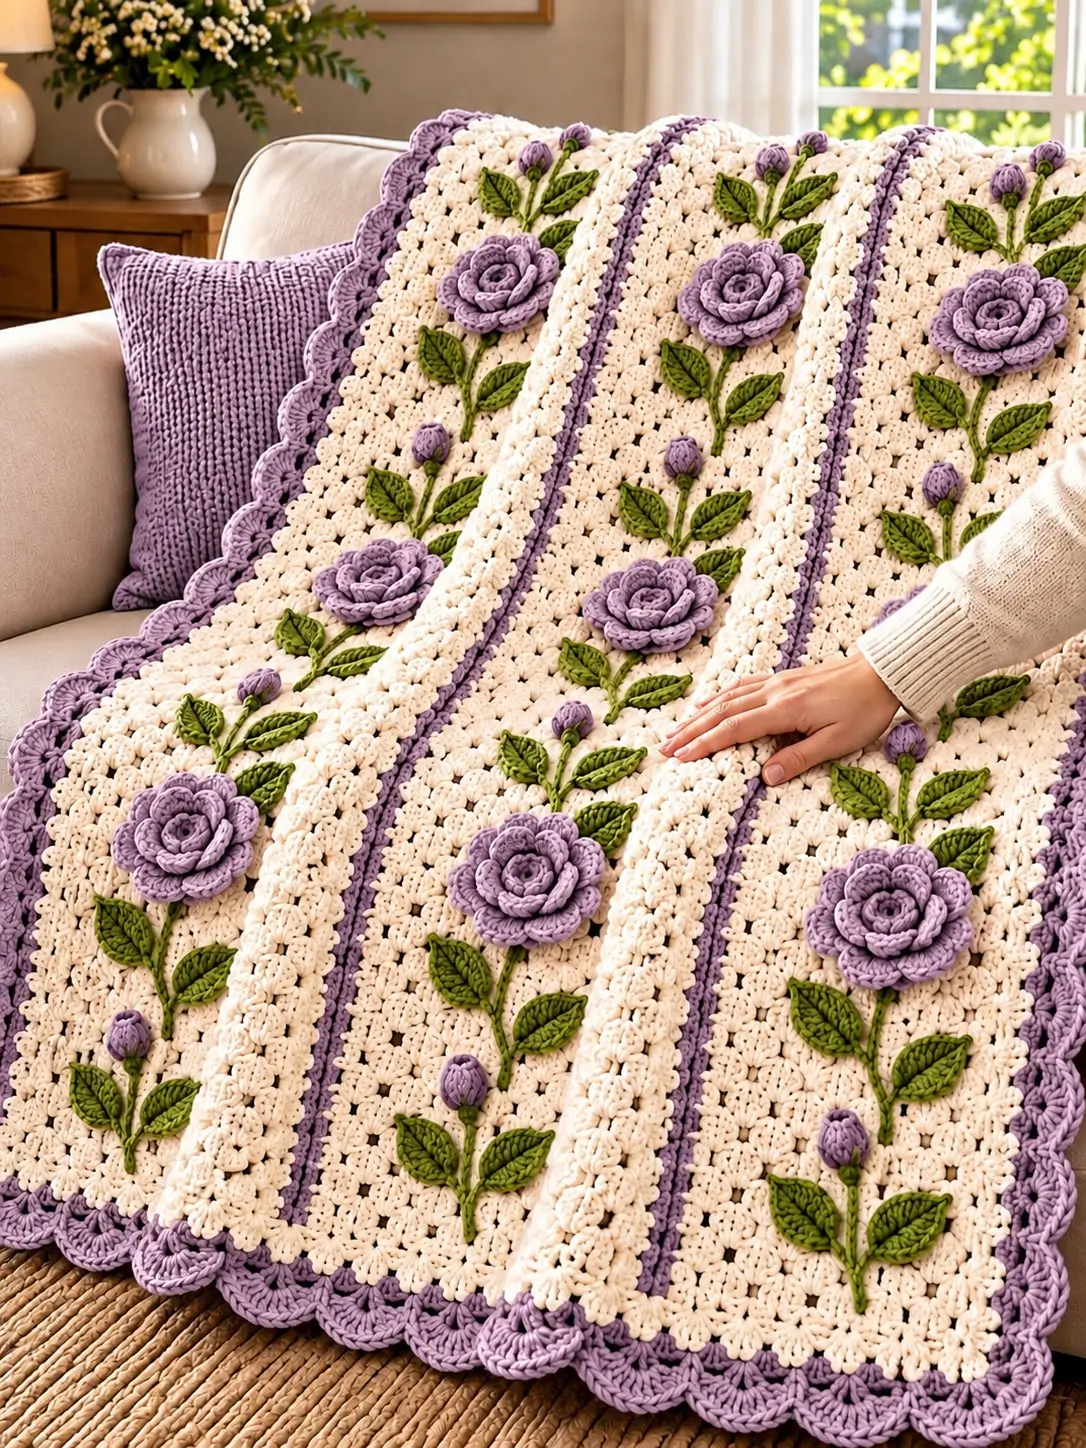
A raised crochet rose needs enough depth to resemble layered petals, but its attachment point must stay compact or the blanket underneath will buckle. This lavender rose crochet blanket pattern uses an ivory textured background, dimensional lavender roses, olive-green leaves, small rosebuds, narrow lavender dividing lines, and a wide scalloped border. The construction below is an original photo-inspired method designed for an intermediate crocheter using worsted-weight yarn and a 5 mm hook.
The Design: What Makes This Floral Blanket Different
The blanket is organized into long ivory panels rather than conventional floral granny squares. Each panel carries a vertical rose vine made from separately crocheted flowers, buds, leaves, and surface stems. Narrow lavender lines separate the panels and repeat the flower color without competing with the appliqués.
The large roses are built in several petal layers. Leaves use a central chain with stitches worked along both sides to create a pointed oval shape. Small closed buds break up the repeated full-size flowers and make each vine appear continuous. The ivory foundation must remain relatively flat because the appliqués already contribute considerable thickness. A common construction error is sewing every petal to the blanket; only the rose base should be secured so the outer petals retain their relief.
Project Information at a Glance
| Skill Level | Construction | Target Size | Hook | Yarn |
|---|---|---|---|---|
| Intermediate | Textured panels with sewn floral appliqués | Approx. 120 × 155 cm | 5 mm | Worsted #4 |
The dimensions and yarn quantities in this pattern are project targets. Measure a finished swatch before calculating yarn for a larger bed-size version.
Materials and Tools
Yarn
- Warm Ivory — Worsted #4 — approximately 1300–1600 g for the main blanket
- Lavender — Worsted #4 — approximately 450–600 g for roses, buds, dividing lines, and border
- Olive Green — Worsted #4 — approximately 300–400 g for leaves and stems
- Dark Olive — optional small quantity for leaf-vein definition
Tools
- 5 mm crochet hook
- 4–4.5 mm hook for firmer appliqués if required
- Yarn needle
- Scissors
- Locking stitch markers
- Measuring tape
- Rustproof pins for positioning the floral vines
Abbreviations
- ch — chain
- sc — single crochet
- hdc — half double crochet
- dc — double crochet
- tr — treble crochet
- sl st — slip stitch
- st/sts — stitch/stitches
- sp — space
- BLO — back loop only
- FLO — front loop only
- RS — right side
- WS — wrong side
Gauge and Planning
Make a minimum 20 × 20 cm ivory swatch using the selected background stitch. Wash or block it according to the yarn label, then measure it without stretching.
The blanket shown in the reference image has several long floral lanes. For a 120 cm wide throw, plan approximately five decorative lanes separated by narrow lavender lines.
A useful starting layout is:
- Ivory floral panel — approximately 20–22 cm
- Lavender divider — approximately 1–2 cm
- Ivory floral panel — approximately 20–22 cm
- Lavender divider — approximately 1–2 cm
Repeat across the required width. Keep both outer ivory sections symmetrical.
Ivory Blanket Foundation
The background should have enough texture to support the roses without becoming visually heavy. A compact cluster pattern works well.
Foundation Chain
Using warm ivory, chain to the required blanket width based on your blocked gauge.
Use an even stitch count plus the turning chains required by your chosen edge treatment.
Row 1
Sc in the second chain from the hook and in each chain across.
Turn.
Row 2
Ch 2.
Hdc in each stitch across.
Turn.
Row 3 — Textured Cluster Row
Ch 1.
Sc in first stitch.
Skip 1 stitch, work (sc, ch 1, sc) in the next stitch.
Repeat across, adjusting the final repeat at the edge if necessary.
Row 4
Ch 2.
Work hdc across, placing stitches consistently into the cluster stitches and spaces so the original stitch count is restored.
Repeat Rows 3–4 until the blanket reaches the required length.
Check the width every 20–25 cm. Dense textured fabric can gradually contract if the chain spaces are pulled too tightly.
Alternative Panel Construction
For more distinct vertical channels, crochet each ivory panel separately and join the panels with lavender.
This construction is particularly useful for a large bedspread because each panel remains manageable while the roses are attached.
Make every ivory panel the same width and length. Block them to identical measurements before joining.
Lavender Divider Strips
The narrow lavender lines in the design visually separate the floral vines.
If the blanket is constructed as separate panels, place two panels with RS facing upward.
Join lavender yarn through corresponding edge stitches.
Work a row of sc through both panel edges, or use a flat slip-stitch join.
For a slightly raised decorative divider, work a second row of surface sl st directly over the joining line.
The finished lavender divider should remain narrow. A strip wider than approximately 2 cm begins to compete with the roses.
Large Lavender Rose
Make enough roses for the planned vines. A sofa-size blanket with five lanes may require approximately 12–18 large flowers depending on spacing.
Rose Center
With lavender, ch 4 and join with sl st to form a ring.
Round 1: Ch 1, work 8 sc into ring. Join with sl st. (8)
Round 2: Ch 1, work 2 sc in each stitch around. Join. (16)
Inner Petals
Work in FLO.
Round 3: *Sl st in next stitch, 5 dc in next stitch.* Repeat around.
This produces eight compact inner petal sections.
Allow the petals to cup upward rather than flattening them.
Middle Petal Foundation
Turn the flower to access the unused loops behind the first petal layer.
Join lavender.
*Sl st around the next available back loop or post, ch 4.* Repeat evenly around to form eight arches.
Middle Petals
Into each ch-4 arch work:
(sc, hdc, 4 dc, hdc, sc)
Repeat in every arch.
Outer Petal Foundation
Work behind the middle petals.
Create eight larger arches using ch 6, anchoring each arch evenly around the flower base.
Outer Petals
Into each ch-6 arch work:
(sc, hdc, 2 dc, 3 tr, 2 dc, hdc, sc)
Repeat around.
Fasten off, leaving a 30–35 cm sewing tail.
Optional Fourth Rose Layer
For a larger flower closer to the oversized roses in the photograph, add one more foundation layer behind the outer petals.
Create eight ch-8 arches.
Into each arch work:
(sc, hdc, 2 dc, 4 tr, 2 dc, hdc, sc)
The completed rose should measure approximately 10–13 cm across, depending on yarn and tension.
Small Lavender Rosebud
The buds are intentionally compact and should remain narrower than the leaves surrounding them.
Bud Base
Ch 12.
Starting in the second chain from the hook, work:
2 hdc in each chain across.
The strip will curl naturally.
Roll it tightly from one end to form a small rosebud.
Use the yarn tail to stitch through the bottom several times.
Do not sew through the upper loops; the top should remain rounded.
Green Bud Base
With olive green, join around the lower edge of the rolled bud.
Work 5–6 sc evenly around the base.
For small sepals, repeat:
Ch 3, sl st in second chain, sc in next chain, sl st into next base stitch.
Fasten off.
Olive Crochet Leaf
Make leaves in pairs and individual pieces. Slight differences in size prevent the vines from looking mechanically repeated.
Medium Leaf
With olive green, ch 10.
Starting in the second chain from the hook work:
sc, hdc, dc, 2 dc, tr, 2 dc, dc, hdc.
Work 3 sc into the final chain to turn around the tip.
Continue along the opposite side of the foundation chain:
hdc, dc, 2 dc, tr, 2 dc, dc, hdc, sc.
Join with sl st.
Leaf Edging
Work sc around the leaf.
At the tip work:
(sc, ch 2, sl st in second chain, sc)
This creates a defined point.
Fasten off, leaving a sewing tail.
Small Leaf
Ch 8.
Starting in the second chain work:
sc, hdc, dc, tr, dc, hdc, sc.
Work 3 sc into the final chain and repeat the stitch-height sequence along the opposite side.
Finish with the same pointed edging used for the medium leaf.
Raised Leaf Vein
Use dark olive or the main olive shade.
Insert the hook at the leaf base and work surface slip stitches along the original foundation chain toward the tip.
Keep the surface stitches loose. A tight vein will fold the leaf lengthwise.
For additional detail, embroider one short diagonal vein toward each side of the leaf.
Crochet Vine Stem
The green stems can be crocheted separately or added directly to the finished ivory blanket.
Separate Stem Method
Chain to the required distance between a flower and the next bud.
Starting in the second chain, sl st back across the chain.
Fasten off with long sewing tails.
This creates a narrow cord that can curve naturally during assembly.
Surface Crochet Method
Position the roses, buds, and leaves first.
Remove everything except the pins marking the vine path.
With olive yarn on the WS, bring a loop through the fabric and work surface slip stitches along the marked line.
Keep every stitch relaxed so the blanket remains flat.
Building One Complete Rose Vine
Lay the blanket flat with the RS facing upward.
Position one large lavender rose approximately 12–15 cm from the beginning of the decorative area.
Extend a green stem vertically from the flower.
Place one pair of leaves approximately 4–6 cm above or below the flower.
Add a lavender bud farther along the stem.
Place another pair of leaves below the bud.
Continue toward the next large rose.
A useful repeat is:
Large rose → leaf pair → bud → leaf pair → large rose.
Reverse some leaf directions on neighboring vines so the blanket does not look identical from column to column.
Spacing the Floral Columns
Keep the rose centers aligned within each long panel, but offset the flowers between neighboring panels.
For example:
- Panel 1 — first rose high
- Panel 2 — first rose lower
- Panel 3 — first rose high
- Panel 4 — first rose lower
- Panel 5 — first rose high
This staggered arrangement gives the floral surface more movement while preserving a controlled repeat.
Attaching the Roses
Pin each flower before sewing.
Thread the long lavender tail onto a yarn needle.
Sew only through the compact circular base of the rose and the ivory blanket underneath.
Make several small stitches around the base.
Do not stitch the outer 2–3 cm of the petals to the blanket.
The petals should remain free enough to overlap and cast visible shadows.
Attaching the Leaves
Position each leaf with its pointed end angled away from the stem.
Sew along the center vein from the base toward the tip.
Add one small anchoring stitch near each side if the leaf curls excessively.
Leave most of the outer leaf edge unattached. This preserves the raised botanical appearance.
Attaching the Rosebuds
Place each bud directly above a stem section.
Sew through the green base and the lowest part of the lavender bud.
Keep the rounded upper section free.
Check that the bud points upward or slightly outward rather than hanging sideways.
Ivory Raised Divider Texture
The photograph also suggests raised ivory lines bordering the floral lanes. Add these after the main background is complete.
Work surface slip stitches along a straight vertical line approximately 1–2 cm from each lavender divider.
For a thicker ridge, work a second line directly beside the first.
Another option is surface hdc, but test it first because taller stitches can make the blanket noticeably heavier.
Lavender Inner Border
Once all floral components are attached, add the border.
Join lavender in one corner.
Round 1
Sc evenly around the entire blanket.
At each corner work:
(sc, ch 2, sc)
Join with sl st.
Round 2
Ch 1.
Sc in every stitch around.
Work (sc, ch 2, sc) into each corner space.
Join.
Wide Lavender Scalloped Border
The outer edge uses large rounded shells that repeat the curved rose petals.
Scallop Foundation
Switch to lavender if the previous structural round was worked in ivory.
Work:
*Sc in next stitch, skip 2 stitches, 7 dc in next stitch, skip 2 stitches.*
Repeat around.
At the corners, use a larger shell of 9 dc if necessary to turn the corner without pulling.
Final Scallop Round
Work sc across each shell.
At the center stitch of each shell work:
(sc, ch 2, sc)
This adds a small point while retaining the rounded border profile.
Join with sl st and fasten off.
Optional Ivory Accent on the Border
For a lighter outline, join ivory and work surface slip stitches immediately inside the lavender scalloped border.
Keep the accent narrow. The roses should remain the strongest lavender elements in the design.
Suggested Blanket Sizes
| Project | Target Size | Suggested Floral Lanes |
|---|---|---|
| Baby Blanket | 75 × 95 cm | 3 |
| Lap Blanket | 90 × 120 cm | 3–4 |
| Sofa Throw | 120 × 155 cm | 5 |
| Large Throw | 140 × 175 cm | 5–6 |
| Bedspread | 170 × 210 cm or larger | 7–8 |
Estimating Yarn for a Larger Blanket
Complete one full background swatch and at least one rose, two leaves, one bud, and a sample section of border.
Weigh each component separately.
For example, if one large rose weighs 28 g and the planned blanket uses 15 roses:
28 × 15 = 420 g of lavender yarn for the large roses alone.
Add the weight required for buds, dividing lines, and the scalloped border before calculating the total lavender quantity.
Use the same method for green leaves. This is more reliable than estimating floral-appliqué yarn from blanket area.
Matching Lavender Rose Cushion
The same construction can be adapted to a coordinating cushion.
Crochet an ivory panel approximately 45 × 45 cm.
Position one large lavender rose in the center.
Add a vertical olive stem with two or three leaf pairs and one small bud.
Work a narrow lavender inner round and finish with the same scalloped border used on the blanket.
For the back, use two overlapping ivory hdc panels or a single solid panel with a removable closure.
Alternative Color Combinations
The structure can be retained while changing the floral palette.
- Dusty Rose + Cream + Sage — soft botanical version
- Burgundy + Ivory + Forest Green — high-contrast floral version
- Powder Blue + Cream + Olive — cooler palette
- Terracotta + Oatmeal + Moss — autumn version
- White + Pale Pink + Sage — light spring version
Assembly
- Crochet the complete ivory blanket foundation or make equal ivory panels and block them to matching dimensions.
- Add the narrow lavender panel dividers, keeping every joining line the same width.
- Mark the centerline of each floral lane with removable stitch markers.
- Crochet all large lavender roses and arrange them in staggered positions before sewing any flower permanently.
- Make the rosebuds and place them between the large flowers, leaving approximately 8–15 cm according to the scale of the blanket.
- Crochet the olive leaves, add their raised veins, and arrange them in balanced pairs around the stems.
- Add the olive stems with surface crochet or separately crocheted cords, then sew the rose bases, buds, and leaf centers in place.
- Work any raised ivory divider lines and inspect the blanket from several feet away to correct uneven floral spacing.
- Add the structural border followed by the wide lavender scallops, adjusting shell spacing at the corners if the edge begins to wave.
- Weave every tail into dense sections on the WS, reshape the blanket to its target measurements, and allow all appliqués to dry completely after blocking.
The completed blanket should have a flat ivory foundation, evenly spaced lavender floral vines, free outer rose petals, defined olive leaves, and a scalloped edge that lies flat.
7 Technical Tips
- Rose centers become bulky: do not sew through every petal layer when attaching a flower. Secure only a central area approximately 3–4 cm across so the blanket does not develop a hard knot beneath each rose.
- Outer petals collapse: leave the final 2–3 cm of each large petal unattached. Sewing the full petal perimeter removes the layered relief visible in the floral design.
- Leaves twist after sewing: attach each leaf first along its center vein. Add no more than one small anchoring stitch on either side unless the edge lifts excessively.
- Surface stems pucker the background: the olive slip stitches are too tight. After every 10 cm of stem, lay the blanket flat and check that the fabric beneath it remains at its original length.
- Floral columns drift sideways: mark each panel center before positioning appliqués. Keep every rose center within approximately 1 cm of that reference line unless an intentional offset is planned.
- The scalloped border ruffles: too many shells have been forced into the foundation round. Remove one shell from the affected section and redistribute the remaining repeats before continuing.
- The finished blanket becomes excessively heavy: weigh one complete rose-and-leaf repeat before making the full set. Multiplying that weight by the planned number of repeats gives an early estimate of how much mass the appliqués will add.
Care and Finishing
Follow the washing instructions for the selected yarn. A large floral blanket should be supported when wet because the appliqués increase its weight.
For blocking, lay the blanket flat and correct the rectangular foundation first. Arrange each rose with the outer petals overlapping naturally, then straighten the stems and shape the leaf points.
Avoid pressing the flowers flat. If the yarn permits steaming, hold the steam source above the crochet rather than placing an iron directly against the raised petals.
Check the reverse side after the blanket dries. Trim no tails until every sewn component has been tested with a gentle pull.
Conclusion
This lavender rose crochet blanket pattern separates the structural blanket from the dimensional decoration, allowing the ivory background to remain flat while the roses, leaves, and buds retain substantial relief. Make one complete floral repeat before producing the remaining appliqués; it provides a reliable check for flower diameter, leaf scale, spacing, and yarn consumption. Position all roses before permanently sewing them, then add the stems and leaves around the established flower locations. Finish with the lavender scalloped border and reshape the outer edge after washing. Save the project to Pinterest or share your finished version on Instagram with #LavenderRoseCrochetBlanket. Would you arrange every rose in lavender, or alternate lavender and ivory flowers between the vines?









