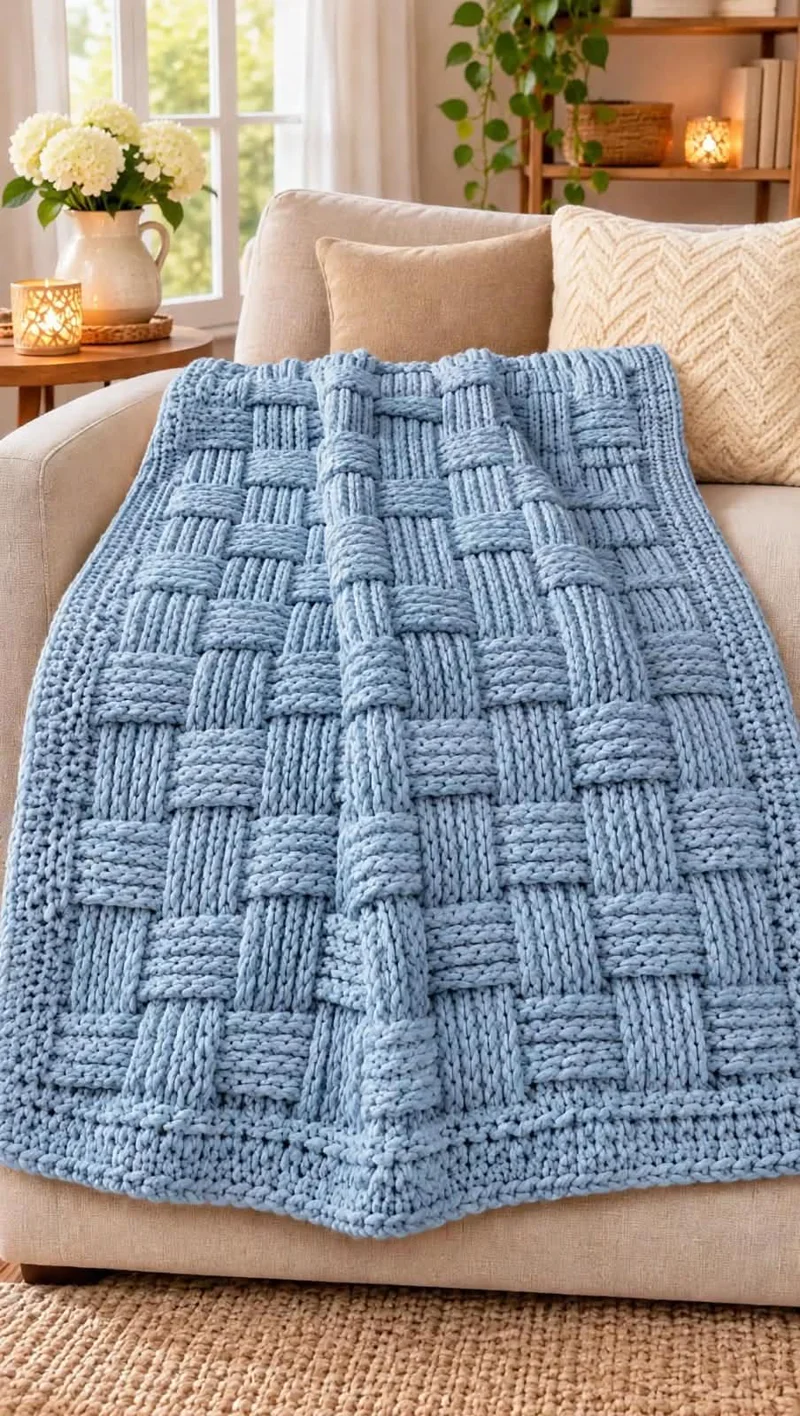
A basketweave blanket gets its distinctive surface from alternating raised and recessed crochet stitches. This free basketweave crochet blanket pattern uses chunky blue yarn, front post double crochet, and back post double crochet to produce a thick woven texture. The proposed throw measures approximately 120 × 150 cm (47 × 59 inches), including its border. It is an intermediate-level project suitable for a sofa throw or textured home accessory.
The Design: What Makes This Basketweave Blanket Different
The blue blanket shown in the reference photograph features large rectangular blocks arranged to imitate interlaced strips of fabric. Some blocks appear vertical, while their neighbors run horizontally. The pronounced relief is the defining structural feature.
This chunky crochet blanket pattern recreates that effect through groups of front post and back post double crochet stitches. Each group contains six stitches, and the stitch orientation changes after six rows. The resulting squares form a continuous basketweave grid.
A second design decision concerns the border. A flat, closely worked crochet edging stabilizes the sides and frames the raised center without adding another competing texture.
The most common problem with a basketweave crochet throw is accidental stitch loss at the edges. Keeping one ordinary double crochet at each end of every row makes the stitch count easier to control. The final result is a substantial, textured blanket with a structured rectangular outline.
Project Information at a Glance
| Project | Basketweave crochet throw |
|---|---|
| Skill Level | Intermediate |
| Estimated Time | 20–35 hours |
| Target Size | 120 × 150 cm / 47 × 59 inches |
| Yarn Weight | Super bulky / Category 6 |
| Suggested Hook | 9 mm |
| Construction | Worked flat in turned rows |
| Terminology | US crochet terms |
| Best For | Sofa throws and textured blankets |
These are proposed project specifications, not measurements taken from the photographed blanket. Finished dimensions and yarn requirements depend on gauge.
Materials and Tools
Yarn
Main color: Dusty blue or powder blue.
- Yarn weight: Super bulky, Category 6.
- Suggested yarn: Bernat Blanket or a similar soft, bulky blanket yarn.
- Estimated quantity: 2,400–3,000 g, depending on gauge and border size.
- Recommended purchase: Approximately 8–10 balls of 300 g yarn, subject to a swatch-based calculation.
- Accent yarn: None required.
Choose yarn from the same dye lot whenever possible. A single-color blanket makes changes in stitch direction easier to see and keeps the raised blocks visually consistent.
Tools
- 9 mm crochet hook, or the size needed for your gauge.
- Large-eye yarn needle for weaving in ends.
- Locking stitch markers for marking edge stitches.
- Measuring tape for checking width and length.
- Scissors for cutting yarn.
- Row counter for tracking six-row texture blocks.
Abbreviations
| Abbreviation | Meaning |
|---|---|
| ch | Chain |
| sc | Single crochet |
| dc | Double crochet |
| FPdc | Front post double crochet |
| BPdc | Back post double crochet |
| sl st | Slip stitch |
| st / sts | Stitch / stitches |
| RS | Right side |
| WS | Wrong side |
| rep | Repeat |
Understanding the Basketweave Crochet Stitch
The basketweave stitch is built around two raised-stitch techniques. Both are variations of the standard double crochet, but the hook passes around the vertical post of the stitch below instead of through its top loops.
Front Post Double Crochet (FPdc)
- Yarn over once.
- Insert the hook from front to back and then to the front again around the post of the next stitch.
- Yarn over and pull up a loop.
- Yarn over and pull through two loops.
- Yarn over and pull through the remaining two loops.
This places the stitch post toward the front of the fabric and produces a raised vertical ridge.
Back Post Double Crochet (BPdc)
- Yarn over once.
- Insert the hook from back to front and then to the back again around the post of the next stitch.
- Yarn over and pull up a loop.
- Yarn over and pull through two loops.
- Yarn over and pull through the remaining two loops.
This moves the stitch post toward the back of the fabric, creating the recessed section beside a raised group.
Alternating groups of FPdc and BPdc produces the woven appearance. Switching their positions after a fixed number of rows changes the direction of the visible blocks.
Gauge and Size Planning
Before making the full blanket, crochet a basketweave sample measuring at least 20 × 20 cm. Use the intended yarn and hook, then measure the central 10 cm after the fabric has relaxed.
For the written example below, the planning gauge is approximately 8 stitches and 5 rows per 10 cm in the basketweave pattern. This is a reference gauge, not a confirmed gauge for the photograph.
The foundation creates 98 stitches across, including two edge stitches. At the planning gauge, the center panel measures approximately 122.5 cm wide before any changes caused by the border. To obtain a finished width closer to 120 cm, adjust the hook size or choose a smaller foundation after measuring your sample.
The pattern uses a multiple of 12 textured stitches, plus two edge stitches. To change the width, add or subtract 12 textured stitches at a time. Each adjustment adds or removes two complete six-stitch blocks.
Free Basketweave Crochet Blanket Pattern
Construction: Work the blanket flat in rows, turning after every row. The first chain two of each textured row does not count as a stitch.
Stitch count: 98 stitches throughout the blanket body: one plain double crochet at each edge and 96 post stitches between them.
Step 1: Foundation Chain
Using the dusty blue yarn and a 9 mm hook, chain 100.
Row 1: Work 1 dc in the third chain from the hook and 1 dc in every remaining chain. Turn. (98 sts)
This first row creates the vertical posts needed for the basketweave stitches.
Place a stitch marker in the first and last stitch. These two positions remain the plain edge stitches throughout the main panel.
Step 2: First Basketweave Section
Row 2: Ch 2, turn. Dc in the first stitch. *FPdc around each of the next 6 stitches, BPdc around each of the following 6 stitches.* Repeat from * to * 8 times in total. Dc in the final stitch. (98 sts)
Row 3: Ch 2, turn. Dc in the first stitch. *BPdc around each of the next 6 stitches, FPdc around each of the following 6 stitches.* Repeat 8 times. Dc in the final stitch. (98 sts)
Row 4: Repeat Row 2. (98 sts)
Row 5: Repeat Row 3. (98 sts)
Row 6: Repeat Row 2. (98 sts)
Row 7: Repeat Row 3. (98 sts)
The first six-row texture section is complete. Its groups alternate between raised and recessed stitches, with each group measuring six stitches wide.
Step 3: Reverse the Basketweave Blocks
For the next six rows, reverse the stitch groups relative to the first section. This creates the visual impression of woven strips crossing over and under one another.
Row 8: Ch 2, turn. Dc in the first stitch. *BPdc in the next 6 stitches, FPdc in the following 6 stitches.* Repeat 8 times. Dc in the final stitch. (98 sts)
Row 9: Ch 2, turn. Dc in the first stitch. *FPdc in the next 6 stitches, BPdc in the following 6 stitches.* Repeat 8 times. Dc in the final stitch. (98 sts)
Row 10: Repeat Row 8. (98 sts)
Row 11: Repeat Row 9. (98 sts)
Row 12: Repeat Row 8. (98 sts)
Row 13: Repeat Row 9. (98 sts)
At this stage, the fabric contains two horizontal sections with opposing stitch orientations.
Step 4: Continue the Full Blanket
Repeat Rows 2–13, maintaining the same 98-stitch count in every row.
Each 12-row repeat contains two six-row basketweave sections. Their alternating stitch orientation forms the complete woven grid.
Continue until the main panel measures approximately 140–145 cm in length, or until it reaches your preferred size before adding the border.
For a symmetrical finish, stop after a complete six-row texture section. The number of rows needed will vary with yarn thickness, hook size, and individual tension.
Measure the blanket while it lies flat. Avoid stretching the fabric when checking its length because raised post stitches can expand under tension.
How to Crochet the Blanket Border
The reference blanket has a substantial border surrounding the textured center. A simple single crochet edging provides a practical interpretation while keeping the raised basketweave blocks as the main design element.
Border Round 1: Foundation Edging
After completing the final basketweave row, do not fasten off.
- Ch 1.
- Work single crochet stitches evenly along the top edge.
- At the first corner, work (sc, ch 2, sc).
- Continue down the side, placing stitches evenly into the row ends.
- Work (sc, ch 2, sc) at the next corner.
- Single crochet across the foundation edge.
- Repeat the corner treatment and continue up the remaining side.
- Complete the final corner and join with a slip stitch.
As a starting point, use approximately two single crochet stitches for each double crochet row end. Adjust the spacing to keep the edge flat. If the border waves, remove some stitches; if it pulls inward, add stitches.
Border Round 2: Structured Edge
Ch 1. Work one single crochet into every stitch around the blanket.
At each corner chain-two space, work (sc, ch 2, sc).
Join to the first stitch with a slip stitch.
Border Round 3: Final Frame
Repeat Border Round 2.
For a wider frame, continue adding rounds until the edging reaches the desired depth. Keep the same corner increases to prevent the border from tightening.
Fasten off, leaving a yarn tail approximately 15 cm long.
Finishing and Shaping
- Lay the blanket on a clean, flat surface.
- Check that the basketweave blocks remain aligned.
- Inspect all four corners for excess fabric or pulling.
- Measure the finished width at the top, middle, and bottom.
- Measure the length along both sides.
- Use a yarn needle to weave each loose tail through several neighboring stitches.
- Reverse the direction of the needle and weave the tail back through another section.
- Trim the remaining ends without cutting the working stitches.
- Shape the blanket gently according to the yarn manufacturer’s care instructions.
- Allow the fabric to rest flat before folding or using it.
The completed blanket has a repeating basketweave center and a continuous crochet border.
7 Technical Tips for a Better Basketweave Blanket
- Mark both edge stitches. Losing one edge stitch changes the row count from 98 to 97 and can gradually narrow the blanket.
- Track each six-row section. Changing the stitch orientation after five or seven rows instead of six creates an uneven basketweave block.
- Control post-stitch tension. Pulling FPdc stitches too tightly compresses the raised columns and makes the blanket narrower than the gauge sample.
- Measure the center panel before adding the border. A border that adds 3 cm on every side increases both finished dimensions by approximately 6 cm.
- Check the foundation chain for twisting. A twisted starting chain can distort the lower edge before the textured rows begin.
- Test the border stitch spacing. Too many single crochet stitches along the sides produce waves, while too few pull the corners inward.
- Secure every yarn tail. Weave tails at least 10–15 cm through the fabric, changing direction to reduce the chance of loose ends appearing after washing.
Common Basketweave Crochet Problems and Solutions
Why Are My Basketweave Blocks Uneven?
Uneven blocks usually result from inconsistent post-stitch placement, changes in yarn tension, or incorrect row tracking.
Count the stitches within every group. Each raised or recessed group should contain exactly six post stitches. Check the row counter before reversing the stitch orientation.
Why Is My Blanket Curling at the Edges?
Basketweave crochet produces a dense fabric with raised stitches that can pull against one another. Curling may occur when the foundation chain is too tight or when the border contains too few stitches.
Try a larger hook for the foundation chain and maintain consistent tension throughout the main panel. A balanced single crochet border can help stabilize the perimeter.
Why Does the Blanket Feel Too Stiff?
A hook that is too small for the chosen yarn can produce an unusually dense fabric. The basketweave structure already uses more yarn and creates greater thickness than ordinary double crochet.
Make a second gauge sample using a hook 1 mm larger. Compare flexibility, stitch definition, and overall width before choosing the final hook.
Can I Use Velvet or Chenille Yarn?
Yes. Velvet and chenille-style blanket yarns can create a pronounced textured surface, although the stitch definition depends on the pile and thickness.
Work a sample first because plush yarn can conceal the stitch posts. Use a stitch marker at both ends of every row and count the six-stitch groups regularly.
How to Adjust the Blanket Size
The written pattern uses 96 textured stitches plus two edge stitches. Its basketweave repeat contains 12 stitches.
| Foundation Chain | Stitches in Row 1 | Textured Groups |
|---|---|---|
| 76 chains | 74 stitches | 12 groups of 6 |
| 88 chains | 86 stitches | 14 groups of 6 |
| 100 chains | 98 stitches | 16 groups of 6 |
| 112 chains | 110 stitches | 18 groups of 6 |
| 124 chains | 122 stitches | 20 groups of 6 |
These stitch counts are calculated from the written repeat. They are not fixed blanket dimensions. Your gauge determines the actual width.
For a smaller lap blanket, reduce the number of foundation chains and stop at a shorter length. For a larger bed throw, increase the foundation in increments of 12 chains and repeat the texture sections until the required length is reached.
Washing and Caring for a Chunky Crochet Blanket
Always follow the washing instructions printed on the yarn label. Many polyester blanket yarns are machine washable, but their temperature limits and drying instructions differ.
A large wet blanket can become heavy. Support the entire fabric when transferring it from the washing machine rather than lifting it by one corner.
Dry the blanket according to the yarn manufacturer’s instructions. If flat drying is recommended, spread the blanket evenly and reshape the border while it is damp.
Avoid high heat unless the yarn label explicitly permits it. Excessive heat can damage synthetic fibers and alter the appearance of the raised stitches.
Frequently Asked Questions
Is the basketweave crochet stitch difficult?
The stitch is best suited to crocheters who already know double crochet and can work around stitch posts. Once the front post and back post techniques are familiar, the blanket follows a repeating sequence.
How much yarn does a chunky basketweave blanket need?
For the proposed throw, allow approximately 2,400–3,000 g of super bulky yarn as an initial estimate. The actual amount depends on the yarn’s length per ball, the stitch gauge, and the finished dimensions. A weighed sample provides a more reliable estimate.
Is basketweave crochet reversible?
Basketweave crochet creates texture on both sides. The raised and recessed areas exchange visual roles when the fabric is turned over, so the two faces may not look completely identical.
Can I make this blanket with worsted weight yarn?
Yes, but a smaller hook and more foundation stitches will be necessary to reach the same dimensions. Make a new gauge sample and calculate the width using the 12-stitch pattern repeat.
Does basketweave crochet use more yarn than regular double crochet?
Generally, yes. Working around the posts increases the yarn path and creates a denser fabric. Yarn consumption should be calculated from a basketweave sample rather than a plain double crochet sample.
Conclusion
This basketweave crochet blanket pattern uses a repeating arrangement of six front post and six back post double crochet stitches to produce a structured woven surface. The main panel is worked flat, with two plain edge stitches helping maintain a consistent width. A single crochet border completes the rectangular shape.
Before beginning the full-size blanket, crochet and measure a sample using your selected yarn and hook. Record the gauge, estimate the yarn quantity, and adjust the foundation chain if necessary.
Share your completed blue blanket on Pinterest or Instagram using #BlueBasketweaveBlanket. Would you keep the six-stitch blocks shown here, or make the woven squares larger?









