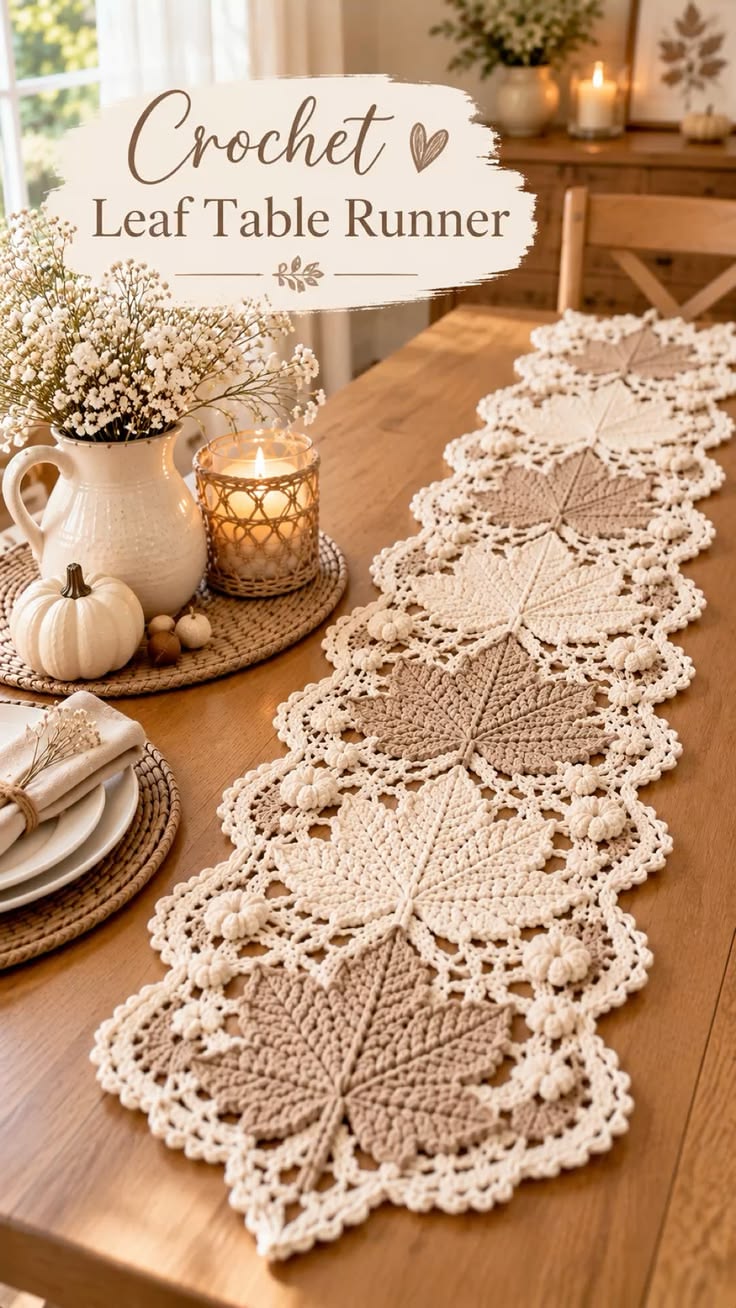
Five pointed maple leaves create the entire rhythm of this table runner, so their center veins must stay aligned from one motif to the next. This crochet maple leaf table runner pattern combines large cream and taupe leaves with an open cream lace framework, small dimensional accents, and a scalloped perimeter. The construction is modular, making the finished length easy to adjust for dining tables, consoles, or seasonal displays.
The Design: What Makes This Leaf Table Runner Different
The runner is built around individual maple-leaf motifs rather than a conventional rectangular stitch pattern. Each leaf has five defined lobes, a raised central vein, and smaller side veins that help the motif hold its shape after blocking.
Cream and warm taupe leaves alternate along the center line. An open chain-space framework surrounds each motif and connects it to the next leaf without hiding the pointed silhouette. Small dimensional bobble-style accents fill selected spaces near the sides, while a cream scalloped border creates one continuous outline around the completed runner.
The main construction problem is width control. Maple leaves naturally spread at their side lobes, so every motif should be blocked to the same width before the lace connectors are added.
Project Information at a Glance
| Skill Level | Construction | Leaf Size | Suggested Hook | Best For |
|---|---|---|---|---|
| Intermediate | Separate leaf motifs with lace joining | Approximately 18–22 cm | 3.5–4.0 mm | Dining tables, consoles and seasonal decor |
Materials and Tools
Yarn
- Warm Cream — DK #3 or light worsted #4 cotton or cotton blend — leaves, lace framework and border
- Warm Taupe — DK #3 or light worsted #4 — alternating maple leaves
- Optional Beige — small quantity for additional dimensional accents
Use yarns of equal thickness for both leaf colors. A firm cotton or cotton-blend yarn gives the points and raised veins more definition than a very soft, loosely spun fiber.
Tools
- 3.5–4.0 mm crochet hook
- Yarn needle
- Scissors
- Stitch markers
- Measuring tape
- Blocking mats
- Rust-resistant pins
Abbreviations
- MR — magic ring
- ch — chain
- sc — single crochet
- hdc — half double crochet
- dc — double crochet
- tr — treble crochet
- dtr — double treble crochet
- sl st — slip stitch
- sp — space
- st/sts — stitch/stitches
- RS — right side
Pattern Construction
Make the maple leaves separately, block them, arrange them in one long line, and then connect them with the cream lace framework. Work the dimensional side accents after the main joining structure is stable. Finish with several openwork rounds and a scalloped outer edge.
The instructions below create a photo-inspired maple leaf rather than attempting to duplicate every stitch visible in the reference image.
Maple Leaf Motif
Make the required number of leaves, alternating cream and taupe.
Center Foundation
Make an MR.
Round 1: Work 10 sc into MR. Join with sl st. (10)
Round 2: Ch 1. Work 2 sc in each st around. Join. (20)
The second round forms the compact center from which the five lobes extend.
Center Lobe
Join yarn at the upper center of the motif.
Ch 15.
Beginning in the second chain from the hook, work along one side of the chain:
1 sc, 1 hdc, 2 dc, 3 tr, 2 dc, 2 hdc, 2 sc.
Work (sc, ch 2, sc) into the final chain to form the pointed tip.
Rotate the foundation chain and work down the opposite side, mirroring the stitch heights:
2 sc, 2 hdc, 2 dc, 3 tr, 2 dc, 1 hdc, 1 sc.
Sl st into the center foundation.
The center lobe should be the longest section of the leaf.
Upper Side Lobes
Make two, one on each side of the center lobe.
Join approximately two stitches away from the center lobe attachment.
Ch 12.
Beginning in the second chain from the hook, work:
sc, hdc, 2 dc, 3 tr, 2 dc, hdc.
At the tip work:
(sc, ch 2, sc).
Work back along the opposite side using corresponding stitch heights.
Attach to the center foundation with sl st.
Repeat on the opposite side.
Lower Side Lobes
Make two.
Join below an upper lobe.
Ch 9.
Beginning in the second chain from the hook, work:
sc, hdc, 2 dc, 2 tr, dc.
Work (sc, ch 2, sc) at the point.
Return along the opposite side with mirrored stitch heights.
Sl st into the foundation.
Repeat for the second lower lobe.
Leaf Stem
Join yarn at the bottom center of the leaf.
Ch 9–12 depending on the desired stem length.
Starting in the second chain from the hook, sl st loosely along the chain.
For a thicker stem, work sc along one side instead, place 2 sc into the final chain, then sc back along the opposite side.
Fasten off.
Outer Leaf Edging
Join the same leaf color near the base.
Work sc evenly around the complete outline.
At each major lobe tip work:
(sc, ch 2, sc).
At shallow valleys between lobes, use a sl st or skip one edge position if necessary. This draws the valley inward and makes the five points more distinct.
Continue around all lobes and return to the starting point.
Fasten off.
Raised Center Vein
The visible vein is an important part of the leaf design.
With the leaf lying RS up, join yarn at the stem base.
Surface sl st from the base through the center of the motif and toward the point of the longest lobe.
Keep these stitches loose enough that the leaf remains flat.
Fasten off at the tip.
Side Veins
Join yarn along the central vein approximately one-third of the way above the base.
Surface sl st diagonally toward the lower side lobe.
Fasten off.
Repeat toward the opposite lower lobe.
Add another pair of shorter veins toward the upper side lobes.
The raised lines should support the leaf shape without creating puckering.
Blocking the Maple Leaves
Block every leaf before assembling the runner.
Pin the center lobe first.
Next position the two upper side lobes at matching angles.
Pin the lower lobes last.
Measure from the tip of one upper side lobe to the opposite upper side lobe. Use this measurement to standardize every motif.
A practical target is approximately 18–22 cm wide, but the actual measurement should follow your yarn, hook and tension.
Planning the Table Runner
Arrange the blocked leaves in one line before crocheting the connecting lace.
Alternate the colors:
Taupe → Cream → Taupe → Cream → Taupe
or reverse the sequence.
For a longer runner, simply continue the alternating arrangement.
| Number of Leaves | Suggested Use |
|---|---|
| 3 leaves | Short centerpiece |
| 5 leaves | Small to medium dining table |
| 7 leaves | Long dining table |
| 9 leaves | Extra-long table or console |
Measure the arranged motifs rather than relying only on the table above. The lace between leaves adds additional length.
Connecting Two Leaves
Position two leaves tip-to-base with a small gap between them.
Join cream yarn to an outer edge point of the first leaf.
Ch 5.
Sc into a corresponding point on the second leaf.
Ch 5 and return to the first leaf at the next suitable attachment point.
Continue alternating between the two motifs until a flexible lace bridge has formed.
Keep the connection open. Pulling the motifs directly against each other hides the pointed leaf outline.
First Lace Framework
After all leaves have been connected in one line, join cream yarn near one end.
Work around the outside using repeating chain loops:
*Ch 5, sc into the next suitable leaf edge or existing chain space.*
Repeat around.
Near a deep valley between leaves, a ch-6 or ch-7 loop may be required.
Near a protruding lobe, shorten the loop to ch 3 or ch 4.
The objective is a balanced outer line rather than an identical chain count at every point.
Second Lace Round
Sl st into the first chain space.
Work:
(sc, ch 5, sc) into each larger chain space.
Where the edge needs additional width, work two ch-5 loops into the same large space.
Check the runner on a flat table every 20–30 cm.
The lace should neither pull the leaves inward nor create excessive ruffling.
Decorative Side Clusters
The photographed runner includes small raised accents around the leaf motifs. These can be recreated as compact puff or bobble-style circles.
Small Dimensional Accent
With cream, make an MR.
Round 1: 8 sc into MR. Join. (8)
Round 2: Work a small puff or 3-dc cluster in each st, placing ch 1 between clusters.
Join and fasten off.
Pull the center tightly closed.
Make enough accents to distribute them symmetrically along both sides of the runner.
Attaching the Dimensional Accents
Place the accents near the lace spaces between successive maple leaves.
Sew through the center and lower edges only.
Do not flatten the raised top.
Repeat the placement on the opposite side so both edges remain visually balanced.
Outer Openwork Round
Join cream into an outer lace space.
Work:
*Sc in space, ch 4, sc in next space.*
Repeat around.
At the extreme ends of the runner, use slightly larger loops if necessary to follow the rounded outline.
Decorative Shell Round
Sl st into a ch-4 space.
Work:
(sc, hdc, 3 dc, hdc, sc) into the space.
Skip to the next appropriate space and repeat.
Keep the shells small enough that the border remains secondary to the maple leaves.
Final Scalloped Border
Join cream at one end.
Work small scallops around the complete perimeter.
A useful repeat is:
Sl st in next space, 5 dc in following space, sl st in next space.
Repeat around.
Where the border passes a sharp leaf point, reduce the shell size if needed. At the rounded ends of the runner, slightly wider shells can help maintain the curve.
Optional Picot Detail
For a finer lace finish, add a small picot to the center of selected scallops.
At the third dc of a 5-dc shell:
Ch 3, sl st into the first ch.
Continue the remaining dc stitches of the shell.
Use picots consistently rather than adding them randomly.
Adjusting the Runner Width
The width can be changed without altering the maple leaves.
For a narrow runner, stop after the first or second lace framework.
For a wider version, add another round of ch-5 loops before beginning the shell border.
One additional openwork round can add several centimeters while using relatively little yarn.
Adjusting the Runner Length
Length is controlled primarily by the number of leaf motifs.
Measure the table and decide how much uncovered surface should remain at each end.
For a traditional runner, the finished piece may extend slightly beyond the tabletop ends. For a centerpiece-style runner, keep the entire crochet piece within the table length.
Make the required number of leaves before beginning the final outer lace so the perimeter can be worked as one continuous unit.
Alternative Color Arrangements
- Cream + Taupe — matches the neutral reference palette
- Ivory + Caramel — warmer autumn version
- Sage + Cream — botanical neutral palette
- Rust + Beige — stronger fall contrast
- Mustard + Ivory — brighter seasonal variation
- Burgundy + Cream — deeper holiday-table version
Yarn Quantity Planning
The most reliable calculation is based on a completed sample rather than a fixed gram estimate.
Make one maple leaf and weigh it.
If one leaf uses 28 g and the runner requires seven leaves:
28 × 7 = 196 g
This example covers the leaf motifs only.
Make a small lace sample or weigh the yarn before and after completing the framework around two leaves. Use that measurement to estimate the additional cream yarn required for joining and edging.
Add approximately 10–15% to your calculated quantity for border adjustments, swatching and finishing.
Keeping the Runner Flat
A table runner exposes construction problems immediately because the finished piece rests on a hard, flat surface.
After every complete lace round, place the project on a table without stretching it.
If the edge forms waves, there are too many stitches or chain loops.
If the runner cups upward, the outer circumference is too short.
Correct the affected round before continuing.
Assembly
- Crochet one maple leaf and block it to establish the master dimensions.
- Make the remaining cream and taupe leaves using the master motif for comparison.
- Add the raised center and side veins, keeping surface stitches loose enough for each leaf to remain flat.
- Block all finished leaves to matching widths and lobe angles.
- Arrange the leaves in a straight alternating-color sequence and confirm the planned runner length.
- Connect neighboring leaves with flexible cream chain-space bridges.
- Work the first and second cream lace framework rounds around the complete arrangement.
- Make and attach the small dimensional accents symmetrically along both sides.
- Add the openwork, shell and scalloped perimeter rounds while checking the runner frequently on a flat surface.
- Weave in all yarn tails and complete a final light blocking to align the center veins and outer scallops.
The completed runner should have a straight central line of alternating maple leaves, visible pointed lobes, balanced side lace and an even cream perimeter.
7 Technical Tips
- Leaf points becoming rounded: place a ch-2 point at the end of each major lobe and pin that chain space during blocking. A lobe without a defined tip tends to lose the maple-leaf silhouette.
- Raised vein puckering: surface slip stitches are being worked too tightly. Keep each surface stitch approximately the same length as the underlying stitch it crosses.
- Leaves finishing at different widths: measure across the two upper side lobes before fastening off the edging. Correct tension differences before the motifs are joined.
- Lace pulling the leaves together: increase a connecting loop from ch 5 to ch 6 or ch 7. The leaf points should remain visible after the bridge is attached.
- Outer edge developing waves: too many shells or chain loops are being placed around the perimeter. Remove one repeat from the affected section instead of trying to flatten the excess fabric during blocking.
- Dimensional accents leaning sideways: sew each accent through at least three points around its base. Attaching only through the center allows the motif to rotate during use or washing.
- Runner losing its straight center line: measure from each leaf’s center vein to the table edge during assembly. A shift of even 1–2 cm per motif becomes obvious across a long runner.
Care and Final Blocking
Follow the washing instructions for the yarn used in the project.
After washing, support the runner rather than lifting it from one end. The open lace can stretch while wet.
Lay the piece flat and align the center veins first.
Shape the five lobes of every maple leaf next. Then arrange the side accents and outer scallops.
Allow the runner to dry completely before removing the pins.
Conclusion
This crochet maple leaf table runner pattern combines substantial five-lobed leaves with lighter chain-space lace, allowing the leaf silhouettes to remain the dominant feature. Start with one taupe or cream master leaf, block it carefully, and record its width before making the remaining motifs. Once the leaves match, test-connect two pieces to establish the correct lace spacing before assembling the full runner. The modular construction also makes the design easy to lengthen for larger tables. Save the finished runner to Pinterest or share your version on Instagram with #MapleLeafTableRunner. Would you keep the alternating cream-and-taupe sequence, or make every maple leaf a different autumn color?









