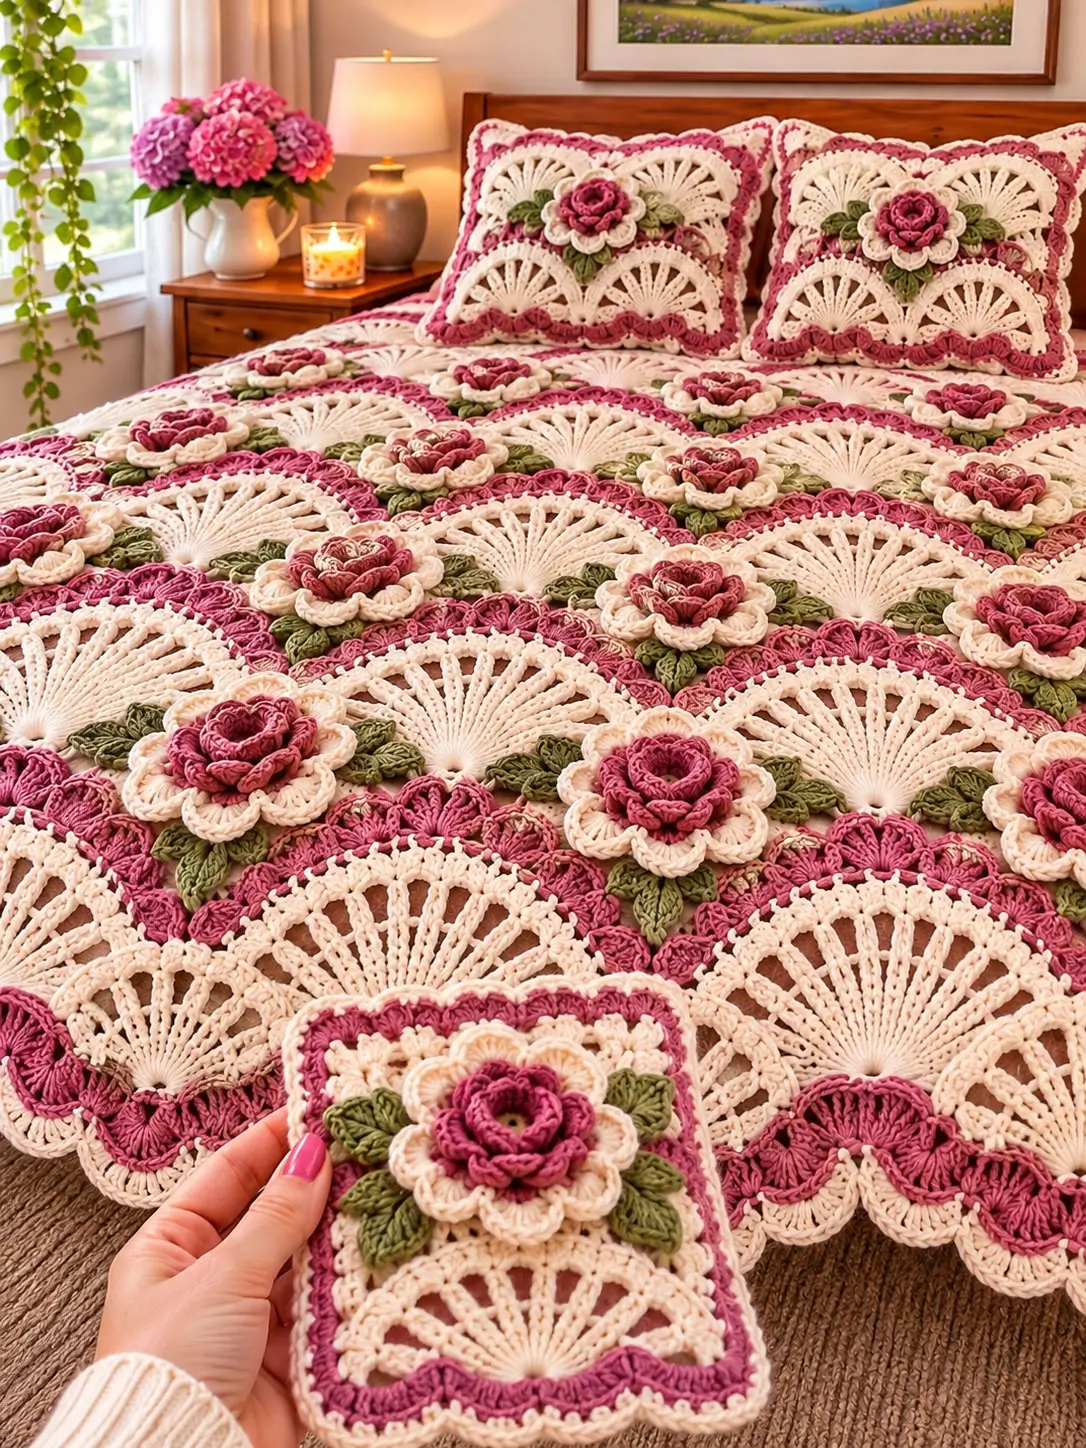
Each square in this bedspread has to support two very different structures: a raised rose at the top and an open fan below it. This 3D rose crochet bedspread pattern uses dusty rose, warm cream and sage green to build floral square motifs with layered petals, leaves, radiating lace sections and scalloped edges. The modular construction can be adjusted for different mattress sizes and matching pillow covers.
The Design: What Makes This Floral Bedspread Different
The main motif is not a conventional granny square. Its upper section carries a dimensional rose surrounded by cream petals and green leaves, while the lower section opens into a large fan formed from tall stitches and chain spaces. A dusty-pink framework connects these elements and establishes the square shape.
Separating the decorative rose from the structural frame is important. The flower can remain raised while the outer edges stay flat enough for joining. The fan section also needs consistent spacing: narrow at its base, progressively wider toward the outer edge.
The photographed design repeats these motifs across the bed and uses coordinated floral squares for the pillow covers. A broad scalloped perimeter continues the fan geometry around the finished bedspread.
Project Information at a Glance
| Skill Level | Construction | Target Motif Size | Suggested Hook | Best For |
|---|---|---|---|---|
| Intermediate to Advanced | Modular floral lace squares | Approximately 20–24 cm | 3.5–4.5 mm | Bedspreads, throws and pillow covers |
Materials and Tools
Yarn
- Dusty Rose / Raspberry Pink — DK #3 or light worsted #4 — roses, structural sections and border accents
- Warm Cream / Ivory — same yarn weight — outer flower petals, fan lace and edging
- Sage / Olive Green — same yarn weight — leaves
A cotton or cotton-blend yarn gives the fan openings and flower petals enough definition to remain visible after blocking. Keep all three colors within the same yarn family or match their thickness closely.
Tools
- 3.5–4.5 mm crochet hook
- Yarn needle
- Scissors
- Stitch markers
- Measuring tape
- Blocking mats
- Rust-resistant pins
Abbreviations
- MR — magic ring
- ch — chain
- sc — single crochet
- hdc — half double crochet
- dc — double crochet
- tr — treble crochet
- dtr — double treble crochet
- sl st — slip stitch
- sp — space
- st/sts — stitch/stitches
- RS — right side
- BLO — back loop only
- FLO — front loop only
Pattern Construction
Work one complete sample motif before beginning the full bedspread. The sample establishes the finished square measurement, flower diameter, fan width and yarn consumption.
The construction is divided into five elements:
- Dusty-pink layered rose
- Cream outer petals
- Sage leaves
- Cream radiating fan
- Dusty-pink and cream structural frame
The instructions are an original photo-inspired construction. Small adjustments to chain-space lengths may be necessary depending on yarn thickness and personal tension.
Layered Rose Center
Rose Foundation
With dusty rose, make an MR.
Round 1: Ch 1, work 8 sc into MR. Join with sl st. (8)
Round 2: Ch 1, work 2 sc in each st around. Join. (16)
Round 3: Working in FLO, repeat *sl st in next st, ch 3, skip 1 st* around to form 8 small petal loops.
Inner Petals
Into each ch-3 loop work:
(sc, hdc, 2 dc, hdc, sc).
Repeat around. Join with sl st.
These petals form the compact center of the rose.
Second Petal Layer
Turn the flower slightly and work into the unused back loops from the foundation.
Create larger loops behind the first petals:
*Sl st into the next available back loop, ch 5.*
Repeat around, spacing the loops evenly.
Into each ch-5 loop work:
(sc, hdc, 3 dc, hdc, sc).
Allow this layer to sit behind the first petals rather than directly on top of them.
Third Rose Layer
For the larger outer dusty-pink petals, create another foundation behind the second layer.
Work ch-6 loops evenly around.
Into each loop work:
(sc, hdc, 2 dc, 2 tr, 2 dc, hdc, sc).
Fasten off.
Shape the petals upward with your fingers but do not sew them together. The overlapping layers create the dimensional rose.
Cream Outer Flower Petals
Join cream behind the dusty-pink rose.
Create 8 evenly spaced ch-7 loops around the flower base.
Into each loop work:
(sc, hdc, 2 dc, 3 tr, 2 dc, hdc, sc).
Repeat around.
The cream petals should extend beyond the rose without covering its outer dusty-pink layer.
Fasten off and weave the yarn tail into the back of the flower.
Sage Leaf Layer
The green leaves sit behind the flower and help transition from the dimensional center into the flatter square framework.
With sage yarn, join behind a cream petal.
Ch 8.
Beginning in the second chain from the hook, work:
sc, hdc, dc, 2 tr, dc, hdc.
Work (sc, ch 2, sc) into the final chain to create the pointed tip.
Rotate the chain and work back along the opposite side with corresponding stitch heights.
Sl st into the flower foundation.
Make approximately 6–8 leaves, distributing them symmetrically behind the flower.
Raised Leaf Veins
For additional definition, surface crochet a loose line of slip stitches from the base toward the point of each leaf.
Do not tighten the surface stitches. A tight vein bends the leaf and can pull the completed motif out of shape.
Cream Fan Section
The large open fan is the defining lace element below the rose.
Fan Base
Join cream into the structural foundation below the flower.
Work 7 dc into the designated central space.
Turn.
Fan Row 2
Ch 3.
Work:
*dc in next dc, ch 1* across, placing additional dc stitches at regular intervals so the fan begins expanding.
Turn.
Fan Row 3
Ch 4.
Work one tall stitch into each dc from the previous row with ch 2 between tall stitches.
Increase by working two tall stitches from selected positions near both sides of the fan.
The spaces should begin spreading outward like ribs.
Fan Row 4
Ch 4.
Work:
*tr around or into the next vertical rib, ch 2* across.
Add increases evenly so the outer edge becomes wider without ruffling.
Fan Row 5
Continue the radiating ribs with tr or dtr stitches as needed.
Increase the chain spaces to ch 3 near the widest section.
The completed fan should form approximately a half-circle beneath the floral center.
Fan Stabilizing Edge
Work a row of sc across the curved outer edge of the fan.
Place 2 sc into larger chain spaces and 1 sc into smaller spaces.
Check the fan on a flat surface.
If the edge cups inward, add stitches. If it ripples, reduce the number of stitches before continuing.
Dusty-Pink Fan Outline
Join dusty rose along the curved edge.
Work a decorative shell repeat such as:
*Sl st in next position, 5 dc in next position, sl st in next.*
Repeat across the curved edge.
This pink line visually connects the fan with the rose above it.
Building the Square Framework
After the flower and fan components are complete, establish four corners independently of the decorative shapes.
Place four stitch markers around the motif at approximately 90-degree intervals.
Join cream at the first marker.
Work chain spaces between the decorative sections, attaching them at stable points behind the flower, leaves and fan.
At each marked corner work:
(2 dc, ch 3, 2 dc).
Continue around and join.
The first structural round may look irregular. Its purpose is to convert the floral composition into a four-sided foundation.
Second Structural Round
Ch 3.
Work dc evenly along each side.
At every corner ch-3 space work:
(2 dc, ch 3, 2 dc).
Repeat around.
Count the stitches on all four sides. Opposite sides must match.
Dusty-Pink Openwork Round
Change to dusty rose.
Work:
*Sc in next space or st, ch 3, skip the next suitable section.*
Repeat along each side.
At the corners work:
(sc, ch 5, sc).
This round creates the open pink lace visible between the cream sections.
Cream Outer Frame
Change to cream.
Work hdc or dc into each dusty-pink chain space.
At each corner work:
(2 dc, ch 2, 2 dc).
Continue around.
Add a final sc round if a firmer joining edge is required.
Blocking the Master Square
Block the first finished motif before making the full set.
Pin all four corners first.
Measure both diagonals.
Adjust until the difference between the diagonals is no more than approximately 5 mm.
Next shape the fan, leaves and outer frame.
Do not flatten the rose petals.
A practical target for this style is approximately 20–24 cm per blocked motif. Record your actual measurement and use it for every subsequent square.
Making the Remaining Motifs
Use the blocked master square as the physical reference.
Do not rely only on row counts. Small tension differences can accumulate across dozens of motifs.
Compare every fifth square with the master. Correct any size difference before joining.
Planning the Bedspread Size
Use the actual blocked measurement of your motif to calculate the number of squares.
| Square Size | Layout | Approximate Motif Area Before Border |
|---|---|---|
| 22 cm | 6 × 8 | 132 × 176 cm |
| 22 cm | 7 × 9 | 154 × 198 cm |
| 22 cm | 8 × 10 | 176 × 220 cm |
| 22 cm | 9 × 11 | 198 × 242 cm |
| 22 cm | 10 × 12 | 220 × 264 cm |
The final border adds extra width and length. Measure the mattress and decide how much side drop is required before choosing the layout.
Joining the Squares
Arrange all motifs on a clean floor or large table before joining.
Rotate each square so the flowers and fans follow the same orientation.
Use cream yarn for a quieter seam or dusty rose for a stronger grid.
Slip-Stitch Join
Place two squares with RS facing each other.
Insert the hook through corresponding outer loops.
Work loose slip stitches across the entire side.
Do not pull the seam tightly.
Continue joining squares into rows, then connect the completed rows.
Continuous Crochet Join Option
A continuous join can reduce the number of yarn tails.
Work around one motif and connect to the neighboring motif at corresponding chain spaces as the final round is completed.
At intersections where four squares meet, keep the join compact. Too many stitches at these points create hard raised knots.
Bedspread Border — Foundation Round
With cream, work sc evenly around the entire assembled bedspread.
Place additional stitches at the four corners.
Do not force the same number of stitches into every square edge if the seam positions require small adjustments.
Lay the bedspread flat after this round.
Border Round 2
Continue with cream.
Work hdc in each stitch around.
At each corner work:
(2 hdc, ch 2, 2 hdc).
Dusty-Pink Lace Border
Change to dusty rose.
Work:
*Sc in next st, ch 3, skip 2 sts.*
Repeat around.
Adjust the final repeat slightly if required so the corners remain centered.
Cream Fan Border
Join cream into a dusty-pink chain space.
Work a shell:
(sc, hdc, 5 dc, hdc, sc).
Skip to the next appropriate chain space and repeat.
For a broader border resembling the reference design, use larger fan sections:
(sc, hdc, 2 dc, 5 tr, 2 dc, hdc, sc).
Keep the spacing between shells consistent.
Final Dusty-Pink Scallop
Join dusty rose.
Work along the cream fans with a shallow scalloped edging.
A simple repeat is:
Sl st, skip 1 st, 5 dc in next st, skip 1 st, sl st.
Repeat around.
Check the border every 30–40 cm. Remove a repeat if the edge begins to ruffle.
Optional Small Flowers Between Motifs
The spaces where several squares meet can be decorated with small dusty-pink flowers.
With dusty rose, make an MR.
Round 1: 6 sc into MR. Join. (6)
Round 2: In each stitch work (sl st, ch 3, 2 dc, ch 3, sl st).
Fasten off.
Sew the small flower over selected intersections.
Do not cover every intersection unless the additional weight has been considered.
Matching Floral Pillow Covers
The pillow covers can repeat the same visual language without reproducing an entire bedspread panel.
For each pillow front, arrange four motifs in a 2 × 2 layout or construct one larger central flower-and-fan panel.
Join the motifs and add dusty-pink and cream frame rounds until the front matches the pillow insert dimensions.
For the back, crochet two overlapping rectangular panels in cream or dusty rose.
Overlap the panels by approximately 12–15 cm to form an envelope closure.
Join the front and back with sc around three or four sides.
Finish with the same shallow scallop used on the bedspread.
Yarn Quantity Planning
A heavily textured bedspread can require substantially more yarn than a flat granny-square blanket. Weighing a complete master motif provides the most useful estimate.
For example, if one finished and trimmed motif weighs 70 g and the planned layout contains 80 motifs:
70 × 80 = 5600 g
This is only an example calculation, not a fixed yarn requirement.
Separate the yarn used for one sample motif by color if you want a more accurate shopping estimate. Record the grams of dusty rose, cream and sage individually.
Add yarn for joining, the large outer border, pillow covers and approximately 10% contingency.
Controlling the 3D Flowers
The rose should project above the bedspread, but excessive height makes the surface difficult to use.
A finished relief of approximately 2–3 cm is enough to produce a strong dimensional effect.
If the rose becomes too tall, reduce the number of outer petal layers rather than tightening the stitches.
Color Placement
Use dusty rose consistently for the central roses and major structural accents.
Keep the large fan sections cream to create visual space between the flowers.
Sage should remain a smaller percentage of the total surface. Its purpose is to separate the pink rose from the surrounding cream and pink sections.
For a softer variation, replace dusty rose with blush pink. For stronger contrast, use burgundy with ivory and muted olive.
Assembly
- Make one complete flower-and-fan square and block it to establish the master measurement.
- Crochet the required number of dusty-pink roses, keeping the petal layers consistent.
- Add the cream outer petals and sage leaves, then work the cream fan sections.
- Complete the dusty-pink and cream structural frames and block every square to the master dimensions.
- Arrange all motifs in the planned bedspread layout with the fans facing the same direction.
- Join the squares into rows with cream or dusty-pink yarn, keeping every seam relaxed.
- Join the completed rows and inspect all four-square intersections for excess bulk.
- Work the cream foundation border followed by the dusty-pink lace and cream fan edging.
- Add optional small flowers, complete the matching pillow covers, and weave every yarn tail into structurally dense areas.
- Block the finished bedspread flat, shape the perimeter scallops, and arrange the rose petals only after the main fabric is dry.
The finished piece should lie flat through the joined framework while the roses remain visibly raised above the cream fan sections.
7 Technical Tips
- Rose centers collapsing: keep the first two foundation rounds firm and compact. A loose center allows the outer petal layers to pull the flower into an oval.
- Fan sections curling upward: the outer circumference does not contain enough stitches. Add one extra tall-stitch increase near each side rather than lengthening every chain space.
- Fan sections ruffling: too many increases have been added. Remove one or two increase points from the affected row before continuing.
- Square corners shifting away from 90 degrees: mark all four corners before working the structural frame. Compare the two diagonals after blocking and keep their difference within approximately 5 mm.
- Leaves disappearing behind the rose: position each leaf so at least 2–3 cm remains visible beyond the cream petal layer. Pin the leaves temporarily before sewing if necessary.
- Joining seams becoming rigid: slip stitches are being pulled too tightly. The finished seam should stretch almost as much as the outer edge of an individual blocked square.
- Scalloped border developing waves: the shell repeat is too dense for the available perimeter. Remove one complete shell at intervals rather than attempting to correct heavy ruffling with blocking.
Care and Final Blocking
Follow the washing instructions for the selected yarn. Support the entire bedspread when wet because the open fan sections can stretch under their own weight.
Lay the piece flat for final shaping. Align the square grid first, then straighten the cream fans and border. Shape the sage leaves next.
Do not pin the dimensional roses flat. Arrange their petals by hand after the surrounding fabric has dried.
For storage, fold the bedspread loosely and avoid placing heavy objects directly over the flower centers for extended periods.
Conclusion
This 3D rose crochet bedspread pattern is controlled by the relationship between three structures: raised floral centers, open cream fans and a stable square framework. Begin with one complete sample and record its blocked dimensions before producing the remaining motifs. The next practical step is to weigh that master square and calculate the number required for your mattress width, length and desired side drop. Matching pillow fronts can then be built from the same motifs for a coordinated set. Share a finished pink, cream and sage version on Pinterest or Instagram with #RoseFanCrochetBedspread. Would you keep the dusty-rose flowers shown here, or replace them with burgundy roses for stronger contrast?









