Introduction
A bear-ear band, rabbit ears, layered flower, crown edge, and five different bows cannot be built from the same decorative piece. This crochet headband pattern collection uses separate constructions on adjustable bands in pink, lavender, cream, brown, sage, blue, mustard, navy, and gray. Most versions use DK or worsted yarn with 3.5–5 mm hooks and can be resized for babies, children, or adults.
The Design: What Makes This Headband Collection Different
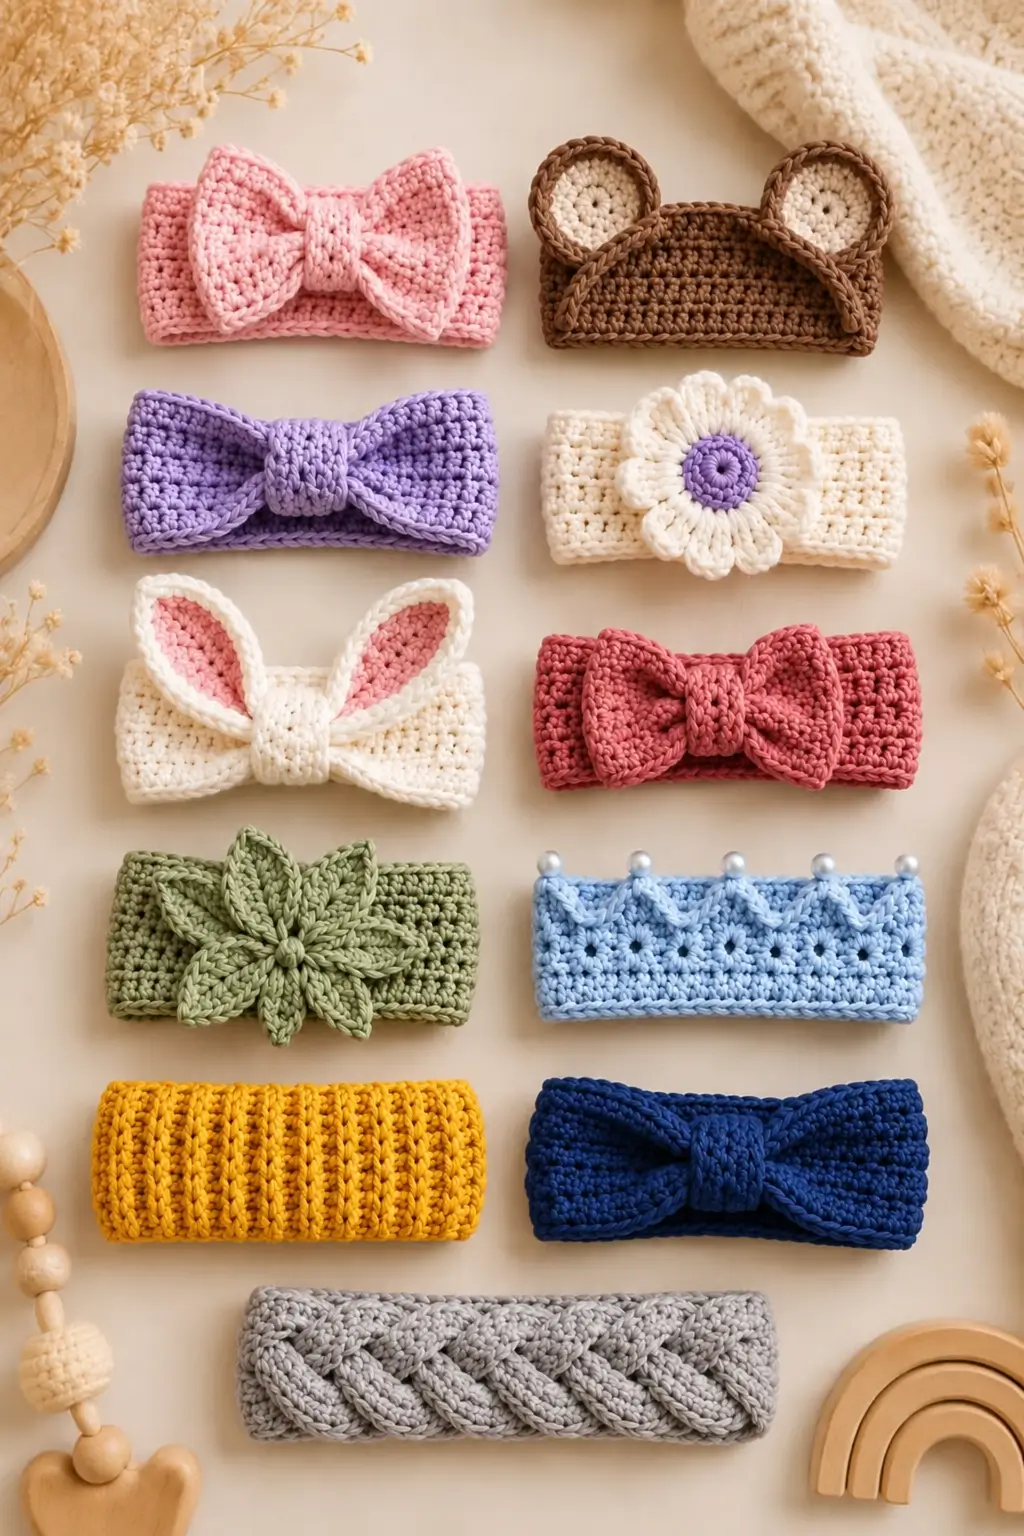
The photograph shows ten distinct crochet hair-accessory ideas rather than one headband repeated in different colors. Several use a rectangular band with a separately crocheted bow, while the bear and bunny versions depend on shaped ears. The cream design carries a dimensional flower, the sage version uses pointed botanical petals, and the blue band replaces a central decoration with a repeating crown-like edge.
Construction should therefore start with fit, not decoration. The band circumference determines whether the accessory stays in position; the bow, flower, ears, or braid is attached only after that measurement is established. Comparable published crochet bow headband patterns use worsted yarn with 5 mm hooks, while DK examples use different hook sizes according to gauge. The main failure point is making a finished band equal to head circumference without allowing for stretch.
Project Information
| Detail | Specification |
|---|---|
| Skill Level | Beginner to Intermediate |
| Project Type | Crochet headbands and hair accessories |
| Yarn | DK or worsted weight |
| Hook | 3.5–5 mm depending on yarn and gauge |
| Construction | Flat band joined into a loop with separate decorations |
| Decorations | Bows, bear ears, flower, bunny ears, leaves, crown points and braid |
| Best For | Baby, child and adult hair accessories |
Published headband patterns confirm considerable variation in materials. A current worsted bow design uses a 5 mm hook, another adjustable worsted headband also specifies 5 mm, and a braided design uses a 3.5 mm hook. Select the hook that produces a flexible but stable fabric rather than matching a single number across every yarn.
Materials and Tools
Yarn
- Pink DK or worsted yarn — bow headbands and bunny-ear centers
- Lavender DK or worsted yarn — classic bow
- Cream DK or worsted yarn — flower and bunny bands
- Brown DK or worsted yarn — bear-ear headband
- Sage green DK or worsted yarn — botanical headband
- Light blue DK yarn — crown-style headband
- Mustard worsted yarn — ribbed band
- Navy worsted yarn — dark bow headband
- Gray worsted yarn — braided headband
Most individual headbands require substantially less than a full skein. Yarn consumption depends on circumference, band width, decorative elements, and yarn thickness.
Tools
- 3.5 mm crochet hook for lighter DK constructions
- 4.0–5.0 mm crochet hook for DK/worsted bands
- Tapestry needle
- Scissors
- Stitch markers
- Flexible measuring tape
Abbreviations
- ch — chain
- sc — single crochet
- hdc — half double crochet
- dc — double crochet
- tr — treble crochet
- sl st — slip stitch
- st/sts — stitch/stitches
- BLO — back loop only
- FLO — front loop only
- MR — magic ring
All instructions use US crochet terminology.
Headband Sizing
Measure around the head where the finished band will sit. Crochet fabric stretches, so the finished circumference should normally be slightly smaller than the actual head measurement.
| Size | Starting Finished Circumference | Suggested Width |
|---|---|---|
| Baby | Approx. 35–40 cm | 4–6 cm |
| Toddler | Approx. 40–44 cm | 5–7 cm |
| Child | Approx. 44–48 cm | 6–8 cm |
| Teen | Approx. 48–52 cm | 7–9 cm |
| Adult | Approx. 50–55 cm | 7–10 cm |
These measurements are starting targets rather than universal sizing. Test the stretch of the actual stitch pattern before joining the band permanently.
Basic Crochet Headband
This foundation can be used for the pink, lavender, cream, brown, sage, and navy versions.
Band
Ch 13.
Row 1: Hdc in second ch from hook and in each ch across. (12)
Row 2: Ch 1, turn. Hdc in BLO across. (12)
Repeat Row 2 until the strip measures approximately 5–10 percent shorter than the intended head circumference.
Bring the short ends together without twisting the strip.
Sl st or sew the short ends together.
Fasten off and weave the tail through several stitches on the wrong side.
1. Pink Classic Bow Headband
The upper-left design uses a wide pink bow with a narrow center wrap.
Bow
Yarn: pink.
Ch 31.
Row 1: Hdc in second ch from hook and across. (30)
Rows 2–8: Ch 1, turn. Hdc across. (30)
Fasten off.
Fold the rectangle so the short ends meet. Sew the short edges together and rotate the seam to the back.
Pinch the center into an accordion fold.
Center Wrap
Ch 7.
Row 1: Sc in second ch and across. (6)
Rows 2–8: Ch 1, turn. Sc across. (6)
Wrap the strip around the pinched center of the bow and the headband.
Sew the ends together on the back.
2. Bear Ear Crochet Headband
The brown version uses two rounded ears with cream centers.
Outer Ear — Make 2
Yarn: brown.
MR.
Round 1: 6 sc in MR. (6)
Round 2: 2 sc in each stitch. (12)
Round 3: (Sc, inc) × 6. (18)
Round 4: (2 sc, inc) × 6. (24)
Fasten off with a long sewing tail.
Inner Ear — Make 2
Yarn: cream.
MR.
Round 1: 6 sc in MR. (6)
Round 2: 2 sc in each stitch. (12)
Round 3: (Sc, inc) × 6. (18)
Fasten off.
Center each cream circle on a brown ear and stitch it in place. Fold the lower edge of the completed ear slightly before attaching it to the brown headband.
3. Lavender Bow Headband
This version uses the same basic bow construction but a wider finished shape.
Ch 35.
Row 1: Hdc in second ch and across. (34)
Rows 2–9: Ch 1, turn. Hdc across. (34)
Fasten off.
Join the short edges to create a loop, flatten it with the seam centered at the back, and pinch the middle.
Make a 6-stitch-wide center band and wrap it firmly around both the bow and headband.
Published bow headbands use several different constructions, but rectangular bows with separate center wraps provide direct control over both width and fullness.
4. Daisy Flower Crochet Headband
The cream headband in the image uses a large dimensional flower with a lavender center.
Flower Center
Yarn: lavender.
MR.
Round 1: 8 sc in MR. (8)
Round 2: 2 sc in each stitch. (16)
Fasten off.
Petals
Change to cream.
Join yarn in any stitch.
For each petal work:
Sl st, ch 4, 2 tr, 2 dc, ch 3, sl st.
Move to the next suitable attachment point and repeat until the flower has 8 evenly distributed petals.
Fasten off with a long tail.
Sew the flower to the headband through its center and inner petal bases. Leave the outer half of each petal unattached.
5. Bunny Ear Crochet Headband
The cream version uses two tall ears with pink inner panels.
Outer Bunny Ear — Make 2
Yarn: cream.
Ch 16.
Starting in second ch from hook:
Sc in next 3 ch, hdc in next 3, dc in next 5, hdc in next 2, sc in final 2.
Ch 3 at the tip.
Work down the opposite side of the foundation chain using the mirrored stitch sequence.
Sl st at the base.
Work one round of sc around the ear, placing 3 sc at the upper point.
Fasten off.
Pink Inner Ear — Make 2
Ch 12.
Starting in second ch:
Sc in next 2, hdc in next 2, dc in next 4, hdc in next 2, sc in final stitch.
Work around the opposite side and fasten off.
Sew each pink panel to the center of a cream ear.
Pinch the bottom 1–2 cm of each ear before sewing it to the headband. This gives the ears a more upright shape.
6. Coral Bow Headband
The coral-pink version has a compact bow and a relatively wide band.
Make the basic band in coral yarn.
For the bow, ch 27.
Row 1: Hdc in second ch and across. (26)
Rows 2–7: Ch 1, turn. Hdc across. (26)
Join the short edges.
Flatten the bow, pinch its center, and secure the folds with several sewing stitches.
Make a narrow center wrap approximately 4 cm wide and attach the completed bow directly over the band seam.
7. Sage Botanical Flower Headband
The sage version uses pointed leaves arranged radially rather than rounded flower petals.
Pointed Leaf — Make 8
Yarn: sage green.
Ch 10.
Starting in second ch:
Sl st, sc, hdc, dc, 2 tr, dc, hdc, sc.
Ch 2.
Work down the opposite side:
Sc, hdc, dc, 2 tr, dc, hdc, sc, sl st.
Fasten off.
Arrange eight leaves in a radial formation with their lower ends overlapping.
Sew the bases together.
Make a small MR with 6 sc and attach it over the center junction.
Sew the completed botanical decoration securely to the sage band.
8. Blue Crown Crochet Headband
The blue version replaces a separate bow or flower with repeated pointed peaks along the top edge.
Make a light-blue basic headband approximately 5–7 cm wide.
Crown Edge
Join blue yarn at the upper edge.
Round 1: Sc evenly around the upper edge.
Round 2: *Sc in next 3 stitches, skip 1 stitch, work (2 dc, ch 3, sl st in first ch, 2 dc) in next stitch, skip 1 stitch.* Repeat around.
Adjust the final repeat so the peaks remain evenly spaced.
Fasten off.
If decorative beads are added to the points, attach them only when the finished accessory is intended for an age group for which small detachable components do not present a hazard.
9. Mustard Ribbed Crochet Headband
The mustard design depends entirely on vertical ribbing rather than an attached decoration.
Ch 13.
Row 1: Sc in second ch from hook and across. (12)
Row 2: Ch 1, turn. Sc in BLO across. (12)
Repeat Row 2 until the band measures approximately 5–10 percent less than the required head circumference.
Bring the short edges together and sew them securely.
The BLO construction creates the vertical ribs visible across the band.
10. Navy Bow Headband
The navy version combines a dense headband with a broad low-profile bow.
Make the basic band using navy worsted yarn.
Ch 33 for the bow.
Row 1: Sc in second ch and across. (32)
Rows 2–10: Ch 1, turn. Sc across. (32)
Join the short ends and place the seam at the center back.
Pinch the bow vertically into three folds.
Wrap a separately crocheted strip around the center and sew it through the headband to stop the bow from rotating.
11. Gray Braided Crochet Headband
The lower gray design uses interlaced crochet strips to produce a wide cable-like braid.
Published braided headbands use several methods. Comparable designs use worsted yarn and hooks ranging from approximately 3.5 to 6 mm, depending on the construction and desired density.
Braid Strips — Make 3
Yarn: gray.
Ch 61.
Row 1: Hdc in second ch from hook and across. (60)
Row 2: Ch 1, turn. Hdc across. (60)
Row 3: Ch 1, turn. Hdc across. (60)
Fasten off.
Make three matching strips.
Braiding
Align the three strips at one short end and sew them together.
Braid the strips with consistent tension. Do not pull the braid tightly; excessive tension shortens the finished circumference substantially.
When the braid is complete, align the opposite ends and sew them together.
Join the two end sections to create the headband loop.
How to Resize Any Headband
Fit should be determined from the actual fabric rather than a fixed row count. Crochet a few centimeters of the selected stitch pattern and gently stretch it before deciding the finished circumference.
For a flat rectangular band, continue adding rows until it reaches the target length. For the braided version, measure after braiding because interlacing shortens the strips.
Decorations should also be scaled to the band. A 12 cm bow can dominate a small baby band while appearing proportionate on an adult accessory.
When making several sizes, record the finished unstretched circumference rather than relying only on age labels.
Assembly
- Crochet the selected headband to the required width and circumference.
- Test its stretch before joining the short ends permanently.
- Join the band without twisting it and place the seam at the back.
- Make the bow, flower, ears, leaves, crown edge, or braided component separately.
- Pin the decoration to the band and check its position before sewing.
- Attach bows through the center wrap and lower bow layer rather than the outer edges.
- Attach ears through their folded bases so the upper portions remain free.
- Sew flowers through the center and lower petal layer to retain dimension.
- Weave each yarn tail through at least several neighboring stitches on the wrong side.
- Check the finished circumference and every attachment point before the headband is worn.
The finished accessory should stretch over the head without loose decorative pieces or a bulky seam at the back.
7 Technical Tips for Crochet Headbands
- Account for negative ease. A headband made exactly equal to the wearer’s head circumference can loosen during use; begin approximately 5–10 percent smaller and test the actual yarn stretch.
- Measure a braid after interlacing it. Braiding can remove several centimeters from three straight crochet strips, so measuring them before assembly can produce an undersized band.
- Place the band seam at the back. A seam shifted 2–3 cm toward the side can rotate a large bow or flower away from the intended center position.
- Secure ears across their full lower edge. Attaching an ear at only one point allows it to twist instead of standing in the intended direction.
- Do not sew every flower petal flat. Attach the center and lower petal bases; stitching the complete perimeter removes the dimensional structure.
- Match the hook to the fabric. If a 5 mm hook creates large gaps around a decorative ear or flower, move down a hook size rather than pulling every stitch tighter.
- Check all attachments before use. Small beads or detachable embellishments require particular caution on accessories intended for babies and young children.
Choosing Yarn for Crochet Hair Accessories
Worsted yarn creates substantial bows and broad winter-style bands, while DK yarn produces lighter flowers, ears, and narrower accessories. Published designs reflect this range: adjustable bow headbands are commonly made in worsted yarn with 5 mm hooks, while other bow patterns use DK yarn and larger hooks to produce a softer fabric.
Cotton gives decorative ears and flower petals more definition. Acrylic and wool blends generally provide more recovery when a band needs to stretch repeatedly over the head.
For the image-inspired palette, use dusty pink, lavender, cream, chocolate brown, sage, powder blue, mustard, navy, and light gray. A single neutral yarn can also be used across all ten constructions when texture rather than color is the priority.
Conclusion
This crochet headband pattern collection separates fit from decoration: establish the band circumference first, then add the bow, flower, bear ears, bunny ears, botanical leaves, crown points, ribbing, or braid. Measure the finished fabric under light stretch instead of depending entirely on a fixed row count. For the first sample, make the basic band and one removable decoration before producing additional sizes.
Save the collection to Pinterest or share completed versions on Instagram with #CrochetHeadbandCollection. Record the unstretched circumference, yarn, and hook size for every successful fit. Which image-inspired version should become a matching set first: the bunny ears, brown bear ears, or lavender bow?









