Introduction
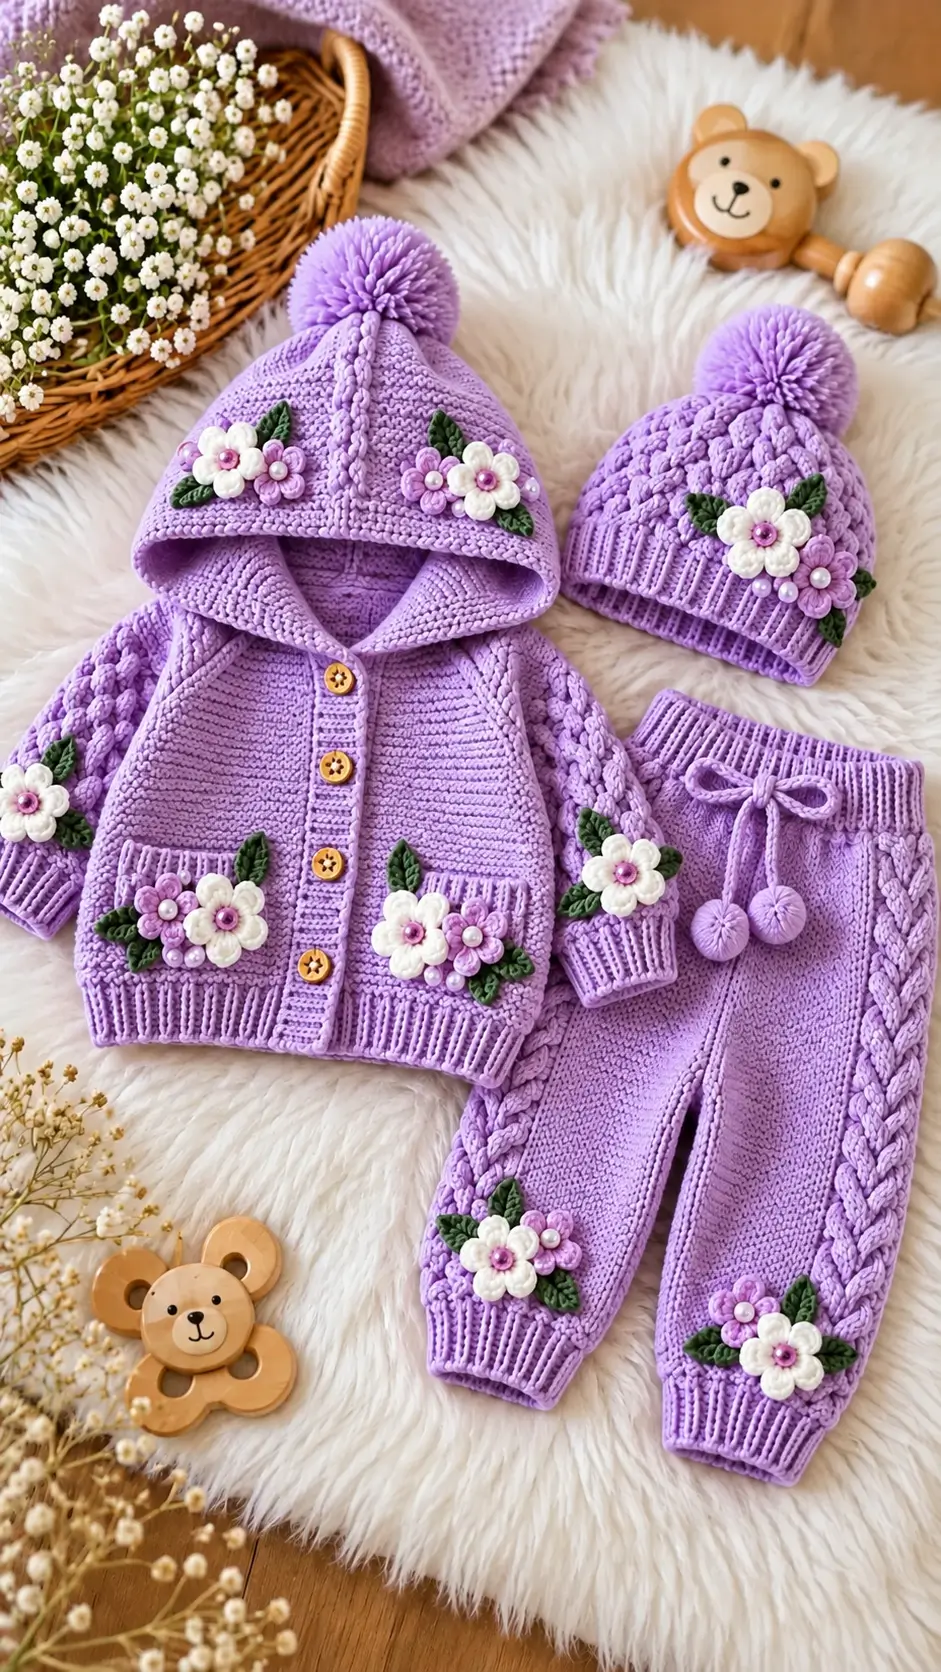
Lavender flower clusters along the cardigan pockets and trouser cuffs create the defining detail of this four-piece baby outfit. This lavender crochet baby outfit pattern combines a hooded cardigan, matching trousers, and two pom-pom hats using DK-weight yarn, crochet ribbing, and raised floral appliqués. Designed as an intermediate-level project, the set offers coordinated garment construction with customizable sizing and decoration.
The Design: What Makes This Lavender Baby Set Different
The outfit uses three distinct construction elements: a structured hood, cable-inspired raised textures, and separately attached flower appliqués.
The hood must have sufficient depth to cover the back of the head without pulling the cardigan neckline upward. Its front opening is finished with a defined border that maintains the shape.
The crochet baby cardigan with hood also includes textured sleeves and ribbed edges. Raised post stitches can imitate knitted cables, although the photographed fabric may use a different technique.
For the matching crochet baby pants pattern, the waistband requires more elasticity than the trouser legs. A back-loop ribbed band provides flexibility while maintaining a consistent fit.
One frequent construction error is placing decorative flowers before checking garment dimensions. The appliqués should be attached only after the main pieces have been measured, joined, and blocked.
Project Info at a Glance
| Detail | Specification |
|---|---|
| Skill Level | Intermediate |
| Project Time | Approximately 18–30 hours (estimate) |
| Reference Size | 0–6 months |
| Reference Cardigan Chest | 53.5 cm |
| Hook | 4 mm |
| Yarn | DK-weight baby yarn |
| Main Stitches | sc, hdc, dc, BLO, FPdc, BPdc |
| Construction | Flat panels, joined rounds, sewn appliqués |
| Components | Cardigan, trousers, two hats |
| Gauge | Determine using selected yarn |
The chest measurement is taken from a comparable published baby cardigan, not from the photographed garment.
Materials and Tools
Yarn
The following quantities are provisional purchasing estimates for a coordinated infant set. They are not measured quantities from the photograph.
- Lavender DK yarn: 350–450 g for garments, hats, and decorative details.
- White DK yarn: 25–40 g for flower petals.
- Light pink DK yarn: 15–25 g for smaller flowers and centers.
- Dark green DK yarn: 15–25 g for decorative leaves.
- Lavender embroidery yarn: Small amount for optional detailing.
Choose washable yarn with a smooth finish. Baby-specific acrylic or merino blends can work, provided the finished fabric is appropriate for the intended use and the manufacturer’s care instructions are followed.
Tools
- 4 mm crochet hook
- 3.5 mm crochet hook for smaller appliqués if required
- Four flat buttons, securely attached
- Tapestry needle
- Stitch markers
- Scissors
- Flexible measuring tape
- Blocking mat
- Pom-pom maker for decorative display samples
- Sewing pins
Infant safety: Avoid loose beads, pearl embellishments, detachable pom-poms, and long decorative cords on clothing intended for babies. These details may detach or present choking, strangulation, or entanglement hazards.
Crochet Abbreviations
| Abbreviation | Meaning |
|---|---|
| MR | Magic ring |
| ch | Chain |
| sc | Single crochet |
| hdc | Half double crochet |
| dc | Double crochet |
| inc | Increase |
| dec | Decrease |
| sl st | Slip stitch |
| BLO | Back loop only |
| FPdc | Front post double crochet |
| BPdc | Back post double crochet |
| st(s) | Stitch(es) |
| RS | Right side |
| WS | Wrong side |
Invisible decreases reduce the visible gaps between stitches in rounded crochet components.
Before You Crochet: Gauge and Sizing
Unlike a stuffed amigurumi figure, a baby garment cannot be sized reliably from stitch count alone.
Prepare a swatch at least 12 × 12 cm using the selected DK yarn and 4 mm hook. Wash and dry it according to the yarn label, then measure the central 10 cm.
- Record the number of stitches per 10 cm.
- Measure the number of rows per 10 cm.
- Check the finished fabric stretch.
- Evaluate the fabric thickness.
- Measure any changes after washing.
For example, if a swatch measures 20 stitches across 10 cm, a panel requiring 25 cm of width needs approximately 50 stitches before allowing for seams or borders.
This is a calculation example, not a verified gauge for the photographed outfit. Use the intended child’s current measurements and an established infant sizing chart to determine the final garment dimensions.
Pattern – Step by Step
Pattern note: The following instructions provide original construction guidance inspired by the photographed outfit. They are not a complete, test-crocheted row-by-row garment pattern. The floral appliqués include specific stitch instructions, while the wearable components require gauge-based sizing and shaping.
1. Hooded Cardigan – Back Panel
Yarn: Lavender DK
The back panel forms the primary measurement reference for the cardigan.
- Calculate the required panel width using the target finished chest measurement and selected ease.
- Chain to the calculated width, plus the turning chain required by the chosen stitch.
- Work the first row in hdc.
- Continue in hdc, turning at the end of every row.
- Measure the panel regularly rather than relying on a fixed row count.
- Stop at the selected shoulder-to-hem length.
- Mark the shoulder sections and back neckline.
For a garment with a ribbed lower edge, the ribbing may be made separately and attached afterward.
A 5–6 cm ribbed hem creates a proportion similar to the photographed cardigan.
2. Cardigan – Front Panels (Make 2)
Yarn: Lavender DK
Each front panel should coordinate with the back panel while leaving space for the central button bands.
Work two mirrored panels using the same stitch gauge.
Begin at the lower hem and continue upward in hdc. Maintain the required width through the lower body, then shape the neckline using the selected garment measurements.
The right and left panels must match in total length.
For the button bands, work several rows of sc or BLO sc along the front openings.
Position four buttons evenly, with sufficient distance from the neckline and hem.
Buttonholes should be sized to prevent accidental opening. For infant garments, buttons must be attached with reinforced stitching and checked frequently for looseness.
3. Cardigan Sleeves (Make 2)
Yarn: Lavender DK
The photograph shows textured sleeves with prominent raised stitch columns.
Construct the sleeves from the cuff upward.
Begin with a ribbed cuff approximately 4–5 cm deep. Work the sleeve fabric using hdc for the background and front-post stitches for the raised texture.
A cable-inspired repeat can be created with crossed post stitches, but the exact crossing sequence must be matched to the selected sleeve stitch count.
Increase gradually toward the upper arm according to the garment measurements.
Check both sleeves against each other after every shaping section.
Fasten off, leaving a sewing tail of approximately 25 cm.
4. Cardigan Hood
Yarn: Lavender DK
The hood is constructed as a shaped fabric section attached to the neckline.
Measure the completed neckline before beginning.
Work a foundation row that matches the neckline length without stretching. Continue in rows until the fabric reaches the intended hood depth.
Fold the hood section in half and join the upper seam.
A slightly rounded top seam gives the hood a softer profile than a sharply pointed rectangle.
Work a sc border around the front opening.
For the raised center detail visible in the photograph, make a separate narrow cable-inspired strip and sew it along the hood seam.
Attach it without gathering the surrounding fabric.
5. Cardigan Pockets (Make 2)
Yarn: Lavender DK
The photograph shows two front pockets with ribbed upper edges and floral decoration.
R1: Ch 17, hdc in second ch from hook and across (16).
R2–R10: Ch 1, turn, hdc in each st (16).
R11–R13: Ch 1, turn, sc in BLO across (16).
Fasten off, leaving a 25 cm sewing tail.
These pockets form small rectangular appliqués; adjust their dimensions if the selected garment size requires it.
Attach each pocket along the sides and bottom, leaving the upper edge open.
6. Matching Baby Trousers
Yarn: Lavender DK
The trousers have a broad waistband, a central crotch division, ribbed ankle cuffs, and decorative side textures.
Begin with a waistband sized to the intended waist measurement. BLO sc worked in rows produces a flexible ribbed band.
Join the short ends to form a ring.
Work the upper trouser section downward using hdc rounds, adding sufficient depth for the intended diaper allowance.
Once the rise is complete, divide the available stitches equally between the two legs, accounting for the crotch opening.
Continue each leg separately.
A published crochet trouser pattern demonstrates a 42-stitch body divided into two 21-stitch legs, but those counts belong to that specific design and should not be transferred directly to this garment.
Finish each leg with a ribbed cuff.
For a visual match, add raised cable-inspired strips along the outer legs before attaching the floral decorations.
Infant safety adjustment: Replace the pictured decorative waist tie with an enclosed, securely constructed waistband that contains no accessible long cords.
7. Floral Pom-Pom Hat – First Version
Yarn: Lavender DK
The first hat has a ribbed lower band, textured crown, one large pom-pom, and floral appliqués.
Measure the intended head circumference.
Make a ribbed band using BLO sc rows, checking the unstretched and stretched measurements.
Join the band into a ring.
Work upward from the band in joined rounds of hdc, incorporating front-post and back-post stitches for texture.
Shape the crown with decreases distributed evenly across the rounds.
Close the remaining crown opening and weave in the yarn ends.
For a decorative photography sample, a securely attached pom-pom can reproduce the photographed appearance. For infant wear, omit the pom-pom.
8. Decorative Hat – Second Version
Yarn: Lavender DK
The second hat in the photograph has a taller, tapered crown with pronounced raised stitch columns.
Its lower section is comparatively smooth, while the crown narrows toward the pom-pom.
Begin with a ribbed band fitted to the selected head circumference.
Work the main section in hdc, then gradually decrease toward the crown.
Raised stitch columns can be made using FPdc stitches placed at regular intervals.
Maintain symmetry between the columns during crown shaping.
The exact decrease frequency depends on the starting circumference and row gauge.
Finish the crown securely.
This second hat is best treated as a separate design rather than a direct variation of the first hat, because the crown proportions differ.
9. White Crochet Flowers (Make 8–12)
Yarn: White DK
These flowers are used on the cardigan, sleeves, hats, and trouser legs.
R1: 6 sc in MR (6).
R2: Inc × 6 (12).
R3: Repeat [sl st in next st, 3 dc in next st] six times to create six petals.
Join with sl st and fasten off.
Leave a 15–20 cm sewing tail.
The resulting flower is a six-petal appliqué. The photograph includes flowers with approximately five visible petals, so a five-petal variation may be used where a closer visual match is desired.
For the center, embroider a small pink circle rather than attaching a bead.
10. Small Pink Flowers (Make 6–8)
Yarn: Pale pink DK
R1: 5 sc in MR (5).
R2: Repeat [sl st, ch 2, 2 dc, ch 2, sl st] in each stitch around to form five petals.
Fasten off.
Leave a 15 cm sewing tail.
These flowers should be smaller than the white appliqués.
Attach them in groups of two or three, allowing some overlap without covering the main flower centers.
11. Crochet Leaves (Make 16–24)
Yarn: Dark green DK
Foundation: Ch 8.
R1: Working along one side of the chain, sc in second ch, hdc in next ch, dc in next 3 ch, hdc in next ch, 3 sc in final ch.
R2: Continue along the opposite side: hdc in next ch, dc in next 3 ch, hdc in next ch, sc in final ch.
Join with sl st.
Fasten off, leaving a 15 cm sewing tail.
For a more defined center vein, work a line of surface slip stitches down the middle of the leaf.
Attach leaves beneath the flower clusters so that their pointed ends remain visible.
12. Decorative Cable-Inspired Strips
Yarn: Lavender DK
Raised cable-like sections are visible along the sleeves, hood, and outer trouser legs.
These details can be produced with post stitches or made as separate narrow strips.
For separately attached decoration, work a foundation chain matching the required length and create raised stitch columns using FPdc.
The strip should lie flat before sewing.
Do not pull the sewing thread tightly, as this can shorten the garment panel and distort the fabric.
The photographed cables have a pronounced braided appearance. A more accurate reproduction may require crossed post stitches or another textured technique.
Assembly – 10 Steps
- Join the cardigan shoulders. Align the front and back panels, checking that the neckline remains centered.
- Attach the sleeves. Mark the sleeve centers and distribute the fabric evenly across each armhole.
- Join the side and sleeve seams. Use a consistent seam allowance and check both sides for symmetry.
- Attach the hood. Match its center seam to the center of the back neckline.
- Finish the cardigan opening. Add button bands and secure the four buttons.
- Attach the pockets. Position both pockets at the same height and distance from the front opening.
- Complete the trousers. Finish the crotch seam, leg seams where applicable, waistband, and ankle cuffs.
- Finish both hats. Close the crown openings and secure all yarn ends.
- Arrange the flowers and leaves. Pin each floral cluster in place before sewing, keeping decorations away from areas where they may irritate the wearer.
- Inspect and finish. Remove all pins, weave in tails, check seams and fastenings, and measure the finished garments.
The completed set contains one hooded cardigan, one pair of trousers, and two matching hats.
7 Technical Tips for Better Results
- Mark the beginning of every round. A misplaced stitch marker can shift a trouser-leg division or hat decrease by one or more stitches.
- Check garment measurements after washing the gauge swatch. A difference of two stitches per 10 cm can produce a substantial change in the cardigan’s finished chest width.
- Avoid over-tightening decreases. Excessively tight decrease stitches can create puckering around the hat crown.
- Position decorations after assembly. Flowers sewn onto unassembled panels may appear uneven once the garment is worn.
- Keep raised stitches consistent. Uneven tension in front-post stitches can cause the cable-inspired columns to pull inward.
- Pin both pockets before sewing. Measure the distance from the lower hem and button band so the pockets sit at equal heights.
- Weave yarn tails through several stitch directions. A short tail hidden under a single row can work loose during washing, particularly around cuffs and appliqués.
Care and Infant Safety
Wash the completed garments according to the yarn manufacturer’s instructions.
Lay the items flat to dry, supporting the hood and sleeves so they do not stretch.
Inspect all seams and decorative attachments before use.
For clothing intended for babies, omit detachable beads, dangling cords, and loose pom-poms. Secure buttons with reinforced stitching, or replace the button closure with an alternative that does not introduce small detachable components.
The photographed set is particularly suitable as a design reference for a decorative display or supervised photography sample. A wearable version should prioritize fit, mobility, and attachment security over exact reproduction of the styling.
Conclusion
This lavender crochet baby outfit pattern brings together several garment-making techniques in one coordinated design. The hooded cardigan provides the main structural component, while the trousers and two hats repeat the same lavender color and raised textures. White flowers, pink accents, and green leaves connect the separate pieces visually.
Before making a wearable version, establish the gauge, select the intended size, and test the garment proportions. Use a complete size-specific garment pattern where shaping instructions are required.
Save the design to Pinterest or share your finished version on Instagram using #LavenderFloralBabySet.
Which floral arrangement would you choose for the cardigan: symmetrical pocket clusters or flowers concentrated around the hood?









