Introduction
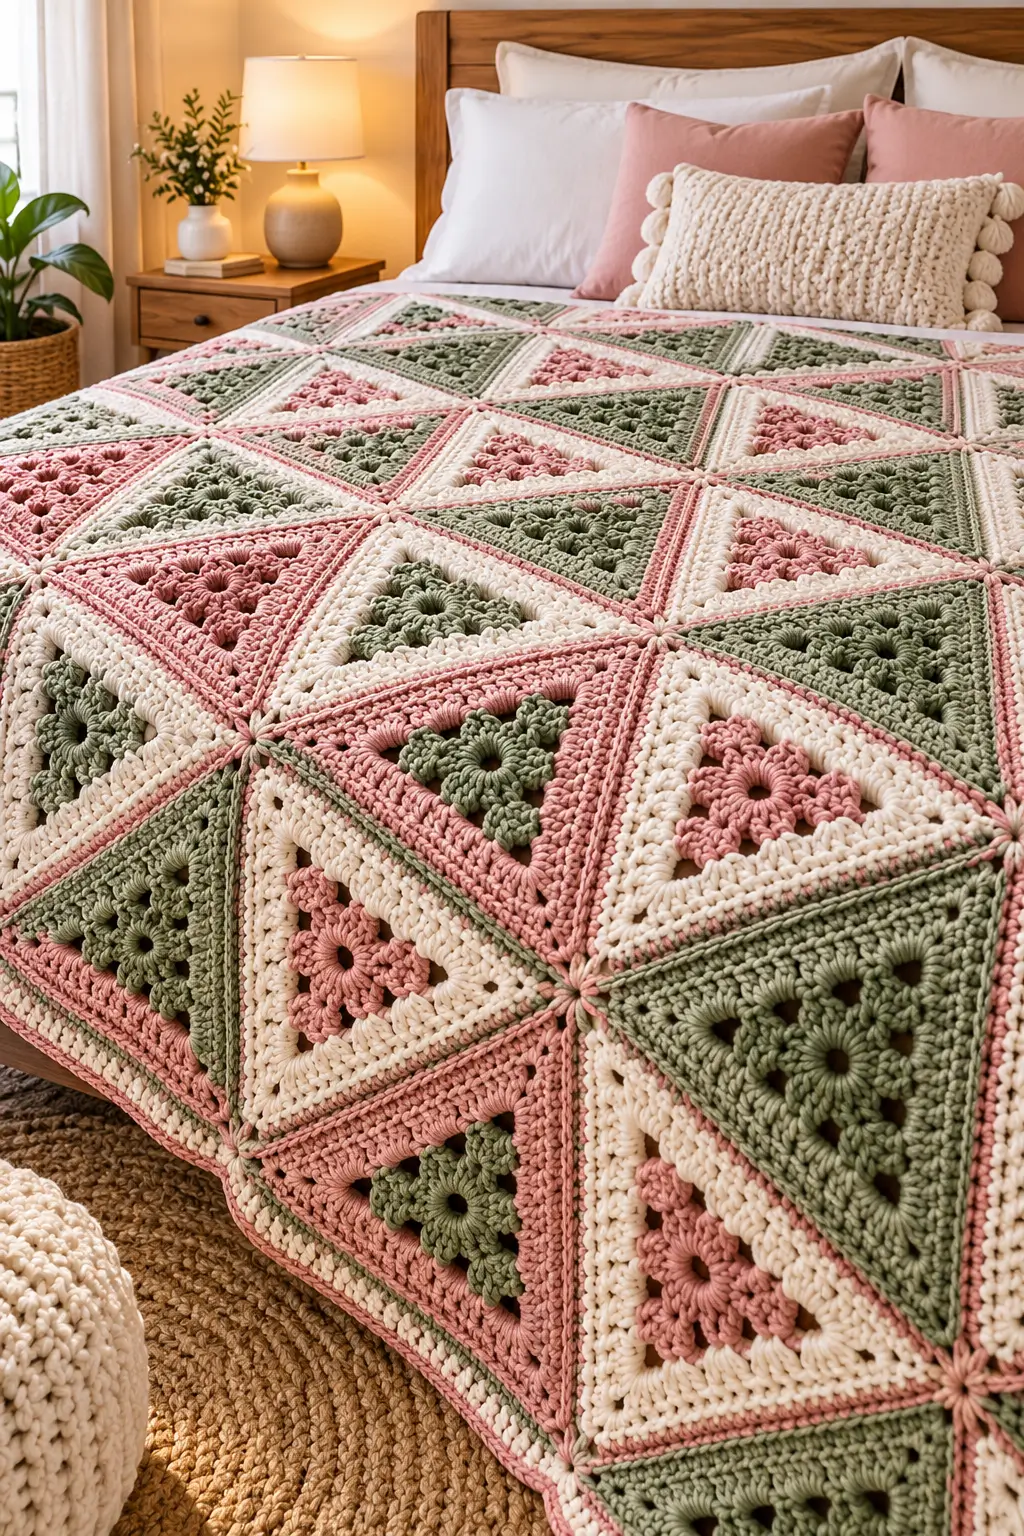
Three sharp corners change the entire geometry of a granny motif: six triangles can meet around one point while still building a rectangular blanket. This triangle granny square crochet blanket pattern uses dusty pink, sage green, and cream floral triangles joined with narrow contrasting seams. Worked with DK cotton-blend yarn and a 3.5 mm hook, the modular design can be expanded for a throw, bed blanket, or full bedspread.
The Design: What Makes This Triangle Crochet Blanket Different
The photographed blanket replaces conventional square blocks with triangular floral motifs. Each triangle contains a raised flower near its center, open corner spaces, textured crochet rounds, and a defined outer frame. Alternating the orientation of neighboring triangles creates larger diamonds, pinwheels, and square-like units across the finished surface.
Color placement reinforces that geometry. Sage, dusty pink, and cream rotate through the motifs rather than forming simple horizontal stripes. A narrow pink joining line separates neighboring triangles and makes each diagonal edge visible.
The main technical problem is corner distortion. If the three corner spaces receive inconsistent increases, a crochet triangle motif becomes rounded or begins cupping. All three corners therefore need identical stitch groups and the same chain-space length.
Project Information
| Detail | Specification |
|---|---|
| Skill Level | Intermediate |
| Technique | Floral triangle granny motifs |
| Yarn Weight | DK / light #3 |
| Hook | 3.5 mm |
| Colors | Dusty pink, sage green and cream |
| Triangle Size | Approx. 15–17 cm per edge after blocking |
| Construction | Individual triangles joined into larger geometric units |
| Best For | Throw, blanket or bedspread |
The 3.5 mm hook is a practical starting point for a DK cotton-blend construction. Published triangle granny projects range widely according to yarn: one DK cotton-blend example uses a 3.5 mm hook, while a worsted triangle motif uses a 5 mm hook. Make one complete triangle before calculating the final blanket dimensions.
Materials and Tools
Yarn
- Dusty pink DK yarn — approximately 35% of total yarn
- Sage green DK yarn — approximately 30% of total yarn
- Cream DK yarn — approximately 30% of total yarn
- Joining yarn — approximately 5% of total yarn; use dusty pink or cream
For a large bed blanket, do not purchase yarn from a visual estimate alone. Make one finished triangle, weigh it, multiply that weight by the required motif count, then add 15–20 percent for joining, edging, swatching, and variation in tension.
Tools
- 3.5 mm crochet hook
- Tapestry needle
- Scissors
- Locking stitch markers
- Flexible measuring tape
- Blocking mats
- Rustproof pins
Abbreviations
- MR — magic ring
- ch — chain
- sc — single crochet
- hdc — half double crochet
- dc — double crochet
- tr — treble crochet
- sl st — slip stitch
- st/sts — stitch/stitches
- sp — space
- yo — yarn over
All instructions use US crochet terminology. Place a stitch marker in each corner space if the triangular shape becomes difficult to read after the textured rounds are added.
Floral Triangle Granny Square Crochet Pattern
The following motif is an original photo-inspired construction. Make a sample first and block it before beginning a bed-size quantity.
Round 1: Flower Center
Use dusty pink or sage green.
Make an MR.
Ch 1 and work 6 sc into the ring.
Pull the ring closed and join with a sl st to the first sc. (6 sc)
Round 2: Six Flower Petals
In the first stitch work:
(sl st, ch 3, 3 dc, ch 3, sl st)
Repeat the same sequence in each of the remaining 5 stitches.
You should have 6 petals.
Fasten off the first color.
Round 3: Foundation Behind the Flower
Change to cream.
Join the new yarn behind any petal.
Ch 4 and sl st between the next two petals.
Repeat around until 6 ch-4 spaces have been formed behind the flower.
Join with a sl st.
Keep these chain spaces behind the petals rather than pulling them over the flower surface.
Round 4: Begin the Triangle
The six spaces are now divided into three corners and three sides.
In the first ch-4 space work:
(3 dc, ch 3, 3 dc)
This forms Corner 1.
In the next ch-4 space work 3 dc.
In the following ch-4 space work:
(3 dc, ch 3, 3 dc)
This forms Corner 2.
Work 3 dc in the next space.
In the following space work:
(3 dc, ch 3, 3 dc)
This forms Corner 3.
Work 3 dc in the final space and join.
The motif should now have three clearly defined points.
Round 5: Expand the Triangle
Sl st to the first corner space.
In each corner work:
(3 dc, ch 3, 3 dc)
Across each side, work 3 dc into every space between the previous round’s groups, placing ch 1 between adjacent 3-dc groups.
Repeat around and join.
Round 6: Textured Color Round
Change to sage, dusty pink, or cream according to the selected color layout.
In each corner work:
(2 dc, ch 3, 2 dc)
Across each side work 1 hdc into each stitch.
When reaching a ch-1 space, work:
(hdc, ch 1, hdc)
Continue around all three sides.
Join with a sl st.
Round 7: Raised Texture Round
Ch 1.
Sc in each stitch across the side.
At each corner work:
(2 sc, ch 2, 2 sc)
Where a ch-1 opening occurs from the previous round, work 3 dc into that opening to create a small raised fan.
Continue around and join.
Round 8: Granny Expansion
Change color if required.
Sl st to the nearest corner.
Work:
(3 dc, ch 3, 3 dc)
in each corner.
Across each side, distribute 3-dc groups evenly with ch 1 between groups.
Keep the same number of groups on all three sides.
Join with a sl st.
Round 9: Final Structural Round
Use the primary border color.
Ch 1.
Sc evenly across each side.
At each corner work:
(2 sc, ch 2, 2 sc)
Join with a sl st.
Fasten off and leave a 15 cm tail.
Block the motif before measuring. Aim for approximately 15–17 cm along each side.
Three Color Variations
The blanket gains its patchwork appearance by changing the dominant color of otherwise compatible motifs.
Pink Triangle
- Flower: sage green or dusty pink
- Inner background: dusty pink
- Accent: cream
- Final edge: dusty pink
Sage Triangle
- Flower: sage green
- Inner background: sage
- Accent: cream or pink
- Final edge: sage
Cream Triangle
- Flower: dusty pink
- Inner background: cream
- Accent: sage
- Final edge: cream or pink
Make approximately equal quantities of the three versions if you want the color distribution visible in the reference image.
How to Arrange the Crochet Triangles
The orientation of the motifs is more important than the individual color sequence.
Lay the blocked triangles on a large flat surface before joining them.
Place one triangle with its point facing upward. Position an adjacent triangle upside down so the two long edges meet.
Continue alternating upward and downward triangles to form straight horizontal bands.
For the pinwheel effect visible across the blanket, rotate several triangles around a shared junction. The points should converge cleanly without overlapping.
Take a photograph of the full layout before collecting the motifs for joining. That provides a reference if the color sequence becomes confused during assembly.
Joining Two Crochet Triangles
Use dusty pink for the visible joining lines.
Place two blocked triangles side by side with right sides facing upward.
Insert the hook through the corresponding outer loops of both motifs.
Pull up a loop of joining yarn.
Work one relaxed slip stitch through the matching loops.
Continue across the complete edge.
Do not pull the slip stitches tightly. The joined seam should remain approximately the same length as the unjoined triangle edge.
Fasten off at the opposite corner or continue directly into the next seam when the layout permits.
Four-Triangle Diamond Unit
A useful assembly method is to create larger units before constructing the complete blanket.
- Place one triangle with its point facing upward.
- Position a second triangle with its point facing downward.
- Add two more triangles to the left and right.
- Check that all four center points meet cleanly.
- Join the first two triangles.
- Add the third triangle along its matching edge.
- Attach the fourth triangle.
- Reinforce the center junction with one small stitch if necessary.
Repeat these units across the blanket while rotating the pink, sage, and cream motifs.
Six-Triangle Pinwheel Unit
The photographed design also suggests larger junctions where several triangular motifs create a rotating geometric arrangement.
Place six triangle points toward one central position.
Alternate the dominant colors:
Pink → Cream → Sage → Pink → Cream → Sage.
Pin the arrangement before joining.
Connect neighboring edges individually and inspect the center after every seam.
A hole larger than approximately 1 cm at the center indicates that the corner chains are too loose or the seams stop too far from the points.
How Many Triangle Motifs Are Needed?
Always calculate the final count from a blocked sample because small changes in gauge accumulate rapidly across a bed-size project.
For planning purposes, a triangle with approximately 16 cm edges can be paired with another triangle to form a larger geometric unit.
| Project | Approximate Triangle Count |
|---|---|
| Baby blanket | 60–90 motifs |
| Lap blanket | 90–130 motifs |
| Large throw | 130–180 motifs |
| Bed blanket | 180–260+ motifs |
These numbers are planning ranges rather than fixed pattern counts. The exact quantity depends on motif height, edge length, mattress dimensions, desired overhang, and border depth.
Half Motifs for Straight Blanket Edges
A triangle-based layout can naturally produce pointed or zigzagging edges. If a straight rectangular blanket is required, arrange the outermost motifs before joining the center field.
In many layouts, rotating full triangles is enough to create a straight line. Where a gap remains, work a smaller filling triangle using the same flower-free granny construction.
Small Filling Triangle
Make an MR.
Round 1: Ch 3, 2 dc, ch 3, 3 dc, ch 3, 3 dc into the ring. Join.
Round 2: Work (3 dc, ch 3, 3 dc) into each corner and one 3-dc group between corners.
Continue until the filler matches the required edge opening.
Finish with the same border color as the neighboring motifs.
Blanket Border
Once all motifs are joined, place the blanket flat and inspect the perimeter. Correct any twisted motifs before beginning the border.
Border Round 1
Use cream.
Join yarn at a corner.
Work sc evenly around the complete blanket.
Place one sc into each joining seam rather than skipping over it.
At each outer corner work:
(2 sc, ch 2, 2 sc)
Border Round 2
Change to dusty pink.
Ch 3 and dc in every stitch around.
At each corner work:
(2 dc, ch 2, 2 dc)
Border Round 3
Change to sage green.
Work one sc in each stitch around.
At the corners work:
(sc, ch 2, sc)
Border Round 4
Return to cream.
Ch 3, skip 2 stitches and sc into the next stitch.
Repeat around to create small chain loops.
Use ch 5 at each major corner.
Border Round 5
Use dusty pink.
In each ch-3 space work:
(sc, hdc, 3 dc, hdc, sc)
Repeat around.
Adjust the shell placement slightly at the corners so the border remains flat.
Fasten off and weave the tail through matching stitches on the wrong side.
Assembly
- Make one complete floral triangle and block it before beginning the full batch.
- Measure all three edges and adjust hook size if the motif is not lying flat.
- Crochet the required number of pink, sage, and cream triangle variations.
- Block every motif to the same dimensions and allow them to dry completely.
- Arrange the triangles on a flat surface, alternating upward and downward orientations.
- Photograph the final color arrangement before moving any motifs.
- Join neighboring triangles with relaxed dusty-pink slip stitches.
- Connect the smaller joined sections into full blanket rows or panels.
- Work the five-round border around the completed blanket.
- Weave in all remaining tails and lightly block the perimeter and joining lines.
The completed blanket should have flat triangular motifs, crisp three-point geometry, even joining seams, and balanced distribution of pink, sage, and cream.
7 Technical Tips for Triangle Granny Blankets
- Measure all three sides of the first blocked motif. A difference greater than 5 mm between edges can produce visible gaps when several triangles meet.
- Mark every ch-3 corner. Missing one corner increase changes the triangle angle and causes the next round to curve inward.
- Keep joining slip stitches relaxed. A seam that finishes 1 cm shorter than the original motif edge can make a large blanket pucker.
- Check the central junction before fastening off. When several triangles meet, a center opening larger than about 1 cm becomes conspicuous across repeated units.
- Block before joining, not only afterward. Trying to correct hundreds of mismatched triangle edges after assembly puts unnecessary tension on the seams.
- Keep flower height consistent. Different petal tension can make one motif appear larger even when its three outer edges have identical measurements.
- Weigh one completed triangle. Multiply that figure by the planned motif count and add 15–20 percent before calculating the total yarn requirement.
Choosing the Pink, Sage and Cream Color Layout
The photographed blanket works because none of the three main colors is confined to a single row. Instead, the colors move diagonally through the triangular grid.
Use sage as the darkest structural color. Cream creates visual breaks between stronger sections, while dusty pink provides both the floral color and much of the visible joining framework.
For a balanced arrangement, make approximately one-third of the motifs predominantly sage, one-third predominantly cream, and one-third predominantly pink.
Do not place every matching color in the same orientation. Rotate the motifs so some sage triangles point upward while others point downward. Apply the same rule to the pink and cream sections.
Spread the blanket layout on the floor before joining and photograph it in grayscale. Areas that appear unusually dark in the grayscale image contain too many sage motifs together and can be redistributed before sewing.
How to Change the Blanket Size
Modular construction makes this crochet triangle blanket easier to resize than a continuously worked afghan.
For additional width, add complete columns of alternating upward and downward triangles. For extra length, add complete horizontal motif bands.
Avoid changing hook size halfway through the project. Even a small gauge difference becomes visible when two triangles share a long seam.
If a larger blanket is required after joining has already begun, make another complete band separately and attach it to one end. Match the existing color rotation before completing the seam.
Care and Blocking
Check the yarn manufacturer’s care instructions before washing the finished blanket. A cotton or cotton-blend project becomes substantially heavier when saturated, so support the fabric rather than lifting it from one corner.
Press out excess water without twisting the joined motifs.
Lay the blanket flat and align the major horizontal and diagonal seams while damp. Correct the outer corners before arranging the border.
Allow the blanket to dry fully before folding it.
For storage, fold along several different motif lines over time rather than repeatedly creasing the same joining seams.
Conclusion
This triangle granny square crochet blanket pattern depends on three consistent elements: equal triangle edges, identical corner increases, and relaxed joining seams. Make and block one floral motif first, record its three edge measurements, then repeat that gauge across the dusty-pink, sage-green, and cream variations. Alternating the direction of the triangles produces the geometric diamonds and pinwheel junctions that distinguish the finished blanket from a conventional granny-square afghan.
Record your blocked motif size and final color sequence before assembling additional panels. Save the finished blanket to Pinterest or share it on Instagram with #FloralTriangleGrannyBlanket. Would you make the next version predominantly sage green or reverse the palette so dusty pink becomes the main background?









