Introduction
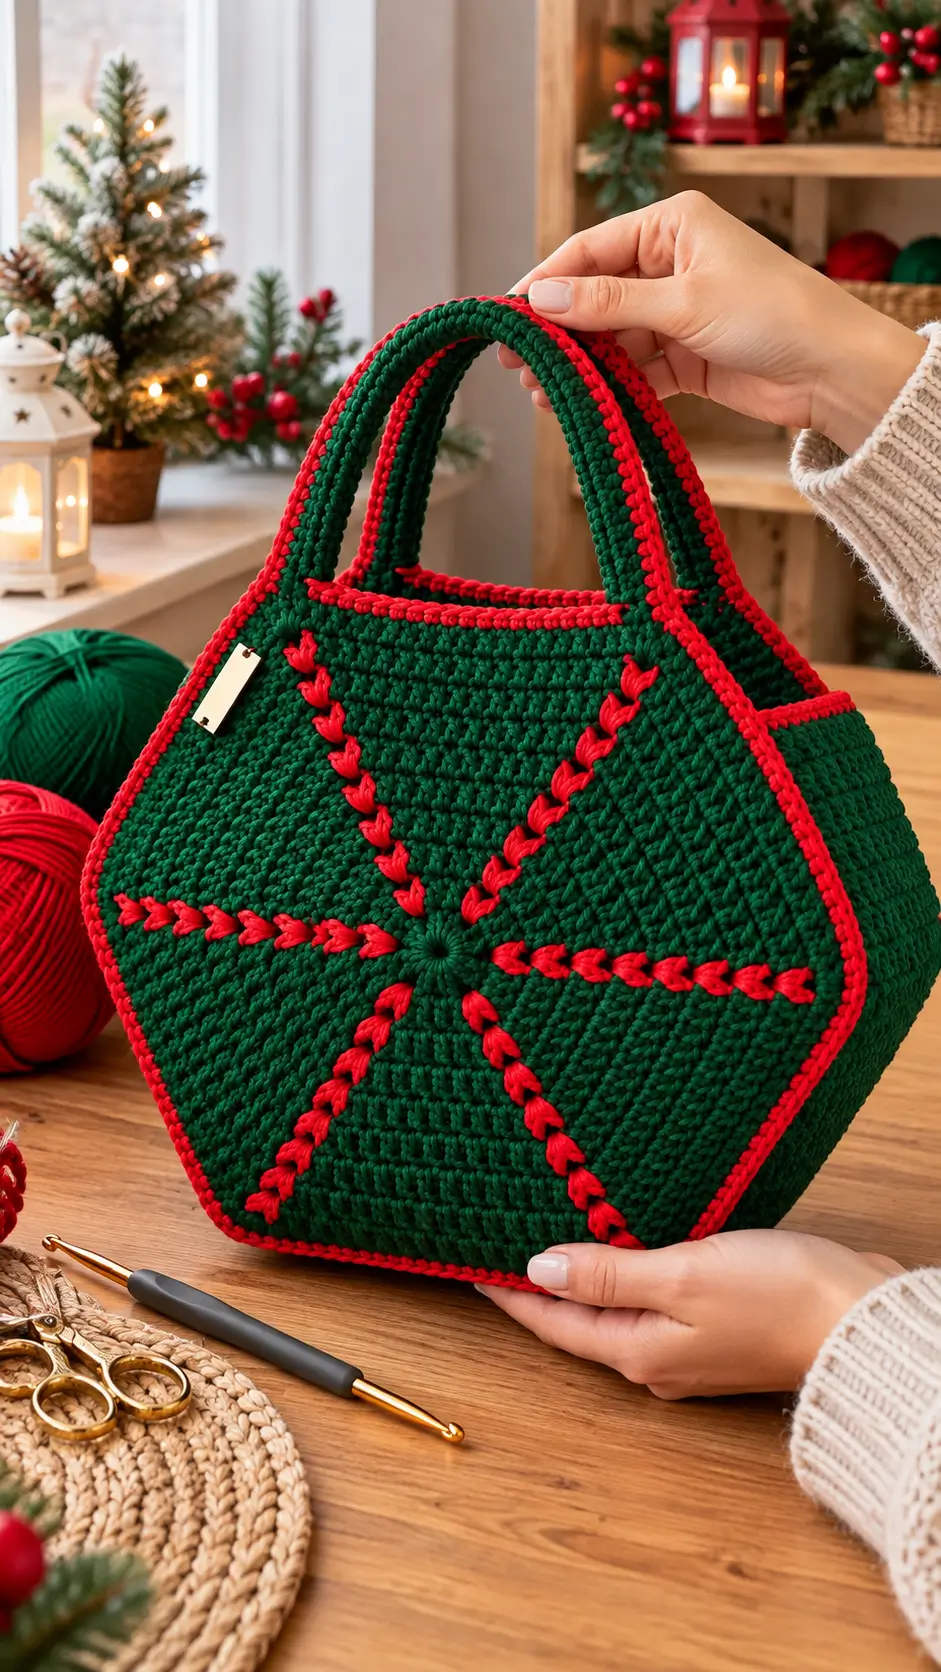
Eight red spokes radiate from the center of this forest-green Christmas handbag, forming a distinctive geometric design. This Christmas crochet tote bag pattern uses dense cotton stitches, reinforced handles, and contrasting surface embroidery to create a structured holiday accessory. The proposed finished size is approximately 32 × 30 cm, excluding the handles. Designed for intermediate crocheters, the bag provides reusable storage for lightweight gifts, seasonal accessories, and everyday essentials.
The Design: What Makes This Christmas Tote Different
The defining feature of this Christmas crochet handbag is its radial front decoration. Eight raised red lines divide the green surface into triangular sections, creating a geometric effect without requiring complicated color changes throughout the main fabric.
The second structural decision concerns the handles. Two broad crocheted straps distribute carrying pressure across several stitches rather than concentrating the load at narrow attachment points. Reinforced stitching reduces stretching during use.
Finally, the red edging creates a continuous outline around the bag’s front and back panels. This border also covers the seams and helps the handmade Christmas tote maintain a defined silhouette.
A common construction mistake is tightening the decorative embroidery until the front panel puckers. The red lines should follow the fabric without compressing it. Consistent spacing, controlled tension, and careful pinning are essential for a balanced finished appearance.
Project Info at a Glance
| Detail | Project Specification |
|---|---|
| Skill Level | Intermediate |
| Estimated Time | 12–16 hours |
| Target Finished Size | 32 × 30 × 6 cm |
| Crochet Hook | 4.0 mm |
| Yarn | Worsted-weight cotton |
| Construction | Flat panels with side and bottom gusset |
| Main Stitches | Single crochet, slip stitch, surface embroidery |
| Best For | Lightweight personal items and holiday gifts |
Measurements and working time are design estimates. The pattern is a photo-inspired adaptation rather than a tested reproduction of the original handbag.
Materials and Tools
Yarn
- Forest green cotton yarn — worsted weight — approximately 350 g. Suggested type: Lion Brand 24/7 Cotton or comparable firm cotton yarn.
- Christmas red cotton yarn — worsted weight — approximately 70 g. Use a matching yarn weight for borders and embroidery.
Buy extra yarn if your tension is tight or you plan to lengthen the handles. A different yarn may change the fabric density, stitch gauge, finished dimensions, and total consumption.
Tools
- 4.0 mm crochet hook
- Tapestry needle with a large eye
- Stitch markers, at least eight
- Measuring tape and scissors
- Rustproof blocking pins
- Optional cotton lining fabric and matching thread
- Optional small decorative label
- Optional cotton webbing for additional handle support
Cotton is preferable to highly elastic yarn for this construction. Dense crochet fabric and secure strap attachments are particularly important for functional bags.
Gauge
Work a 15 × 15 cm test square using single crochet. Measure the central 10 cm without stretching the fabric.
The proposed working gauge is approximately 18 stitches and 20 rows per 10 cm.
A 57-stitch-wide panel should therefore measure approximately 32 cm, while 60 rows should measure approximately 30 cm. Adjust the hook or stitch count if your swatch differs significantly.
This is a target gauge, not a measured sample from the photograph.
Abbreviations
| Abbreviation | Meaning |
|---|---|
| ch | Chain |
| sc | Single crochet |
| sl st | Slip stitch |
| st / sts | Stitch / stitches |
| RS | Right side |
| WS | Wrong side |
| BLO | Back loop only |
| FO | Fasten off |
| rep | Repeat |
| MR | Magic ring |
| inc | Two single crochets in one stitch |
| dec | Single crochet two together |
An invisible decrease is made through the front loops of two consecutive stitches and is unnecessary for the main rectangular panels.
Christmas Crochet Tote Bag Pattern – Step by Step
This bag is worked mainly in turned rows rather than continuous amigurumi spirals. The two panels form the front and back, while a narrow gusset provides depth along the sides and base.
Front Panel (Make 1)
Yarn: forest green — original flat-panel design.
Foundation: Ch 58.
R1: Sc in the second chain from the hook and in every remaining chain. (57)
R2: Ch 1, turn, sc in each stitch. (57)
R3–R10: Repeat R2. (57 per row)
R11–R20: Ch 1, turn, sc in each stitch. (57 per row)
R21–R30: Repeat R2. (57 per row)
R31–R40: Repeat R2. (57 per row)
R41–R50: Repeat R2. (57 per row)
R51–R60: Repeat R2. (57 per row)
Fasten off, leaving a 20 cm tail.
The completed panel should be approximately 32 cm wide and 30 cm tall at the target gauge.
Lay the panel flat and identify its center. Place a removable marker at the midpoint of the fabric, approximately 16 cm from either side and 15 cm from the bottom.
This position becomes the meeting point for the red decorative lines.
The photograph shows a more angular silhouette than a rectangle. The rectangular foundation here is a practical simplification; blocking and edge shaping can soften the corners, but the result will not duplicate the photographed polygon exactly.
Back Panel (Make 1)
Yarn: forest green — original flat-panel design.
Foundation: Ch 58.
R1: Sc in the second chain from the hook and across. (57)
R2–R60: Ch 1, turn, sc across. (57 per row)
Fasten off, leaving a 20 cm tail.
Check the width and height against the front panel. Both pieces should have the same stitch and row counts.
A difference greater than 5 mm along corresponding edges may produce an uneven seam. Recheck the gauge before joining.
The back can remain plain or receive the same red radial decoration as the front.
Side and Bottom Gusset (Make 1)
Yarn: forest green — original gusset construction.
Foundation: Ch 13.
R1: Sc in the second chain from the hook and across. (12)
R2: Ch 1, turn, sc across. (12)
R3–R177: Repeat R2. (12 per row)
Fasten off, leaving a 30 cm sewing tail.
The gusset should measure approximately 6–7 cm wide. Its long edge is designed to follow the left side, bottom, and right side of the front panel.
At the proposed gauge, the three panel edges total approximately 60 + 57 + 60 = 177 row/stitch positions. However, row height and stitch width differ, so the gusset must be checked against the actual panel before seaming.
Pin the gusset around the front panel first. If it is too long, remove rows; if too short, add rows. Do not stretch either piece to force alignment.
Reinforced Handles (Make 2)
Yarn: forest green.
Foundation: Ch 9.
R1: Sc in the second chain from the hook and across. (8)
R2: Ch 1, turn, sc across. (8)
R3–R80: Repeat R2. (8 per row)
Fasten off, leaving a 30 cm sewing tail at each handle end.
Each handle is approximately 4–5 cm wide at the proposed gauge. Its final length depends on row gauge and may be adjusted to reach approximately 40 cm.
For a more stable handle, sew cotton webbing to the underside before attachment. Alternatively, work a second identical crochet strip and join the two layers.
Red Handle Edging (Make 2 Sets)
Yarn: Christmas red.
Attach red yarn to one long edge of the first green handle.
R1: Work approximately one sc into each row-end space along the handle. The working count is approximately 80 sc, but distribute stitches according to the actual fabric.
Fasten off and weave in the ends. Repeat on the opposite long edge.
Work the same edging on the second handle.
Avoid pulling the red yarn tighter than the green handle fabric. Excess tension creates curved straps and reduces their usable length.
Red Radial Decoration (Eight Lines)
Yarn: Christmas red — surface embroidery.
The photograph’s defining design is a set of eight red raised lines meeting near the center of the front panel.
Use the center marker as the starting point. Mark eight destinations around the panel perimeter: top-left, top-center-left, top-center-right, top-right, right-middle, lower-right, lower-left, and left-middle.
For a simplified eight-spoke layout, distribute these points around the central marker at approximately 45-degree intervals. Keep the embroidery within 1 cm of the future outer seam.
Thread a tapestry needle with doubled red yarn.
Work one line at a time using raised chain embroidery or closely spaced loop stitches. Each decorative stitch should span approximately 5–7 mm.
Begin near the center and work outward, following a lightly marked path. Secure each line on the wrong side without forming bulky knots.
Repeat until all eight lines are complete.
Keep the surface stitches loose enough that the green fabric lies flat. The red decoration should appear raised, not tightly embedded.
Center Detail (Make 1)
Yarn: forest green.
R1: 6 sc in MR. (6)
R2: Inc ×6. (12)
R3: (1 sc, inc) ×6. (18)
Fasten off, leaving a 20 cm sewing tail.
Sew the small circle over the point where the decorative red lines meet.
This optional center detail conceals the embroidery starts and creates a cleaner radial junction.
Red Outer Border
Yarn: Christmas red.
After the bag body is assembled, join the red yarn at a lower corner on the front side.
Work single crochet evenly along the visible front seam, following the left side, bottom, and right side.
Place extra stitches only where needed to turn corners without curling. Work approximately one stitch per row along vertical edges and one stitch per stitch along horizontal edges, adjusting for actual gauge.
Fasten off and repeat on the back seam.
A second red slip-stitch pass can create a more prominent outline, similar to the raised border in the photograph.
Upper Opening Border
Yarn: Christmas red.
Join the red yarn at one side seam of the bag opening.
R1: Sc evenly around the entire opening; join with sl st. (Count depends on assembled perimeter.)
R2: Ch 1, sc in each stitch around; join with sl st. (Same count as R1.)
R3: Repeat R2. (Same count as R1.)
Fasten off and weave in the tail.
Check the opening after each round. If the upper edge pulls inward, loosen the tension or use a slightly larger hook for the edging.
Optional Decorative Label
Cut a small rectangular label approximately 3 × 1 cm, or use a ready-made washable fabric tag.
Position it near the upper-left portion of the front panel, away from the handle attachment area.
Sew it through several green stitches using matching thread. Avoid attaching it only to the raised red decoration.
Assembly – 10 Steps
- Prepare the panels. Lay the front and back pieces flat with the correct sides facing outward. Check that both measure the same width and height.
- Attach the gusset to the front. Pin the gusset around the left side, bottom, and right side of the front panel. Sew using mattress stitch or a firm slip-stitch seam.
- Join the back panel. Align the second long edge of the gusset with the back panel. Pin at the corners and center before sewing the full seam.
- Shape the body. Turn the bag right side out. Push the lower corners gently into position and inspect the base for twisting.
- Complete the radial decoration. If not embroidered before assembly, mark the eight paths and work the red surface lines now. Keep the central point aligned.
- Attach the center detail. Sew the small green circle over the embroidery junction using its reserved tail.
- Position the handles. Place the first handle on the front, with its ends approximately 7 cm from the side seams. Repeat on the back at matching positions.
- Reinforce the handle ends. Sew each end at least 3 cm below the upper rim, working around the attachment perimeter and diagonally through the area.
- Add the borders and label. Complete the red upper edging, outer seam edging, and optional decorative tag. Inspect each corner for puckering.
- Finish and block. Weave in all remaining yarn tails, lightly dampen the cotton fabric, and shape the bag on a flat surface until completely dry.
The completed bag has two reinforced handles, a flat gusseted base, red edging, and an eight-spoke decorative front panel.
7 Technical Tips for a Better Crochet Bag
- Stitch-marker drift: Place a marker at every 10th row when working the panels. A missing or additional row can produce mismatched side seams during assembly.
- Fabric firmness: Test a 10 × 10 cm swatch before starting the main panels. If the fabric stretches excessively under light tension, reduce the hook size by 0.5 mm and test again.
- Unnecessary decreases: Do not introduce invisible decreases into the rectangular front or back panels. Losing even one stitch gradually narrows the fabric and distorts the final dimensions.
- Handle placement: Position both ends of each handle approximately 7 cm from their nearest side seams. Unequal spacing causes the bag to tilt when carried.
- Yarn tension: Maintain the same tension across the green body and red border. An overly tight edging compresses the corners and can make the front panel bow.
- Pinning accuracy: Use at least eight pins to position the gusset before joining. Pin the corners and center points first, then distribute the remaining fabric evenly.
- Tail security: Weave each yarn tail through at least 5 cm of neighboring stitches, reverse direction, and pass through another 3 cm. Short, unsecured tails are especially vulnerable at handle attachments.
Troubleshooting Common Construction Problems
Why Is the Front Panel Curling?
Curling usually indicates tight foundation chains, inconsistent stitch tension, or a mismatch between the stitch width and row height.
Measure the fabric before attaching the gusset. If the starting edge is significantly narrower than the final row, remake the foundation using a hook 0.5 mm larger.
Why Does the Bag Sag at the Opening?
The upper edge may stretch if the handles pull directly on an unsupported row.
Work two or three firm rounds around the opening and sew handle ends several centimeters below the rim. A fabric lining can provide further support.
Why Are the Red Decorative Lines Uneven?
The eight embroidery paths may not be distributed evenly around the center.
Mark the endpoints before stitching. Measure opposite spokes from the central marker and compare their lengths.
Why Does the Bottom Twist?
A twisted bottom usually results from uneven gusset placement or pulling one seam tighter than the other.
Remove the affected seam, repin the corners, and rejoin the pieces without stretching the fabric.
Care and Maintenance
Cotton crochet bags should be washed according to the yarn manufacturer’s care instructions.
For a bag with decorative surface stitching, gentle handwashing may help preserve the raised details. Avoid wringing the fabric because twisting can distort the gusset and handles.
Lay the bag flat to dry. Reshape the corners while the fabric is damp.
If the handles stretch after repeated use, inspect the attachment stitches and consider adding a cotton webbing reinforcement.
Do not use the bag for heavy groceries or books until the handle construction has been tested under an appropriate load.
Conclusion
This Christmas crochet tote bag pattern combines dense single-crochet panels, a separate gusset, reinforced handles, and raised red embroidery to create a structured holiday handbag. The most important construction checks are consistent panel dimensions, balanced strap placement, and controlled decorative tension. Before making a second bag, record your finished gauge, yarn consumption, and handle length so the instructions can be repeated accurately.
Save the finished project to Pinterest with a clear front-view photograph, or share the completed bag on Instagram using #ChristmasCrochetToteBag. Include your yarn weight and hook size when posting. Would you keep all eight red radial lines, or replace some with a different Christmas-inspired geometric arrangement?









