Introduction
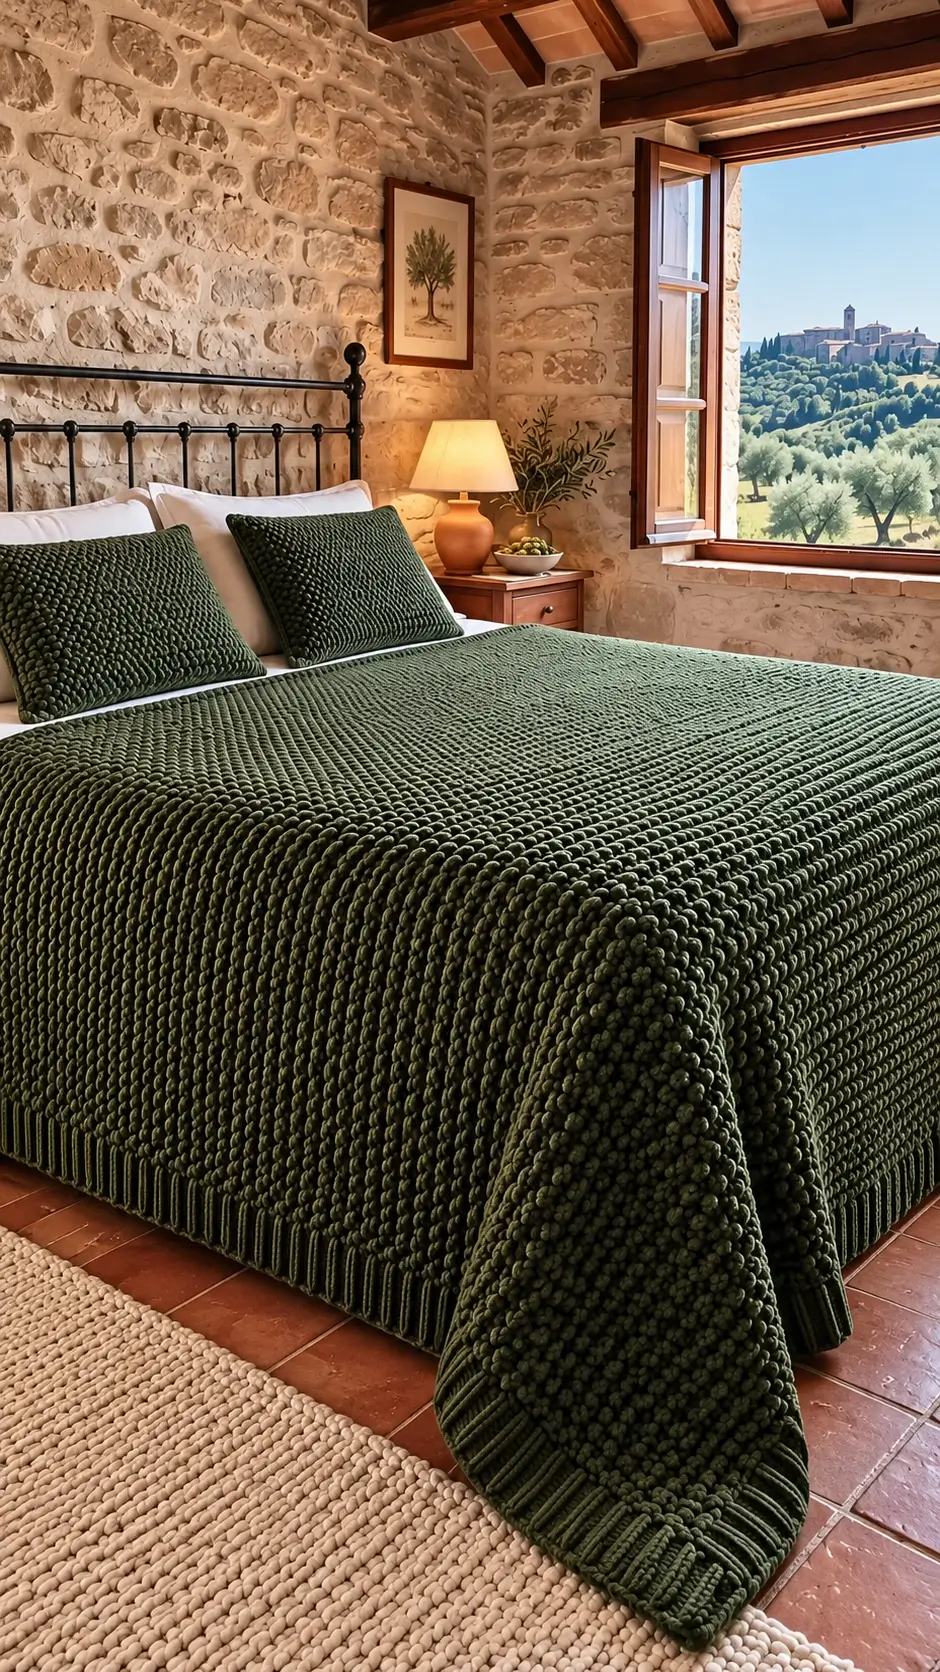
A dark olive bedspread needs closely spaced raised stitches and a deep ribbed edge to reproduce the distinctive surface shown in the reference photograph. This chunky crochet bedspread pattern uses bulky yarn, an 8 mm hook, and coordinated pillow panels to create a 230 × 250 cm bedding design. Intended for intermediate crocheters, the project combines repeatable stitch sections with removable pillow covers, making the finished set practical to maintain.
The Design: What Makes This Bedspread Different
The bedspread uses three structural elements: a dense textured center, an attached ribbed border, and matching square pillow fronts. Each element serves a different purpose.
The raised bobble stitches create the repeated three-dimensional surface. Their spacing is controlled so the fabric remains relatively flat instead of developing irregular ridges. You will work the bobbles on alternating textured rows, with plain single crochet rows separating them.
The olive green crochet bedspread also uses a ribbed perimeter. This edging frames the main panel and creates a stronger visual boundary at the mattress sides.
Matching crochet pillow covers repeat the same stitch arrangement at a smaller scale. The rear panels remain plain to reduce bulk behind the pillow inserts.
A common mistake with heavily textured blankets is working bobbles too tightly. This compresses the surface, reduces the finished width, and increases yarn consumption.
Project Info at a Glance
| Detail | Specification |
|---|---|
| Skill Level | Intermediate |
| Estimated Time | 70–110 hours |
| Bedspread Size | 230 × 250 cm |
| Pillow Size | 45 × 45 cm each |
| Hook Size | 8 mm |
| Yarn Weight | Category 5 Bulky |
| Main Technique | Single crochet, bobble stitch, BLO ribbing |
| Construction | Flat rows and attached borders |
| Best For | Queen beds with generous drape |
Measurements are approximate design targets. The completed dimensions depend on yarn selection, gauge, washing behavior, and border tension. This is an original, untested crochet interpretation of the photographed bedding.
Materials and Tools
Yarn
Choose a washable bulky yarn with enough stitch definition to show the raised bobbles. Smooth acrylic or an acrylic-wool blend is a practical starting point.
- Dark olive green bulky yarn (#5): For the main bedspread and matching pillow fronts. A smooth bulky yarn such as Lion Brand Hue + Me is one possible option, subject to color availability.
- Matching dark olive green bulky yarn (#5): For borders and pillow backs. Use the same brand, color, and dye lot when possible.
- Accent yarn: Not required.
How Much Yarn Will You Need?
The large dimensions and frequent bobbles make yarn consumption sensitive to stitch size and fiber density. A fixed gram estimate would not be reliable without testing the selected yarn.
Work a full-pattern 20 × 20 cm sample, including its proportion of bobble and plain rows. Weigh the sample after finishing.
The bedspread’s 220 × 240 cm central area contains 132 such sample areas, before adding the border.
For example, if a 20 × 20 cm sample weighs 30 g, the central bedspread would require approximately 3,960 g before the border. This is an illustration of the calculation, not a tested yarn requirement.
Calculate the border and pillow yarn separately, then allow an additional 10–15% for joins and adjustments.
Tools
- 8 mm crochet hook: Starting hook size; adjust to match gauge.
- 6.5–8 mm crochet hook: Optional for tighter edging.
- Stitch markers: At least eight locking markers.
- Measuring tape: For gauge and final measurements.
- Digital kitchen scale: For yarn calculations.
- Large-eye tapestry needle: For joining and weaving ends.
- Sharp scissors: For trimming yarn.
- Two 45 × 45 cm pillow inserts: Adjust covers to fit the inserts.
- Blocking mats or a clean flat surface: For checking measurements.
Crochet Abbreviations
| Abbreviation | Meaning |
|---|---|
| ch | Chain |
| sc | Single crochet |
| dc | Double crochet |
| st / sts | Stitch / stitches |
| sl st | Slip stitch |
| BLO | Back loop only |
| RS | Right side |
| WS | Wrong side |
| rep | Repeat |
| BO | Bobble stitch |
All instructions use US crochet terminology.
Special Stitch: Five-Double-Crochet Bobble
- Yarn over, insert the hook into the designated stitch, and pull up a loop.
- Yarn over and pull through two loops, leaving the unfinished double crochet on the hook.
- Repeat the unfinished double crochet into the same stitch four more times.
- Yarn over and pull through all six loops on the hook.
- Make the next stitch as directed.
The completed bobble counts as one stitch. Work bobbles from the wrong side if you want their raised surfaces to project toward the right side. Mark the preferred display face on your sample before beginning the full blanket.
Chunky Crochet Bedspread Pattern — Step by Step
This design is worked in turned rows, not continuous rounds. Turning chains do not count as stitches.
Part 1: Make the Gauge Swatch
Yarn: Dark olive green bulky yarn.
Foundation: Ch 25.
Row 1: Sc in the second chain from the hook and across (24).
Row 2: Ch 1, turn, sc across (24).
Row 3: Ch 1, turn, repeat [3 sc, BO] six times (24).
Row 4: Ch 1, turn, sc across (24).
Row 5: Ch 1, turn, sc across (24).
Row 6: Ch 1, turn, sc across (24).
Row 7: Ch 1, turn, repeat [1 sc, BO, 2 sc] six times (24).
Row 8: Ch 1, turn, sc across (24).
Repeat the eight-row stitch sequence until the sample is at least 20 cm high, working each new repeat into the existing stitches rather than making another foundation chain.
Measure the central 10 cm without stretching the fabric. The provisional design gauge is 10 stitches and 10 rows per 10 cm.
If the sample does not meet that gauge, adjust the hook or recalculate the starting stitch count. Because bobble rows can change fabric height, count complete eight-row repeats when measuring vertical gauge.
Part 2: Crochet the Main Bedspread Panel
Make 1. Yarn: Dark olive green.
The target center measures approximately 220 × 240 cm before adding the border.
Foundation: Ch 221.
Row 1: Sc in the second chain from the hook and across (220).
Row 2: Ch 1, turn, sc across (220).
Row 3: Ch 1, turn, repeat [3 sc, BO] 55 times (220).
Row 4: Ch 1, turn, sc across (220).
Row 5: Ch 1, turn, sc across (220).
Row 6: Ch 1, turn, sc across (220).
Row 7: Ch 1, turn, repeat [1 sc, BO, 2 sc] 55 times (220).
Row 8: Ch 1, turn, sc across (220).
Rows 9–240: Repeat the eight-row stitch sequence another 29 times, working into the existing stitches without making a new foundation chain. Maintain 220 stitches per row.
At the end of Row 240, check the length against the 240 cm target. If the length differs, add or remove complete eight-row repeats and record the adjustment.
Do not cut the yarn if you intend to work the perimeter setup round immediately.
Main Panel Stitch Counts
- Stitches per row: 220
- Total rows: 240
- Eight-row repeats: 30
- Textured rows: 60
- Bobbles per textured row: 55
- Total bobbles: 3,300
Each bobble replaces one single crochet position, so textured rows do not increase the stitch count. These figures are calculated from the written instructions and have not been verified by a completed sample.
Part 3: Prepare the Bedspread Border
Make one continuous perimeter setup.
Before adding the ribbing, create an even foundation around the central panel.
- Work one single crochet in each stitch across the top edge.
- At the first corner, work three single crochets into the corner position.
- Along the side, begin with approximately one single crochet per row end.
- Adjust the spacing if the fabric starts to wave or pull inward.
- Work three single crochets into each remaining corner.
- Continue around the bottom and opposite side.
- Join the setup round with a slip stitch.
Place markers at the four corners and at the midpoint of each side.
The correct side-edge pickup ratio depends on the actual row height. Do not force a fixed stitch count if it distorts the fabric.
Part 4: Work the Ribbed Border
Yarn: Dark olive green. Target border width: Approximately 5 cm.
An attached back-loop single crochet border creates ridges perpendicular to the main fabric.
Ribbing Row 1: Attach yarn to a foundation stitch. Ch 7, sc in the second chain from the hook and in the remaining five chains (6 sc). Sl st into the foundation stitch where the yarn was joined, then sl st into the next foundation stitch.
Ribbing Row 2: Turn, skip the attachment slip stitches, sc BLO across the six ribbing stitches (6). Ch 1, turn.
Ribbing Row 3: Sc BLO across (6). Sl st into the next two available foundation stitches, adjusting attachment spacing if necessary.
Repeat Rows 2–3 around the blanket.
At corners, spread the attachment points rather than stretching the outer ribbing. If the corner cups or flares, undo the affected section and change the pickup spacing.
Join the last ribbing row to the first with a mattress stitch or slip-stitch seam. Fasten off and weave the tail through several ribbing ridges.
Important: Six single crochet stitches do not automatically equal 5 cm. Measure the ribbing width on your sample and change the starting chain if necessary.
Part 5: Crochet the Matching Pillow Fronts
Make 2. Yarn: Dark olive green.
Each textured central pillow panel is designed to measure approximately 40 × 40 cm before edging.
Foundation: Ch 41.
Row 1: Sc in the second chain from the hook and across (40).
Row 2: Ch 1, turn, sc across (40).
Row 3: Ch 1, turn, repeat [3 sc, BO] ten times (40).
Row 4: Ch 1, turn, sc across (40).
Row 5: Ch 1, turn, sc across (40).
Row 6: Ch 1, turn, sc across (40).
Row 7: Ch 1, turn, repeat [1 sc, BO, 2 sc] ten times (40).
Row 8: Ch 1, turn, sc across (40).
Rows 9–40: Repeat the eight-row stitch sequence four more times, working into the existing stitches (40 stitches per row).
Fasten off, leaving a 20 cm tail for finishing.
Each pillow front contains ten bobbles per textured row and ten textured rows, producing 100 bobbles per pillow front.
Part 6: Crochet the Pillow Backs
Make 4 back panels total: Two for each pillow.
The backs use single crochet rather than bobbles. This reduces bulk behind the pillow inserts and makes the covers easier to remove.
Foundation: Ch 41.
Row 1: Sc in the second chain from the hook and across (40).
Rows 2–26: Ch 1, turn, sc across (40).
Fasten off, leaving a 25 cm sewing tail.
At the proposed gauge, each back panel is approximately 40 cm wide and 26 cm high. Two panels overlap by approximately 12 cm when aligned with the 40 cm front.
The overlapping panels form an envelope opening that allows the pillow insert to be removed without a zipper.
Part 7: Add the Pillow Borders
Work an evenly spaced single crochet setup round around each pillow front, placing three single crochets at each corner.
Attach a ribbed edging using the same back-loop method as the bedspread. Start with fewer chains to create a narrower border, aiming for approximately 2.5 cm.
Check that the final outer measurement is near 45 × 45 cm.
The pillow back pieces must cover the opening inside the border. Attach them to the inner edge of the front’s ribbing rather than stretching them across its outer perimeter.
If the pillow insert is especially firm, test the cover around the insert before completing the seams.
Assembly Instructions
- Lay the completed bedspread flat and measure the center panel in both directions.
- Inspect the ribbed border for uneven corners or changes in width.
- Mark the right side of both pillow fronts so the raised bobbles face outward.
- Place the first pillow front face down on a clean work surface.
- Position two back panels over it, with their overlapping edges toward the center.
- Align the outside edges of the back panels with the inner boundary of the front’s ribbing.
- Pin the layers, keeping the central envelope opening free.
- Sew the back panels to the front around the perimeter, working through the available edge stitches without pulling the seam tight.
- Repeat for the second pillow, turn both covers right side out, and insert the pillow forms.
- Weave in remaining yarn ends, inspect the seams, and measure the finished bedding pieces.
The completed set consists of one textured bedspread and two removable pillow covers.
7 Technical Tips for a More Accurate Result
- Stitch-marker drift: Place a marker every 20 stitches across the main panel. If a marker moves relative to the stitch count, correct the error before working the next bobble row.
- Uneven bobble height: Keep the five unfinished double crochets in each bobble at a consistent height. Shortened loops can make the textured surface pull inward.
- Incorrect gauge: Measure a central 10 × 10 cm section after the swatch has relaxed. A difference of one stitch per 10 cm can substantially change a 220 cm-wide panel.
- Border flaring: If the outer ribbing develops waves, the attachment stitches may be too closely spaced. Remove a short section and reduce the number of attachment points before continuing.
- Bulky yarn tension: Avoid tightening the working loop after every bobble. Repeated tension changes can create visible horizontal bands across the bedspread.
- Pillow alignment: Pin each pillow back at all four corners before sewing. A displacement of even 1–2 cm can make the finished pillow appear twisted.
- Loose yarn tails: Weave tails at least 10 cm through neighboring stitches, reversing direction where possible. Trim only after checking that the ends remain secure when the fabric is gently stretched.
How to Adjust the Bedspread for Different Bed Sizes
The bedspread shown in the reference image has a substantial drop over the mattress sides. To reproduce that proportion, measure the mattress rather than selecting a blanket size solely from its bed label.
Finished width = Mattress width + (2 × Desired side drop)
For length, include the desired foot drop and any additional coverage required near the pillows.
| Bed Style | Suggested Finished Bedspread |
|---|---|
| Twin | 170 × 230 cm |
| Full | 200 × 240 cm |
| Queen | 230 × 250 cm |
| King | 270 × 260 cm |
These measurements are illustrative design targets, not standardized bedding specifications.
At a gauge of ten stitches per 10 cm, every additional four stitches adds approximately 4 cm of panel width. Maintain a stitch count divisible by four so the bobble repeats remain complete.
For length adjustments, add or remove eight-row sections. Each complete section preserves the alternating bobble placement.
The border adds width and length beyond the center panel. Subtract twice the planned border width from each finished dimension when calculating the central rectangle.
Washing, Drying, and Storage
A bedspread containing thousands of raised bobbles can become heavy when wet. Fiber selection and washing instructions therefore matter before the first stitch is made.
Check the yarn label for permitted washing temperatures, agitation, and drying methods. Do not assume that all bulky acrylic or wool-blend yarns have the same care requirements.
Wash the gauge swatch before committing to the full project. Measure it both before and after washing to identify shrinkage, growth, or distortion.
When drying the completed bedspread, support its weight so wet fabric does not stretch under its own mass. Flat drying may be appropriate for some yarns, while others have different manufacturer instructions.
Store the set folded rather than hanging. This reduces the risk of prolonged stretching at the ribbed edges.
Conclusion
This chunky crochet bedspread pattern translates the reference image into a coordinated bedding project with raised bobble stitches, olive-green yarn, attached ribbing, and two matching pillow covers. The written stitch counts provide a consistent construction plan, while the final dimensions depend on the gauge established with the selected yarn.
Before purchasing the full yarn quantity, complete and weigh a 20 × 20 cm sample, wash it, and confirm the measurements. Save the finished project on Pinterest or share progress photos on Instagram with #OliveGreenCrochetBedspread.
For this particular design, would you prefer the bobbles to cover the entire bedspread or appear only across the visible top surface?








