Introduction
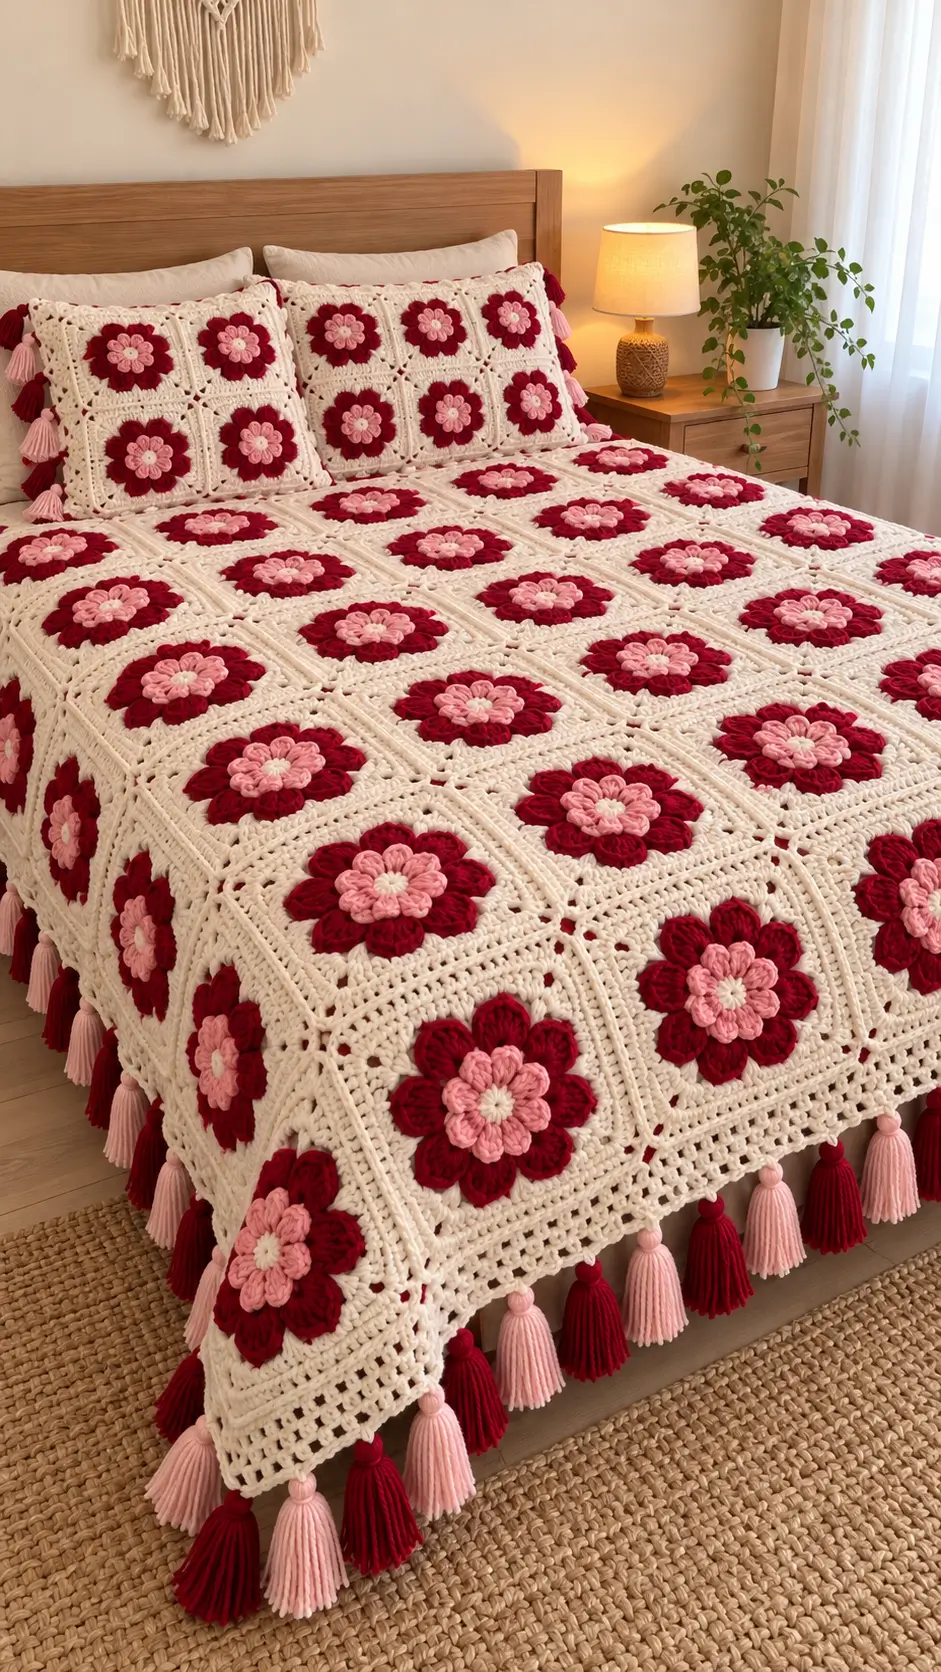
Two stacked petal layers make each flower rise above the cream square instead of disappearing into the blanket surface. This 3D flower granny square crochet blanket uses burgundy outer petals, pink inner petals and a small cream center. The photographed design adds raised cream joins, an openwork perimeter and alternating pink and burgundy tassels. It is best suited to an intermediate crocheter who can work clusters, corners and motif joins.
The Design: What Makes This Flower Blanket Different
The blanket is constructed from individual floral squares rather than worked as one continuous piece. Each motif begins at the flower center, develops into two contrasting petal layers, then transitions into a cream square. That construction keeps the flowers visually separate while creating a consistent grid across the bed.
The second structural feature is depth. Burgundy petals form the larger lower flower while pink petals sit above them, producing the pronounced 3D flower granny square appearance visible in the photograph. Comparable published floral squares use popcorns, clusters and layered stitches to create similar dimensional effects. Flower granny squares can range considerably in size: published examples include approximately 12.5 cm squares made with worsted cotton and a 4.5 mm hook and 16 cm squares made with weight-4 yarn and a 5 mm hook.
The most common construction error is allowing the flower rounds to become too tight before squaring the motif. That produces a raised center and corners that refuse to lie flat.
Project Info at a Glance
| Skill Level | Construction | Square Size | Hook | Best For |
|---|---|---|---|---|
| Intermediate | Joined motifs | Approx. 15–16 cm | 5 mm | Bedspreads, throws and matching pillow covers |
A published 3D flower granny square made with weight-4 yarn and a 5 mm hook measures approximately 16 cm. Another documented flower square made with worsted cotton and a 4.5 mm hook measures 12.5 cm. Your finished measurement therefore depends on yarn, hook and tension.
Materials and Tools
Yarn
- Cream / warm ivory — worsted weight #4 — main background, joining and border color
- Deep burgundy — worsted weight #4 — large lower petals and tassels
- Dusty pink — worsted weight #4 — raised inner petals and tassels
- Warm cream — worsted weight #4 — flower centers
For a bed-sized project, purchase the cream yarn in a single dye lot because it occupies most of every square and all joining areas. Burgundy and pink consumption depends on the number and depth of petals.
Tools
- 5 mm crochet hook
- Worsted weight #4 yarn
- Yarn needle
- Locking stitch markers
- Scissors
- Tape measure
- Blocking mats
- Rust-resistant blocking pins
- Cardboard tassel template approximately 10–12 cm long
Abbreviations
- MR — magic ring
- ch — chain
- sl st — slip stitch
- sc — single crochet
- hdc — half double crochet
- dc — double crochet
- tr — treble crochet
- sp — space
- st/sts — stitch/stitches
- dc2tog — double crochet two together
- dc3tog — double crochet three together
For a cluster, leave the final loop of each partial stitch on the hook, then yarn over and pull through all remaining loops together.
3D Flower Granny Square Pattern
The following motif is an original construction developed to reproduce the visual structure of the uploaded photograph rather than a transcription of another designer’s pattern. Work each square separately and block every motif to the same measurement before joining.
Flower Center
Yarn: cream.
Round 1: Make a MR. Ch 1, work 8 hdc into ring. Pull the ring closed and join with sl st to first hdc. (8 hdc)
Fasten off.
The eight-stitch center establishes eight positions for the first petal layer.
Pink Inner Petals
Yarn: dusty pink.
Join pink yarn to any stitch of Round 1.
Round 2: Ch 1. In the same stitch work (hdc, 3 dc, hdc), sl st into next stitch. Repeat the petal sequence around until 8 petals have been formed.
(8 pink petals)
Fasten off.
Push the petals toward the front of the motif before beginning the burgundy layer. The pink petals should overlap slightly but should not fold tightly into the center.
Burgundy Outer Petals
Yarn: deep burgundy.
The second flower layer is worked behind the pink petals.
Join burgundy yarn around the post or available back structure between two pink petals.
Foundation Round: Ch 1, sc around the back of the first petal position, ch 3. Repeat around, ending with sl st to first sc. (8 ch-3 spaces)
Outer Petal Round: Sl st into first ch-3 sp. In each ch-3 sp work (sc, hdc, 4 dc, hdc, sc). Repeat around.
(8 burgundy petals)
Fasten off.
The larger burgundy layer should remain visible beyond the pink petals. If the burgundy petals curl strongly toward the center, move up one hook size for this round only or loosen the chains supporting the petals.
Preparing the Flower for the Square
Yarn: cream.
Join cream behind any burgundy petal.
Round 1: Ch 1, sc into the back structure between petals, ch 3. Repeat around. Join with sl st. (8 sc, 8 ch-3 spaces)
Round 2: Sl st into first ch-3 sp. Ch 3, work 3 dc in same space, ch 2. Work 4 dc in each remaining ch-3 sp with ch 2 between groups. Join with sl st.
The cream stitches should remain behind the petals. Pull the flower forward before continuing.
Turning the Flower into a Square
Yarn: cream.
This round establishes four corners around the circular flower.
Square Round 1: Begin in a ch-2 space. Ch 3 and work 2 dc in the same space. Ch 1.
In the next space work 3 dc, ch 2, 3 dc to create the first corner.
Ch 1, work 3 dc in next space, ch 1, then create another corner in the following space with (3 dc, ch 2, 3 dc).
Continue this sequence around until four corners have been formed. Join with sl st to the top of beginning ch-3.
The motif should now show a clear square outline surrounding the raised flower.
Cream Expansion Round
Square Round 2: Sl st to the first ch-1 space. Ch 3, work 2 dc in the same space.
Work 3 dc in each ch-1 space along the side.
In every corner ch-2 space work:
(3 dc, ch 2, 3 dc)
Continue around all four sides. Join with sl st.
Do not allow the corner chains to become tighter than the side spaces. Tight corners pull the square inward and make joining more difficult.
Solid Cream Framing Round
The photographed blanket has a substantial cream frame surrounding each flower rather than stopping immediately after the motif becomes square.
Square Round 3: Ch 3. Dc in each stitch and chain space across the first side. In the corner space work (2 dc, ch 2, 2 dc).
Repeat across all four sides. Join with sl st.
Square Round 4: Ch 1, sc in each stitch across. In each corner space work (2 sc, ch 2, 2 sc). Repeat around and join.
Fasten off and weave in the tail.
Block the square to approximately 15–16 cm. More important than hitting an exact measurement is making every square identical.
How Many Squares to Make
The exact motif count depends on the mattress, desired drop and finished square measurement. Do not copy the apparent square count in the photograph without measuring your own motifs.
For planning, use this formula:
Required blanket width ÷ blocked square width = number of squares across
Required blanket length ÷ blocked square height = number of squares down
For example, a 16 cm motif arranged 10 squares across creates approximately 160 cm before accounting for joining and the outer border. Twelve motifs down would create approximately 192 cm before the border.
Make one complete square first. Wash or block it according to the yarn care instructions, measure it, then calculate the final motif count.
Joining the Flower Granny Squares
The photograph uses pronounced cream lines between motifs. A visible crochet join works better for this appearance than an entirely hidden mattress seam.
Single Crochet Join
Block all squares to matching dimensions before joining.
Arrange the motifs on a large flat surface. Check the orientation of every flower before beginning.
Place two squares with wrong sides together and corresponding edges aligned.
Join cream yarn at one corner. Insert the hook through the corresponding edge stitches of both squares and work one sc.
Continue with one sc through each matching pair of stitches across the seam.
At the corner, secure the join without adding unnecessary stitches. Fasten off or continue directly into the next pair of squares if using a continuous joining plan.
Join all horizontal seams first, then work the vertical seams. A single crochet join naturally creates the raised cream grid visible between the floral motifs.
Openwork Blanket Border
After all motifs have been joined, work around the complete rectangle in cream.
Border Round 1
Join cream in any outer corner.
Ch 1 and sc evenly around the blanket. Place one stitch in each available edge stitch and add stitches where necessary across joining seams.
At each blanket corner work (2 sc, ch 2, 2 sc).
Join with sl st.
Border Round 2
Ch 3. Dc in each stitch around.
At every corner work (2 dc, ch 2, 2 dc).
Join with sl st.
Border Round 3 — Openwork
Ch 4. Skip 1 stitch, dc in next stitch, ch 1. Repeat skip 1, dc in next, ch 1 around.
At each corner work (dc, ch 2, dc) into the corner space.
Join with sl st.
Border Round 4
Ch 1. Work sc into each dc and each ch-1 space around.
In each corner ch-2 space work (2 sc, ch 2, 2 sc).
Join and fasten off.
The openwork round provides attachment points for the tassels while keeping the lower edge lighter than the solid floral squares.
Pink and Burgundy Tassels
The alternating tassels are a major part of the photographed design. Keep their finished lengths consistent or the lower edge will look irregular even when the crochet border is level.
Make Each Tassel
- Cut a piece of cardboard approximately 10–12 cm tall.
- Wrap pink or burgundy yarn around the cardboard approximately 25–35 times.
- Thread a separate strand beneath the wraps at the upper edge and tie tightly.
- Cut through all wrapped strands at the opposite edge.
- Fold the bundle downward from the top tie.
- Wrap another strand around the tassel approximately 1.5–2 cm below the top.
- Tie securely and weave the wrapping ends into the tassel.
- Trim the bottom to an even finished length.
Alternate burgundy, pink, burgundy, pink around the visible blanket edges. Attach each tassel through a border space using its upper tie.
For a blanket used by infants or very young children, omit detachable decorative tassels and other loose embellishments.
Matching 3D Flower Granny Square Pillow Covers
The pillows in the photograph repeat the same motif at a smaller scale. A simple cover can be constructed from two square panels.
Make enough flower motifs to form the desired front panel. A 3 × 3 arrangement of 16 cm motifs produces a panel approximately 48 cm square before joining and edging. Adjust the motif size or number of squares to fit the pillow insert.
Join the front motifs with the same cream single crochet seam used for the blanket.
For the back, either make another floral panel or crochet a plain cream square to the same finished dimensions.
Place the panels together and sc around three sides. Insert the cushion form, then close the remaining edge using removable buttons, a zipper, or a crochet seam according to the intended laundering method.
Attach tassels only after the cover has been assembled and measured.
Assembly
- Crochet one complete flower square and block it to establish the finished motif measurement.
- Make the required number of cream, pink and burgundy flower squares.
- Weave in all flower-center and color-change tails before joining.
- Block every motif to exactly the same width and height.
- Arrange the squares in the final grid and check that every flower faces the same direction.
- Join the horizontal motif rows with cream single crochet seams.
- Join the vertical seams to complete the blanket grid.
- Work the solid and openwork cream border around the complete blanket.
- Make equal-length pink and burgundy tassels and attach them at consistent intervals.
- Lay the finished blanket flat and correct any twisted tassels, loose tails or distorted corner joins.
The completed construction should form a regular cream grid with raised two-layer flowers centered consistently inside every motif.
7 Technical Tips for Better 3D Flower Squares
- Block every motif to the same 15–16 cm measurement. Even a 5 mm difference multiplied across ten squares can shift the opposite blanket edge by approximately 5 cm.
- Keep the pink petals in front of the burgundy layer. Accidentally catching a pink petal while working the back foundation anchors it flat and destroys part of the 3D effect.
- Check all four corners after the first squaring round. If one corner sits closer to the flower than the other three, the circular foundation has probably been divided unevenly.
- Do not overstuff the center with stitches. Excess stitches around the flower create a bowl-shaped motif that remains visible after joining.
- Pin the blocked corners to identical dimensions. Joining an unblocked 15 cm square beside a 16 cm square forces excess fabric into the seam and produces rippling.
- Keep single crochet joining tension looser than petal tension. A tight joining seam can shorten every motif edge and create raised ridges across the finished bedspread.
- Cut all tassels against the same 10–12 cm template. Freehand wrapping produces inconsistent lengths, which becomes obvious when alternating two strongly contrasting colors.
Choosing Yarn for a Bed-Sized Flower Blanket
Worsted weight yarn is a practical choice when reproducing the substantial flowers visible in this design. Published 3D flower squares provide useful reference points: one documented pattern uses worsted yarn with a 5 mm hook to produce a 16 cm motif, while another large floral square uses worsted yarn with a 5.5 mm hook and measures approximately 30.5 cm.
DK yarn can also be used. Published 3D flower granny square patterns exist with DK yarn and a 4 mm hook, but the resulting motif dimensions and required square count must be recalculated.
For a bedspread, yarn consistency matters more than matching a particular brand. Use the same yarn line for all cream sections when possible. Differences in fiber content, twist or thickness can make joined squares behave differently during blocking and laundering.
How to Keep the Flowers Raised
The dimensional effect depends on keeping the petals structurally separate from the background. When working the cream foundation behind the flower, insert the hook only into the designated rear spaces rather than through the petal fabric.
Avoid aggressive blocking directly over the flower. Pin the square perimeter to size and arrange the petals with your fingers while damp. Pressing the flower flat under a heavy object can reduce the layered profile.
The burgundy petals should remain wider than the pink layer. If both layers finish at almost identical diameters, the lower petals disappear. Increase the burgundy petal height slightly or reduce the pink layer rather than adding more petals.
Conclusion
The key measurement for this 3D flower granny square crochet blanket is the blocked motif size. Complete one cream, burgundy and pink square first, block it to approximately 15–16 cm, then calculate the number required for the intended bed width and length. Make the remaining motifs in batches, join them with raised cream seams, and add the openwork perimeter only after the grid lies flat. Finish by spacing equal-length burgundy and pink tassels around the selected edges. Save the pattern to Pinterest or share the completed version on Instagram with #BurgundyBloomGrannyBlanket. Would you keep the burgundy outer petals, or reverse the two flower colors and put pink underneath?








