Introduction
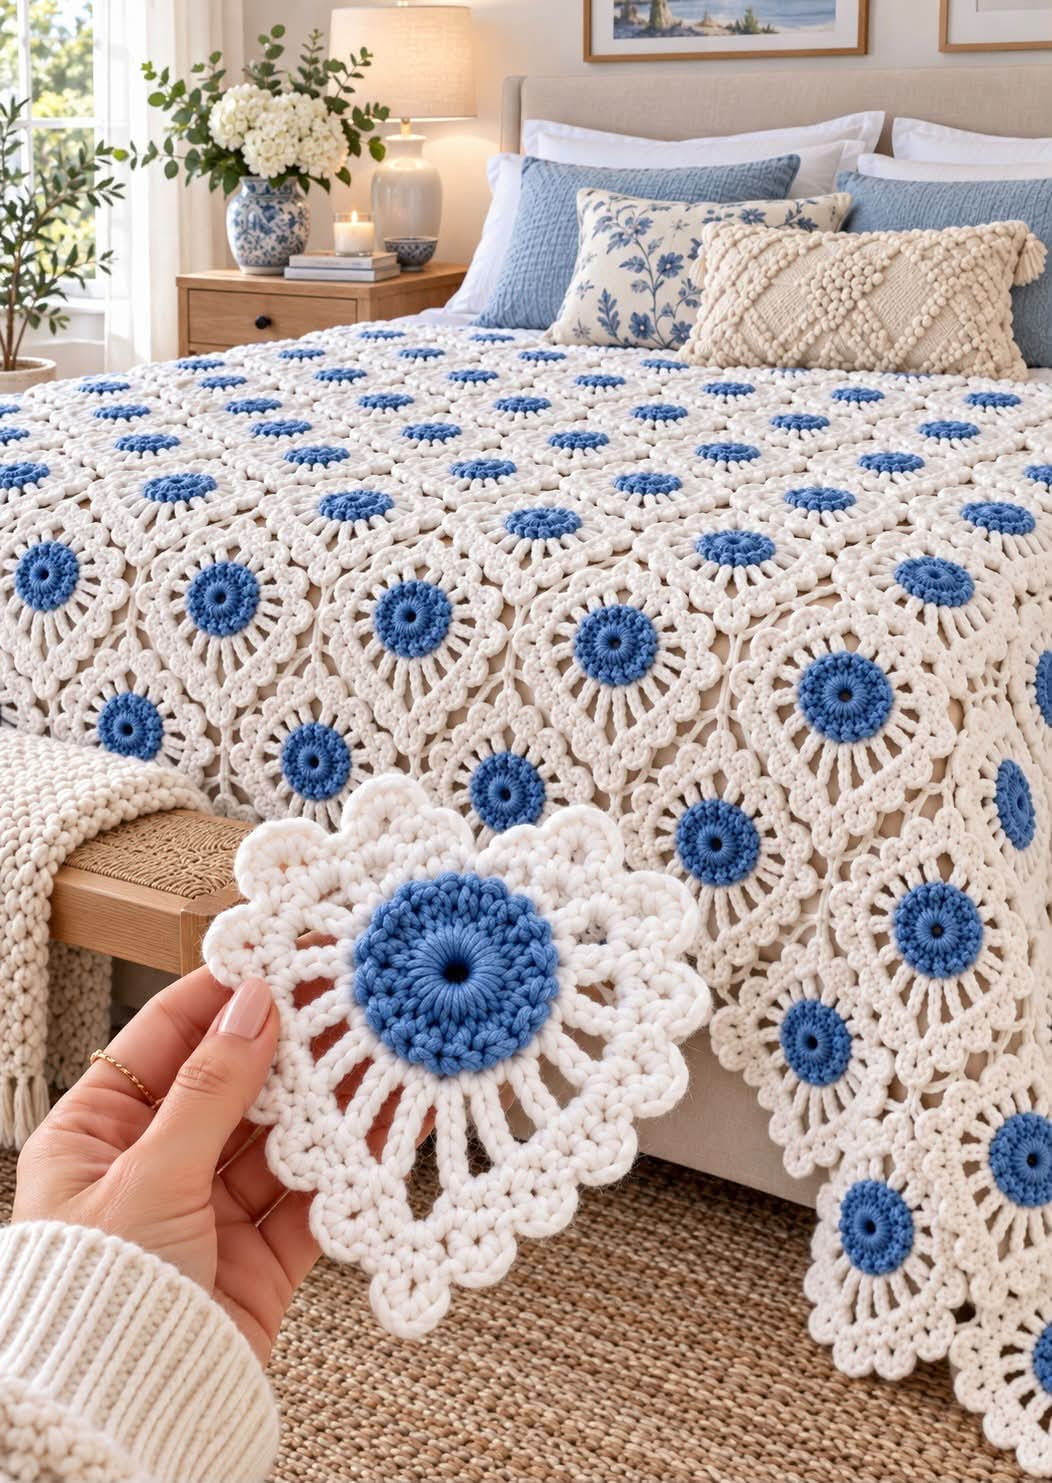
The blue centers of these crocheted daisies form a repeating grid across an openwork white blanket. This crochet daisy blanket pattern uses circular flower motifs with raised blue centers, elongated white spokes, and scalloped outer petals. Designed for intermediate crocheters, the project uses worsted-weight yarn and a 5 mm hook. The modular construction makes it possible to adjust the blanket’s dimensions by adding or removing complete flower motifs.
The Design: What Makes This Daisy Blanket Different
Unlike a traditional granny square blanket, this floral throw relies on circular motifs with pronounced openwork spaces. Each daisy begins with a blue center that remains slightly raised above the surrounding white stitches. The center is followed by a ring of elongated stitches that creates the characteristic radiating appearance of the petals.
The outer scalloped round adds texture and provides attachment points for joining neighboring flowers. This construction produces a lightweight lace effect while preserving enough fabric for a functional blanket.
The most important technical detail is maintaining consistent motif diameter. If individual flowers differ in size, the joined blanket may develop waves or uneven edges.
The blue and white color arrangement also emphasizes the geometric repetition. The flower centers create a regular visual rhythm, while the ivory stitches connect the motifs into one continuous fabric.
Project Information at a Glance
| Project Detail | Specification |
|---|---|
| Skill Level | Intermediate |
| Estimated Time | 40–60 hours |
| Target Finished Size | Approximately 150 × 200 cm |
| Crochet Hook | 5.0 mm |
| Yarn Weight | Worsted / Aran |
| Main Colors | Ivory white and cornflower blue |
| Construction | Individual circular flower motifs |
| Joining Method | Slip-stitch or sewn joins |
| Best For | Bedspread, decorative throw, floral home décor |
Measurements and working time are estimates for this adaptation. The final size depends on motif gauge, the number of flowers, and the joining arrangement.
Materials and Tools
Yarn
Choose a soft worsted-weight yarn with consistent thickness. Acrylic, cotton-acrylic blends, and washable wool blends are suitable options.
- Ivory white worsted yarn — approximately 1,600–2,000 g: For the petals, connecting stitches, and border.
- Cornflower blue worsted yarn — approximately 350–500 g: For the circular daisy centers.
- Additional ivory yarn — 100 g allowance: For finishing and adjustments.
These quantities are purchasing estimates rather than measured consumption. Make one complete motif, weigh it by color, and multiply by the planned number of flowers before purchasing the full quantity.
Tools
- 5.0 mm crochet hook
- 4.5 mm crochet hook for tighter centers if needed
- Yarn needle for joining and weaving in ends
- Locking stitch markers
- Sharp scissors
- Measuring tape
- Blocking mats and rustproof pins
- Digital kitchen scale for yarn consumption measurements
Crochet Abbreviations
All instructions use US crochet terminology.
| Abbreviation | Meaning |
|---|---|
| MR | Magic ring |
| ch | Chain |
| sc | Single crochet |
| hdc | Half double crochet |
| dc | Double crochet |
| tr | Treble crochet |
| sl st | Slip stitch |
| st(s) | Stitch(es) |
| sp | Space |
| rep | Repeat |
| FO | Fasten off |
Understanding the Daisy Motif Construction
The photographed blanket appears to use repeating circular motifs. Each flower has three visible structural sections: a blue circular center, an openwork white ring, and a scalloped white perimeter.
The following written motif is an original approximation of that structure. It uses twelve repeated sections around each flower to simplify counting and joining.
Work each motif in joined rounds rather than a continuous spiral. Keep the right side facing throughout the construction.
Gauge target: Approximately 15 cm across one completed, blocked motif. This is a design target, not a measurement taken from the photograph.
Free Blue and White Crochet Daisy Blanket Pattern
Part 1: Blue Daisy Center
Yarn: cornflower blue. Hook: 5.0 mm.
R1: Make a magic ring. Ch 3 (counts as first dc), work 11 dc into the ring. Pull the ring closed and join with sl st. (12 dc)
R2: Ch 3 (counts as first dc), work 1 dc in the same stitch. Work 2 dc in each remaining stitch around. Join. (24 dc)
R3: Ch 1, sc in each stitch around. Join. (24 sc)
R4: Ch 1, work 1 sc in the first stitch and 2 sc in the next stitch. Repeat around. Join. (36 sc)
Fasten off the blue yarn, leaving a 15 cm tail.
The completed center should be circular and lie reasonably flat. If the edges begin to cup, check stitch tension before continuing.
The center in the photograph has a small visible opening. Leave a slight central opening if desired, but secure the starting tail so the ring cannot loosen during use.
Part 2: White Openwork Spokes
Yarn: ivory white.
Join white yarn into any stitch of the blue center.
R5: Ch 1, sc in the same stitch. Ch 5, skip 2 stitches, sc in the next stitch. Repeat the ch-5 and skip-2 sequence around. Finish with ch 5 and join to the first sc. (12 sc, 12 ch-5 spaces)
R6: Sl st into the first ch-5 space. Ch 1, work (sc, ch 7, sc) into the same space. Repeat (sc, ch 7, sc) in each remaining ch-5 space. Join. (24 sc, 12 ch-7 spaces)
These long chain spaces form the radiating openings between the blue center and the outer petals.
Keep the chains relaxed and consistent. Tight chains can pull the flower inward and reduce its diameter.
Part 3: White Scalloped Petals
Continue with ivory white yarn.
R7: Sl st into the first ch-7 space. Ch 1, work (2 sc, 3 hdc, 3 dc, 3 hdc, 2 sc) into the same space. Repeat in each remaining ch-7 space. Join with sl st. (156 stitches; 12 scalloped sections)
Each scalloped section contains thirteen stitches.
R8: Ch 1. Work 1 sc into each stitch around, placing a ch-2 space between adjacent scalloped sections. Join. (156 sc, 12 ch-2 spaces)
Fasten off, leaving a 25 cm tail for joining.
Lay the flower on a flat surface. Its outer edge should form twelve rounded scallops.
The completed motif is expected to measure approximately 14–16 cm, depending on yarn and tension. Block the sample before determining how many motifs are required.
Part 4: Making the Remaining Daisy Motifs
Repeat Parts 1–3 for every flower in the blanket.
Use the same hook, yarn weight, and tension for all motifs. Do not switch between hooks of different sizes after completing the sample.
For a planned 150 × 200 cm blanket, a preliminary layout might use approximately 10 motifs across and 13 motifs down, depending on their joined spacing.
This gives a planning quantity of 130 motifs. However, circular motifs do not fill a rectangular area without gaps or connecting sections, so the final dimensions must be checked using a joined sample.
Before making all 130 motifs, complete four flowers and join them into a small test panel. Measure its width and height, then calculate the required number of motifs from that result.
Part 5: Joining the Daisy Flowers
Yarn: ivory white.
Arrange the completed flowers on a flat surface with the blue centers facing upward.
For this adaptation, neighboring flowers are connected at selected scallop tips using a yarn needle or slip stitches.
Step 1: Place two motifs side by side with the right sides facing upward.
Step 2: Identify two corresponding scallop tips along their adjacent edges.
Step 3: Thread ivory yarn through the top stitches of the first matching pair and secure them with two small sewing passes.
Step 4: Repeat at the second matching pair of scallop tips.
Step 5: Continue adding flowers in rows, checking the spacing after each new motif.
Step 6: Connect adjacent rows at corresponding contact points, leaving the decorative openings between the flowers.
Do not pull the joining yarn tightly. Overly tight connections can fold the petals and make the blanket narrower than the original layout.
Important: Two-point joins alone create a loose lace network. For a blanket intended for frequent use, add more attachment points where motifs meet and test the strength of a four-motif sample before continuing.
Part 6: Filling the Spaces Between Flowers
The circular shape of each motif leaves open spaces between neighboring flowers. Small crochet connectors can help stabilize these areas.
Connector R1: Make MR, work 6 sc into the ring, and join. (6 sc)
Connector R2: Work 2 sc into each stitch around. Join. (12 sc)
Connector R3: Repeat [sc in next stitch, ch 3, skip next stitch] six times. Join. (6 sc, 6 ch-3 spaces)
Fasten off, leaving a 20 cm sewing tail.
Place each connector into a suitable gap between neighboring motifs. Attach its chain spaces to the surrounding scallop edges.
Not every opening requires a connector. Use them where four flowers meet or where the fabric needs additional stability.
Count the actual gaps after laying out the motifs, because the number of connectors depends on the joining arrangement.
Part 7: Crochet Blanket Border
Yarn: ivory white.
A consistent border helps define the outer edges of the floral blanket.
Border R1: Join ivory yarn at an outer edge. Work sc evenly around the blanket, using additional chain stitches to bridge large openings between outer motifs. Join.
Border R2: Ch 1, work sc in each stitch around. At corners, add extra stitches as required to keep the fabric flat. Join.
Border R3: Repeat [skip 1 stitch, 5 dc in next stitch, skip 1 stitch, sl st in next stitch] along straight edges, adjusting the final repeat at each corner. Join.
Fasten off and weave in the remaining yarn ends.
Because the outside edge is formed by circular motifs, the border may require individual adjustment. Mark the four corners before beginning and distribute the stitches evenly.
How to Assemble the Crochet Daisy Blanket
- Complete one blue and white daisy motif and block it to measure the finished diameter.
- Make three additional motifs and connect them into a test panel.
- Measure the joined sample and calculate the number of motifs required for the planned blanket dimensions.
- Crochet the remaining blue centers using consistent stitch tension.
- Add the white openwork spokes to each blue center.
- Complete the scalloped white petal rounds on every flower.
- Block the motifs and arrange them into the selected blanket layout.
- Join adjacent flowers at matching scallop points and add connectors where necessary.
- Work the outer border, maintaining an even edge and stable corners.
- Weave in all yarn tails, inspect the joins, and measure the finished blanket after blocking.
The completed blanket consists of repeated blue-centered white daisy motifs connected into a continuous floral fabric.
7 Technical Tips for a Consistent Daisy Blanket
- Mark the beginning of every round. A stitch marker prevents accidental increases or missing stitches in the blue center. Check that Round 4 contains exactly 36 single crochet stitches.
- Maintain consistent center diameter. Compare the first five blue centers before crocheting the white petals. Differences greater than 5 mm can become more noticeable after joining.
- Control chain tension. The ch-7 spaces in the openwork ring must be similar in length. Short chains pull the scalloped petals inward and produce uneven flowers.
- Check the petal count. Each flower has twelve scalloped sections in this adaptation. Missing one section changes the outer circumference and complicates joining.
- Block before assembly. Pin each motif to the same target diameter without overstretching the chains. Allow the yarn to dry fully before removing the pins.
- Reinforce joining points. Weak connections can separate when the blanket is lifted. Secure each attachment through multiple stitch loops and test a four-motif sample.
- Weave tails in two directions. Thread each tail through several centimeters of dense stitches, reverse direction, and weave through a second section. Avoid hiding tails only inside open chain spaces.
How to Adjust the Blanket Size
The modular flower construction allows the blanket to be adapted to several dimensions.
| Blanket Type | Target Size | Approximate Motif Count |
|---|---|---|
| Baby Blanket | 75 × 90 cm | 30–42 motifs |
| Lap Blanket | 100 × 120 cm | 56–72 motifs |
| Throw Blanket | 120 × 150 cm | 80–100 motifs |
| Large Bed Throw | 150 × 200 cm | 120–150 motifs |
These motif counts are approximate planning ranges. Actual requirements depend on the blocked motif diameter, the joining method, and the spacing between rows.
For accurate sizing, measure a joined sample containing at least four motifs. Divide the desired blanket width and length by the measured repeat spacing to estimate the required layout.
Choosing the Best Yarn for a Crochet Daisy Blanket
Yarn selection affects the blanket’s weight, drape, stitch definition, and washing requirements.
Acrylic Yarn
Worsted-weight acrylic is a practical option for a large blanket. It is available in many shades of blue and ivory and is often machine washable according to the manufacturer’s instructions.
Choose a smooth yarn rather than a heavily textured variety so the petal stitches remain visible.
Cotton Yarn
Cotton produces well-defined stitches and a more structured floral appearance. However, a large cotton blanket can become heavy, particularly when the motifs contain several dense rounds.
Use a lighter cotton blend if you prefer a softer drape.
Wool Blends
Wool blends can provide warmth and elasticity. Select a washable blend if the blanket will be used frequently.
Always check the yarn label before laundering, because heat and agitation can change the size or texture of wool fibers.
Color Variations for the Daisy Blanket
The photographed blanket uses cornflower blue centers and ivory white petals. This two-color arrangement highlights the circular shape of every flower.
For a coastal-inspired variation, replace cornflower blue with navy and use natural white yarn for the petals.
A pastel version can combine powder blue centers with cream or pale beige petals.
For stronger contrast, use dark denim blue centers and bright white outer rounds.
When combining yarns from different brands, compare thickness and gauge before starting. Even small differences in yarn diameter can change the size of the completed motifs.
Washing and Caring for Your Crochet Daisy Blanket
Check the care instructions for every yarn used in the blanket before washing.
For delicate openwork blankets, hand washing or a gentle machine cycle in a mesh laundry bag may help reduce snagging, provided the yarn label permits it.
Avoid washing the blanket with garments that contain zippers, hooks, or rough fasteners.
After washing, remove excess water without twisting the fabric. Lay the blanket flat and reshape the scalloped edges while damp.
Do not hang a heavy wet blanket from one edge. The weight of the water can stretch the openwork sections and distort the joining points.
Store the blanket folded in a dry location. Check the connections periodically, particularly if the blanket is used on a bed every day.
Frequently Asked Questions
Is this crochet daisy blanket suitable for beginners?
The project is best suited to intermediate crocheters who are comfortable with magic rings, double crochet, treble crochet, chain spaces, and joining separate motifs.
A confident beginner can practice the individual flower first before attempting a full blanket.
How many daisy motifs do I need for a large blanket?
A large bed throw may require approximately 120–150 motifs, depending on the final diameter and spacing of each flower.
Make a four-motif sample and measure it before calculating the full quantity.
What hook size should I use?
This adaptation uses a 5.0 mm hook with worsted-weight yarn. A smaller hook produces firmer stitches, while a larger hook creates a more open fabric.
Choose the hook size that produces consistent, flat motifs without excessive gaps in the dense sections.
Can I make this blanket with chunky yarn?
Yes, but chunky yarn will produce larger and heavier flowers. You will need fewer motifs to reach the same blanket dimensions.
Make a complete sample before calculating yarn requirements.
Should I join the flowers as I crochet?
Join-as-you-go construction is possible for floral motifs, but the instructions in this adaptation use separate motifs joined afterward.
Joining after completion allows the flowers to be blocked and arranged before assembly.
How do I stop the blanket from stretching?
Use consistent yarn tension, reinforce the motif connections, and avoid oversized chain spaces.
A stable outer border can help control the edges, but it will not compensate for weak joins within the blanket.
Can I use different colors for every daisy center?
Yes. The stitch instructions remain the same when changing the center color.
Keep the white petal yarn consistent to maintain a unified appearance across the blanket.
Conclusion
This crochet daisy blanket pattern uses blue circular centers, elongated white openwork stitches, and scalloped petals to create a repeating floral surface. Accurate motif sizing and secure joins are the main requirements for a stable finished blanket. Before committing to a full bedspread, crochet four flowers, join them, and record the finished dimensions and yarn consumption. Use those measurements to calculate the remaining materials and motif count.
Share a photograph of your finished blanket on Pinterest or Instagram using #BlueDaisyCrochetBlanket. Include the yarn weight, hook size, and completed dimensions to help other makers compare their results.
Would you keep the cornflower blue centers shown in this design, or choose a darker navy blue for stronger contrast?








