Introduction
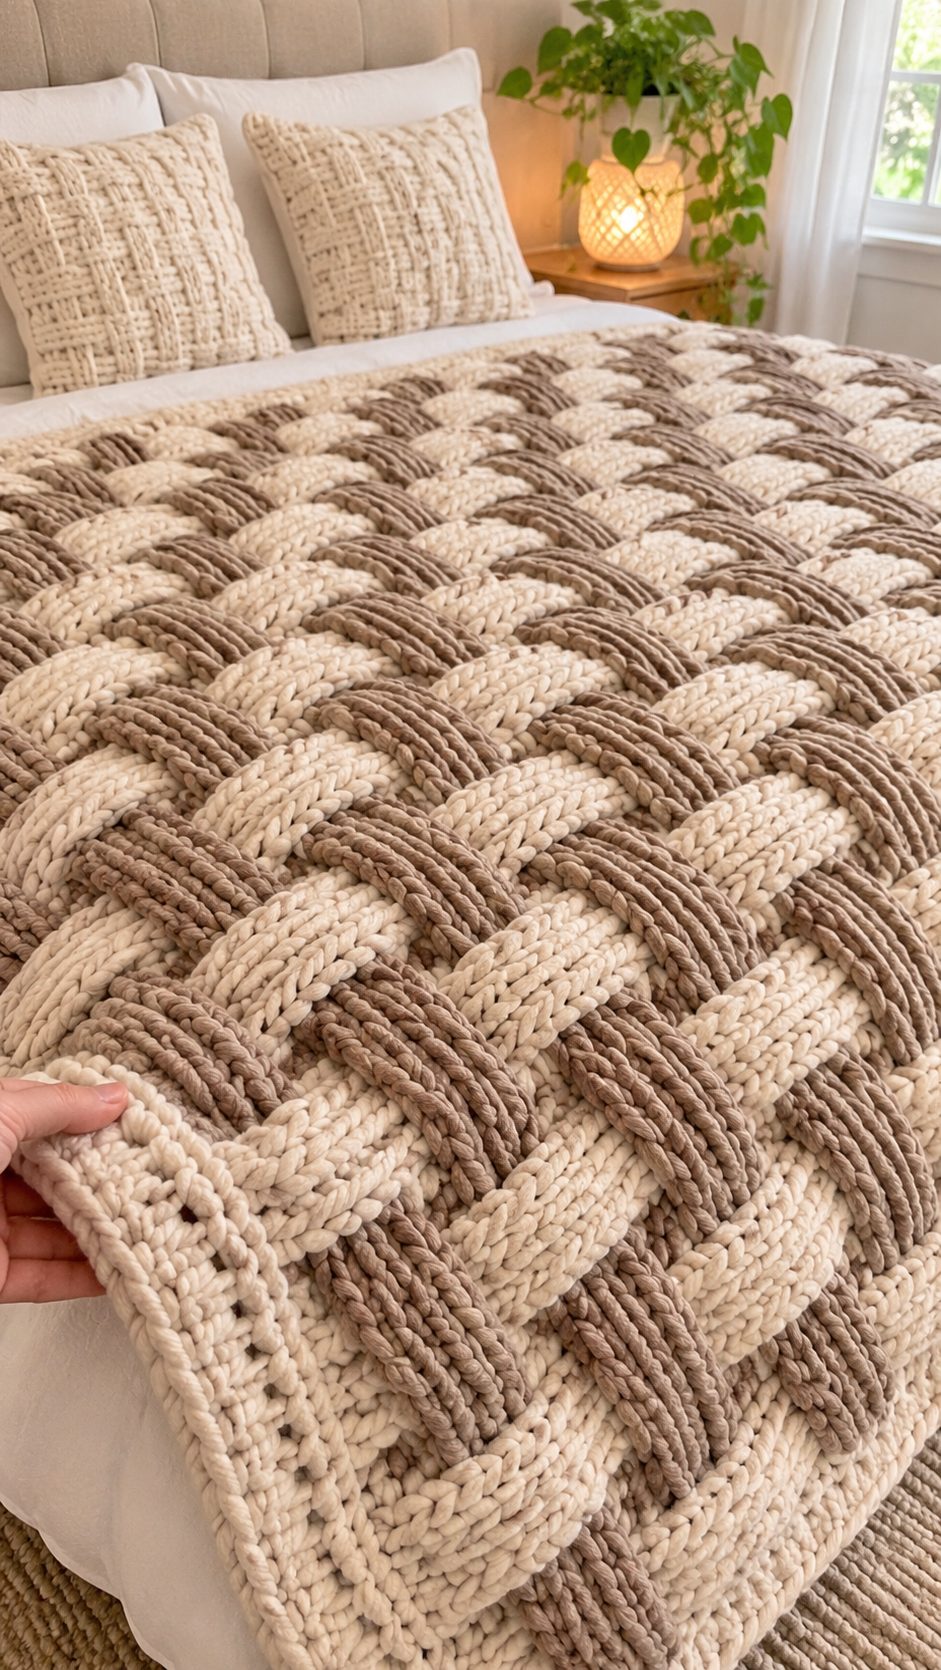
The cream and taupe bands of this blanket form raised rectangular sections that resemble thick woven ribbons. This chunky basketweave crochet blanket uses super-bulky yarn, a 9 mm hook, and alternating front-post and back-post stitches to create a substantial textured throw. Designed for intermediate crocheters, the approximately 102 × 144 cm project provides a practical bed accent or sofa covering without requiring separate motifs or complicated joining.
The Design: What Makes This Blanket Different
The photographed blanket has three important design features: pronounced raised bands, contrasting neutral colors, and a substantial outer edge. Each contributes to its woven appearance.
First, groups of four post stitches create broad textured sections. Front-post stitches project outward, while back-post stitches sit behind the fabric surface. Alternating their positions produces the familiar basketweave structure.
Second, cream and taupe yarn establish contrast without introducing multiple bright colors. This two color crochet blanket uses eight-row color sections, allowing the raised stitch pattern to remain visible.
Third, a simple single-crochet border stabilizes the fabric and reduces edge distortion.
One common mistake in a chunky crochet throw is pulling the post stitches too tightly. The resulting fabric contracts horizontally, causing the sides to curve inward. Maintaining consistent loop height prevents excessive compression.
This original pattern uses a conventional basketweave structure. The photograph’s diagonal interlocking bands are more elaborate than the rectangular texture produced here.
Project Info at a Glance
| Detail | Specification |
|---|---|
| Skill level | Intermediate |
| Working time | Approximately 18–30 hours, planning estimate |
| Finished size | Approximately 102 × 144 cm before border |
| Crochet hook | 9 mm (US M/N) |
| Yarn weight | Super Bulky #6 |
| Construction | One piece, worked flat |
| Main stitches | dc, FPdc, BPdc, sc |
| Colors | Cream and taupe |
| Best for | Sofa throw, bedroom décor, textured bed layer |
Size is calculated from the reference gauge of 8 stitches and 5 rows per 10 cm. Actual dimensions depend on the finished gauge swatch, yarn characteristics, and border.
Materials and Tools
Yarn
Choose super-bulky chenille or plush polyester yarn with approximately the same thickness in both colors.
- Warm cream / ivory: Super Bulky #6 — approximately 900–1,200 g — Bernat Blanket or equivalent.
- Taupe / mushroom brown: Super Bulky #6 — approximately 900–1,200 g — Bernat Blanket or equivalent.
These quantities are provisional purchasing allowances for the original design, not measured consumption from a completed sample. Cream is used for five of the nine eight-row color sections and the border, so its actual requirement may be higher than taupe.
A comparable published basketweave blanket uses 2,400 g of Bernat Blanket Tweeds for a larger finished area.
Select yarns from the same product range whenever possible. Different chenille constructions can vary significantly in diameter, elasticity, and fabric density, even when their labels show the same yarn-weight category.
Tools
- 9 mm crochet hook: or size required to match gauge.
- 10 mm crochet hook: optional for a tight foundation chain.
- Large-eye tapestry needle: suitable for thick yarn.
- Locking stitch markers: at least four.
- Sharp scissors: for cutting yarn.
- Flexible measuring tape: for gauge and dimensions.
- Row counter or written tracking sheet.
- Blocking mats: optional for final shaping.
No stuffing, safety eyes, or assembly hardware is needed.
Abbreviations
All instructions use US crochet terminology.
| Abbreviation | Meaning |
|---|---|
| ch | Chain |
| sc | Single crochet |
| dc | Double crochet |
| FPdc | Front post double crochet |
| BPdc | Back post double crochet |
| sl st | Slip stitch |
| st / sts | Stitch / stitches |
| rep | Repeat |
| RS | Right side |
| WS | Wrong side |
| FO | Fasten off |
The invisible decrease is not used because this blanket is worked flat without shaped reductions.
Understanding the Basketweave Stitch
The basket weave crochet pattern is formed by alternating raised and recessed double-crochet columns.
A normal double crochet is worked into the top loops of the stitch below. Post stitches are different: the hook travels around the vertical post of the previous row’s stitch.
Front Post Double Crochet (FPdc)
Yarn over.
Insert the hook from front to back, then back to front, around the next stitch post.
Yarn over and pull up a loop.
Yarn over and pull through two loops.
Yarn over and pull through the remaining two loops.
The completed stitch sits toward the crocheter on the working side.
Back Post Double Crochet (BPdc)
Yarn over.
Insert the hook from back to front, then front to back, around the next stitch post.
Yarn over and pull up a loop.
Yarn over and pull through two loops.
Yarn over and pull through the remaining two loops.
The stitch recedes from the working side.
Because the blanket is turned after every row, the working-side orientation changes. The written sequence alternates appropriately to maintain consistent raised blocks on the same face.
For additional stitch illustrations, see the Craftsy basketweave stitch tutorial.
Gauge: Check Before Making the Blanket
The target reference gauge is:
8 stitches × 5 rows = 10 × 10 cm in basketweave pattern, using a 9 mm hook.
This gauge comes from a published super-bulky basketweave design. It is a starting target for the pattern below, not a gauge measured from the uploaded photograph.
Make a swatch with at least 18 stitches and 12 rows, using the same four-stitch post groups as the full blanket.
Measure the central 10 cm rather than including the edges. If more than eight stitches fit into 10 cm, the fabric is tighter than the target gauge. Try a larger hook.
If fewer than eight stitches fit into 10 cm, try a smaller hook.
Wash and dry the swatch according to the yarn label before taking the final measurement. Chenille can change its apparent thickness after handling.
Record the actual stitch and row gauge. Those numbers determine the final dimensions and provide a more reliable yarn estimate.
Free Chunky Basketweave Crochet Blanket Pattern
Original, calculated instructions. Not yet independently sample-tested.
This version is worked in one piece from the bottom edge upward. Each row is turned, and the raised pattern repeats every eight rows.
Step 1: Make the Foundation Chain
Yarn: Cream (Color A).
Using the 9 mm hook:
Foundation: Ch 84.
Row 1: Dc in the fourth chain from the hook and in each remaining chain across. The skipped three chains count as the first dc. (82 sts)
Ch 2 and turn. From this point onward, the turning ch-2 does not count as a stitch.
The stitch arrangement for every textured row is:
1 dc at the beginning.
10 groups of 8 post stitches (80 post stitches total).
1 dc at the end.
Total: 82 stitches per row.
Place markers at both edges if the turning chains are difficult to distinguish from the first working stitch.
Step 2: Work the First Basketweave Repeat
Yarn: Cream (Color A).
The following eight-row sequence establishes the complete texture repeat. Every row begins with a dc in the first stitch and ends with a dc in the final stitch.
Row 2: Dc 1, [FPdc 4, BPdc 4] × 10, dc 1. (82)
Row 3: Dc 1, [BPdc 4, FPdc 4] × 10, dc 1. (82)
Row 4: Repeat Row 2. (82)
Row 5: Repeat Row 3. (82)
Row 6: Dc 1, [BPdc 4, FPdc 4] × 10, dc 1. (82)
Row 7: Dc 1, [FPdc 4, BPdc 4] × 10, dc 1. (82)
Row 8: Repeat Row 6. (82)
Row 9: Repeat Row 7. (82)
After each row, ch 2 and turn, except when preparing to fasten off at the end of the project.
Rows 2–5 establish the first orientation of the woven blocks. Rows 6–9 reverse their placement.
This creates a sequence of raised rectangular sections rather than a simple ribbed surface.
Check the fabric after Row 9. The texture should show alternating raised and recessed groups across the width, with no missing stitches at either edge.
Step 3: Continue the Two-Color Pattern
Work the eight-row sequence nine times in total, producing 72 textured rows after the foundation row.
Use the following color schedule.
| Rows | Color | Texture |
|---|---|---|
| 2–9 | Cream | Repeat 1 |
| 10–17 | Taupe | Repeat 2 |
| 18–25 | Cream | Repeat 3 |
| 26–33 | Taupe | Repeat 4 |
| 34–41 | Cream | Repeat 5 |
| 42–49 | Taupe | Repeat 6 |
| 50–57 | Cream | Repeat 7 |
| 58–65 | Taupe | Repeat 8 |
| 66–73 | Cream | Repeat 9 |
Each eight-row block follows the same stitch sequence as Rows 2–9.
The color changes are independent of the post-stitch changes. Both must be tracked separately to keep the blanket consistent.
To change colors, work the final double crochet of the preceding row until two loops remain on the hook. Yarn over with the next color and pull through both loops.
Turn the work and continue with the new yarn.
Leave approximately 15–20 cm of each yarn end for weaving.
Avoid carrying the unused yarn loosely up the blanket edge. Long chenille floats can remain visible beneath the border and may catch during use.
At the end of Row 73, the blanket has one foundation row and 72 textured rows.
Stitch-count check: Every completed row contains 82 stitches, including the two plain double-crochet edge stitches.
Step 4: Check the Blanket Dimensions
Using the published reference gauge:
Width: 82 ÷ 8 × 10 = approximately 102.5 cm.
Height: 73 ÷ 5 × 10 = approximately 146 cm.
These are calculated measurements before the border, not guaranteed finished dimensions. The height includes the foundation row, and the first-row height may differ from the post-stitch row height.
Measure the blanket flat without stretching it.
If additional length is required, work another complete eight-row repeat. At the reference row gauge, eight rows add approximately 16 cm.
If the blanket is too wide, adjust the foundation before continuing. For this pattern, reduce or increase the working width in multiples of eight stitches while retaining one plain dc at each edge.
The post-stitch sequence requires complete groups. Adding only two or three stitches disrupts the pattern alignment.
Step 5: Add the Outer Border
Yarn: Cream (Color A).
The border is worked in joined rounds around the entire blanket.
Border Round 1: With the right side facing, join cream yarn at a corner. Ch 1. Work sc evenly along the first edge, placing 3 sc in each corner. Continue around all four sides and join with sl st to the first sc.
On the top and bottom edges, work approximately one sc per stitch. Along the sides, distribute stitches evenly according to the measured edge length.
Do not force a fixed side-edge count if the fabric begins to ripple or contract.
Border Round 2: Ch 1, sc in each stitch around, working 3 sc into the center stitch of each corner’s three-stitch group. Join with sl st.
Border Round 3 (optional): Repeat Border Round 2 for a wider edge.
Fasten off, leaving a 20 cm tail.
The border should lie flat without pulling the textured fabric inward. If the corners curl, check the placement of the corner increases.
Step 6: Weave in the Ends
Thread each yarn end through a large-eye tapestry needle.
Weave the tail through several nearby stitches on the wrong side, reverse direction, and pass through a second section of stitches.
Do not pull the ends tightly. The yarn must remain flexible enough for the blanket to stretch naturally.
Trim the tails only after checking that they remain secured when the fabric is gently extended.
For slippery chenille, a suitable yarn-end joining method may be necessary because the pile can separate from its core. Test the chosen method on the gauge swatch before using it on the finished blanket.
Step 7: Finish and Shape the Blanket
Lay the blanket on a clean, flat surface.
Measure the width at three positions: top, center, and bottom. Compare the measurements.
Check both diagonals to identify significant skewing. Minor differences are normal in thick crochet fabric, but a visibly twisted rectangle may indicate inconsistent tension.
Follow the yarn manufacturer’s care instructions for washing and drying.
Avoid high heat on polyester chenille. Heat can affect the pile, surface appearance, and dimensions.
Allow the blanket to dry completely before folding or storing it.
How to Make the Blanket Larger or Smaller
This pattern is adjustable because the stitch arrangement is based on eight-stitch groups.
The required foundation produces:
Total stitches = (8 × number of groups) + 2 edge stitches.
Because the first three foundation chains count as the initial dc, the foundation chain length is two greater than the desired total stitch count.
| Width option | Foundation chain | Row stitches | Calculated width |
|---|---|---|---|
| Small throw | 68 | 66 | 82.5 cm |
| Medium throw | 84 | 82 | 102.5 cm |
| Large throw | 100 | 98 | 122.5 cm |
| Extra-large throw | 108 | 106 | 132.5 cm |
Widths use the reference gauge and exclude the border.
For a bed covering, measure the mattress width and decide how much overhang is required.
A blanket intended to cover the entire mattress needs more width than a decorative throw placed across the foot of the bed.
Calculate the necessary stitch count using the measured gauge rather than relying solely on the table.
The same principle applies to length. Add complete eight-row texture repeats to maintain the block arrangement.
7 Technical Tips for Better Basketweave Texture
- Mark both edge stitches. Missing one of the 82 stitches can create a narrowing side edge, particularly where the turning chain resembles a normal stitch.
- Maintain consistent post-stitch tension. If the blanket becomes more than 2 cm narrower across a 20 cm section, the post stitches may be pulling the fabric inward.
- Check the eight-row repeat. Reversing the stitch groups after only three rows can produce uneven rectangular blocks instead of a regular woven grid.
- Measure the gauge after handling. A swatch that measures 10 cm immediately after crocheting may change after washing, especially with polyester chenille.
- Control color-change tails. Leave 15–20 cm of yarn at each change because short chenille ends can work loose under repeated movement.
- Distribute border stitches evenly. Too many single crochets along the side edges produce waves, while too few cause the blanket to cup inward.
- Inspect the yarn core. Chenille pile can shed or separate at cut ends, so test yarn-end security before finishing the full blanket.
Common Problems and How to Fix Them
Why Is My Basketweave Blanket Curling?
Curling usually results from uneven tension or insufficient border stitches.
If the entire width contracts, the post stitches may be too tight. Try a larger hook or increase the height of the loops when working around each post.
If only the border curls, remove the affected round and redistribute the stitches.
Why Are the Raised Blocks Uneven?
Check the placement of front-post and back-post stitches.
The pattern uses four-stitch groups. An accidental five-stitch group shifts every subsequent block.
Count the full 80 post stitches before completing the last edge stitch.
Why Does My Blanket Feel Too Stiff?
Dense post stitches use more yarn and produce a thicker fabric than ordinary double crochet.
A hook that is too small can make the blanket rigid.
Try a 10 mm hook on a separate swatch and compare the drape, gauge, and surface definition before changing the main project.
Can I Use Regular Acrylic Yarn?
Yes, but the result will differ.
Standard worsted-weight acrylic produces smaller stitches and a thinner fabric. To reach similar dimensions, you would need a different foundation count, additional rows, or multiple strands held together.
Super-bulky chenille is the closer choice for the thick, raised appearance shown in the photograph.
Care Instructions for a Chunky Crochet Blanket
The correct washing method depends on the yarn label.
For machine-washable polyester blanket yarn, use the manufacturer’s recommended cycle and water temperature. Avoid fabric treatments or heat settings that the label does not permit.
Large blankets become heavy when wet. A washing machine must have sufficient capacity to accommodate the fabric without excessive compression.
Dry the blanket according to the yarn manufacturer’s instructions.
If laying it flat, support the entire surface to prevent the wet fabric from stretching under its own weight.
Store the blanket loosely folded rather than hanging it for long periods. The weight of super-bulky yarn can gradually lengthen the stitches when suspended.
Conclusion
The chunky basketweave crochet blanket combines super-bulky yarn, alternating post stitches, and controlled color changes to produce a substantial textured throw. The eight-row repeat makes the construction adjustable, while the single-crochet border provides a defined outer edge. Before beginning the full blanket, complete a gauge swatch and calculate the yarn required for your chosen dimensions. Save this pattern to Pinterest for future reference, or share your finished project on Instagram using #ChunkyBasketweaveBlanket. When photographing the finished piece, include a close-up of the raised stitch blocks to show their construction. Would you keep the cream and taupe combination, or reverse the two colors so taupe becomes the dominant shade?








