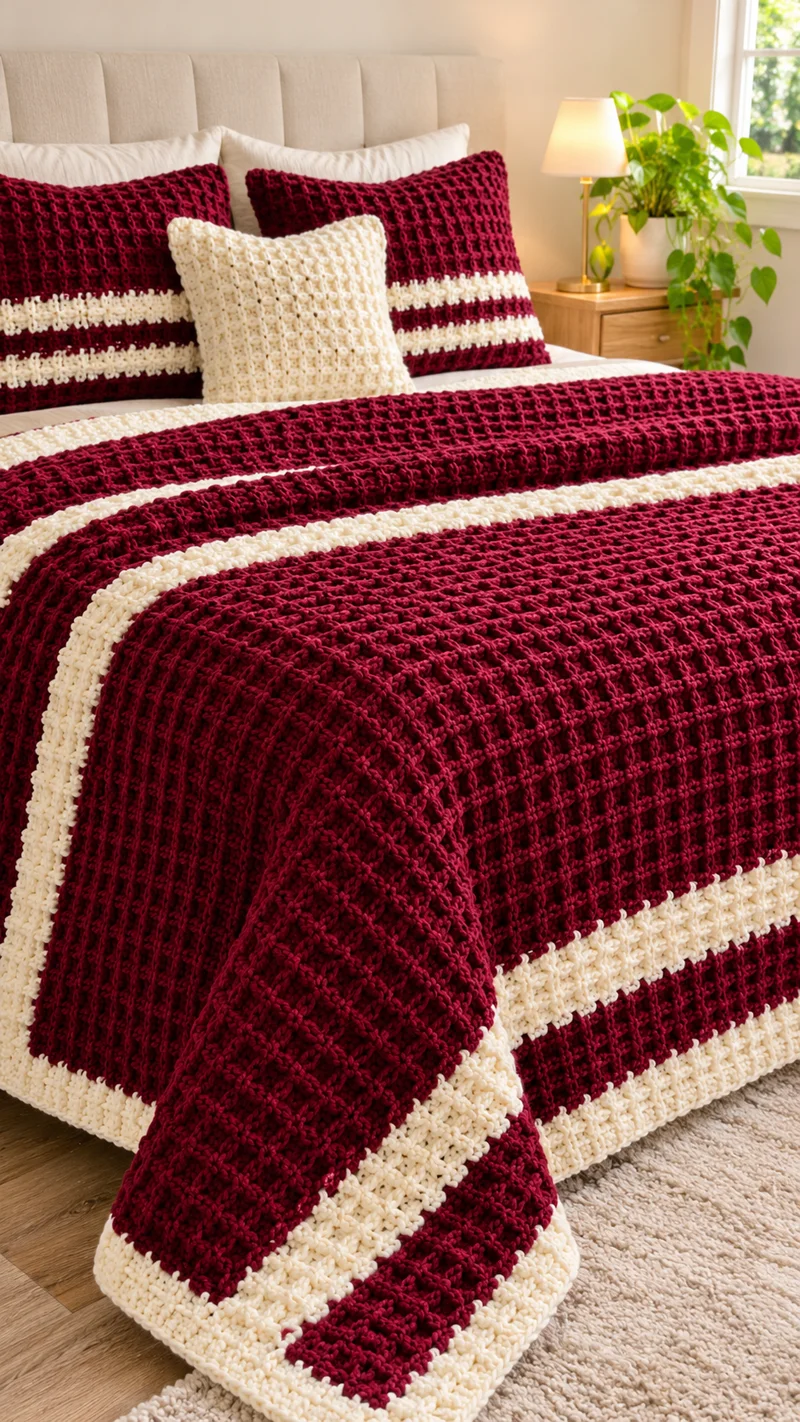
A waffle stitch blanket gets its structure from raised vertical posts crossing recessed horizontal lines, and that geometry is especially visible in the wide burgundy sections of this design. This burgundy and cream crochet blanket pattern recreates the bed-sized look shown in the reference image using chunky yarn, contrasting cream stripes, and a substantial border. The finished project is designed for a bed or an oversized throw.
The Design: Burgundy Waffle Texture with Cream Stripes
The main feature of this blanket is the deep waffle-style texture. Raised stitches divide the burgundy fabric into repeating rectangular cells, giving a large single-color section enough definition without requiring complicated colorwork. The cream stripes interrupt that texture at measured intervals and visually connect the blanket with the coordinating cream and burgundy pillows shown on the bed.
The second structural decision is the wide border. A heavily textured blanket can curl or look unfinished along the edges, particularly when front-post stitches dominate the main fabric. Working several rounds around the completed rectangle gives the perimeter more weight and creates the broad cream framing visible in the reference design.
One common mistake when making a waffle stitch crochet blanket is beginning with a chain that does not match the stitch repeat. Check the repeat before committing to a bed-width foundation chain.
Project Info at a Glance
| Skill Level | Intermediate |
|---|---|
| Construction | Flat rectangular blanket |
| Primary Stitch | Waffle stitch |
| Colors | Burgundy and cream |
| Suggested Yarn | Chunky / bulky yarn |
| Suggested Hook | 6.5 mm |
| Approximate Size | 150 × 200 cm / 59 × 79 in |
| Best For | Bedspread, large throw, guest-room blanket |
Materials and Tools
Yarn
- Burgundy chunky yarn — approximately 2,000–2,300 g
- Cream chunky yarn — approximately 700–900 g
The quantities above are working estimates for a blanket measuring approximately 150 × 200 cm. Waffle stitch consumes considerably more yarn than flat double crochet because the post stitches create additional depth.
If you substitute yarn, buy all skeins for each color from the same dye lot. Burgundy shades can show visible differences between production batches, particularly across a large uninterrupted section.
Tools
- 6.5 mm crochet hook, or the size required to obtain the desired fabric
- Scissors
- Large yarn needle
- Stitch markers
- Flexible measuring tape
Abbreviations
- ch — chain
- st — stitch
- sts — stitches
- sc — single crochet
- dc — double crochet
- FPdc — front post double crochet
- sl st — slip stitch
- rep — repeat
Front post double crochet is worked around the post of the stitch below rather than through the top loops. This placement produces the raised lines responsible for the waffle effect.
Gauge and Sizing
Make a swatch before beginning the full blanket. Waffle stitch contracts differently from ordinary double crochet because some stitches are pulled forward around the posts.
A useful starting target with chunky yarn and a 6.5 mm hook is approximately 12–14 stitches per 10 cm, measured across a relaxed waffle-stitch swatch. Your exact gauge will depend on the yarn construction and individual tension.
The sample dimensions used for this pattern are approximately 150 cm wide × 200 cm long. Adjusting the foundation chain changes the width, while adding or removing row repeats changes the length.
How the Waffle Stitch Repeat Works
The waffle structure is created by alternating ordinary double crochet stitches with front post double crochet stitches. One row establishes raised vertical ribs. The following row crosses those ribs with a different post-stitch sequence, forming recessed squares.
For this pattern, work a foundation chain based on a multiple of 3, plus the turning-chain allowance required by your preferred foundation method.
Do not judge the final width from the foundation chain alone. Crochet several complete waffle repeats, place the work flat without stretching it, and measure again. Post stitches can pull the fabric inward.
Pattern — Step by Step
Foundation
Yarn: Burgundy
Chain enough stitches to reach approximately 150 cm while maintaining a multiple of 3 for the waffle repeat.
For a more accurate result, make a 15–20 cm waffle-stitch swatch first. Calculate the number of complete repeats required for your target width from the finished swatch rather than the loose foundation chain.
Setup Row
Work 1 dc into the appropriate starting chain according to your turning-chain method. Continue with 1 dc in each chain across.
Turn.
This plain row creates the posts needed for the first textured row.
Waffle Row A
Chain for the height of one dc.
Work the following sequence across:
*FPdc around each of the next 2 dc posts, 1 dc in the next stitch; repeat from * across.
Work the final edge stitch as a regular dc.
Turn.
Waffle Row B
Chain for the height of one dc.
Work:
*1 dc in each of the next 2 stitches, FPdc around the next post; repeat from * across.
Work the final edge stitch as a regular dc.
Turn.
Main Burgundy Section
Repeat Waffle Row A and Waffle Row B until the first burgundy section reaches approximately 35–40 cm.
Measure vertically with the blanket resting on a flat surface. Do not stretch the waffle cells while measuring.
The exact number of rows is less important than the measured depth because yarn thickness and post-stitch tension can substantially alter row height.
First Cream Stripe
Change to cream yarn.
Complete the final yarn-over of the last burgundy stitch with cream. Leave enough yarn at the color change for secure weaving later.
Continue the established waffle sequence in cream for approximately 8–10 cm.
Keep the same hook size unless the cream yarn behaves differently from the burgundy yarn. A stripe worked at a tighter gauge can pull the sides inward.
Second Burgundy Section
Change back to burgundy.
Continue alternating Waffle Row A and Waffle Row B for approximately 18–25 cm.
Check the sides every several rows. Both edges should remain vertical rather than gradually narrowing or expanding.
Second Cream Stripe
Change to cream.
Work the established waffle stitch for another 8–10 cm.
Keep the stripe depth consistent with the first cream section. Count rows rather than relying only on visual measurement if the two yarn colors have the same gauge.
Large Central Burgundy Panel
Change to burgundy.
Continue the waffle stitch until the large central section measures approximately 60–70 cm.
This should be the dominant color block. The broad uninterrupted burgundy area produces the strong visual field seen across the top of the bed.
Third Cream Stripe
Change to cream.
Work approximately 8–10 cm in the established waffle pattern.
Keep all post stitches aligned with those below. A misplaced FPdc can interrupt a vertical rib and become conspicuous across a solid cream stripe.
Lower Burgundy Section
Change to burgundy.
Repeat the waffle rows until the blanket approaches the target length, allowing space for the final cream section and border.
For a finished length near 200 cm, lay the blanket flat periodically and measure from the foundation edge to the active row.
Final Cream Section
Change to cream.
Work approximately 8–12 cm in pattern.
Finish after completing a full waffle repeat rather than stopping halfway through the two-row sequence. This gives the top edge a more consistent structure.
Fasten off and weave the tail temporarily through several stitches. Final weaving can be completed after the border is added.
Crochet Border
The reference blanket uses a substantial contrasting perimeter. A border also helps control the irregular edge produced by tall textured rows.
Border Round 1
Yarn: Cream
Join cream yarn at one corner.
Work sc evenly around the entire blanket. Along the top and bottom, place approximately one sc into each stitch. Along the sides, distribute the stitches evenly across the row ends.
Work 3 sc in each corner.
Join with a sl st.
Border Round 2
Ch 1.
Work 1 sc in each stitch around, placing 3 sc in the center corner stitch at each corner.
Join with a sl st.
Border Round 3
Repeat Border Round 2.
Check the blanket on a flat surface before proceeding. If the border ripples, too many stitches have probably been added. If the corners pull upward or the blanket cups, additional stitches are required.
Optional Wider Border
Continue working additional rounds of sc until the border measures approximately 5–8 cm.
For a stronger resemblance to the pictured blanket, use cream as the dominant border color. A narrow burgundy round can be inserted before the final cream rounds if additional color definition is wanted.
Fasten off after the final round.
Finishing the Blanket
- Place the completed blanket on a large flat surface.
- Check all four sides for obvious tension differences.
- Thread each yarn tail onto a large yarn needle.
- Weave each tail through several stitches in one direction.
- Reverse direction and weave through another section to reduce the chance of the tail working loose.
- Trim the remaining yarn without cutting into the crochet fabric.
- Shape each corner so the border sits flat.
- Measure the finished width and length.
- Wash according to the yarn manufacturer’s care instructions.
- Lay flat or dry according to the yarn label, then reshape the border before the blanket is completely dry.
The finished piece should form a rectangular burgundy-and-cream waffle blanket with clearly aligned raised cells and a stable contrasting perimeter.
Matching Burgundy and Cream Crochet Pillows
The reference image pairs the blanket with burgundy pillow covers containing horizontal cream bands and a smaller cream pillow in front. These can be made from the same yarn to coordinate the bed set.
Burgundy Striped Pillow Cover
Measure the pillow insert before beginning. Crochet two rectangular panels slightly smaller than the unstretched insert measurement so the finished cover remains full rather than loose.
Begin with burgundy and work the same waffle stitch used for the blanket. Add one or two cream horizontal bands across the front panel, matching the stripe proportions used in the blanket.
Make the back panel predominantly burgundy.
Place the panels with the correct sides facing outward and crochet around three edges with sc. Insert the pillow form, then close the remaining edge.
Cream Accent Pillow
For the central cream pillow, work two square panels entirely in cream yarn. The waffle stitch can be used for a direct match, or another compact raised crochet stitch can create a slightly different texture while retaining the same color scheme.
Join three sides, insert the pillow form, and close the fourth side. Keep the cream shade identical to the blanket stripes when possible.
Changing the Blanket Size
This pattern can be resized without changing the basic waffle construction.
For a smaller throw, begin with fewer foundation stitches while preserving the multiple-of-three repeat. For a larger bedspread, add complete three-stitch repeats until the swatch calculation reaches the required width.
| Blanket Type | Approximate Finished Size |
|---|---|
| Lap Blanket | 90 × 120 cm |
| Large Throw | 120 × 150 cm |
| Single Bed | 140 × 190 cm |
| Large Bed Blanket | 150 × 200 cm |
| Oversized Bedspread | 180 × 220 cm or larger |
These dimensions are planning references rather than fixed standards. Mattress sizes and the desired amount of side drop vary, so measure the intended bed before calculating the foundation.
Calculating Yarn for a Different Size
Waffle stitch is yarn-intensive. Estimating from surface area alone is therefore safer after making and weighing a representative swatch.
Crochet a measured swatch using the exact yarn, hook, and waffle pattern planned for the blanket. Weigh the completed swatch on a digital scale.
Calculate its area, then compare that area with the target blanket area. Multiply the swatch weight accordingly and add approximately 10–15 percent for the border, swatching, joins, and normal variation.
Calculate burgundy and cream separately when preserving the stripe layout. The large burgundy fields account for most of the yarn requirement.
7 Technical Tips for a Cleaner Waffle Stitch Blanket
- Mark the first and last stitch. Missing one edge stitch can reduce the blanket by one stitch every few rows, producing a diagonal side instead of a rectangle. Place a marker in both edge stitches and move them after every row.
- Check the three-stitch repeat immediately. One missing stitch in the foundation disrupts the FPdc alignment across the entire width. Work at least two waffle rows and inspect every vertical rib before continuing.
- Do not overtighten the front-post stitches. A short FPdc pulls the fabric vertically and can make the waffle cells bunch. Draw each post stitch to approximately the same height as the surrounding double crochet stitches.
- Measure cream stripes by rows. Measuring only in centimeters can produce stripes with different row counts when the fabric is stretched differently. Record the number of rows in the first cream stripe and repeat that number for matching stripes.
- Check width every 15–20 cm. A gradual tension change can alter a bed-sized blanket by several centimeters before it becomes obvious. Compare the current width with the measurement taken after the first complete waffle repeats.
- Test the border after each round. Rippling indicates excess perimeter stitches, while cupping indicates too few. Lay the blanket flat after every border round rather than discovering the problem after five or six rounds.
- Weave tails through textured areas. A short tail can pull free because a heavy blanket places more stress on joins than a small crochet project. Leave approximately 15–20 cm at color changes and weave the yarn back through several dense stitches.
Color Placement
The burgundy-and-cream combination works because the darker shade occupies most of the surface while cream is reserved for high-contrast interruptions. Keeping the cream sections narrower than the burgundy panels prevents the stripe pattern from competing with the waffle texture.
For the closest visual match to the reference image, use a deep wine or burgundy shade rather than a bright primary red. Pair it with warm ivory or soft cream rather than stark optical white.
The pillow covers can repeat those proportions. Burgundy remains dominant on the large pillows, while the smaller central cushion can reverse the balance and use cream as its main color.
Care and Blocking
Follow the care instructions printed on the yarn label, particularly when using chenille, velvet-style, or other plush synthetic yarns.
After washing, reshape the blanket to its intended rectangular dimensions. Align the cream stripes horizontally and check that the border corners remain square.
Acrylic yarn generally requires different handling from wool, and excessive heat can permanently alter synthetic fibers. Do not apply high heat unless the specific yarn manufacturer permits it.
For routine storage, fold the blanket rather than hanging it for long periods. A large waffle blanket can be heavy, and its own weight may stretch the fabric when suspended.
Final Notes
The defining element of this burgundy waffle stitch blanket is not complicated colorwork but controlled repetition: aligned post stitches, consistent cream stripe widths, and a border that remains flat around a large textured rectangle. Make the waffle swatch first, record its finished gauge, and calculate the foundation from that measurement rather than estimating from the chain alone.
Once the blanket is complete, use leftover burgundy and cream yarn for coordinating pillow covers like those shown in the reference setup. If you share the finished burgundy and cream crochet blanket on Pinterest or Instagram, use #BurgundyWaffleBlanket. For your version, would you keep the narrow cream stripes shown here or make the cream bands wider?









