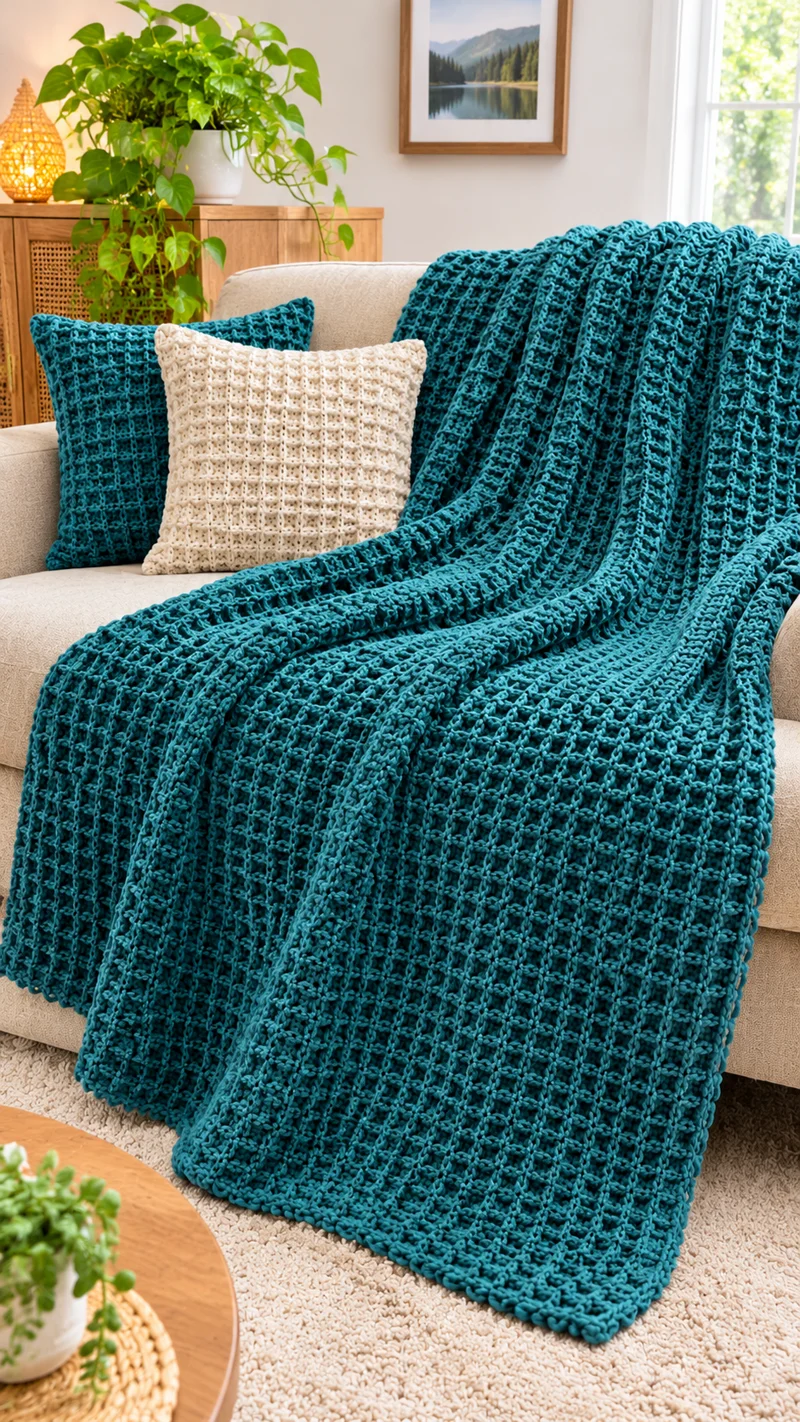
A waffle-textured blanket depends on depth: raised vertical lines need to stay defined while the recessed sections remain flexible enough for the fabric to drape over a sofa. This teal waffle stitch crochet blanket uses a repeating textured structure, a substantial yarn, and a simple border to create the deep geometric surface shown in the reference image. The instructions below are written as an adjustable-size blanket pattern.
The Design: What Makes This Teal Waffle Blanket Different
The main feature is the strongly defined grid running across the teal fabric. Instead of relying on color changes, the design creates contrast through stitch placement and relief. Raised crochet sections form vertical columns, while horizontal divisions create the characteristic waffle-like squares.
The blanket is designed with enough weight to hang naturally over the arm and front of a sofa. A simple outer border stabilizes the textured center without competing with it. Using one solid teal color also makes the stitch architecture easier to see.
One common problem with a waffle stitch crochet blanket is inconsistent tension. Loose post stitches can make the grid irregular, while overly tight stitches reduce drape. Keeping the working loops even throughout the repeat produces cleaner rectangular sections.
Project Info at a Glance
| Skill Level | Time | Finished Size | Hook | Best For |
|---|---|---|---|---|
| Intermediate | Multi-session project | Adjustable | Match to yarn and gauge | Sofa throw, bed throw, home décor |
Materials and Tools
Yarn
- Teal yarn — use a medium to bulky yarn suitable for textured blankets.
The exact yarn quantity depends on the finished dimensions, yarn weight, hook size, and individual tension. Waffle-style fabrics generally consume more yarn than flat double-crochet fabric because relief stitches add depth.
Tools
- Crochet hook — choose the size recommended for your yarn, then adjust if necessary to obtain a flexible fabric.
- Yarn — enough teal yarn for the desired blanket dimensions.
- Tapestry needle — for weaving in ends.
- Scissors.
- Stitch markers — useful for marking the first and last stitch of long rows.
- Measuring tape.
Abbreviations
- ch — chain
- st — stitch
- sts — stitches
- sc — single crochet
- dc — double crochet
- FPdc — front post double crochet
- sl st — slip stitch
- rep — repeat
A front post double crochet is worked around the post of the stitch below rather than through the two loops at the top. This brings the stitch forward and creates the raised lines required for the waffle texture.
Before You Start
This blanket is worked flat in rows. The waffle effect develops through a combination of standard double crochet stitches and front post double crochet stitches.
Because the photographed blanket is a finished object rather than a documented pattern sample, its exact stitch count, gauge, yarn brand, and dimensions cannot be determined reliably from the image alone. The pattern below therefore uses an adjustable foundation.
Make a swatch before starting the full blanket. Measure the swatch after several complete pattern repeats because the relief stitches can change both width and height compared with an ordinary double-crochet swatch.
How to Adjust the Blanket Size
Choose the width first. Make a foundation chain following the repeat required by the waffle stitch used below. For this version, work with a foundation based on a multiple of 3, adding the turning chains required for the first row.
Instead of relying only on a calculated chain count, make the foundation slightly longer than the intended finished width and check it without stretching. Crochet several rows, then measure again. Textured fabric may contract once the post stitches begin forming the grid.
Suggested Blanket Proportions
| Blanket Type | Approximate Width | Approximate Length |
|---|---|---|
| Lap Blanket | 90–100 cm | 120–130 cm |
| Sofa Throw | 110–130 cm | 150–180 cm |
| Large Throw | 130–150 cm | 170–200 cm |
These measurements are sizing targets rather than measurements taken from the photograph.
Pattern — Step by Step
Work the blanket flat. Turn at the end of every row. Keep the turning edge loose enough that it does not pull upward.
Foundation
Using teal yarn, make a foundation chain in a multiple of 3 until it reaches the required blanket width.
Add the turning chains needed for your chosen double-crochet method.
Do not stretch the chain while measuring. A stretched foundation can produce a blanket that becomes noticeably narrower after the first several rows.
Setup Row
Work one double crochet across the foundation chain, beginning in the appropriate chain for your turning-chain method.
Turn.
This row creates the posts around which the relief stitches will be worked.
Waffle Pattern Row 1
Chain for the turning height.
Work a double crochet at the beginning of the row.
Continue across using the following basic sequence:
*FPdc around the next 2 stitches, dc in the next stitch; repeat from * across.
Finish the row with the appropriate edge stitch for your stitch count.
Turn.
Waffle Pattern Row 2
Chain for the turning height.
Work the complementary relief sequence so the horizontal section of each waffle begins to form:
*dc in the next 2 stitches, FPdc around the next stitch; repeat from * across.
Maintain the established edge stitches.
Turn.
Waffle Pattern Row 3
Repeat Waffle Pattern Row 2.
Turn.
The repeated pair of complementary rows creates the recessed center of each block while the front-post stitches remain raised.
Continue the Main Blanket
Repeat the waffle sequence consistently, returning to the first relief arrangement after the complementary rows.
The texture should begin forming recognizable geometric blocks after several rows. Check the columns frequently. Each raised vertical line should remain aligned with the corresponding post stitches below it.
Continue until the blanket reaches the required length.
For a sofa throw similar in proportion to the reference image, aim for a length that allows the fabric to cover the seat and extend substantially over the front edge when draped.
Creating a Stronger Raised Texture
The visual effect depends more on stitch depth than on complicated construction. Insert the hook from front to back and then back to front around the complete post when making an FPdc. The stitch should sit forward from the surrounding fabric.
A common error is inserting the hook into the top loops while attempting the relief stitch. That produces an ordinary double crochet and interrupts the raised column.
Check the back of the blanket periodically as well. The reverse side will not have exactly the same appearance as the front, but the structure should remain orderly without unusually long loops or distorted posts.
Blanket Border
The photographed blanket has a restrained edge that allows the textured field to remain dominant. A compact border works well for this construction.
Border Round 1
With the right side facing, attach teal yarn at a corner.
Work single crochet evenly around the entire blanket.
Along the top and bottom edges, work into the available stitches. Along the row ends, distribute the stitches evenly rather than forcing one stitch into every visible space.
At each corner, work enough stitches into the corner space to turn without pulling.
Join with a slip stitch.
Border Round 2
Chain 1.
Work one single crochet in each stitch around, adding the required corner stitches at each corner.
Join with a slip stitch.
Optional Additional Border Rounds
Repeat the single-crochet border if a thicker frame is required. Keep all additional rounds in teal to maintain the single-color appearance shown in the reference.
Fasten off when the border lies flat.
Finishing
Cut the yarn, leaving a sufficient tail for secure weaving.
Thread the tail onto a tapestry needle and weave it through several stitches on the wrong side. Change direction at least once before trimming the excess yarn. Repeat for every yarn end.
Lay the finished blanket flat and measure it without stretching. If blocking is suitable for the chosen fiber, shape the edges and corners to the intended dimensions according to the yarn manufacturer’s care instructions.
Matching Teal Crochet Cushion
The reference image also includes teal cushions that coordinate with the blanket. A matching cushion can be made using the same yarn and related textured stitches.
Measure the cushion insert before crocheting the panels. Make two squares or rectangles large enough to cover the insert without excessive stretching. The front panel can use the waffle pattern, while the back may be worked in a flatter stitch if less bulk is preferred.
Place the panels together with the correct sides facing outward. Join three sides, insert the cushion form, then close the final side.
Using the same teal yarn links the cushion visually to the blanket even when the exact stitch texture differs.
Cream Crochet Cushion Variation
A cream cushion provides contrast against a teal blanket without adding another strong color. In the reference image, the light cushion also uses a geometric crochet texture, which keeps it related to the surrounding handmade pieces.
For a coordinated set, use the same general yarn weight as the teal cushion but switch to cream or natural yarn. The stitch pattern can be simplified or changed to a smaller grid.
Keep the cushion dimensions proportional to the sofa and insert. Dense textured stitches reduce stretch, so measure the crochet panel after several rows rather than calculating the final dimensions solely from the foundation chain.
7 Technical Tips for a Cleaner Waffle Stitch Blanket
- Mark the edge stitches. Long rows make the final stitch easy to miss. Losing one edge stitch repeatedly creates a diagonal side instead of a rectangular blanket.
- Check the repeat every few groups. One misplaced FPdc can shift an entire raised column. Count the three-stitch groups before reaching the end of each row.
- Watch the foundation tension. A foundation chain that is significantly tighter than the working rows causes the lower edge to curve. Move up a hook size for the chain if your foundation naturally runs tight.
- Work around the full post. Catching only part of the post can produce weak or uneven relief stitches. Insert the hook completely around the designated stitch when making each FPdc.
- Measure after the texture develops. Do not judge final width from the foundation chain alone. Measure after at least several waffle repeats because the post stitches alter the fabric width.
- Distribute border stitches carefully. Too many stitches along the side edges cause ruffling; too few make the border pull inward. Lay the work flat after the first border round and correct any distorted section before continuing.
- Weave tails in multiple directions. A yarn end woven in only one direction can work loose during repeated handling or washing. Run the tail through several stitches, reverse direction, and then trim it.
Common Waffle Stitch Problems
The Blanket Is Getting Narrower
Check the first and last stitches of every row. Missing edge stitches is one of the most common reasons a rectangular crochet blanket gradually loses width.
Place a stitch marker in both edge stitches and move the markers upward after every row.
The Waffle Squares Look Uneven
First check the stitch sequence. A relief stitch worked in the wrong position interrupts both the vertical column and the recessed block.
Next, examine tension. Front-post stitches that are substantially tighter than ordinary double crochet can pull the fabric out of alignment.
The Blanket Feels Too Stiff
The combination of yarn and hook may be producing too dense a fabric. Make another swatch with a slightly larger hook and compare the drape before continuing a large number of rows.
Waffle texture naturally creates a thicker fabric than plain double crochet, so the objective is controlled structure without making the finished throw rigid.
The Edges Are Wavy
First verify that the main stitch count has remained constant. If the center is rectangular but the border waves, the border probably contains too many stitches.
Remove the affected border round and redistribute the side stitches more evenly.
Yarn Selection for This Blanket
Solid-colored yarn makes the waffle structure particularly visible because the shadows produced by the raised posts are not interrupted by frequent color changes. The deep teal shown in the reference works especially well with the geometric surface.
Yarn weight changes the character of the finished fabric. Medium-weight yarn produces a more defined stitch pattern with moderate thickness. Bulky yarn produces larger texture and can increase the weight of a full sofa throw substantially.
Fiber content also affects care and drape. Check the yarn label before beginning and select a fiber whose washing instructions suit the intended use of the blanket.
How Much Yarn Will You Need?
There is no reliable way to calculate the exact yarn quantity from the photograph alone. Waffle stitch is also relatively yarn-intensive because front-post stitches travel around the stitch below instead of taking the shortest path across the top of the row.
The most accurate method is to make and weigh a measured swatch using the actual yarn and hook.
For example, crochet a representative square containing several complete waffle repeats. Measure its area and weigh it. Calculate the total area of the planned blanket, then scale the swatch yarn weight to that area.
Add extra yarn for the border, swatching, joining new skeins, and reasonable variation in tension. Buying the required yarn from the same dye lot also reduces the risk of visible color differences across a large solid-color blanket.
Care and Shape Maintenance
Follow the washing and drying instructions printed on the yarn label. The correct method depends on fiber content rather than the stitch pattern alone.
After washing, reshape the blanket so the corners remain square and the edges return to their intended dimensions. Avoid stretching the raised grid aggressively, since excessive stretching can flatten the relief structure.
Inspect the border and woven ends periodically. A large throw receives repeated movement at its corners and edges, making those areas more likely to show wear before the center panel.
Conclusion
A successful teal waffle stitch crochet blanket depends on three technical controls: a consistent three-stitch repeat, accurately positioned front-post stitches, and stable edge tension. Start with a measured swatch, calculate the required width, and crochet the main panel until it reaches your chosen throw length. Finish with a restrained single-crochet border so the geometric texture remains the dominant feature.
Save the finished blanket to Pinterest or share the completed version on Instagram with #TealWaffleBlanket. Before choosing your foundation length, decide where the blanket will be used and measure that space. Would you keep the entire waffle blanket teal, or use cream for the border to match the contrasting cushion?









