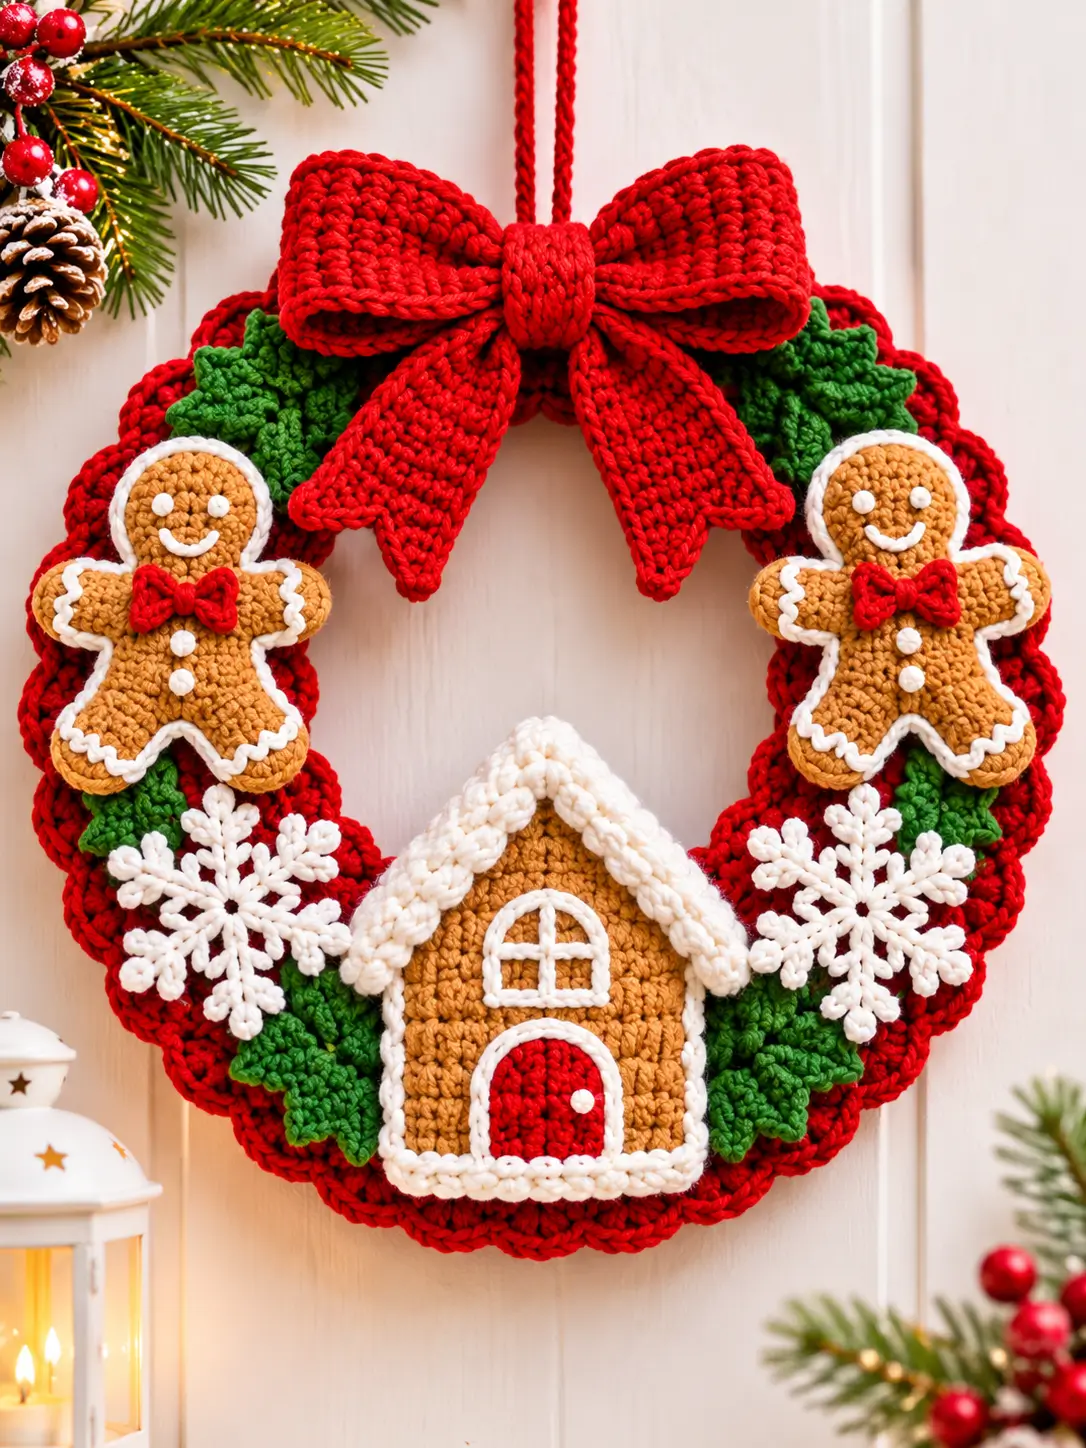
Two gingerbread figures flank a tiny cookie house while six-point snowflakes fill the lower curve of this crochet gingerbread Christmas wreath. The design uses a red wreath base, green foliage, white snowflakes, gingerbread-brown appliqués, and an oversized red bow. Work the decorations separately, block them, and attach them only after testing the complete arrangement on the wreath.
The Design: What Makes This Christmas Wreath Different
The wreath is built in layers rather than as one complicated piece. A firm circular base carries a textured red crochet cover. Green leaves form the second layer, creating visual separation between the red background and the brown gingerbread decorations. The upper half is dominated by a large dimensional bow and two gingerbread people, while the lower half uses a gingerbread house between two white snowflakes.
The important structural decision is keeping the decorative pieces relatively flat. Thick stuffed ornaments can make a hanging wreath tilt forward. Here, the gingerbread people, house, leaves, and snowflakes are appliqué-style pieces. Only the bow needs substantial shaping. This produces the raised appearance seen in the design without concentrating too much weight at the front.
Project Information at a Glance
| Skill Level | Construction | Target Diameter | Hook | Best For |
|---|---|---|---|---|
| Intermediate | Covered wreath with separate appliqués | Approx. 38–42 cm | 4.0 mm | Christmas door and wall decoration |
Materials and Tools
Yarn
- Christmas Red — worsted/Aran #4 — wreath cover, bow, doors, small bows
- Gingerbread Brown — worsted/Aran #4 — gingerbread people and house
- Forest Green — worsted/Aran #4 — foliage
- White or Cream — worsted/Aran #4 — snowflakes, icing, roof trim, facial details
- Small amount of dark brown — optional decorative details
Tools
- 4.0 mm crochet hook
- 35–40 cm foam, wire, or rigid wreath form
- Yarn needle
- Scissors
- Stitch markers
- Blocking pins
- Small amount of polyester stuffing for the bow if extra volume is wanted
Abbreviations
- MR — magic ring
- ch — chain
- sc — single crochet
- hdc — half double crochet
- dc — double crochet
- tr — treble crochet
- inc — two stitches in one stitch
- dec — decrease
- sl st — slip stitch
- st/sts — stitch/stitches
- BLO — back loop only
Construction Overview
Complete the project in separate components:
- Red wreath cover
- Large red bow
- Green foliage
- Two gingerbread people
- Two white snowflakes
- Gingerbread house
- Hanging loop
Do not permanently attach the decorations until every component has been completed. Positioning all pieces together first makes it much easier to balance the wreath.
Red Crochet Wreath Base
The simplest method is to crochet a long red rectangle and wrap it around a purchased wreath form.
Foundation
Measure the circumference of the wreath tube rather than its outside diameter.
Make a foundation chain long enough to wrap around the thickness of the ring with approximately 1 cm of negative ease.
Row 1
Starting in the second chain from the hook, sc across.
Ch 1 and turn.
Row 2
Sc in every stitch across.
Ch 1 and turn.
Row 3
Work sc in BLO across.
Ch 1 and turn.
Rows 4 onward
Alternate a regular sc row with a BLO sc row until the strip is long enough to travel around the entire wreath.
Stretch it lightly around the form while measuring. The fabric should fit firmly without exposing the base underneath.
Covering the Wreath Form
Wrap the completed red strip around the wreath form.
Join the short ends first to create a continuous tube around the ring.
Bring the two long edges together on the back of the wreath.
Using red yarn, whipstitch the edges together.
Keep the seam on the back. Rotate the cover as necessary so the front surface remains smooth.
Optional Scalloped Texture Around the Wreath
The photographed design has a strongly textured outer red edge. Add a decorative shell round along the visible outer curve if desired.
Attach red yarn to a suitable line of stitches on the front-facing outer edge.
Repeat:
*Skip 2 stitches, 5 dc in next stitch, skip 2 stitches, sl st in next stitch.*
Continue around the ring.
Space the shells evenly rather than forcing the repeat into an unsuitable stitch count.
Large Red Christmas Bow
The bow is the largest decoration and should be completed before positioning the smaller motifs.
Main Bow Strip
With red yarn, ch 16.
Row 1: Sc in second ch from hook and across. (15)
Rows 2–48: Ch 1, turn, sc across. (15)
For additional ribbing, work every second row in BLO.
Fasten off, leaving a long sewing tail.
Forming the Bow Loops
Bring the two short ends of the rectangle together.
Overlap them by approximately 2 cm.
Sew securely.
Flatten the resulting ring so the seam sits at the center back.
Pinch the middle firmly to create two symmetrical loops.
Bow Center Band
With red yarn, ch 7.
Row 1: Sc in second ch from hook and across. (6)
Continue working rows of 6 sc until the band wraps completely around the pinched center of the bow.
Fasten off and sew the band closed at the back.
Secure it to the bow with several hidden stitches so it cannot rotate.
Bow Tails — Make 2
With red yarn, ch 13.
Row 1: Sc in second ch from hook and across. (12)
Continue in sc until each tail measures approximately 16–19 cm.
To create the pointed end, decrease one stitch at each side over the final rows until a narrow point remains.
Fasten off.
Attach both tails behind the center band, angling them toward the open center of the wreath.
Green Holly-Style Leaves
Make approximately 12–18 leaves depending on the wreath diameter.
Leaf
With green yarn, ch 12.
Starting in the second chain from the hook, work:
sc, hdc, dc, dc, tr, tr, dc, dc, hdc, sc
Work 3 sc into the final chain.
Continue along the opposite side of the foundation chain:
sc, hdc, dc, dc, tr, tr, dc, dc, hdc, sc
Join with sl st.
Pointed Leaf Edging
For a holly-like outline, work around the leaf using short points:
*sc, ch 2, sl st into first ch, sc in next 2 stitches.*
Repeat around, adjusting the spacing at the tip.
Fasten off, leaving a long sewing tail.
Leaf Vein
Using the same green yarn, surface crochet a line of slip stitches from the base to the tip.
This central ridge helps the leaf hold its shape and gives the foliage more definition against the red background.
Gingerbread Person Appliqué — Make 2
The two gingerbread figures should be approximately 10–13 cm tall for a wreath around 40 cm in diameter.
Head
With gingerbread-brown yarn, make an MR.
Round 1: 6 sc in MR. (6)
Round 2: Inc in every stitch. (12)
Round 3: *Sc, inc* around. (18)
Round 4: *2 sc, inc* around. (24)
Fasten off.
Gingerbread Body
Ch 9.
Row 1: Sc in second ch from hook and across. (8)
Rows 2–9: Ch 1, turn, sc across. (8)
Do not fasten off.
First Leg
Work across the first 3 stitches only.
Continue for 5 rows.
On the final row, decrease at both sides to round the foot.
Fasten off.
Second Leg
Rejoin yarn to the opposite 3 stitches.
Repeat the first leg.
Leave the center stitches unworked to create the gap between the legs.
Gingerbread Arms — Make 2 for Each Figure
Ch 8.
Starting in the second chain from the hook, work sc across.
Ch 1, turn.
Work another sc row.
For a slightly rounded hand, work 3 sc into the final end stitch before fastening off.
Sew one arm to each side of the body.
Assembling the Gingerbread Figure
Sew the head to the upper edge of the body.
Attach both arms at a slight downward angle.
Block the figure flat before adding the icing.
White Icing Outline
Using white yarn and a yarn needle, embroider a continuous line around the outer edge of the gingerbread figure.
For the wavy icing visible on the arms and legs, make small repeating curved stitches rather than pulling one long strand tightly across the surface.
Keep the white line approximately 3–5 mm inside the brown edge.
Gingerbread Face
Embroider two small white eyes.
Make a curved white smile below them.
Add two or three small white buttons down the body.
A tiny amount of black or dark brown yarn can be used inside the eyes if stronger facial definition is wanted.
Mini Red Bow Tie — Make 2
Ch 5.
Work 4 sc across.
Continue for 5–6 rows.
Fasten off.
Pinch the center and wrap red yarn around it several times.
Sew one bow tie below each gingerbread head.
White Crochet Snowflakes — Make 2
Each snowflake should have six branches and remain relatively flat.
Center
With white yarn, make an MR.
Round 1: 12 sc in MR. Join with sl st. (12)
Round 2: *Ch 5, skip 1 stitch, sl st in next stitch.* Repeat six times.
You now have six loops.
Snowflake Branch
Sl st into the first loop.
Ch 8.
Sl st into the second chain from the hook and into the next chain.
Ch 3, sl st into second chain from hook and next chain to create a small side point.
Return to the main branch with a sl st.
Sl st down 2 main-branch chains.
Make another ch-3 side point.
Continue with sl sts back toward the center.
Repeat for all six loops.
Snowflake Tip Variation
For a fuller branch tip, work:
Ch 3, sl st back; ch 4, sl st back; ch 3, sl st back.
This creates a three-pronged end similar to a traditional snow crystal.
Block both snowflakes before attaching them.
Gingerbread House
The house occupies the lower center of the wreath. Make it broad enough to balance the large bow above it.
Main House Panel
With gingerbread-brown yarn, ch 17.
Row 1: Sc in second ch from hook and across. (16)
Rows 2–14: Ch 1, turn, sc across. (16)
Roof Section
Begin decreasing to form the triangular roof.
Row 15: Dec, sc across to final 2 stitches, dec.
Repeat this decrease row until approximately 2 stitches remain at the peak.
Fasten off.
White Snow Roof
Make two thick white roof strips.
Ch enough stitches to follow one roof slope from the peak to the outer corner.
Work 2 rows of sc.
Make a second identical strip.
Sew the strips over the two sloping roof edges so they meet at the peak.
For additional thickness, work one row of surface slip stitches over each white strip.
Red House Door
With red yarn, ch 7.
Rows 1–7: Work 6 sc.
For the rounded top, work a final row containing hdc and dc increases across the center.
Fasten off.
Sew the door to the lower center of the house.
Outline it with white surface stitches.
Add a small white French knot or embroidered dot for the doorknob.
House Window
Using white yarn, embroider a small rounded or square window above the door.
Work one vertical and one horizontal line through the center to divide it into four panes.
Keep the window narrower than the door so the house retains balanced proportions.
White Base Trim
Attach white yarn along the bottom edge of the house.
Work one row of sc.
Turn and work another row of sc if a thicker snow-covered foundation is desired.
Fasten off.
Planning the Wreath Arrangement
Place the wreath flat before sewing anything permanently.
Position the large red bow at 12 o’clock.
Place one gingerbread person at approximately 10 o’clock and the second at approximately 2 o’clock.
Position the snowflakes near 8 o’clock and 4 o’clock.
Center the gingerbread house at 6 o’clock.
Slide green leaves underneath and between these major decorations.
Layering the Green Foliage
Start with the lower half of the wreath.
Place groups of two or three leaves behind the house and snowflakes.
Add another cluster behind each gingerbread figure.
Use smaller clusters beneath the bow if empty red areas remain visible.
Do not cover the entire wreath with foliage. Sections of the red base should remain visible so the circular structure is clear.
Attaching the Decorations
Use matching yarn whenever possible.
Sew green leaves with green yarn, gingerbread pieces with brown, and the bow with red.
Anchor each appliqué at several points rather than sewing continuously around every edge.
For the gingerbread people, secure the head, both hands, and both feet.
For each snowflake, secure the center first and then one small stitch near the end of each branch.
Attach the gingerbread house along its lower edge, both roof corners, and roof peak.
Hanging Loop
With red yarn, ch approximately 45–55.
Turn and sl st into every chain for a stronger cord.
Fasten off.
Fold the cord in half and sew both ends firmly to the back of the wreath behind the bow.
The hanging loop should carry the weight of the wreath form rather than relying on stitches used to attach the bow.
Optional Reinforcement for a Door Wreath
If the wreath will hang on a frequently used door, add a second hidden attachment cord.
Thread strong yarn around the rigid wreath form itself and bring the loop through the crochet cover at the top.
Place the decorative red hanging cord over this structural loop.
This transfers the weight to the wreath form and reduces stretching of the crochet cover.
Size Adjustments
| Wreath Diameter | Gingerbread Height | House Height | Snowflake Diameter |
|---|---|---|---|
| 30 cm | 8–9 cm | 10–11 cm | 7–8 cm |
| 35 cm | 9–11 cm | 11–13 cm | 8–9 cm |
| 40 cm | 10–13 cm | 13–15 cm | 9–11 cm |
| 45 cm | 12–14 cm | 15–17 cm | 10–12 cm |
These are project targets rather than fixed measurements. Test all decorations against the actual wreath before sewing them in place.
Yarn Quantity Method
Because wreath forms vary greatly in thickness, calculate the red yarn from a sample rather than relying on a fixed gram amount.
Crochet approximately 10 cm of the red cover strip and weigh it.
If 10 cm weighs 18 g and the complete strip must measure 125 cm:
125 ÷ 10 = 12.5
12.5 × 18 g = 225 g
Add approximately 10% for joining and finishing.
Repeat the same weighing method for the decorative components if making multiple wreaths.
Alternative Color Schemes
- Burgundy + cream + forest green — darker traditional palette
- Red + white + sage — lighter botanical version
- Ivory + gold + gingerbread brown — neutral Christmas wreath
- Red + emerald + bright white — high-contrast holiday palette
- Dusty red + olive + oatmeal — muted rustic version
Assembly
- Crochet the red wreath cover, wrap it around the form, and close the back seam securely.
- Make the large red bow, center band, and two tails; attach them together before placing the bow on the wreath.
- Crochet all green leaves, block them, and arrange the major foliage clusters around the lower and side sections.
- Complete two gingerbread people, including their white icing, faces, buttons, and red bow ties.
- Crochet and block two six-point white snowflakes, keeping both within the same finished diameter.
- Make the gingerbread house, then attach its white roof, red door, window, and base trim.
- Pin the bow at the top, gingerbread figures on the upper sides, snowflakes below them, and house at the bottom center.
- Adjust the green foliage until the major decorations are separated visually while some red background remains exposed.
- Sew every component securely and attach the hanging loop directly through or around the structural wreath form.
- Lay the wreath flat, reshape the bow loops, straighten all snowflake branches, and check that the house remains centered below the opening.
The completed wreath should hang vertically with the bow centered at the top and the gingerbread house centered directly below it.
7 Technical Tips
- The wreath twists on the wall: too much decorative weight has been placed on one side. Before sewing, suspend the pinned wreath for several minutes and move the heavier appliqués until the ring hangs vertically.
- The red cover wrinkles: the strip is longer than the wreath circumference. Aim for approximately 1 cm of negative ease around the tube so the crochet fabric stretches lightly over the form.
- The bow collapses: the center band is not tight enough. Pinch the bow to approximately one-third of its uncompressed center width before wrapping and sewing the band.
- Snowflake branches curl: branch tension varies from one section to another. Block all six tips at equal distances from the center and allow the motif to dry completely before attachment.
- The gingerbread figures sag: too few anchor points were used. Secure each figure at the head, two hands, and two feet rather than attaching only through the torso.
- The house tilts: its lower edge is not perpendicular to the wreath’s vertical center line. Mark 6 o’clock on the ring and pin the midpoint of the house base there before securing the roof.
- The hanging loop stretches: decorative stitches are carrying the wreath’s full weight. Run the structural hanging yarn around the rigid wreath form itself and hide it behind the red bow.
Care and Storage
Remove surface dust with a soft brush or low-suction handheld vacuum attachment. If the selected yarn can be washed, clean individual removable appliqués according to the yarn manufacturer’s instructions rather than soaking a wreath containing a foam or rigid insert.
For seasonal storage, place the wreath flat in a box wide enough that the bow loops are not compressed. Put acid-free tissue or clean lightweight paper beneath the bow tails and snowflake branches if they need support.
Before rehanging the wreath the following season, reshape the bow and leaves by hand and check the hanging loop for stretching.
Conclusion
This crochet gingerbread Christmas wreath is easiest to control when treated as a collection of separate motifs rather than one continuous crochet piece. Complete the red base first, then use the bow, two gingerbread figures, snowflakes, foliage, and gingerbread house to establish a balanced arrangement before sewing. The next practical step is to measure the intended wreath form and crochet a 10 cm red cover sample so the final strip fits firmly. Finished wreaths can be shared on Pinterest and Instagram with #GingerbreadChristmasWreath. For your version, would you keep the two gingerbread figures identical or make one with a bow tie and the other with a small Christmas hat?









