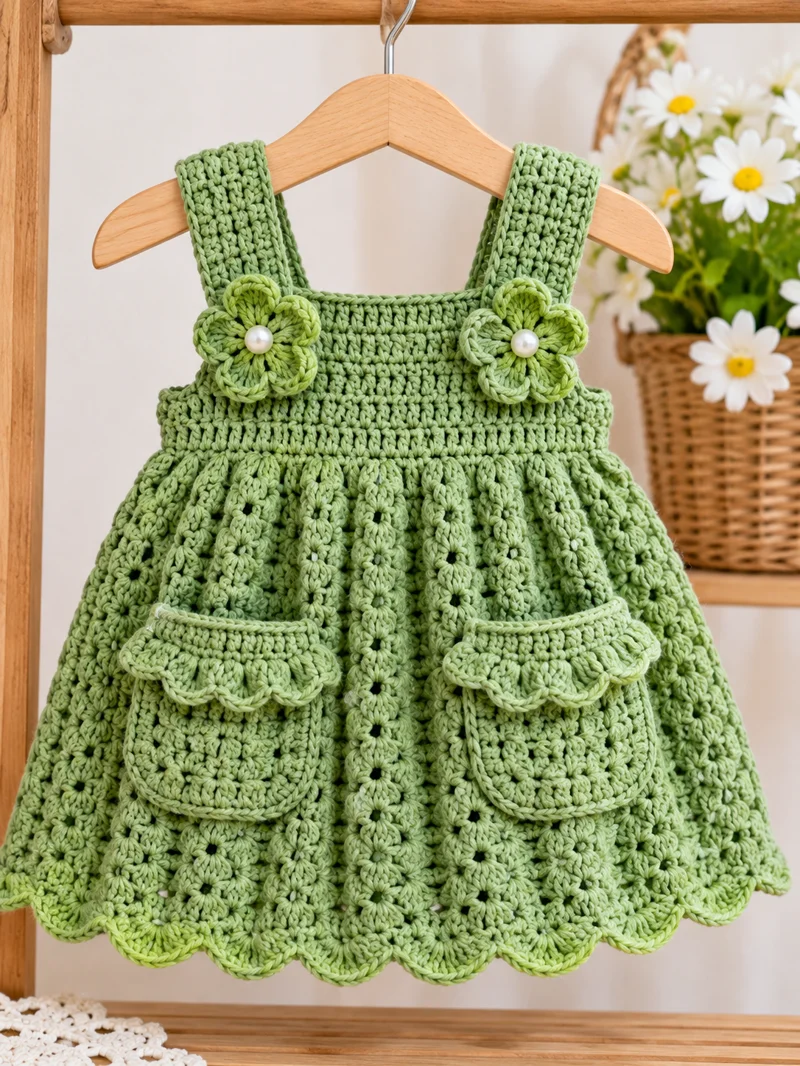
Two raised flowers anchor the straps of this sage green pinafore, while matching pockets decorate the skirt’s floral columns. This crochet baby dress pattern combines a structured bodice, wide shoulder straps, decorative appliqués, and a scalloped hem. Designed for approximately 12–18 months, it uses DK cotton-blend yarn and a 4 mm crochet hook. Intermediate crochet skills are recommended. The separate construction sections make alterations and repairs easier.
The Design: What Makes This Sage Green Dress Different
The square neckline establishes the garment’s proportions. Unlike a round-yoke dress, this crochet toddler pinafore uses two rectangular bodice panels, allowing the maker to adjust shoulder coverage without changing the skirt circumference.
The bodice remains relatively firm while the skirt expands gradually, producing a flared shape without excessive fabric around the chest. The floral crochet baby dress features decorative raised clusters that create vertical texture.
Two decorative pockets sit on the upper skirt, below the waist seam, rather than on the bodice. This distributes their weight across a wider area and maintains the dress’s balanced appearance.
A common mistake is increasing the skirt too rapidly. Excess stitches cause horizontal rippling, particularly when using cotton yarn with limited elasticity.
Project Information at a Glance
| Specification | Details |
|---|---|
| Skill Level | Intermediate |
| Estimated Time | 12–18 hours |
| Size | 12–18 months |
| Target Chest Circumference | 56 cm / 22 inches |
| Target Length | 36–40 cm / 14–16 inches |
| Main Hook | 4 mm |
| Detail Hook | 3.5 mm |
| Yarn Weight | DK / Category 3 |
| Construction | Flat bodice, joined skirt rounds |
| Best For | Baby and toddler pinafore |
Pattern note: This is an original, photo-inspired reconstruction, not the original designer’s pattern. The measurements and gauge are proposed targets. The instructions have not been physically test-crocheted.
Materials and Tools
Yarn
- Sage green DK cotton or cotton-blend yarn — 200–250 g: Main bodice, straps, skirt, and pockets.
- Light lime green DK yarn — 20–30 g: Flower appliqués and optional decorative accents.
- Matching sage green yarn — small reserve: Pocket sewing and finishing.
- Pearl white embroidery thread: Flower centers.
These quantities are purchasing estimates. Actual yarn consumption depends on gauge, meterage, skirt length, and decorative details.
Tools
- 4 mm crochet hook for the bodice and skirt.
- 3.5 mm crochet hook for flower details.
- Tapestry needle for joining and weaving ends.
- Locking stitch markers for positioning.
- Measuring tape for sizing.
- Scissors for cutting yarn.
- Rustproof pins for temporary assembly.
Child safety: Use embroidered flower centers instead of detachable pearl beads. Small detachable decorations may present a choking hazard for babies and toddlers.
Gauge and Sizing
Target gauge: 17 double crochet stitches and 10 rows = 10 × 10 cm (4 × 4 inches).
Make a gauge swatch, wash it, and allow it to dry before measuring. If the swatch is wider than 10 cm, try a smaller hook. If it is narrower, try a larger hook.
At this gauge, a 96-stitch bodice circumference measures approximately 56.5 cm before seam effects. Compare this measurement with the intended child’s actual chest measurement and the desired wearing ease.
Crochet Abbreviations (US Terms)
| Abbreviation | Meaning |
|---|---|
| MR | Magic Ring |
| ch | Chain |
| sc | Single Crochet |
| hdc | Half Double Crochet |
| dc | Double Crochet |
| tr | Treble Crochet |
| inc | Increase |
| dec | Decrease |
| sl st | Slip Stitch |
| BLO | Back Loop Only |
| sk | Skip |
| st(s) | Stitch(es) |
| rep | Repeat |
| RS | Right Side |
| WS | Wrong Side |
An invisible decrease is made by drawing up loops through the front loops of two adjacent stitches and completing them together. This garment does not require invisible decreases.
Pattern convention: Turning chains do not count as stitches unless specified. Join skirt rounds with a slip stitch rather than working continuously.
Free Crochet Baby Dress Pattern — Step by Step
Part 1: Front Bodice Panel (Make 1)
Yarn: Sage green DK.
The front bodice is a rectangular panel with 48 double crochet stitches per row. Its upper edge forms the square neckline between the shoulder straps.
Foundation: Ch 50.
Row 1: Dc in third chain from hook and each remaining chain. Turn. (48)
Row 2: Ch 2, dc in each stitch across. Turn. (48)
Row 3: Ch 2, dc in each stitch across. Turn. (48)
Row 4: Ch 2, dc in each stitch across. Turn. (48)
Row 5: Ch 2, dc in each stitch across. Turn. (48)
Row 6: Ch 2, dc in each stitch across. Turn. (48)
Row 7: Ch 2, dc in each stitch across. Turn. (48)
Row 8: Ch 2, dc in each stitch across. Turn. (48)
Row 9: Ch 2, dc in each stitch across. Turn. (48)
Row 10: Ch 2, dc in each stitch across. Turn. (48)
Row 11: Ch 2, dc in each stitch across. Turn. (48)
Row 12: Ch 2, dc in each stitch across. (48)
Fasten off, leaving a 25 cm sewing tail.
At the proposed gauge, the panel measures approximately 28.2 cm wide and 12 cm high. Measure the actual fabric before proceeding.
Part 2: Back Bodice Panel (Make 1)
Yarn: Sage green DK.
Repeat Rows 1–12 of the front bodice panel. Each completed row contains 48 double crochet stitches.
Place both panels together with right sides facing. Sew the lower 6 cm of each side edge, leaving approximately 6 cm open above each seam for the armholes.
Turn the bodice right side out. The lower edge contains 96 foundation stitches around the full circumference.
Inspect the chest measurement before adding the skirt. If the bodice is too narrow, remake the panels at the correct gauge instead of relying on blocking to create substantial extra width.
Part 3: Wide Shoulder Straps (Make 2)
Yarn: Sage green DK.
Each strap is 10 stitches wide and approximately 12 cm long before attachment.
Foundation: Ch 12.
Row 1: Dc in third chain from hook and each remaining chain. Turn. (10)
Rows 2–12: Ch 2, dc in each stitch across. Turn. (10 per row)
Fasten off, leaving a 30 cm sewing tail. Repeat for the second strap.
Attach each strap to the upper front and back bodice edges, aligning its outer edge with the corresponding side of the bodice.
The central neckline opening is approximately 28 stitches wide between the two 10-stitch attachment zones.
Check the strap length against the child’s shoulder measurement. Adjust the length if necessary, then sew both ends securely.
Part 4: Flared Crochet Skirt
Yarn: Sage green DK.
Join yarn at a side seam along the lower bodice edge. Work into the 96 foundation stitches around the waist.
Round 1: Ch 2, dc in each stitch around, join. (96)
Round 2: Ch 2, dc in each stitch around, join. (96)
Round 3: Ch 2, *dc in next 3 sts, 2 dc in next st*, repeat around, join. (120)
Round 4: Ch 2, dc in each stitch around, join. (120)
Round 5: Ch 2, dc in each stitch around, join. (120)
Round 6: Ch 2, *dc in next 4 sts, 2 dc in next st*, repeat around, join. (144)
Rounds 7–18: Ch 2, dc in each stitch around, join. (144 each round)
Rounds 19–20: Ch 2, dc in each stitch around, join. (144 each round)
At the proposed row gauge, the 20-round skirt measures approximately 20 cm before edging.
The two increase rounds create the flare. Avoid adding unplanned increases, which can produce ripples or uneven drape.
To lengthen the skirt, add complete 144-stitch rounds before working the hem.
Part 5: Floral Openwork-Style Texture
Yarn: Sage green DK.
The reference dress has pronounced vertical floral texture. This decorative surface-crochet method approximates that appearance but does not reproduce the photographed integrated openwork exactly.
- Mark 12 evenly spaced vertical paths around the skirt.
- At the 144-stitch section, position the paths approximately 12 stitches apart.
- Join yarn near the waist at the first marked path.
- Work surface slip stitches downward along the selected stitch column.
- At every third row, ch 3, work 3 dc around the anchoring post, ch 3, and sl st into the anchoring point to create a raised cluster.
- Continue toward the hem, repeating at approximately three-row intervals.
- Fasten off and weave the tail into the wrong side.
- Repeat across the remaining marked columns.
Pin the decorative paths before stitching. Shift anchor positions where necessary to accommodate the skirt’s increase rounds.
The overlay is optional. It adds floral texture without changing the underlying skirt stitch counts.
Part 6: Scalloped Crochet Hem
Yarn: Sage green or light lime DK.
Work the hem over the 144 stitches of the final skirt round.
Round 1: Ch 1, sc in each stitch around, join. (144)
Round 2: *Sc in next stitch, skip 2 stitches, 5 dc in next stitch, skip 2 stitches*, repeat around, join. (24 scallops)
Fasten off and weave in the yarn end.
Each scallop uses six stitches from the previous round. The resulting 24 scallops form a continuous decorative border.
If the hem curls upward, check the stitch tension before adding more stitches.
Part 7: Front Crochet Pockets (Make 2)
Yarn: Sage green DK.
Foundation: Ch 18.
Row 1: Sc in second chain from hook and across. Turn. (17)
Row 2: Ch 1, sc across. Turn. (17)
Row 3: Ch 1, sc across. Turn. (17)
Row 4: Ch 1, sc across. Turn. (17)
Row 5: Ch 1, sc across. Turn. (17)
Row 6: Ch 1, sc across. Turn. (17)
Row 7: Ch 1, sc across. Turn. (17)
Row 8: Ch 1, sc across. Turn. (17)
Row 9: Ch 1, sc across. Turn. (17)
Row 10: Ch 1, sc across. (17)
Fasten off, leaving a 35 cm sewing tail.
Make a second identical pocket.
Part 8: Decorative Pocket Flaps (Make 2)
Yarn: Light sage green DK.
Foundation: Ch 18.
Row 1: Sc in second chain from hook and across. Turn. (17)
Row 2: Ch 2, dc across. Turn. (17)
Row 3: Ch 1, sc across. Turn. (17)
Row 4: Ch 1, *sc in next stitch, skip 1 stitch, 3 dc in next stitch, skip 1 stitch*, repeat four times, then sc in final stitch. (4 shells plus 5 sc)
Fasten off, leaving a 25 cm tail.
Sew each flap across the upper edge of its corresponding pocket, allowing the shells to hang over the opening.
Pin the pockets approximately 5–7 cm below the waistline, with equal spacing from the center front.
Sew the pocket sides and lower edges to the skirt, leaving the top openings free.
Part 9: Five-Petal Crochet Flowers (Make 2)
Yarn: Light lime green DK. Hook: 3.5 mm.
Round 1: Work 10 sc in a magic ring, join. (10)
Round 2: *Sl st in next stitch, ch 2, 3 dc in next stitch, ch 2*, repeat five times, sl st to first stitch. (5 petals)
Fasten off, leaving a 25 cm sewing tail.
Arrange the petals into a balanced five-petal flower.
For each center, use pearl-white embroidery thread to create a compact satin-stitch circle approximately 5–7 mm wide.
Work several passes until the central opening is covered. Avoid loose beads, buttons, or detachable pearl decorations on clothing intended for young children.
Part 10: Neckline and Armhole Edging
Yarn: Sage green DK.
Join yarn at the back neckline.
Work one round of single crochet around the neckline, placing one stitch into each available top-edge stitch and spacing stitches evenly along vertical transitions.
Fasten off.
Repeat around each armhole, including the strap edges.
The edging should lie flat without drawing the straps inward. If the opening becomes tight, remove the edging and adjust the number of stitches along the vertical sections.
How to Assemble the Crochet Baby Dress
- Prepare the bodice: Place the front and back panels together and confirm that both contain 48 stitches per row.
- Join the side seams: Sew the lower 6 cm of each side, leaving the upper sections open for the arms.
- Attach the straps: Align both 10-stitch-wide straps with the outer neckline edges and sew them securely.
- Check the neckline: Confirm that the dress can be put on and removed comfortably before finishing the skirt.
- Finish the skirt: Complete the increase rounds, plain rounds, and scalloped edging.
- Position the floral texture: Mark the vertical paths and add the decorative clusters if desired.
- Attach the pockets: Pin both pockets symmetrically and sew along their sides and bottoms.
- Add the pocket flaps: Secure the flaps without closing the pocket openings.
- Sew the flowers: Attach one five-petal flower over each front strap join.
- Complete finishing: Weave in every tail, inspect all seams, wash according to the yarn label, dry flat, and measure the finished garment.
The completed dress consists of two bodice panels, two straps, one joined skirt, two pockets, two pocket flaps, two flowers, and finished edges.
7 Technical Tips for Better Results
- Control stitch-marker placement. A misplaced marker can shift skirt increases and create an uneven silhouette. Mark the first stitch of every joined round and check the required stitch count.
- Measure the bodice before attaching the skirt. An undersized chest circumference can make the dress difficult to put on. Compare the finished measurement with the child’s chest and the intended wearing ease.
- Avoid excessive skirt expansion. Too many increases create ripples instead of a controlled flare. Keep the shaping rounds at 120 and 144 stitches unless recalculating the skirt.
- Check shoulder-strap symmetry. A difference of one or two rows can pull the neckline out of alignment. Measure both straps and pin them before sewing.
- Control tension in the floral overlay. Tight surface stitches can shorten the skirt vertically and distort the fabric. Lay the skirt flat after every few clusters.
- Pin pockets before sewing. Unequal pocket heights are noticeable against vertical motifs. Measure both upper corners from the waistline and keep the openings level.
- Secure yarn tails and flower centers. Short woven ends may loosen during washing, while detachable beads can create choking hazards. Weave tails through several stitch directions and use embroidered centers.
How to Wash and Care for Your Crochet Baby Dress
Wash the finished garment according to the yarn manufacturer’s instructions. For cotton or cotton-blend yarn, a cool, gentle wash is generally appropriate when permitted by the label.
Dry the dress flat and reshape the scalloped hem while damp. Hanging a wet cotton garment may stretch the shoulder straps and change the skirt length.
Inspect the strap seams, flower appliqués, and pocket attachments after laundering. Repair loose stitches before the garment is worn again.
The decorative skirt is intended as a garment layer. Consider pairing it with a suitable underlayer and inspect the fabric for snagging.
Frequently Asked Questions
What yarn is best for a crochet baby dress?
DK-weight cotton or cotton-blend yarn is a practical option for a structured bodice and decorative skirt. Choose yarn suitable for children’s clothing that is washable and comfortable against the skin.
Can I make this dress for a different age?
Yes, but changing the hook size alone is not a reliable sizing method. Recalculate the bodice width using the required chest circumference and actual gauge. Adjust the skirt stitch counts to match the new waist circumference.
How can I make the crochet skirt longer?
Add more 144-stitch rounds before the scalloped edging. At the proposed gauge of approximately 10 rounds per 10 cm, four additional rounds should add roughly 4 cm before washing and blocking.
Are the front crochet pockets functional?
The pockets can hold very lightweight objects when sewn securely along their sides and bottoms. Their primary purpose is decorative, and heavy items may distort the skirt.
Is this crochet baby dress pattern suitable for beginners?
The individual stitches are familiar to many beginners, but garment gauge, shaping, joining, and symmetrical placement require accuracy. Intermediate crochet experience is recommended.
Can I use acrylic yarn instead of cotton?
Yes, provided the yarn is suitable for children’s garments and matches the required gauge. Acrylic may produce different drape, stretch, and finished dimensions, so test a washed swatch first.
How do I keep the scalloped hem flat?
Maintain consistent stitch tension and follow the six-stitch shell repeat. After washing, reshape the scallops while the fabric is damp and allow the dress to dry flat.
Conclusion
This sage green pinafore combines a square neckline, wide shoulder straps, a gradually flared skirt, two front pockets, and five-petal floral appliqués. The construction separates the fitted sections from the decorative elements, making it possible to adjust the garment before completing the finishing details.
Measure the washed bodice, confirm the intended child’s fit, and inspect the shoulder seams before wearing. Save the finished crochet baby dress pattern to Pinterest and share your completed project on Instagram using #SageGreenFlowerDress. Photograph the front and back to document the fit and finishing.
Would you keep the two raised flowers on the shoulder straps, or replace them with a simpler flat appliqué?








