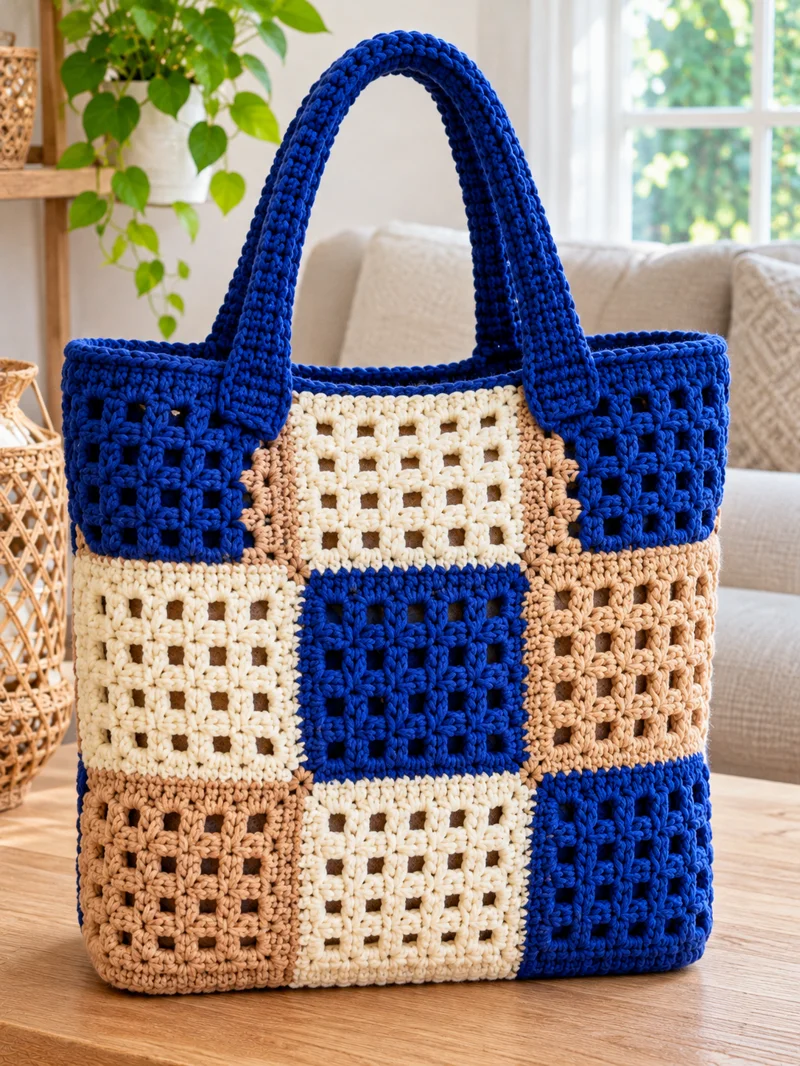
The blue-and-cream patchwork tote bag in the reference photo is a classic crochet project: openwork granny-style squares, a firm base, and strong shoulder handles. This free pattern shows you how to crochet the same bag, square by square, then join it into a useful everyday tote. The finished bag measures about 38 cm wide and 48 cm high including handles, with a depth of about 10 cm. You can carry it as a market bag, library bag, or knitting-and-crochet project bag.
What Makes This Crochet Patchwork Tote Bag Special
The design in the photo uses nine squares on the front and nine on the back. Each square is about 12 cm across, so the finished bag has a balanced grid and a structured panel instead of a loose slouchy shape.
The openwork centre in each square is deliberate. A simple granny-style square with open spaces gives the bag a lightweight, airy look while the two joined panels and the seam make it strong enough for everyday items, papers, and yarn.
Alternate blue, cream, and tan squares to repeat the blue-cream-tan palette in the reference photo. Use navy-blue yarn for the top rows and the handles, because those parts carry the most strain.
The strongest construction choice is a closed joining method. A slip-stitch seam keeps the panels flat and protects the squares from stretching. A closed seam also works for the base, so the bottom can support heavier contents.
Project Information at a Glance
| Specification | Details |
|---|---|
| Skill Level | Easy to Intermediate |
| Estimated Time | 16–20 hours |
| Finished Size | About 38 cm wide x 48 cm high x 10 cm deep |
| Number of Squares | 18 squares, 9 on each side |
| Square Size | About 12 x 12 cm |
| Main Hook | 4.5 mm |
| Detail Hook | 4 mm |
| Yarn Weight | Worsted weight / Aran / Category 4 |
| Construction | 18 granny-style squares joined into panels |
| Best For | Everyday tote, market bag, project bag |
Pattern note: This is an original, photo-inspired reproduction, not the original designer’s pattern. The measurements and gauge are worked from the finished square size, and the pattern has not been test-crocheted yet.
Materials and Tools
Yarn
- Navy blue medium-weight acrylic or cotton yarn — 250–300 g: Squares, top edging, and both handles.
- Cream medium-weight yarn — 100–150 g: Squares and the contrasting centre rows.
- Tan / beige medium-weight yarn — 80–120 g: Squares and alternating panel details.
Exact yardage is estimated from the finished measurements. Actual consumption depends on yarn, hook, gauge, and stitch tension.
Tools
- 4.5 mm crochet hook for squares, joining, and handles.
- 4 mm crochet hook for the top edging and border rows.
- Lining fabric, optional, 80 cm x 115 cm cream cotton for a lined bag interior.
- Fabric scissors for cutting lining fabric.
- Tapestry needle for weaving in ends and joining squares.
- Locking stitch markers for marking joining points.
- Measuring tape for checking square size.
- Rustproof pins for holding joined panels before sewing.
- Sewing needle and thread, same colour as the lining, for attaching a lining.
- Button or magnetic snap, optional, for a closure.
Gauge and Sizing
Gauge: 12 double crochet stitches across 10 cm; 7 rows of double crochet to 10 cm.
Make a gauge swatch, wash it if the yarn label allows, and allow it to dry before measuring. If your swatch is narrower than 10 cm for 12 stitches, change to a larger hook; if it is wider, change to a smaller hook.
Keep every square to the same size. Each finished square should measure 12 cm before joining, so that nine squares measure 36 cm across. With the top rows and base seams, the finished bag is about 38 cm wide.
Abbreviations in This Pattern (US Terms)
| Abbreviation | Meaning |
|---|---|
| ch | Chain |
| dc | Double Crochet |
| hdc | Half Double Crochet |
| sc | Single Crochet |
| sl st | Slip Stitch |
| st(s) | Stitch(es) |
| rep | Repeat |
| RS | Right Side |
| WS | Wrong Side |
Pattern convention: Turning chains do not count as stitches unless the pattern says so. Work the squares in the round. Join the squares with a slip-stitch seam.
Free Crochet Patchwork Tote Bag Pattern — Step by Step
Part 1: Crochet Granny-Style Squares (Make 18)
Work in the round.
Make 18 squares in total. Use the colour plan below, or use your own three-colour pattern.
Round 1: Ch 4, join to first chain with sl st to form ring. Ch 3, work 2 dc in ring, ch 2, *3 dc in ring, ch 2*; repeat from * to * twice more, join with sl st to top of starting ch 3. (12 dc and 4 ch-2 spaces)
Round 2: Slip stitch to first corner space. Ch 3, work 2 dc, ch 2, 3 dc in same space, ch 1, *(3 dc, ch 2, 3 dc) in next corner space, ch 1*; repeat from * to * twice more, join with sl st to top of starting ch 3.
Round 3: Slip stitch to first corner space. Ch 3, work 2 dc, ch 2, 3 dc in same space, ch 1, 3 dc in next ch-1 space, ch 1, *(3 dc, ch 2, 3 dc) in next corner space, ch 1, 3 dc in next ch-1 space, ch 1*; repeat from * to * twice more, join with sl st to top of starting ch 3.
Round 4: Slip stitch to first corner space. Ch 3, work 2 dc, ch 2, 3 dc in same space, ch 1, 3 dc in next ch-1 space, ch 1, 3 dc in next ch-1 space, ch 1, *(3 dc, ch 2, 3 dc) in next corner space, ch 1, 3 dc in next ch-1 space, ch 1, 3 dc in next ch-1 space, ch 1*; repeat from * to * twice more, join with sl st to top of starting ch 3.
Round 5: Slip stitch to first corner space. Ch 3, work 2 dc, ch 2, 3 dc in same space, ch 1, 3 dc in next ch-1 space, ch 1, 3 dc in next ch-1 space, ch 1, 3 dc in next ch-1 space, ch 1, *(3 dc, ch 2, 3 dc) in next corner space, ch 1, 3 dc in next ch-1 space, ch 1, 3 dc in next ch-1 space, ch 1, 3 dc in next ch-1 space, ch 1*; repeat from * to * twice more, join with sl st to top of starting ch 3.
Fasten off and weave in ends on each square. Block lightly if the yarn permits.
Colour plan:
- Squares 1–6: Blue centre and tan outer rows.
- Squares 7–12: Cream centre and blue outer rows.
- Squares 13–18: Tan centre and cream outer rows.
Measure each square. If a square is too small or too large, remake it using a larger hook or a smaller hook until it matches 12 cm.
Part 2: Front Panel
After making 18 squares.
Arrange nine completed squares in a 3-by-3 grid.
For the image-inspired colour placement, use:
| Row | Left | Centre | Right |
|---|---|---|---|
| Top | Blue | Cream | Blue |
| Middle | Cream | Tan | Cream |
| Bottom | Tan | Blue | Tan |
Join the squares along horizontal rows first, then join the rows to each other. Join with the right sides facing, using a slip-stitch seam through both loops. Keep the slip stitches even so the panel lies flat.
When the front panel is joined, it should measure about 36 cm wide and 36 cm high. Repeat this design for the back panel, or use the same arrangement for a matching back.
Part 3: Back Panel
Use the remaining nine squares.
Arrange nine completed squares in a 3-by-3 grid. Use the same arrangement as the front panel.
Join the squares in the same way, with a slip-stitch seam, first along the horizontal rows, then between the rows.
Place the two completed panels side by side and check that they have the same width and height. If one panel is larger, check the square sizes and rejoin the uneven squares.
Part 4: Join the Panels and Make the Base
Use navy blue yarn.
Place the front and back panels together with their wrong sides facing. Work a single-crochet seam along the bottom edge and both side edges, leaving the top open.
To make the flat base, fold each lower corner to form a triangle about 5 cm deep, then sew across the fold. Turn the bag right side out.
The base should measure about 10 cm deep. If the bag still feels narrow at the bottom, make slightly smaller corner folds; if it feels too wide, make slightly larger folds.
Part 5: Top Edging and Handles
Use navy blue yarn and the 4 mm hook.
Join navy-blue yarn at a side seam at the top of the bag. Work one round of single crochet around the whole opening, placing one stitch into each stitch along the top.
Work three more rounds of single crochet around the opening. Fasten off.
For each handle, work a chain of 72 and join the chain in a short row, or start from the top edge and work rows of double crochet. Each handle should be about 24 cm long including the attachment. Attach the handle ends to the top edge, about 12 cm apart from the centre and 5 cm from each side edge. Sew each handle end securely on the inside of the bag.
Reinforce each attachment with an additional row of single crochet.
Assembly — How to Put the Bag Together
- Finish the panels: Join all 18 squares into two flat 3-by-3 panels, checking that both panels are about 36 cm wide and 36 cm high.
- Join the panels: Use single crochet to join the bottom and sides of the panels, leaving the top open.
- Make the base: Fold and sew the lower corners to form a flat base about 10 cm deep.
- Edge the opening: Work four rounds of single-crochet edging around the top opening.
- Add the handles: Attach two handles to the inside of the top edge with secure stitching and reinforcing rows.
- Finish: Turn the bag right side out, weave in all ends, press lightly if the yarn permits, and check the finished size.
How to Line the Crochet Patchwork Tote Bag
A lining is optional, but it prevents small items from falling through the openwork squares and stops the bag from stretching too much.
Cut two rectangles of cream cotton fabric, each 37 cm wide and 47 cm high.
Pin the lining pieces together and sew three sides, leaving the top open. Fold the top edge down 1 cm and press it flat.
Place the lining inside the bag, match the top edges, and sew the lining to the inside of the bag with small stitches. Sew close to the top so the lining stays flat and does not hang below the bag.
7 Tips for Better Results
- Use a stitch marker at every start. Misplaced rows change the width and height of the square, and one square that is slightly off affects the whole panel.
- Check the square size after every few squares. If a square measures more or less than 12 cm, remake it now instead of continuing to the next square.
- Keep tension even on every square. Tight squares make the panel pucker, while loose squares make it stretch. If a row feels too tight, go up half a millimetre in hook size; if it feels loose, go down half a millimetre.
- Use a closed seam for joining squares. Closed seams keep the panels flat and strong, while open seams can stretch and show gaps.
- Reinforce the handle attachments. Use several rows and a strong yarn, and sew each end to the inside of the bag rather than the outside.
- Line the bag if you carry small items. Openwork squares are not suitable for holding keys or pens without a lining. Use cotton lining, and attach it securely around the top edge.
- Block the panels before joining. Block lightly with a steam iron if the yarn label allows, or use a damp cloth. Blocking evens out stitch sizes and makes the panel edges line up exactly.
How to Care for Your Crochet Patchwork Tote Bag
Wash the bag by hand in cool water with a mild detergent. Avoid hot water because it can shrink the fabric and stretch the handles. Rinse thoroughly and roll the bag in a towel to remove water.
Reshape the bag and let it dry flat on a towel. Do not hang the bag to dry because the weight of the water can make the handles longer and the panels larger.
The openwork design and yarn structure are more delicate than solid fabric. Avoid carrying sharp objects, and check the seams occasionally for damage.
Frequently Asked Questions
Can I use a different yarn weight?
Yes, if you adjust your hook and check your gauge. A lighter yarn produces a smaller, lighter bag that may not hold its shape; a heavier yarn produces a stiffer bag with a thicker feel. Try a swatch before making all 18 squares.
What size hook is best for a crochet patchwork tote bag?
Use a 4.5 mm hook for the squares, joining, and handles, and a 4 mm hook for the top edging. A smaller hook creates tighter stitches and a firmer bag; a larger hook creates a looser bag.
Can I make the bag larger?
Yes. Make the squares larger by adding more rounds, or make more squares. Add the same number of squares to the front and back, or the bag will be unbalanced.
How do I keep the bag from stretching out of shape?
Use a closed joining seam, reinforce the handles and top rows, and line the bag if needed. Cotton yarn can stretch with weight, so do not overload the bag and reshape it after washing.
Is this crochet patchwork tote bag suitable for beginners?
Yes, although it takes patience. The squares use basic stitches and simple repeats, but a finished bag requires careful counting, joining, and finishing. It is a good project for a confident beginner or an intermediate crocheter.
Conclusion
This patchwork tote combines open granny-style squares with a firm base, neat seams, and strong handles. The blue, cream, and tan palette mirrors the reference photo and gives the bag a balanced look without adding complicated shaping.
Start by crocheting one square to check your gauge, then make the other 17. Work the panels and the handles carefully, block every piece lightly, and reinforce the places that carry the most strain. Your finished bag should measure about 38 cm wide and 48 cm high including handles, with a depth of about 10 cm. Save the project to Pinterest and share your finished bag with #PatchworkToteBagCrochet.
What is the best piece of this bag? The blue-and-cream colour palette or the airy openwork squares — which would you keep?








