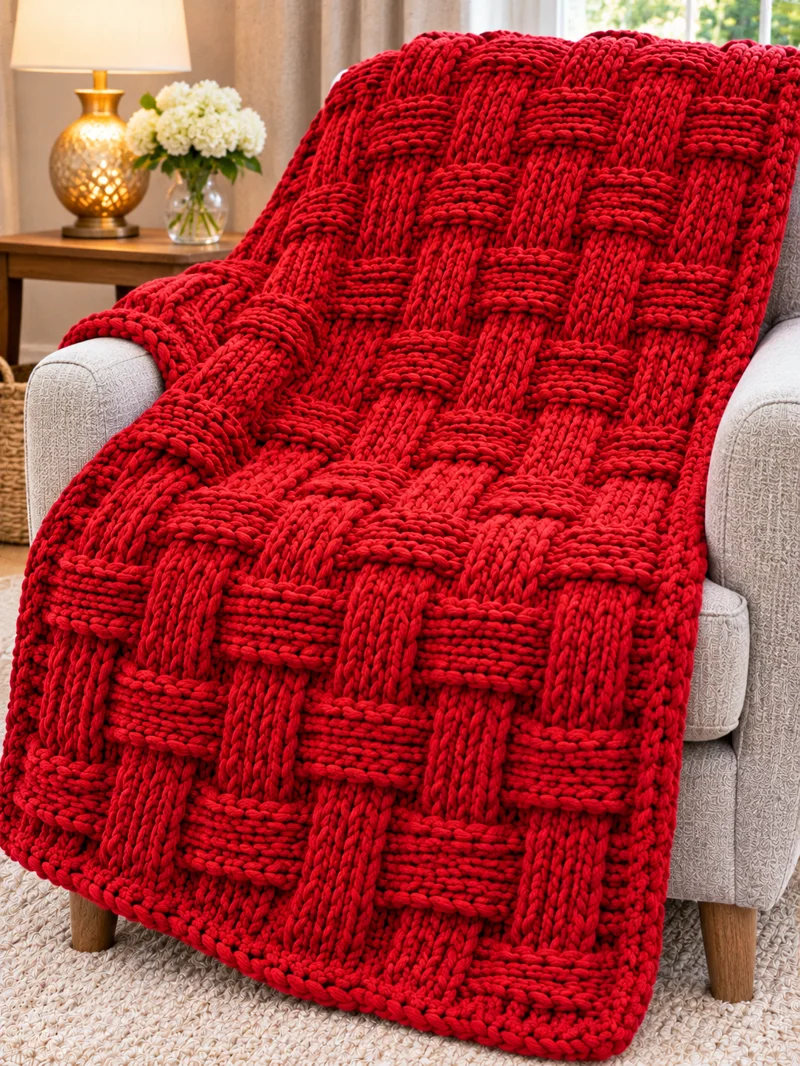
The deep red basketweave blocks in this blanket look like thick strips of yarn crossing over and under one another. This chunky crochet basketweave blanket pattern recreates that raised texture using front-post and back-post double crochet stitches. Worked in one solid crimson red color with chunky yarn and a large crochet hook, the finished blanket measures approximately 120 × 150 cm (47 × 59 inches). The pattern is designed for intermediate crocheters and uses a repeating stitch sequence that becomes easier to follow after the first few rows.
The Design: What Makes This Crochet Basketweave Blanket Different
This red crochet basketweave blanket features large rectangular blocks that create a pronounced woven appearance without requiring separate strips or complicated assembly.
The first important design choice is the use of front-post double crochet (FPdc) and back-post double crochet (BPdc) stitches. These stitches are worked around the posts of previous stitches rather than through the usual top loops. Alternating them creates raised and recessed sections that resemble interlaced fabric.
The second design feature is the eight-stitch basketweave block. Wider blocks produce a more substantial texture than narrow two-stitch or four-stitch variations, particularly when using chunky chenille yarn.
Finally, the blanket is worked as one rectangular panel with a simple crochet border. This construction keeps finishing work minimal and gives the edges a consistent appearance.
One common mistake is reversing the front-post and back-post sections at the wrong point. Keeping a row counter nearby helps maintain the repeating pattern.
Project Info at a Glance
| Project Detail | Information |
|---|---|
| Pattern Name | Chunky Crochet Basketweave Blanket |
| Skill Level | Intermediate |
| Estimated Time | 12–18 hours, depending on experience |
| Finished Size | Approximately 120 × 150 cm (47 × 59 inches) |
| Yarn Weight | Super bulky, category 6 |
| Crochet Hook | 10 mm (US N/P), adjustable to gauge |
| Main Color | Solid crimson red |
| Main Stitches | Double crochet, FPdc, BPdc |
| Construction | One-piece rectangular blanket |
| Border | Single crochet edging |
| Pattern Repeat | 16 stitches and 16 rows |
The finished measurements are a design target rather than a tested sample measurement. Because basketweave stitches contract more than ordinary double crochet, the final size depends on the yarn, hook, and individual tension.
Materials and Tools
Yarn
Choose a thick, soft yarn that allows the raised basketweave blocks to remain visible. A solid red color highlights the direction changes between front-post and back-post stitches.
- Main yarn: Super bulky weight yarn, category 6.
- Color: Crimson red, cherry red, or deep scarlet.
- Estimated quantity: Approximately 1,800–2,400 g, depending on yarn thickness, meterage, and gauge.
- Suggested yarn: Bernat Blanket, or a comparable super bulky chenille yarn.
- Optional extra yarn: One additional skein from the same dye lot for the border or adjustments.
The yarn quantity is a planning estimate, not a measured requirement for a completed sample. Front-post and back-post stitches can use considerably more yarn than flat double crochet stitches, so checking consumption with a swatch is recommended.
For a blanket intended for frequent use, select yarn with washing instructions appropriate for regular cleaning. Polyester chenille creates a thick fabric, while smooth acrylic or wool-blend yarn can provide more defined individual stitches.
Tools
- 10 mm crochet hook: Use a comfortable hook with a smooth head suitable for chunky yarn.
- Stitch markers: At least four removable markers for identifying the first and last stitches and tracking block boundaries.
- Measuring tape: For checking the gauge swatch and blanket dimensions.
- Large-eye yarn needle: For weaving in thick yarn ends.
- Sharp scissors: For cutting yarn cleanly.
- Row counter: For tracking the eight-row texture sections.
A 10 mm hook is the starting recommendation for this pattern. Some super bulky chenille yarns may require a larger hook to produce a flexible basketweave fabric.
Gauge and Size Planning
Gauge is especially important when crocheting a basketweave blanket because post stitches pull the fabric inward. A blanket that begins at the correct width can become narrower after several rows of raised texture.
The target basketweave gauge for this design is:
- Stitch gauge: 8 stitches = approximately 10 cm.
- Row gauge: 8 rows = approximately 10 cm.
- Target width: 120 cm.
- Target length: 150 cm.
These are calculated design targets, not independently verified measurements. A finished swatch is needed to determine whether your yarn and hook produce this gauge.
How to Make a Basketweave Gauge Swatch
Make a swatch large enough to contain several complete eight-stitch blocks. Use the same yarn, hook, and post-stitch technique planned for the blanket.
- Chain 35.
- Work one double crochet into the fourth chain from the hook and one double crochet into each remaining chain. You will have 33 double crochet stitches, counting the turning chain as the first stitch.
- Work the basketweave stitch sequence described below for at least 20 rows.
- Lay the swatch flat without stretching it.
- Measure the central stitches across 10 cm, avoiding the edges.
- Measure the number of completed rows within 10 cm.
- Compare the measurements with the target gauge and change hook size if necessary.
If your swatch is too narrow, try a larger hook. If it is too wide, try a smaller hook.
Allow the swatch to rest before measuring. Thick chenille yarn may relax after handling, and the dimensions can change slightly.
Crochet Abbreviations
| Abbreviation | Meaning |
|---|---|
| ch | Chain |
| sc | Single crochet |
| dc | Double crochet |
| FPdc | Front-post double crochet |
| BPdc | Back-post double crochet |
| sl st | Slip stitch |
| st(s) | Stitch(es) |
| rep | Repeat |
| RS | Right side |
| WS | Wrong side |
Important: This pattern uses US crochet terminology. A US double crochet is equivalent to a UK treble crochet.
How to Work a Front-Post Double Crochet (FPdc)
- Yarn over.
- Insert the hook from front to back and then to front again around the post of the indicated stitch in the previous row.
- Yarn over and pull up a loop.
- Yarn over and pull through two loops.
- Yarn over and pull through the remaining two loops.
The completed stitch projects toward you on the side of the fabric currently facing you.
How to Work a Back-Post Double Crochet (BPdc)
- Yarn over.
- Insert the hook from back to front and then to back again around the post of the indicated stitch.
- Yarn over and pull up a loop.
- Yarn over and pull through two loops.
- Yarn over and pull through the remaining two loops.
The stitch recedes on the side currently facing you, creating the contrast required for the basketweave texture.
Chunky Crochet Basketweave Blanket Pattern — Step by Step
The blanket is worked flat in rows from the bottom edge upward. Turn the work at the end of every row.
The design uses a 16-stitch horizontal repeat, formed by alternating eight FPdc stitches and eight BPdc stitches. The texture changes direction after each eight-row section.
Pattern note: Chain 2 at the beginning of each row after the foundation row. This turning chain does not count as a stitch. Work the first stitch into the first actual stitch of the previous row, and do not work into the turning chain at the opposite edge.
Step 1: Crochet the Foundation Chain
Using your 10 mm hook and crimson red yarn, make a foundation chain of 99 chains.
This foundation produces 96 double crochet stitches plus one double crochet at each edge and the beginning turning chain.
The central 96 stitches form six complete 16-stitch basketweave repeats.
Keep the foundation chain relaxed. A chain that is significantly tighter than the rest of the fabric can pull the lower edge inward.
Step 2: Work the Foundation Row
Row 1: Work 1 dc into the fourth chain from the hook. Continue working 1 dc into each remaining chain across.
Stitch count: 97 dc, counting the three skipped chains as the first dc.
Turn your work.
The initial turning chain represents the first edge stitch. The 96 worked double crochet stitches form the basketweave pattern area.
Place a removable marker in the first actual double crochet stitch to help identify the beginning of the textured section.
Step 3: First Basketweave Section
The first eight textured rows establish the raised blocks.
For every row in this section, chain 2 and work one ordinary double crochet into the first actual stitch. This forms the first edge stitch. Then work the central 96 post stitches and finish with one ordinary double crochet into the final edge stitch.
On the first textured row, work around the posts of the foundation double crochet stitches. The starting chain-3 edge stitch is treated as the final edge stitch.
Row 2: Ch 2, dc in first st, *FPdc in next 8 sts, BPdc in next 8 sts*; repeat from * to * 6 times, dc in last edge st. Turn. (98 sts)
Row 3: Ch 2, dc in first st, *BPdc in next 8 sts, FPdc in next 8 sts*; repeat from * to * 6 times, dc in last edge st. Turn. (98 sts)
Row 4: Repeat Row 2. (98 sts)
Row 5: Repeat Row 3. (98 sts)
Row 6: Repeat Row 2. (98 sts)
Row 7: Repeat Row 3. (98 sts)
Row 8: Repeat Row 2. (98 sts)
Row 9: Repeat Row 3. (98 sts)
Technical note: The stitch instructions above assume the 96 pattern stitches and two ordinary double crochet edge stitches are established before beginning the texture repeat. Check the stitch count after the first textured row. If the foundation edge arrangement differs because of your turning-chain method, adjust the foundation so that exactly 98 stitch positions are available for each textured row.
Alternating FPdc and BPdc on successive rows maintains the same raised and recessed blocks on the right side of the fabric.
Step 4: Reverse the Basketweave Blocks
After eight textured rows, reverse the stitch arrangement to create the next set of rectangular blocks.
Row 10: Ch 2, dc in first st, *BPdc in next 8 sts, FPdc in next 8 sts*; repeat from * to * 6 times, dc in last st. Turn. (98 sts)
Row 11: Ch 2, dc in first st, *FPdc in next 8 sts, BPdc in next 8 sts*; repeat from * to * 6 times, dc in last st. Turn. (98 sts)
Row 12: Repeat Row 10. (98 sts)
Row 13: Repeat Row 11. (98 sts)
Row 14: Repeat Row 10. (98 sts)
Row 15: Repeat Row 11. (98 sts)
Row 16: Repeat Row 10. (98 sts)
Row 17: Repeat Row 11. (98 sts)
The previously raised blocks now appear recessed, while the recessed blocks become raised.
This reversal produces the characteristic basketweave appearance.
Step 5: Continue the Basketweave Pattern
Repeat the two eight-row sections until the blanket approaches the desired length.
For the proposed 150 cm blanket, the target is approximately 120 total rows at the stated row gauge. This count must be adjusted if the actual basketweave row gauge differs.
| Rows | Section | Texture Arrangement |
|---|---|---|
| 1 | Foundation | Double crochet |
| 2–9 | A | 8 FPdc / 8 BPdc blocks |
| 10–17 | B | 8 BPdc / 8 FPdc blocks |
| 18–25 | A | Repeat Section A |
| 26–33 | B | Repeat Section B |
| 34–41 | A | Repeat Section A |
| 42–49 | B | Repeat Section B |
| 50–57 | A | Repeat Section A |
| 58–65 | B | Repeat Section B |
| 66–73 | A | Repeat Section A |
| 74–81 | B | Repeat Section B |
| 82–89 | A | Repeat Section A |
| 90–97 | B | Repeat Section B |
| 98–105 | A | Repeat Section A |
| 106–113 | B | Repeat Section B |
| 114–121 | A | Repeat Section A |
At the target gauge, 121 rows correspond to approximately 151 cm before allowing for the border and any difference in foundation-row height.
For a finished blanket close to 150 cm, measure the fabric before beginning the border. Stop after a complete eight-row texture section when the desired length is reached, allowing for the border depth.
Do not stretch the blanket while measuring. Lay it flat and measure from the foundation edge to the top edge.
Step 6: Crochet the Final Row
Once the basketweave panel reaches the required length, work one row of ordinary double crochet across the top.
Final Row: Ch 2, dc in each stitch across. Turn.
Maintain the same number of stitches as the preceding textured row.
This final row creates a flatter edge for attaching the border and helps reduce distortion along the top of the blanket.
Step 7: Crochet the Border
A simple single crochet border frames the thick basketweave texture without competing with the raised blocks.
Use the same crimson red yarn and crochet hook.
- After the final row, chain 1.
- Work one single crochet into each stitch across the top edge.
- At the first corner, work 3 sc into the corner space.
- Continue down the side edge, distributing single crochet stitches evenly along the row ends.
- Work 3 sc into the next corner.
- Work single crochet stitches evenly across the foundation edge.
- Work 3 sc into the next corner.
- Continue along the second side edge, keeping the stitch spacing consistent.
- Work 3 sc into the final corner and join with a slip stitch to the first single crochet.
For the second border round, chain 1 and work one single crochet into each stitch around. Work 3 sc into the center stitch of each corner group.
Join with a slip stitch and fasten off.
If the border begins to ripple, reduce the number of stitches along the side edges. If it pulls inward, add stitches more evenly along those edges.
Step 8: Fasten Off and Weave in Ends
Cut the yarn, leaving a tail approximately 20–25 cm long.
Pull the yarn through the final loop and tighten gently.
Thread the tail through a large-eye yarn needle. Weave it through several stitches on the wrong side of the blanket, then reverse direction to secure it.
Repeat for all remaining yarn ends.
For slippery chenille yarn, follow the manufacturer’s recommendations for securing cut ends. Avoid pulling the woven tails so tightly that the basketweave blocks become distorted.
How to Adjust the Blanket Size
The blanket width can be adjusted by changing the number of complete 16-stitch basketweave repeats.
Each repeat contains eight front-post stitches and eight back-post stitches. The pattern also uses two ordinary double crochet edge stitches.
For the edge-stitch method described in this pattern, the intended total textured-row stitch count is:
Total stitches = (16 × number of repeats) + 2.
When using a chain-3 foundation row that counts as the first double crochet, calculate the starting chain from the required foundation stitch count and verify the first row before continuing.
| Basketweave Repeats | Textured Row Stitches | Approximate Width at Target Gauge |
|---|---|---|
| 4 | 66 | 82.5 cm |
| 5 | 82 | 102.5 cm |
| 6 | 98 | 122.5 cm |
| 7 | 114 | 142.5 cm |
| 8 | 130 | 162.5 cm |
These measurements use the proposed gauge of eight stitches per 10 cm and exclude any additional width contributed by the border.
Adjusting the Length
For a longer blanket, add complete 16-row basketweave repeats.
Each 16-row repeat contains one eight-row Section A and one eight-row Section B.
At the target row gauge of eight rows per 10 cm, an additional 16 rows adds approximately 20 cm before accounting for the border.
For a shorter blanket, remove complete repeats while preserving the same sequence.
Measure the fabric after every two completed sections. The finished length is more reliable than a fixed row count when working with thick yarn.
7 Technical Tips for a Better Crochet Basketweave Blanket
- Track the stitch count: Count the stitches after every textured row, including the two ordinary double crochet edge stitches. Missing a post stitch can shift the next eight-stitch block and create a visible diagonal error.
- Keep post stitches consistent: Insert the hook around the full post of the stitch below rather than through its top loops. Incorrect hook placement flattens the raised texture and breaks the woven appearance.
- Measure the basketweave gauge: Work a swatch at least 20 rows tall before measuring. Post stitches can contract more than ordinary double crochet, causing a blanket to finish narrower than its foundation chain.
- Control chenille tension: Avoid pulling the yarn tightly around the posts when using a 10 mm hook. Excessive tension creates rigid blocks and makes the next row difficult to work.
- Mark section changes: Place a removable marker at the beginning of every eight-row section. Reversing the stitch arrangement one row early produces uneven rectangular blocks.
- Check border spacing: Lay the blanket flat after the first single crochet border round. Too many side-edge stitches cause rippling, while too few make the edges curl inward.
- Secure yarn tails: Leave approximately 20–25 cm of yarn when fastening off. Short chenille ends can loosen after washing or repeated handling if they are not woven securely.
Finishing and Care Instructions
Once the border is complete, lay the blanket on a clean, flat surface and inspect the overall shape.
The finished blanket should form a rectangle with relatively even edges. The raised basketweave blocks should remain visible without excessive stretching or distortion.
Checking the Finished Dimensions
Measure the width across the center of the blanket and the length from the bottom edge to the top edge.
The target dimensions are approximately 120 × 150 cm, but a small difference is expected because of yarn thickness and individual tension.
If the blanket is slightly smaller than planned, avoid stretching it aggressively. Chenille fibers and post stitches may not recover evenly after excessive pulling.
Blocking the Blanket
Blocking may help relax minor unevenness, but the correct method depends on the yarn fiber.
For polyester chenille, follow the yarn label and avoid high temperatures. Direct ironing can flatten the raised texture or damage synthetic fibers.
If the yarn permits gentle wet blocking, lay the blanket flat on towels and shape it to the desired rectangle without stretching the stitches.
Allow it to dry completely before folding or using it.
Washing and Drying
Always follow the care instructions supplied by the yarn manufacturer.
Some polyester blanket yarns are machine washable, but the permitted wash temperature, cycle, and drying method vary by product.
Use a gentle cycle when recommended. Avoid fabric treatments that the yarn manufacturer advises against.
When removing a wet blanket from the washing machine, support its full weight rather than lifting it by one corner.
Heavy wet fabric can stretch if suspended without support.
Dry the blanket according to the yarn label. Check the border and woven-in ends after washing.
Frequently Asked Questions
Is the crochet basketweave stitch difficult?
The basketweave stitch is generally considered an intermediate crochet technique because it requires front-post and back-post double crochet stitches.
Once those two stitches are familiar, the pattern follows a predictable sequence of eight-stitch blocks and eight-row sections.
The main challenge is maintaining the correct stitch placement and remembering when to reverse the raised and recessed blocks.
What is the best yarn for a chunky crochet basketweave blanket?
Super bulky category 6 yarn is a practical choice for creating a thick blanket with clearly defined basketweave blocks.
Chenille yarn produces a plush surface, while smooth acrylic or wool-blend yarn can make the individual post stitches easier to identify.
The best option depends on the desired thickness, drape, washing requirements, and stitch definition.
What size crochet hook should I use?
This pattern recommends a 10 mm crochet hook as a starting point.
However, the correct hook size depends on the selected yarn and the gauge achieved with the basketweave stitch.
If the fabric feels too stiff or the post stitches are difficult to work, try a larger hook. If the stitches are excessively loose, try a smaller hook.
How much yarn do I need for a 120 × 150 cm crochet blanket?
For this chunky basketweave design, approximately 1,800–2,400 g of super bulky yarn is a preliminary purchasing estimate.
Actual consumption depends on the yarn’s meterage per gram, hook size, stitch tension, and final measurements.
Basketweave crochet generally requires more yarn than a flat double crochet fabric of similar dimensions because the post stitches create additional depth.
For a more accurate estimate, weigh a measured swatch and calculate the yarn required for the intended blanket area, including an allowance for the border.
Why is my basketweave blanket curling?
Curling can occur when the foundation chain is too tight, the border contains too few stitches, or the post-stitch fabric contracts unevenly.
Check the foundation edge first. If it is noticeably shorter than the main blanket width, a looser foundation or larger hook may be necessary.
For curling along the sides, inspect the border stitch spacing and adjust it before completing additional rounds.
Why do my basketweave blocks look uneven?
Uneven blocks often result from inconsistent stitch counts or incorrect changes between front-post and back-post stitches.
Each textured block should contain eight stitches. The direction of the blocks changes after eight completed rows.
Use stitch markers to identify the boundaries and count each block before moving to the next one.
Can beginners crochet this basketweave blanket?
A crocheter who already knows how to make chains and double crochet stitches can learn the additional post-stitch techniques needed for this blanket.
Practice FPdc and BPdc on a small swatch before beginning the full project.
The blanket contains no shaping, increases, or decreases, making the overall construction manageable once the stitch sequence is understood.
Is a crochet basketweave blanket reversible?
A basketweave blanket displays texture on both sides, but the two surfaces are not identical.
Raised sections on one side correspond to recessed sections on the opposite side.
Both sides can be displayed, although the direction and prominence of the blocks will differ.
Can I make this blanket with two colors?
Yes. The pattern can be adapted to use alternating colors between eight-row sections.
However, the solid crimson red version creates a more continuous woven appearance and matches the intended design.
If using multiple colors, change yarn at the end of a completed row and secure the ends carefully.
How can I make the basketweave texture more pronounced?
Use a yarn with enough body to support raised post stitches and maintain consistent tension throughout the project.
A smooth super bulky yarn can show the individual stitches more clearly, while chenille emphasizes the overall raised blocks.
Avoid pulling the post stitches excessively tight. The blocks need enough flexibility to stand out without becoming rigid.
Can I use a different basketweave block size?
Yes. The stitch can be adapted to four-stitch, six-stitch, or larger block widths.
Smaller blocks create a tighter woven appearance, while wider blocks produce more pronounced rectangular sections.
When changing the block width, recalculate the foundation stitch count and maintain the same alternating FPdc and BPdc arrangement across the fabric.
How do I prevent gaps between the basketweave blocks?
Gaps often appear when the hook is inserted incorrectly around the stitch post or when the working yarn is pulled unevenly.
Keep each post stitch close to its neighboring stitch and maintain consistent loop height.
Check the transition between FPdc and BPdc groups after every row, particularly when working with slippery chenille yarn.
Conclusion
This chunky crochet basketweave blanket pattern combines super bulky red yarn, front-post double crochet stitches, and back-post double crochet stitches to create a thick, raised woven texture. The one-piece construction eliminates the need for joining panels, while the single crochet border provides a defined edge. Before starting the full blanket, make a gauge swatch and confirm the stitch count needed for your preferred dimensions. Save this tutorial to Pinterest for future reference, and share your finished project on Instagram using #RedBasketweaveBlanket. Record your final yarn consumption, hook size, and measurements to make future versions easier to plan. Would you keep the large eight-stitch basketweave blocks or choose smaller blocks for a tighter woven texture?








