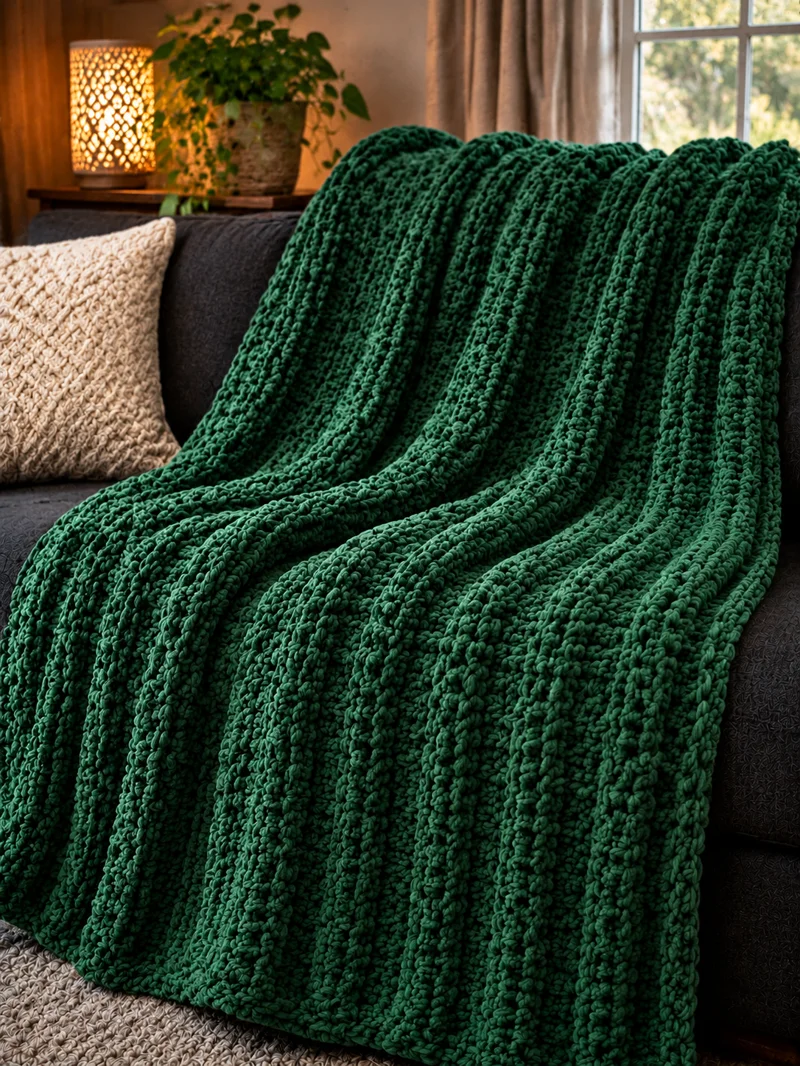
The forest-green ribs on this blanket run in parallel channels, creating a textured surface without cables or sewn panels. This ribbed crochet blanket pattern uses super bulky chenille-style yarn, an 8 mm hook, and back-loop-only half-double crochet to produce a rectangular throw targeting 120 × 150 cm. Designed for confident beginners, the construction repeats one principal stitch technique and provides a practical way to make a washable sofa blanket with consistent edges.
The Design: What Makes This Forest Green Blanket Different
Three structural decisions define this blanket: directional ribbing, uninterrupted color, and a relatively simple rectangular construction.
The raised channels come from working half-double crochet stitches through the back loop. This shifts the unused front loops toward the fabric surface, creating lines that become more pronounced when successive rows are turned.
Forest green is used throughout the project. A single-color fabric keeps the texture visually continuous and avoids the additional ends created by stripe changes.
The blanket is worked flat rather than assembled from squares. That reduces joining seams and allows its length to be adjusted by adding or removing rows.
A common mistake with chunky crochet blankets is assuming that a large hook automatically produces a flexible fabric. Excessively tight tension can still create a stiff result, particularly with chenille yarn.
This textured crochet blanket is therefore designed around a measured gauge swatch. The chunky crochet blanket can be resized without changing the principal stitch repeat.
Project Info at a Glance
| Detail | Specification |
|---|---|
| Skill level | Confident beginner |
| Estimated time | 12–20 hours, depending on pace |
| Target finished size | 120 × 150 cm |
| Crochet hook | 8 mm, adjustable after swatching |
| Yarn weight | Super bulky #6 |
| Construction | Flat rows, turned after each row |
| Main stitch | Half-double crochet, back loop only |
| Color | Forest green |
| Best for | Sofa throw, bed accent, household blanket |
| Gauge | Measure before starting the full width |
The project time and dimensions are planning estimates, not published measurements for the pictured blanket.
Materials and Tools
Yarn
- Forest green chenille-style yarn — super bulky #6 — provisional 1,800–2,400 g — Bernat Blanket or comparable washable blanket yarn.
- Accent yarn — none — 0 g. The reference design uses one color throughout.
Bernat Blanket is a suitable material reference because its published specifications list 100% polyester, 300 g per ball, approximately 201 m per ball, and an 8 mm recommended crochet hook. See the Bernat Blanket yarn specifications.
The provisional yarn allowance corresponds to six to eight 300 g balls. This is a shopping estimate, not a tested consumption figure. Buy matching dye lots and use the gauge swatch method below to calculate a more dependable quantity.
Tools
- 8 mm crochet hook, or the size needed for the desired fabric
- Large-eye yarn needle for securing chenille ends
- Locking stitch markers, at least four
- Measuring tape with centimeter markings
- Scissors
- Digital kitchen scale for yarn calculations
- Blocking mats or a clean flat surface for shaping
No stuffing, safety eyes, sewing accessories, or decorative appliqués are required.
Choosing the Right Green Yarn
The photograph uses a dark, saturated green that reads as forest green rather than olive, sage, or mint. Look for a shade labeled forest, evergreen, pine, or deep emerald, then compare it in natural light.
Color names vary by manufacturer. Confirm the actual shade and yarn weight before ordering, rather than relying on a product name alone.
A polyester chenille yarn creates rounded, plush-looking stitches. Acrylic or wool-blend super bulky yarn can also be used, but the rib definition, drape, and finished dimensions will change.
Avoid mixing yarn weights within the same blanket. Even two products labeled super bulky may differ substantially in thickness.
Crochet Abbreviations
| Abbreviation | Meaning |
|---|---|
| ch | Chain |
| sc | Single crochet |
| hdc | Half-double crochet |
| BLO | Back loop only |
| st / sts | Stitch / stitches |
| sl st | Slip stitch |
| RS | Right side |
| WS | Wrong side |
| rep | Repeat |
| FO | Fasten off |
All instructions use US crochet terminology.
Invisible decreases are not used because the blanket is rectangular and has no shaped or tapered sections.
Gauge and Sizing
Gauge determines whether the blanket reaches the intended dimensions. Chenille yarn compresses under tension, and different makers may obtain different measurements using the same hook.
Make a Gauge Swatch
- Chain 18.
- Work one hdc into the third chain from the hook and in each remaining chain, giving 16 hdc.
- Chain 2 and turn; the turning chain does not count as a stitch.
- Work 16 hdc BLO across.
- Repeat the previous row until the swatch measures at least 15 cm high.
- Lay it flat without stretching and measure a central 10 cm section.
Record the number of stitches and rows per 10 cm.
For the proposed 94-stitch blanket width to measure approximately 120 cm, the required stitch gauge is about 7.83 stitches per 10 cm. This is a calculated target, not a published gauge for the specific stitch pattern.
Required stitches = desired width in cm × stitches per 10 cm ÷ 10.
Round to the nearest whole stitch. For this pattern’s foundation method, add two chains to that number.
Estimate Yarn Before Starting
Weigh the completed swatch and calculate its area in square centimeters. Divide its weight by its area to obtain grams per square centimeter.
Multiply by the target blanket area of 18,000 cm² for a 120 × 150 cm blanket. Add approximately 10–15% for finishing, tension variation, and a small reserve.
For example, if a 15 × 15 cm swatch weighs 20 g, the projected fabric consumption is:
(20 ÷ 225) × 18,000 = 1,600 g.
Adding a 15% allowance gives 1,840 g, or seven 300 g balls when rounded up. This is an illustrative calculation, not an actual swatch result.
Ribbed Crochet Blanket Pattern – Step by Step
The blanket is worked in turned rows, not continuous rounds. The main fabric uses one repeated half-double crochet technique.
Foundation Chain
Yarn: Forest green. Original pattern construction.
Row 0: Chain 96.
Row 1: Work 1 hdc into the third chain from the hook. Continue with 1 hdc in each remaining chain. (94 sts)
Chain 2 and turn.
Check that Row 1 contains exactly 94 hdc stitches. The two skipped foundation chains establish the turning height and are not counted as stitches.
If your gauge requires a different width, replace the 96-chain foundation with the recalculated number.
Main Ribbed Blanket Panel
Yarn: Forest green. Original BLO half-double crochet repeat.
Row 2: Work 1 hdc BLO in each stitch across. (94 sts)
Chain 2 and turn.
Row 3: Work 1 hdc BLO in each stitch across. (94 sts)
Chain 2 and turn.
Row 4: Work 1 hdc BLO in each stitch across. (94 sts)
Chain 2 and turn.
Rows 5–10: Repeat Row 2 for each row. (94 sts per row)
Rows 11–20: Repeat Row 2 for each row. (94 sts per row)
Rows 21–30: Repeat Row 2 for each row. (94 sts per row)
Rows 31–40: Repeat Row 2 for each row. (94 sts per row)
Rows 41–50: Repeat Row 2 for each row. (94 sts per row)
Rows 51–60: Repeat Row 2 for each row. (94 sts per row)
Rows 61–70: Repeat Row 2 for each row. (94 sts per row)
Rows 71 onward: Continue repeating Row 2 until the panel reaches approximately 150 cm in the row-growth direction. (94 sts per row)
The 150 cm length is the controlling measurement. A fixed total row count cannot be stated accurately without a tested row gauge.
Construction note: In turned BLO rows, the raised ridges follow the direction of the crochet rows. Rotate the finished rectangle when placing it on the sofa to orient the ribs as desired.
Understanding the Back-Loop Stitch
Every crochet stitch has two upper loops that form a small V. Normally, a standard half-double crochet passes under both loops.
For BLO construction, insert the hook under the loop farthest from you.
Yarn over, pull up a loop, yarn over again, and draw through all three loops on the hook.
The unused front loop remains visible as a horizontal line on the fabric. When rows accumulate, these lines form the ribbed surface.
Do not alternate between BLO and standard hdc unless intentionally changing the texture. Inconsistent loop placement creates interruptions in the raised channels.
Keeping the Edges Straight
At the beginning of each row, chain two and turn. The chain-two turning chain does not count as a stitch.
Place a locking marker in the first and last actual hdc of the row. Work into those stitches when returning across the fabric.
If the blanket gradually narrows, the final stitch is probably being missed. If it widens, the turning chain may be getting counted as an additional stitch.
The stitch count should remain at 94 for every row in the original-size version.
Joining a New Ball of Yarn
When approximately 20 cm of yarn remains, finish the current stitch and prepare the next ball.
Attach the new yarn at a row edge when possible. Leave tails of approximately 15–20 cm from both balls.
Avoid bulky knots in the center of the fabric. Chenille yarn may have a slippery core, and cut ends can shed fibers when pulled repeatedly.
Secure the tails by weaving them through several stitches in different directions. Test the join with gentle tension before trimming.
Optional Single-Crochet Border
The pictured blanket has no clearly distinguishable contrasting border. A narrow border is optional and can help stabilize the edges.
Border Round 1: With the right side facing, work 1 sc into each stitch along the top edge, 3 sc into the corner, then distribute sc evenly along the side edge.
Work 3 sc into each corner and continue around the remaining sides. Join with a sl st to the first sc.
Border Round 2: Work 1 sc into each stitch, placing 3 sc into the center stitch of each corner group. Join with a sl st and fasten off.
The exact border stitch total depends on the final number of rows and the spacing used along the sides. Keep the border flat; if it ripples, reduce the number of side stitches, and if it pulls inward, add more.
For a border that remains visually unobtrusive, use the same forest-green yarn and hook.
Adjusting the Blanket Size
The repeat is not dependent on a multiple of four, six, or eight. Any whole-number stitch count can be used.
| Size | Target dimensions | Intended use |
|---|---|---|
| Small lap blanket | 90 × 120 cm | Chair or lap throw |
| Standard throw | 120 × 150 cm | Sofa blanket |
| Large throw | 140 × 180 cm | Oversized couch covering |
| Bed accent | 150 × 200 cm | Foot-of-bed layer |
These are suggested dimensions, not finished measurements from a tested sample.
For a wider blanket, increase the foundation chain based on the swatch stitch gauge. For a longer blanket, continue working additional rows.
Keep the same stitch technique throughout to maintain consistent ribs. A width adjustment changes the number of stitches in every row; a length adjustment changes only the number of rows.
Yarn consumption increases with fabric area. A 140 × 180 cm blanket has approximately 40% more area than a 120 × 150 cm blanket, before accounting for border differences.
Assembly and Finishing
A rectangular blanket requires no sewn assembly. The following ten steps cover the final inspection and finishing process.
- Complete the main panel. Stop when the measured length reaches the intended target.
- Check the final width. Measure the blanket flat without stretching the ribbed fabric.
- Inspect the stitch count. Confirm that the last row has the same number of stitches as the first.
- Check the rib direction. Lay the blanket on the sofa and determine its preferred orientation.
- Inspect the surface. Identify any accidental front-loop or both-loop stitches that interrupt the pattern.
- Finish the final stitch. Cut the working yarn with a tail approximately 20 cm long and fasten off.
- Secure yarn joins. Weave each tail through several stitches and reverse direction to reduce slipping.
- Add the optional border. Work it only if the edges require additional structure.
- Shape the blanket. Lay it flat and adjust the corners and edges by hand without overstretching.
- Measure and document. Record the finished dimensions, total yarn consumption, hook size, and any changes made to the foundation.
The finished blanket is a single rectangular fabric with continuous ribbing and secured yarn ends.
7 Technical Tips for Better Rib Definition
- Use stitch markers to prevent uneven edges. Place markers in the first and last hdc of every row, particularly when chenille fibers obscure the top loops.
- Control tension across the foundation chain. If the chain edge is more than 2 cm shorter than the first completed row, remake it with a larger hook or looser tension.
- Check loop placement after every yarn join. Accidentally inserting the hook under both loops produces a visible break in the rib pattern.
- Avoid excessive hook pressure. If the 8 mm hook splits the chenille core or requires force to enter stitches, test a 9 mm hook on a new swatch.
- Measure length with the fabric resting flat. Hanging a heavy blanket over the edge of a table can stretch the fabric and give a misleading measurement.
- Keep border spacing consistent. Too many single crochet stitches along the sides cause rippling, while too few draw the edges inward.
- Secure chenille ends with sufficient overlap. Weave approximately 15 cm of each tail through multiple stitch paths rather than trimming close to a single knot.
Washing and Care
The recommended Bernat Blanket reference yarn is polyester and is marketed as machine washable and dryable. Check the yarn care specifications and always follow the label on the yarn actually used.
For a large throw, check the washing machine’s capacity before loading. Wet blankets can become heavy, and tightly packed fabric may not rinse properly.
Avoid ironing chenille polyester. Direct heat can damage the fiber surface or flatten the raised texture.
If the blanket needs reshaping after washing, spread it flat, align the corners, and allow it to return to its intended dimensions without aggressive stretching.
Common Problems and How to Fix Them
The Blanket Is Narrower Than Expected
The stitch gauge is tighter than the design calculation. Compare the current width against the gauge swatch before adding more rows.
If the discrepancy is substantial, restart with a larger foundation or a different hook. Continuing to add length will not correct the width.
The Ribs Are Not Visible
Check whether the stitches are consistently worked through the back loop. A fabric made with ordinary hdc under both loops will have a different surface.
Very loose tension can also reduce the definition of the raised channels. Make a smaller swatch with a slightly smaller hook before changing the full blanket.
The Edges Are Wavy
Wavy edges usually indicate accidental increases or inconsistent tension. Count the stitches in several rows and compare them.
If every row contains 94 stitches, the waviness may be caused by changing tension rather than incorrect stitch math.
The Blanket Feels Too Stiff
Tight stitches in super bulky yarn can create a dense fabric with limited drape.
Test a hook one size larger. Compare both swatches after laying them flat to see which produces the desired balance of structure and flexibility.
The Yarn Ends Keep Slipping Out
Some chenille yarns have a smooth internal core that makes short tails difficult to secure.
Use longer tails, weave them through multiple directions, and avoid cutting the ends immediately after the first pass.
Frequently Asked Questions
Is this ribbed crochet blanket suitable for beginners?
A maker who can chain, work half-double crochet, identify stitch loops, and maintain a consistent stitch count should be able to follow the pattern. A small practice swatch is recommended before beginning the full throw.
What yarn works best for a chunky ribbed blanket?
Super bulky chenille-style yarn produces a thick fabric similar in appearance to the reference photograph. Bernat Blanket is one possible material, but any comparable yarn may be used after adjusting the gauge.
How much yarn is needed for a 120 × 150 cm blanket?
The provisional allowance is 1,800–2,400 g, but actual consumption depends on the stitch gauge, yarn construction, hook size, and border. A weighed swatch provides a better estimate than blanket dimensions alone.
Can the blanket be made without a border?
Yes. The main panel can be fastened off and finished without an additional border, provided the edges are even and all yarn tails are secured.
How do I make the ribs run vertically?
The raised ribs follow the direction of the worked rows. To display them vertically on a sofa, orient the finished blanket so that the crochet rows run in that direction. If the blanket needs a particular width and length after rotation, plan the foundation length and row-growth direction accordingly.
Can I substitute worsted-weight yarn?
Yes, but a worsted-weight version will require substantially more stitches and rows. It will also have a different fabric thickness and yarn consumption. Recalculate the foundation from a new gauge swatch rather than following the super bulky stitch count.
Conclusion
This forest green ribbed crochet blanket combines a rectangular construction with repeated back-loop-only half-double crochet rows. The design avoids complex shaping, but accurate gauge measurements remain essential for controlling width, length, and yarn consumption. Before starting the full ribbed crochet blanket pattern, complete a 15 cm swatch, record its stitch gauge, and weigh it to estimate the required yarn. After finishing, photograph the blanket laid flat and draped over a sofa to show the direction and depth of the ribs. Share the completed project on Pinterest or Instagram using #ForestGreenRibbedBlanket. Which rib orientation works better for your sofa: channels running vertically down the front or horizontally across the seat?








