Introduction
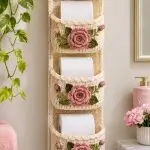
Three toilet rolls require more structure than a decorative wall pocket normally provides. This crochet toilet paper holder pattern uses a firm cream backing, three deep storage pockets, pink edging, and dimensional crochet roses with green leaves. The vertical construction keeps spare rolls accessible without using floor or shelf space. A reinforced hanging loop at the top carries the load while the separate floral appliqués keep the storage sections functional.
The Design: What Makes This Hanging Organizer Different
The organizer is built around one long rectangular backing rather than three independent bags. That decision keeps the pockets aligned and prevents the completed piece from twisting when all three compartments are filled.
Each cream pocket is attached along its lower edge and both sides while the upper edge remains open. Extra width is added to the pocket panel so a toilet roll can project forward instead of forcing the backing to curve around it.
The floral decoration is constructed separately. Each pocket receives one large layered pink rose, four prominent green leaves, two small rosebuds, and narrow embroidered or crocheted stems. Pink scalloped edging repeats along the pocket openings and around the organizer, linking the three sections visually.
Project Information at a Glance
| Skill Level | Construction | Target Size | Hook | Best For |
|---|---|---|---|---|
| Intermediate | Long backing + 3 shaped pockets | Approx. 25–28 × 90–100 cm | 4.0–4.5 mm | Bathroom wall or door storage |
The measurements are project targets. Measure the toilet rolls that will actually be stored before fixing the pocket width and depth, since roll dimensions vary between brands.
Materials and Tools
Yarn
- Warm cream — worsted weight cotton or cotton blend — approximately 450–600 g
- Dusty pink — worsted weight — approximately 120–170 g
- Olive green — worsted weight — approximately 50–80 g
Tools
- 4.0–4.5 mm crochet hook
- Yarn needle
- Scissors
- Stitch markers
- Measuring tape
- Blocking pins
- Optional cotton fabric for backing reinforcement
Abbreviations
- MR — magic ring
- ch — chain
- sc — single crochet
- hdc — half double crochet
- dc — double crochet
- tr — treble crochet
- sl st — slip stitch
- st/sts — stitch/stitches
- sp — space
- BLO — back loop only
- RS — right side
- WS — wrong side
Construction Overview
The project has six main components:
- One long cream backing panel.
- Three cream pocket panels.
- Pink edging around each pocket opening.
- Three large dimensional pink roses.
- Green leaves, small buds, and stems.
- One reinforced hanging loop.
Make the backing first. Fit and attach all three pockets before sewing on the heavy flowers. This keeps the pocket seams accessible and prevents the appliqués from interfering with assembly.
Measure the Toilet Roll First
Place one roll on a flat surface and measure its diameter and width.
For a typical roll, a finished pocket approximately 22–25 cm wide and 18–21 cm high is a useful starting range. The pocket must also project several centimeters away from the backing.
Do not make the pocket exactly the same width as the roll. Add approximately 4–6 cm of ease across the panel so the roll can be inserted and removed without stretching the stitches excessively.
Main Backing Panel
Use cream yarn.
The backing should be firm enough to carry three full rolls without narrowing excessively through the center.
Foundation
Make a foundation chain that measures approximately 25–28 cm without stretching.
For medium worsted yarn and a 4.5 mm hook, this may fall near 50–58 chains, but use the actual measurement rather than relying on a fixed chain count.
Row 1
Hdc in the second chain from hook and in every chain across.
Ch 1 and turn.
Row 2
Hdc in every stitch across.
Ch 1 and turn.
Rows 3 onward
Repeat Row 2 until the panel measures approximately 90–100 cm.
Do not fasten off if you intend to work the first edging round immediately.
Backing Edge
Work one round of cream sc around the complete rectangle.
Place approximately one sc into each stitch along the top and bottom. Along the row ends, distribute stitches evenly so the long edges remain flat.
At each corner work:
sc, ch 1, sc
Join and fasten off.
Measure the rectangle again. Both long sides should be approximately equal before the pockets are added.
Pocket Panels — Make 3
Use cream yarn.
The pockets in the reference design are wider than the flat backing section directly behind them. This creates the forward curve needed to hold a roll.
Foundation
Chain enough stitches to measure approximately 30–33 cm.
Row 1
Hdc in second chain from hook and across.
Ch 1 and turn.
Rows 2–6
Hdc in every stitch across.
Texture Section
For the remaining rows, alternate:
Row A: sc across.
Row B: hdc across.
Continue until the panel measures approximately 18–21 cm high.
Fasten off.
Make all three pocket panels to identical measurements.
Shaping the Pocket Depth
Lay one pocket panel over the backing.
Center it horizontally.
The pocket panel should extend beyond the backing width. Fold the excess inward near both lower corners, forming small pleats approximately 2–3 cm deep.
Pin the bottom edge first.
Then pin both sides while allowing the center of the pocket to project forward.
Insert a toilet roll temporarily. It should sit inside the pocket without stretching the upper opening into a straight, tight line.
Remove the roll before sewing.
Attaching the First Pocket
Position the lowest pocket approximately 3–5 cm above the bottom edge of the backing.
Using cream yarn and a yarn needle, sew the lower edge firmly to the backing.
Sew upward along the first side.
Return to the lower edge and sew the opposite side.
Leave the top completely open.
Reinforce both upper corners with several additional stitches. These points receive the greatest pulling force when a roll is inserted.
Positioning the Second and Third Pockets
Insert a roll into the first pocket.
Place the second pocket above it, leaving approximately 3–5 cm of visible backing between the functional pocket sections.
Pin and sew it using the same method.
Repeat for the upper pocket.
Before adding decoration, load all three compartments simultaneously. Hang the panel temporarily and check that the backing remains vertical.
Pink Pocket Edging
Join dusty pink yarn to one upper corner of a pocket.
Edging Row 1
Sc evenly across the complete opening.
Fasten off.
Edging Row 2 — Small Shells
Join pink yarn again.
Work:
*skip 1 st, 4 dc in next st, skip 1 st, sl st in next st*
Repeat across the opening.
Adjust the spacing at the final few stitches if necessary so a complete shell finishes near the opposite corner.
Repeat on all three pockets.
Large Layered Crochet Rose — Make 3
The large rose is the focal point of each compartment. Build it as a separate appliqué and sew it on after the pockets are structurally complete.
Use dusty pink yarn.
Rose Center
Make a MR.
Round 1: 8 sc in MR. Join. (8)
Round 2: 2 sc in each stitch around. Join. (16)
Inner Petal Layer
Work:
*sl st in next st, 5 dc in next st, sl st in next st*
Distribute the petals evenly around the center.
The inner petals should curl slightly upward.
Second Petal Foundation
Working behind the first petals:
*sl st around the base connection, ch 4*
Repeat around to form evenly spaced loops.
Second Petal Layer
Into each ch-4 loop work:
sc, hdc, 4 dc, hdc, sc
Outer Petal Foundation
Working behind the second layer, make larger loops:
*sl st around the next connection, ch 6*
Repeat around.
Outer Petals
Into each ch-6 loop work:
sc, hdc, 2 dc, 3 tr, 2 dc, hdc, sc
Fasten off, leaving a long sewing tail.
Shape the petals by folding the inner layer slightly toward the center and allowing the outer petals to open outward.
Green Leaves — Make 12 Large Leaves
Use olive green yarn.
Chain 11.
Beginning in the second chain from hook, work:
sc, hdc, dc, dc, tr, tr, dc, dc, hdc, sc
Ch 2 at the tip.
Working down the opposite side of the foundation chain, repeat:
sc, hdc, dc, dc, tr, tr, dc, dc, hdc, sc
Join at the base.
Leaf Definition
Work one round of sc around the leaf.
At the tip work:
sc, ch 2, sc
Fasten off with a sewing tail.
Each large rose uses four prominent leaves.
Optional Leaf Vein
Thread green yarn onto a needle.
Work a line of surface stitches from the leaf base toward the point.
For more definition, add two short diagonal stitches on each side of the center line.
Keep these stitches relaxed. Tight embroidery causes the leaf to curl.
Small Rosebuds — Make 6
Use dusty pink.
Ch 8.
Starting in the second chain, work 2 hdc into each chain.
The strip will curl naturally.
Roll it tightly from one end.
Use the yarn tail to stitch through the base several times.
Wrap a small amount of green yarn around the lower portion to form a calyx.
Each pocket receives two buds.
Small Green Leaves — Make 12
Ch 6.
Starting in the second chain work:
sc, hdc, dc, hdc, sc
Ch 1.
Repeat the same sequence along the opposite side.
Fasten off.
These smaller leaves are positioned near the rosebuds and stems.
Green Stems
The narrow stems can be embroidered directly onto the pocket after the flower position has been marked.
Use doubled green yarn and work a chain-stitch embroidery line from the side of the main rose toward each bud.
Alternatively, crochet a narrow chain approximately 8–10 cm long and sew it flat to the pocket.
The embroidered method creates less bulk inside the compartment.
Floral Arrangement on Each Pocket
Place the large rose slightly below the pocket opening and centered horizontally.
Arrange two leaves on the upper diagonal and two on the lower diagonal.
Position one rosebud toward each upper side.
Add small leaves along the stems.
Pin every component before sewing.
Insert a roll into the pocket while the appliqués are pinned. Confirm that the rose does not interfere with the opening.
Sewing the Large Rose
Do not stitch through the complete thickness of every petal.
Secure the rose through its central foundation and the bases of the outer petals only.
Leave the outer petal edges free.
This preserves the layered appearance.
Check the inside of the pocket while sewing. Avoid catching the backing panel behind the pocket, since that would reduce the available storage depth.
Outer Pink Border
Once all three pockets have been attached, work a continuous pink border around the long backing.
Border Round 1
Join dusty pink at one lower corner.
Sc evenly around the entire outer edge.
At each corner work:
sc, ch 1, sc
Border Round 2
For the small scalloped effect, work:
*skip 1 st, 4 dc in next st, skip 1 st, sl st in next st*
Repeat around the sides where practical.
At the lower corners, use an additional stitch if required to prevent the border from pulling inward.
Fasten off.
Hanging Loop
The hanging loop must carry the weight of the backing, three pockets, flowers, and three toilet rolls.
Do not rely on a thin decorative chain.
Foundation
Using dusty pink, chain approximately 45–55 cm.
Check the loop length against the intended hook before continuing.
Row 1
Sc in the second chain and across.
Row 2
Ch 1 and turn.
Sc across.
Row 3
Repeat Row 2.
Fasten off with long tails.
The resulting strap should be approximately 2–3 cm wide.
Attaching the Hanging Loop
Mark two points near the upper corners of the backing.
Position one end of the strap behind each mark.
Overlap approximately 4–5 cm of strap with the backing.
Sew a rectangle around each overlap area, then sew diagonally across the rectangle to form an X-shaped reinforcement.
Repeat several times with strong yarn.
Test the organizer with gradually increasing weight before hanging it permanently.
Optional Reinforced Backing
If the crochet fabric stretches noticeably when loaded, add a hidden fabric reinforcement.
Cut cotton fabric slightly smaller than the cream backing.
Turn the raw fabric edges inward and press them.
Hand-sew the fabric to the back of the organizer, keeping stitches behind the pink border.
Do not sew through the pocket fronts.
This addition is particularly useful when the organizer is made from soft acrylic yarn rather than firm cotton.
Adjusting the Organizer for Two or Four Rolls
The modular construction makes the length easy to modify.
For a two-pocket version, make the backing approximately 60–70 cm long and attach two compartments.
For four pockets, extend the backing to approximately 120–130 cm.
A four-roll organizer carries significantly more weight. Use a wider hanging strap or two separate hanging loops at the upper corners.
Alternative Color Combinations
- Cream + dusty pink + olive — matches the photographed floral style.
- White + lavender + sage — lighter botanical version.
- Natural beige + terracotta + dark green — warmer neutral palette.
- Ivory + burgundy + forest green — deeper traditional floral version.
- Soft gray + blush + eucalyptus green — muted contemporary version.
Assembly
- Crochet the long cream backing and block it into a straight rectangle before attaching any pockets.
- Make three identical cream pocket panels and test each one around an actual toilet roll.
- Pin the lowest pocket first, form equal side pleats, and sew the bottom and two side edges securely.
- Attach the middle and upper pockets while maintaining consistent vertical spacing.
- Add the dusty-pink edging across all three pocket openings.
- Crochet three large roses, twelve large leaves, six buds, and the required small leaves.
- Arrange the floral components on each pocket and add the narrow green stems before sewing the large flowers.
- Sew the roses and leaves through the pocket fronts only so the compartments retain their full depth.
- Work the pink outer border and attach the reinforced hanging strap to the upper backing.
- Load all three compartments, hang the organizer, and check that the backing remains vertical before trimming the final yarn tails.
7 Technical Tips
- Failure mode: the pockets flatten the toilet rolls. Add 4–6 cm of width beyond the flat backing measurement and form small pleats at both lower corners instead of making a completely flat pocket.
- Failure mode: the backing becomes narrow through the middle. Use firm cotton yarn and keep the long backing edges within approximately 1 cm of the same width from top to bottom.
- Failure mode: a pocket tears away at the opening. Reinforce the upper 2–3 cm of both side seams with a second pass of stitching because those four points receive repeated pulling during use.
- Failure mode: the large rose blocks the pocket. Keep the highest petal edge at least 3 cm below the functional opening and test with a full roll before permanently sewing the appliqué.
- Failure mode: the organizer leans forward when loaded. Attach the hanging strap close to both upper corners rather than attaching a narrow loop only at the center.
- Failure mode: the pink scallops ripple. Reduce the number of shell repeats if the edging circumference becomes longer than the cream foundation; the border should rest against the pocket rather than flare outward.
- Failure mode: leaves curl after sewing. Secure each leaf at the base, tip, and two side points while leaving the remaining edge free; pulling a continuous seam around the entire leaf can distort its shape.
Care Instructions
Remove all toilet rolls before washing the organizer.
For cotton yarn, hand washing or a gentle machine cycle may be suitable according to the yarn label. Support the wet organizer when lifting it because the added water substantially increases its weight.
Reshape the backing and pockets while damp. Dry flat rather than hanging the wet organizer from its strap.
Arrange the rose petals and leaves before the piece is completely dry.
Conclusion
This crochet toilet paper holder pattern works because the storage structure is completed before the decorative roses are attached. Measure an actual roll, build three pockets with enough forward depth, and reinforce the four upper pocket corners before adding the floral details. The pink roses, olive leaves, small buds, and scalloped edging can then be changed without altering the functional dimensions of the organizer. For the next step, make one pocket panel and test it around the toilet roll brand used in the bathroom before crocheting the remaining two. Share the finished organizer on Pinterest or Instagram with #CrochetRoseToiletPaperHolder. Would you use three large roses as shown, or make each pocket with a different flower?








