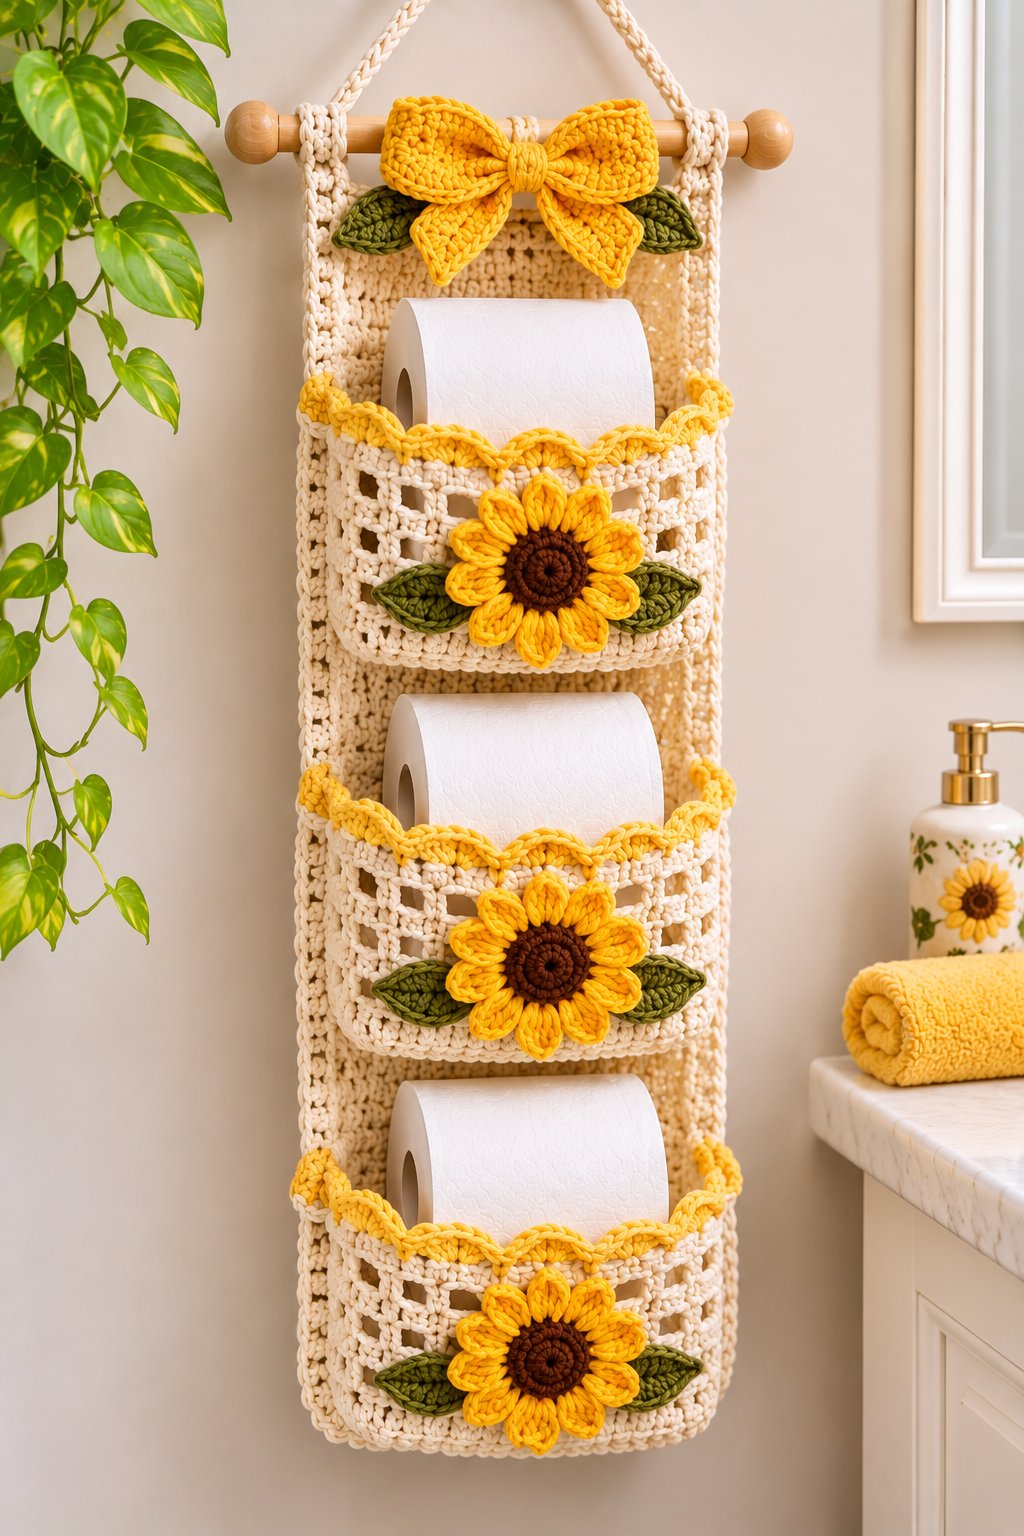
Three sunflower appliqués mark the front of this vertical toilet paper organizer, while a large yellow bow and two green leaves finish the top. The sunflower crochet toilet paper holder shown in the reference image has three open pockets, a cream-colored textured backing, scalloped yellow edges, and a wooden dowel suspension. This tutorial translates those visible details into a practical, adaptable construction plan. It is an original interpretation rather than a tested transcription of an existing pattern.
Understanding the Three-Pocket Design
The holder works as a narrow hanging storage panel. Each pocket cradles one spare toilet paper roll with its circular opening facing sideways. Three pockets are stacked vertically, and their lower edges attach to the same long backing. The cream base provides visual continuity; yellow scallops identify the openings; brown-centered sunflowers create a repeating focal point. The bow above the first pocket balances the vertical arrangement without interfering with the rolls.
A useful construction sequence is to crochet a sturdy rectangular backing, make three separate pocket fronts, attach their bottoms and sides, and then add the decorative pieces. This approach gives you control over pocket depth and spacing. It also makes the project easier to adjust for different toilet paper roll diameters. The reference photograph does not reveal the reverse side or exact stitch structure, so dimensions and stitch instructions below are suggested starting points, not measurements verified from the image.
Project Size, Fit, and Planning
Plan for an organizer approximately 22 cm wide and 75 cm long, excluding the hanging cord. Each pocket should comfortably accommodate a roll around 10 to 12 cm in diameter, but measure your own paper before cutting yarn. Allow a little extra width for the roll to slide in without stretching the decorative front. The wooden dowel should extend beyond both sides of the backing so the suspension loops have room to sit securely.
This is an intermediate home-decor project because it combines flat crochet, open mesh, shaped appliqués, and assembly. A confident beginner can make the individual components, although accurate placement requires patience. Expect several working sessions rather than a single short sitting. The final weight depends on the cotton, hook, dowel, and rolls used; avoid hanging the piece from an adhesive hook that has not been rated for the complete load.
Materials and Tools
Choose a firm cotton yarn that holds its shape after handling. Medium-weight cotton is a reasonable starting point, with a 4 mm hook for the cream structure and a smaller hook if your flower stitches appear loose. The photograph suggests thick, clearly defined stitches rather than fluffy fibers. Cotton also helps the pockets keep a consistent shape and makes surface cleaning more predictable than highly textured novelty yarn.
- Cream cotton yarn: approximately 250 to 350 g for the backing, pockets, and hanging loops.
- Golden-yellow cotton yarn: approximately 70 to 100 g for petals, scallops, and bow.
- Dark brown cotton yarn: approximately 20 to 30 g for three flower centers.
- Olive-green cotton yarn: approximately 20 to 30 g for leaves.
- Crochet hooks around 3.5 to 4 mm, stitch markers, scissors, and a blunt yarn needle.
- Wooden dowel approximately 28 to 32 cm long, plus a strong hanging cord or crocheted chain.
These yarn quantities are planning allowances, not values that can be determined from a photograph. Buy extra cream yarn if you plan to make a denser backing or wider pockets. Before beginning, crochet a small swatch and check that the fabric does not sag dramatically when held upright. If the fabric feels floppy, use a smaller hook or a firmer yarn.
Crochet Abbreviations
Instructions use US terminology. Ch means chain; sc means single crochet; hdc means half double crochet; dc means double crochet; sl st means slip stitch; st means stitch; sp means space; inc means two stitches worked into one stitch; and BLO means back loop only. A turning chain does not count as a stitch unless explicitly stated. Join rounds where indicated, and use a marker to identify the beginning of any spiral.
Step 1: Crochet the Cream Backing Panel
Make a foundation chain that measures about 22 cm after a few rows have been worked. For a sample using medium cotton and a 4 mm hook, begin with ch 39, then work sc in the second chain from the hook and in each remaining chain for 38 sc. Ch 1, turn, and work 38 sc across. Repeat the second row until the panel reaches roughly 75 cm. The exact row count depends on your gauge; measuring the fabric is more reliable than copying a fixed number.
Finish with one round of sc around the perimeter, placing three sc in each corner to prevent curling. Fasten off and weave in the end. The top edge will eventually fold around the dowel or connect to hanging loops. Keep the panel flat while you prepare the pockets so that the intended spacing can be marked accurately.
Step 2: Make Three Open Pocket Fronts
The reference design shows open, lattice-like crochet across the pocket fronts, with a firmer lower border. To reproduce that effect, make three matching rectangular pieces about 20 cm wide and 16 cm high. A simple mesh is created by alternating dc and ch 1 spaces. Start with a foundation chain long enough to fit the backing after a small amount of stretch. Work a firm row of sc first, then build the mesh above it.
For each mesh row, ch 3 to represent the first dc, skip one stitch, ch 1, and work a dc into the next stitch. Repeat the skip-one, chain-one sequence across the row. On following rows, place each dc into the next dc and make a chain over each open space. This creates aligned square openings. Maintain an even number of openings from row to row; adding extra spaces at the edges can make one pocket wider than the others.
After reaching approximately 16 cm, work two firm rows of sc along the upper edge. These rows strengthen the lip and provide a stable place for the yellow trim. Do not make the upper edge so tight that a roll cannot be inserted. Test the first front against a real roll before making the remaining two. If the roll protrudes too far, increase the height or add a deeper lower gusset.
Step 3: Add Depth and Attach the Pockets
A flat rectangle sewn directly onto a flat backing may not provide enough room for a full roll. To create usable depth, crochet a narrow cream strip approximately 3 to 4 cm wide for each pocket. Attach the strip along the bottom and both side edges of the front, forming a shallow gusset. The strip can be worked in sc for strength. Its length should match the combined bottom and side measurements of the pocket front.
Position the lowest pocket first, leaving approximately 3 cm of backing visible below it. Pin its gusset to the backing and sew along the bottom and side edges with matching yarn. Keep the top open. Place the second pocket above the first with enough clearance to reach into the lower pocket; repeat for the third. In the photograph the compartments sit close together, so adjust their spacing by testing the rolls in place rather than relying on appearance alone.
After sewing each compartment, insert a roll and check three things: the opening stays accessible, the pocket does not pull sharply away from the backing, and the roll remains supported at the bottom. If one side twists, remove a few stitches and reattach it with equal tension. This test matters more than making all seam allowances exactly identical.
Step 4: Crochet Three Brown Sunflower Centers
Each visible sunflower has a compact dark-brown circular center. Make three centers using the same method. Round 1: work 6 sc into a magic ring and pull closed (6). Round 2: inc in each stitch (12). Round 3: repeat sc, inc six times (18). Round 4: repeat 2 sc, inc six times (24). Round 5: repeat 3 sc, inc six times (30). Join with a sl st and leave a long tail for sewing.
Step 5: Shape the Yellow Sunflower Petals
The image shows broad, layered-looking yellow petals arranged around each brown disk. For an adaptable version, attach yellow yarn to a stitch on the outer edge of a center. Chain 6, work a sl st into the second chain from the hook, sc in the next chain, hdc in the next, dc in the next, and hdc in the last chain. Slip stitch into the next available edge stitch to anchor the petal. Repeat around the disk, distributing petals evenly.
Depending on yarn thickness and the width of each petal, aim for eight to ten petals per flower. The photograph is decorative rather than a stitch diagram, so an exact petal count cannot be verified. If the petals crowd together, skip an additional center stitch between anchors. If large gaps appear, add one more petal. Shape each petal gently with your fingers and secure loose ends on the back.
Step 6: Crochet the Olive-Green Leaves
Each sunflower has a leaf extending to the left and another to the right. Make six leaves for the three pocket flowers, plus two additional leaves for the bow at the top. For one leaf, ch 12. Starting in the second chain, work sl st, sc, hdc, dc, dc, dc, hdc, hdc, sc, sc, and sl st along one side. Work around the end of the chain and mirror the sequence along the opposite side, adjusting stitches so the shape lies flat.
Join with a sl st and leave a sewing tail. To make the central vein visible, use a yarn needle to run a line of green yarn along the original foundation chain. Pinch one end slightly to create a pointed tip. The leaves should be narrow enough to remain visible beside the sunflower without extending beyond the backing. Use the same orientation on all three pockets for a consistent vertical rhythm.
Step 7: Add the Yellow Scalloped Pocket Trim
The pocket openings have a prominent yellow scalloped border. Attach golden-yellow yarn at one upper corner. Work sc across the edge as a foundation row, distributing stitches evenly. For the decorative row, repeat the following sequence: skip one stitch, work five dc into the next stitch, skip one stitch, and sl st into the following stitch. Continue across, adjusting the final repeat so the scallops finish symmetrically at both ends.
If the border ripples excessively, reduce the number of double crochets in each shell from five to four. If it draws the pocket inward, add a little space between shells or use a slightly larger hook. Repeat the same edging on all three compartments. Sew the flower centers to the middle of each front, then position one leaf on either side. Attach appliqués to the front layer only so the pocket remains open behind them.
Step 8: Make the Large Yellow Bow
The bow above the upper pocket is an important visual feature. Crochet a yellow rectangle approximately 24 cm long and 9 cm high using rows of hdc. Fold the short ends toward the center and stitch them together on the back, forming a loop. Flatten the loop and pinch its middle into two symmetrical wings. Wrap a separate narrow yellow strip around the center several times, then secure the strip at the back.
To echo the photograph, make two short tapered ribbon tails. Start each with a narrow chain and work a few rows of hdc, decreasing at the tip to create a pointed finish. Sew the tails behind the center wrap so they angle downward. Attach the bow near the top of the backing, beneath the dowel, and position the remaining two green leaves behind its lower corners. Keep all attachment stitches hidden.
Step 9: Install the Dowel and Hanging Cord
The top of the reference holder is suspended from a horizontal wooden dowel. Crochet two sturdy cream loops long enough to wrap over the dowel and connect to the upper backing corners. Use tightly worked sc rather than an open mesh for these load-bearing sections. Sew each loop through several backing stitches, not just one edge loop. Test the connection with the empty organizer before adding any rolls.
A braided cotton cord can be attached near both ends of the dowel to form a triangular hanger. Alternatively, make several strands of crochet chain and braid them together. Keep the hanging cord centered so the organizer does not tilt. The wood must be smooth and free of splinters. Hang the finished holder from a securely mounted hook suitable for its loaded weight, away from direct contact with shower spray.
Step 10: Final Assembly and Shape Check
Lay the organizer face up and check the alignment of the three sunflowers. Their centers should sit approximately on the same vertical line. Adjust the leaves so they frame each flower without hiding the yellow scallops. Place the bow above the upper pocket and verify that it does not obstruct the dowel loops. Weave in every tail on the reverse, passing through several stitches before trimming.
Load the pockets from bottom to top and watch for sagging. A slight curve is normal because the rolls are cylindrical, but severe drooping indicates that the pocket fabric or side seams need reinforcement. Remove the rolls before making adjustments. Once the piece hangs straight and the openings remain accessible, the three-pocket organizer is ready for use.
Seven Technical Tips for a Neater Finish
- Mark the center line of the backing before sewing. A flower placed even 1 cm off-center becomes noticeable when three motifs repeat vertically.
- Measure the actual roll diameter rather than relying on a standard size. A pocket designed for a 10 cm roll may be too tight for a bulkier 12 cm roll.
- Keep the gusset depth consistent at approximately 3 to 4 cm. Uneven side strips can cause one pocket to twist or project farther than the others.
- Test the first scallop border before repeating it. Five double crochets per shell can cause flaring when the yarn is thicker than expected.
- Pin each sunflower before sewing. Stitches made directly through the backing may accidentally close part of the storage compartment.
- Reinforce the upper hanging loops with multiple passes of yarn. A single attachment stitch can fail under the combined weight of three rolls.
- Dry the organizer flat after gentle cleaning. Hanging it while saturated may stretch the cream backing and change pocket spacing.
Cleaning, Storage, and Everyday Use
The dowel can usually be removed before washing if the loops are not permanently closed. Avoid soaking unfinished wood, which may swell or discolor. Reshape the pockets and flower petals while the crochet is still slightly damp, then allow everything to dry fully. Check the hanging cord periodically for wear. Replace it if strands become thin, frayed, or stretched.
Frequently Asked Questions
Can I make this organizer with acrylic yarn?
Yes, although acrylic may stretch more under sustained weight and can behave differently during washing. Choose a firm acrylic rather than a very soft, loosely spun version. Make a sample pocket, load it with a roll, and leave it hanging overnight before committing to the full project.
How do I adapt the pattern for larger toilet paper rolls?
Measure the roll width and diameter. Increase the pocket front width, height, and gusset depth together, then adjust the backing width to keep a visible margin at both sides. Make one test pocket first. A larger roll also increases the load on the dowel and hanging cord.
Can the holder be made with only two pockets?
Yes. Shorten the backing by approximately one pocket height plus its planned gap, and make only two pocket fronts, two sunflowers, and four pocket leaves. Keep the top bow and dowel arrangement. Recheck the overall balance before attaching the lower compartment.
Are the sunflowers crocheted directly onto the pockets?
No. In this proposed construction, the brown centers, yellow petals, and green leaves are made separately and sewn on afterward. Separate appliqués make positioning easier and reduce the risk of distorting the open mesh during flower construction.
Is this an exact reproduction of the photographed item?
No. The photograph establishes the visual arrangement: three cream pockets, yellow scallops, three sunflower motifs, green leaves, a large bow, and a dowel hanger. It does not disclose gauge, yarn brand, seam construction, reverse details, or precise stitch counts. The tutorial therefore supplies a practical interpretation that should be sampled and adjusted.
Conclusion
This sunflower crochet toilet paper holder combines a vertical cream backing with three open compartments and repeated floral appliqués. Its most important functional details are pocket depth, secure side seams, a firm upper suspension, and enough clearance for each roll. Complete one pocket and test it with the toilet paper you actually buy before making the remaining two. Once the organizer is assembled, photograph it both empty and filled to show the flower placement and usable storage. Share your finished version on Pinterest or Instagram with the hashtag #SunflowerToiletPaperHolder. Would you keep the large bow at the top, or replace it with another sunflower?








