Introduction
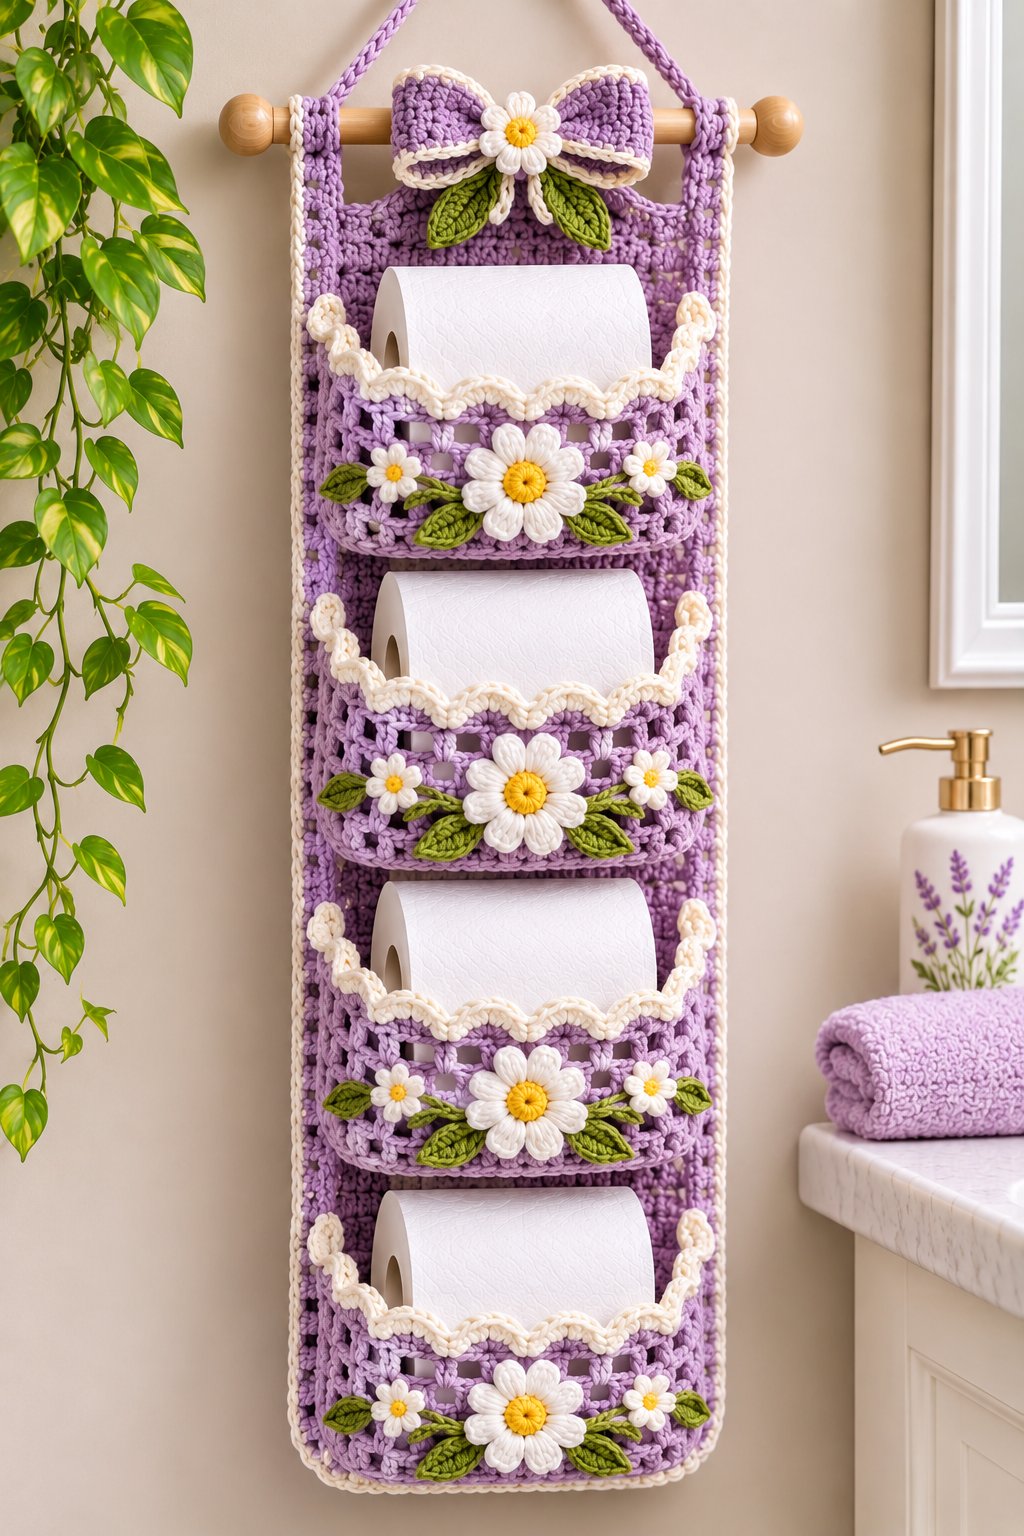
Four toilet paper rolls rest in individual lavender pockets beneath a bow decorated with a white daisy. This lavender daisy crochet toilet paper holder combines practical vertical storage with scalloped cream trim and green leaf appliqués. The image shows four stacked compartments supported by a rectangular crochet backing and wooden dowel. This intermediate, image-inspired project uses cotton yarn and a suggested 4 mm hook. It is designed for keeping spare rolls visible and accessible without using floor space.
The Design: What Makes This Organizer Different
The organizer is built around a long lavender backing rather than a continuous tube. Four separately attached pocket fronts hold one horizontal roll apiece, so a roll can be removed without disturbing the others. Their openwork texture contrasts with the denser backing, and a cream scalloped edge outlines each opening. A large white daisy sits in the center of every pocket, with two smaller flowers and olive leaves on either side. The upper bow repeats the same palette, linking the hanging hardware to the floral decoration.
For a functional replica, the critical measurements are pocket depth, backing stiffness, and attachment strength. Decorative flowers should sit below the opening. An oversized appliqué sewn across the upper edge can snag paper or narrow the entrance. The photographed piece is the visual reference; dimensions, yarn amounts, and stitch instructions below are suggested design choices, not measurements extracted from the image or a tested original pattern.
Project Information at a Glance
| Feature | Suggested specification |
|---|---|
| Skill level | Intermediate |
| Working time | Approximately 12–16 hours |
| Finished size | Approximately 90–100 cm high and 23–25 cm wide |
| Hook | 4 mm, adjusted to gauge |
| Yarn | Medium-weight cotton or cotton blend |
| Storage | Four pockets, one standard roll each |
| Construction | Flat backing, sewn pocket fronts, floral appliqués |
Measure your own toilet paper rolls before crocheting. Roll diameter and width vary between brands, so the finished pocket dimensions matter more than matching a single stitch count.
Materials and Tools
Yarn
- Lavender medium-weight cotton, approximately 350–450 g: backing panel, four pocket fronts, straps, cord, and bow.
- Cream medium-weight cotton, approximately 80–120 g: outside border, pocket scallops, and bow outline.
- White cotton, approximately 60–90 g: large and small daisy petals.
- Golden yellow cotton, approximately 15–25 g: flower centers.
- Olive green cotton, approximately 40–60 g: pointed leaves and decorative details.
These are planning allowances, not verified consumption figures. Buy enough of each dye lot to finish the visible sections consistently. Cotton usually gives the panel more structure than a very elastic yarn; a firm cotton blend is also reasonable if your sample retains its dimensions after hanging.
Tools
- 4 mm crochet hook or a hook that produces a dense, stable fabric.
- Wooden dowel, approximately 30–35 cm long, with smooth ends.
- Tapestry needle, scissors, measuring tape, and stitch markers for assembly.
- Rust-resistant pins to position pockets and flowers before sewing.
- Optional washable fabric backing or plastic canvas for reinforcement.
- Four toilet paper rolls in the size you normally purchase.
Abbreviations and Gauge
MR = magic ring; ch = chain; sc = single crochet; hdc = half double crochet; dc = double crochet; sl st = slip stitch; inc = two sc in one stitch; dec = decrease; BLO = back loop only; st = stitch; sp = space; RS = right side.
An invisible decrease passes through the front loops of two adjacent stitches before completing one single crochet.
Make a sample of 20 single crochet stitches over several rows. Record its width and height after relaxing the fabric. Use those measurements to adjust the backing and pocket foundations. The row numbers below describe a starting construction, but a measured target takes priority when your yarn behaves differently.
Pattern: Step by Step
Work flat pieces in turned rows unless the instructions specify rounds. Chain stitches used for turning do not count as stitches. Check the stitch count at the end of every solid row and keep a marker at each side edge. For the floral motifs, join rounds where indicated instead of assuming continuous spirals.
1. Main Lavender Backing Panel (Make One)
Yarn: lavender. Chain 49. Row 1: sc in the second chain from the hook and across (48). Rows 2–110: ch 1, turn, sc across (48). Continue until the panel is approximately 90–95 cm long, adding or removing complete rows as required by your gauge. Fasten off, leaving a 20 cm sewing tail.
For a ridged texture, work every fourth row through the back loops only. Keep the other rows in ordinary single crochet so the panel remains compact. Lay the backing on a table and check that both long edges are parallel. If one side leans inward, a stitch may have been missed at the end of a row. Correct that error before attaching any pockets; the vertical alignment will otherwise become increasingly visible.
The backing should be at least as wide as the usable pocket attachment area. If your 48-stitch sample is narrower than the intended width, increase the foundation by an even number of chains and maintain the new count on every row. Do not stretch the finished panel to meet the target measurement.
2. Cream Border (Make One)
Yarn: cream. Attach yarn at a lower corner. Work sc evenly around all four sides, placing three sc into each corner stitch. On the row ends, distribute stitches so the fabric lies flat; the number may differ from the count along the top edge. Join with a sl st.
For a second decorative round, repeat three sc followed by ch 2 and one skipped stitch where the spacing allows. Adjust at corners rather than forcing the repeat. If the border ripples, remove some edge stitches. If it pulls inward, add stitches along the affected side. Fasten off and weave the end into the backing, not into the open chain spaces.
3. Openwork Pocket Fronts (Make Four)
Yarn: lavender. Chain 47. Row 1: sc in the second chain and across (46). Row 2: ch 2, turn, dc in each stitch (46). Row 3: ch 2, turn, dc in first three stitches, then repeat [ch 1, skip one stitch, dc in next three stitches] ten times; ch 1, skip one stitch, dc in final two stitches (46 positions, counting chain spaces). Row 4: ch 2, turn, dc in every dc and every chain space (46). Repeat Rows 3–4 until the panel measures approximately 16–18 cm tall. Finish with one row of 46 sc. Fasten off with a 30 cm tail.
The row-three sequence is an adaptable openwork layout. Before repeating it, count the positions and modify the last solid group if your foundation width has changed. Each pocket front should be slightly wider than the section of backing between its side seams. That extra width creates a shallow curve around the roll instead of flattening the pocket against the wall.
Make all four panels from the same stitch plan and compare their dimensions before sewing. If one front is taller, correct it now. Different pocket heights make the cream scallops appear uneven when the holder hangs vertically.
4. Attach the Four Pockets
Place the lowest pocket approximately 2–3 cm above the bottom edge of the backing. Pin its lower edge in a gentle curve and sew it down using lavender yarn. Sew both sides from bottom to top, leaving the entire upper edge open. Insert a roll to test the fit. The front should support the roll without forcing it against the backing.
Repeat upward for the other three pockets, leaving approximately 2–3 cm between finished compartments. Mark all four top-edge positions before attaching the second pocket. This prevents gradual spacing errors. If the backing bows away from the wall when loaded, shorten the pocket fullness slightly or add reinforcement behind the panel.
5. Cream Scalloped Pocket Trim (Make Four)
Yarn: cream. Attach cream yarn at the upper corner of a pocket. Work one row of sc across the open edge. For the scalloped row, repeat [skip one stitch, five dc in the next stitch, skip one stitch, sl st in the next stitch]. Adjust the last repeat to fit the actual stitch count. Fasten off securely at the opposite corner.
Repeat for the remaining pockets. The cream scallops should face outward, not fold into the storage space. Test each opening after adding trim; a decorative edge that looks correct while empty may become too tight when a roll is inserted. A hook half a millimeter larger can help if the trim is noticeably firmer than the lavender fabric.
6. Large Daisy Centers (Make Four)
Yarn: golden yellow. Round 1: 6 sc in MR (6). Round 2: inc six times (12). Round 3: [sc 1, inc] six times (18). Round 4: sc around (18). Join with a sl st and leave a 20 cm sewing tail. Keep the circles flat and do not stuff them. The yellow centers are small accents rather than raised buttons.
7. Large White Daisy Petals (Make Four Flowers)
Yarn: white. Attach white yarn to a yellow center. For each petal, ch 5, work dc into the third chain from the hook, dc into the next chain, hdc into the last chain, and sl st into the next available center stitch. Repeat around the yellow circle, distributing approximately nine to twelve petals evenly. Join, fasten off, and leave a 25 cm sewing tail.
The photograph shows broad, layered white petals. To suggest that fullness, add a second white petal layer behind the first or work an extra hdc into the widest part of selected petals. Keep the center visible. Flatten and arrange each flower before sewing; an irregular flower is easier to reshape while it is separate from the pocket.
8. Small Side Daisies (Make Eight)
Yarn: yellow and white. For each center, work 6 sc in MR (6), then inc six times (12). Join and change to white. For a small petal, ch 3, hdc in the second chain from the hook, sl st into the next chain, and sl st into the next center stitch. Repeat around the center. Fasten off with a sewing tail.
Make two small daisies for each pocket. Their approximate target diameter is 3–4 cm, while the central flowers can be approximately 7–9 cm across. These sizes are decorative targets, not required measurements. Leave enough separation between the flowers that the lavender mesh remains visible.
9. Pointed Olive Leaves (Make Sixteen to Twenty)
Yarn: olive green. Chain 11. Starting in the second chain, work sc, hdc in next two chains, dc in next four, hdc in next two, and three sc in the last chain. Continue around the opposite side of the foundation chain with hdc in next two chains, dc in next four, hdc in next two, and sc in the last available chain. Join with a sl st.
Run surface slip stitches along the center of the leaf to suggest a vein. Leave a 20 cm tail. Arrange four leaves around each large pocket flower, adding extras where the design needs balance. Point the leaf tips diagonally outward so they frame the daisies rather than obscure the yellow centers.
10. Lavender Bow and Upper Flower (Make One Set)
Yarn: lavender, cream, white, yellow, and green. Chain 31. Row 1: sc in the second chain and across (30). Rows 2–12: ch 1, turn, sc across (30). Fasten off. Outline the rectangle with cream slip stitches if desired. Fold both short ends toward the middle and wrap lavender yarn around the center to form two bow loops.
Make another daisy using the large flower method, shortening its petals slightly if the bow is narrow. Sew it over the gathered center. Attach two green leaves below the flower, pointing left and right. Pin the complete bow beneath the dowel position before stitching it to the backing. Keep the upper attachment area clear so the hanging straps can bear weight independently.
11. Hanging Straps and Cord
Yarn: lavender. For each of two straps, chain 11, sc in the second chain and across (10), then work 18 more rows of 10 sc. Fold the straps around the wooden dowel and sew their ends firmly to the top of the backing. Position them symmetrically, close to the outer ends of the rod.
For a decorative hanging cord, make a chain approximately 70–90 cm long and work slip stitches back along it. Secure the cord to the dowel supports rather than relying on the flower or bow. Hang the empty organizer first, then add rolls one at a time. If the dowel tips or the straps pull unevenly, correct the attachment points before use.
Assembly: Ten-Step Checklist
- Lay the backing flat and check its finished width, length, and cream border.
- Mark four evenly spaced pocket locations, allowing small gaps between compartments.
- Attach the lowest pocket along its bottom edge and both sides.
- Attach the remaining three pockets and test each one with a full roll.
- Add cream scallops to the four open pocket edges.
- Center one large white daisy on the front of every pocket.
- Position two smaller daisies and green leaves around each large flower.
- Sew the lavender bow and its flower beneath the upper support area.
- Secure the straps around the dowel and attach the hanging cord.
- Weave in loose ends, inspect the seams, and test the loaded organizer on a suitable hook.
The completed holder has four separate storage openings and one decorative hanging section.
Seven Technical Tips
- Backing stretch: If the loaded panel grows by more than 2–3 cm, reinforce its reverse side. Excessive stretch can change pocket spacing and make the lowest roll hang too low.
- Stitch markers: Mark matching corner heights on both sides before sewing. A pocket attached higher on one side will make the scalloped trim look slanted.
- Pocket depth: Test an approximate 15–18 cm front height against your actual roll. A shallow pocket can let the roll escape, while an overly deep one makes removal awkward.
- Scallop tension: Check the opening with a roll inserted before fastening off. If the cream trim narrows the entrance, use a slightly larger hook or fewer tight joining stitches.
- Flower position: Keep the top of each central daisy below the pocket opening. A flower sewn across the opening may catch the roll during removal.
- Support seams: Sew the hanging straps through several backing rows, not one edge loop. Concentrated load can tear or distort a single crochet stitch.
- Tail weaving: Weave each sewing tail through at least 5 cm of firm stitches and reverse direction. Unsecured tails near the openings can snag paper or loosen appliqués.
Placement, Cleaning, and Safety
Install the holder on a wall hook or support rated for the complete loaded weight. The decorative bow is not a structural anchor. The dowel should remain level, and the straps should not twist when the pockets are filled. Position the holder where rolls can be removed without pulling the entire piece sideways. Keep it away from direct shower spray, splashing sinks, and consistently damp surfaces.
Remove all paper rolls before cleaning. Follow the yarn label’s washing guidance and protect any wooden components from prolonged soaking. If the dowel cannot be removed, spot cleaning may be preferable. Reshape the pocket openings and flower petals while damp, then dry the organizer thoroughly before refilling it. Persistent moisture can affect both the cotton fabric and the stored paper.
Frequently Asked Questions
How many toilet paper rolls does the holder store?
It has four individual pockets, each designed for one standard roll positioned horizontally. Jumbo rolls may need additional pocket width and depth. Test your preferred brand before finishing the seams.
Is this crochet bathroom organizer suitable for beginners?
A crocheter comfortable with basic stitches, reading rows, and sewing pieces together can attempt it. The more demanding parts are maintaining equal pocket sizes, positioning the flowers, and securing the hanging hardware.
Can the holder be made without the bow?
Yes. The bow and its daisy are decorative. Removing them does not change the four-pocket construction or the need for secure straps and a properly supported dowel.
What if my pockets are too tight?
Check the roll dimensions, then add foundation stitches or reduce the fullness taken up by the side seams. Test a pocket before sewing all four. Changing only the cream edging may not solve a front panel that is too narrow.
Can I wash the finished organizer?
Cleaning depends on the yarn, lining, and wooden components you choose. Remove the paper first, follow the yarn care instructions, and dry the entire holder completely before returning it to the bathroom.
Conclusion
This lavender daisy crochet toilet paper holder combines four separate storage compartments with a compact hanging format and repeated floral details. The dense backing carries the weight, the curved pocket fronts hold the rolls, and cream scallops identify each opening. White daisies, yellow centers, olive leaves, and the upper bow reproduce the key decorative elements visible in the reference photograph.
Before final installation, load all four pockets and inspect the seams and hanging supports. Save the project to Pinterest, or share a finished version on Instagram with #LavenderDaisyToiletPaperHolder. Would you keep the large bow above the pockets or replace it with another floral arrangement?








