Introduction
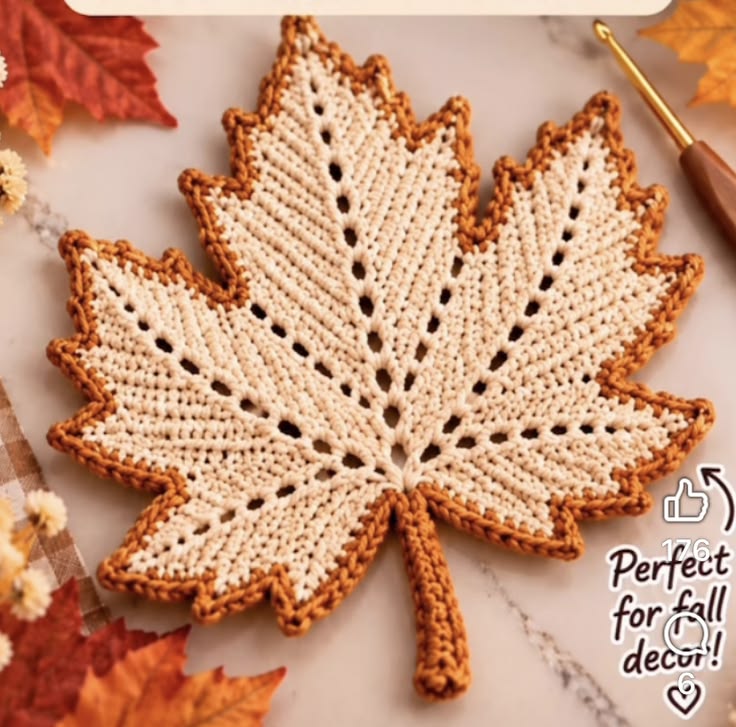
A maple leaf fails immediately when its center point is no taller than the two side lobes. This crochet maple leaf placemat pattern uses ivory DK cotton, a 3.5–4 mm hook, five graduated lobes, eyelet veins, a rust outline, and a reinforced stem. The intermediate construction targets a large table-decoration scale and gives you a washable autumn mat without relying on sewn-together leaf pieces.
The Design: What Makes This Maple Leaf Different
The five lobes do not share equal proportions. The center lobe extends farthest from the stem junction, the upper side lobes finish slightly lower, and the two lower lobes spread outward to establish the maple silhouette. Eyelet lines replace embroidered veins, creating structural openings that radiate toward each point. A final rust border then traces every serration and makes the pale maple leaf crochet doily readable against a light tabletop. The dense ivory areas use short stitches so the mat remains stable between those open veins. A common mistake in a fall crochet placemat is adding identical points around the perimeter. Maple anatomy needs hierarchy. If every lobe reaches the same length and angle, the finished piece resembles a star rather than a maple leaf.
Project Information at a Glance
| Skill Level | Time | Target Size | Hook | Best For |
|---|---|---|---|---|
| Intermediate | 3–5 hours | Approx. 35–40 cm wide | 3.5–4 mm | Placemat, centerpiece mat, wall décor |
Published maple-leaf patterns range from small 11 cm appliqués to large placemat-scale pieces above 40 cm. The 35–40 cm target used here is a photo-inspired working size, not a measurement taken from the supplied photograph.
Materials and Tools
Yarn
- Warm-ivory DK/light-worsted cotton — approximately 70–100 g for the main leaf.
- Burnt-orange or rust DK/light-worsted cotton — approximately 15–25 g for the outline and stem.
Those quantities are planning estimates for this enlarged version. Published small maple leaves use approximately 9–18 m, but appliqué yardage cannot be multiplied directly into placemat-scale consumption.
Tools
- 3.5–4 mm crochet hook
- Tapestry needle
- Scissors
- Locking stitch markers
- Flexible measuring tape
- Blocking mat
- Rustproof pins
Abbreviations
- MR — magic ring
- ch — chain
- sl st — slip stitch
- sc — single crochet
- hdc — half double crochet
- dc — double crochet
- tr — treble crochet
- sp — space
- st/sts — stitch/stitches
- BLO — back loop only
- picot — ch 3, sl st into first chain
When a decrease is required during lobe correction, work through the front loops of the next two stitches so the reduction creates less bulk on the right side.
Pattern — Step by Step
This is an original photo-inspired construction rather than a transcription of the photographed maker’s pattern. The leaf is assembled from five connected lobe panels so the proportions and eyelet veins can be controlled independently.
Central Junction
Yarn: warm ivory.
R1: 6 sc in MR. (6)
R2: inc × 6. (12)
Join with a sl st.
Do not fasten off.
Mark five attachment zones around the upper and side portions of the circle. The remaining lower area becomes the stem junction.
Center Lobe
The center lobe is the longest section and controls the overall height.
From the upper center attachment zone, ch 31.
Row 1: Starting in the second ch, sc in 14 chains, ch 1, skip 1 ch, sc in 15 chains. (29 sc + 1 ch-1 sp)
Row 2: Ch 1, turn, sc to the ch-1 sp, (sc, ch 1, sc) in the sp, sc across. (31 sc + 1 ch-1 sp)
Row 3: Ch 1, turn, sc across to center sp, (sc, ch 1, sc) in sp, sc across. (33 sc + 1 ch-1 sp)
Row 4: Repeat the established center increase. (35 sc + 1 ch-1 sp)
Row 5: Repeat the established center increase. (37 sc + 1 ch-1 sp)
Row 6: Repeat the established center increase. (39 sc + 1 ch-1 sp)
Row 7: Repeat the established center increase. (41 sc + 1 ch-1 sp)
The ch-1 spaces form the open central vein.
Center Lobe Serration Row 1
Ch 1 and turn.
Work sc across the first section.
At approximately one-third of the distance to the center point, work:
(sc, hdc, dc, picot, dc, hdc, sc)
across the next available stitches.
Continue toward the center.
At the main point work:
(hdc, dc, tr, ch 3, sl st in first ch, tr, dc, hdc)
Mirror the first serration on the opposite side.
Fasten off with a 25 cm tail.
Upper Left Lobe
Yarn: warm ivory.
Join at the upper-left attachment zone.
Ch 25.
Row 1: Sc in 11 chains, ch 1, skip 1, sc in remaining 12 chains. (23 sc + 1 ch-1 sp)
Row 2: Ch 1, turn, sc to center sp, (sc, ch 1, sc) in sp, sc across. (25 sc + 1 ch-1 sp)
Row 3: Repeat center increase. (27 sc + 1 ch-1 sp)
Row 4: Repeat center increase. (29 sc + 1 ch-1 sp)
Row 5: Repeat center increase. (31 sc + 1 ch-1 sp)
Row 6: Repeat center increase. (33 sc + 1 ch-1 sp)
Shape one secondary point on the outer edge and one larger terminal point at the center vein.
Fasten off with a sewing tail.
Upper Right Lobe
Repeat the Upper Left Lobe instructions.
Mirror the serration placement so the two lobes angle away from the center symmetrically.
Fasten off with a 25 cm tail.
Lower Left Lobe
Yarn: warm ivory.
Join at the lower-left attachment zone.
Ch 19.
Row 1: Sc in 8 chains, ch 1, skip 1, sc in remaining 9 chains. (17 sc + 1 ch-1 sp)
Row 2: Ch 1, turn, sc to center sp, (sc, ch 1, sc) in sp, sc across. (19 sc + 1 ch-1 sp)
Row 3: Repeat center increase. (21 sc + 1 ch-1 sp)
Row 4: Repeat center increase. (23 sc + 1 ch-1 sp)
Row 5: Repeat center increase. (25 sc + 1 ch-1 sp)
Finish with a pointed terminal section and one smaller side serration.
Fasten off.
Lower Right Lobe
Repeat the Lower Left Lobe instructions.
Mirror all shaping.
Fasten off with a sewing tail.
Joining the Five Lobes
Lay the five pieces flat around the central junction.
The center lobe should point vertically upward.
Angle the upper side lobes approximately 35–45 degrees away from it.
The lower lobes should spread more horizontally.
Using ivory yarn, whipstitch adjacent lower lobe edges together for approximately 3–5 cm.
Do not sew all the way toward the tips.
The open spaces between the lobes create the deep maple-leaf valleys.
Branch Vein Eyelets
The supplied image uses diagonal open spaces extending from the center junction toward the five main points.
Join ivory yarn near the base of one lobe.
Work a short surface chain or slip-stitch line beside the existing eyelet row.
Where additional open holes are required, replace one sc with:
ch 1, skip 1
on the next shaping row.
Keep the holes approximately 1–1.5 cm apart.
Repeat toward each major point.
Filling the Inner Gaps
Small triangular openings may remain where the five lobes meet.
Join ivory yarn at the edge of one gap.
Ch 1.
Work sc evenly across the first side.
Use hdc and dc in the deepest section.
Return to hdc and sc toward the opposite edge.
Fasten off.
Repeat only where necessary.
Do not fill the intentional eyelet veins.
Rust Contrast Border
Yarn: burnt orange/rust.
Join at the stem junction.
Ch 1.
Work sc evenly around the complete leaf perimeter.
At each small serration work:
(sc, ch 2, sc)
At each of the five major points work:
(sc, ch 3, sl st in first ch, sc)
Work one sc into narrow valleys.
Use a sl st in especially tight valleys where an additional sc would create ruffling.
Continue around to the opposite side of the stem junction.
Do not fasten off if working the stem immediately.
Stem
Yarn: rust.
Ch 22.
Row 1: Starting in the second chain, sc across. (21)
Ch 1.
Rotate and work 21 sc along the opposite side of the foundation chain.
At the bottom tip work:
(sc, ch 2, sc)
Continue back toward the leaf junction.
Join with a sl st.
Fasten off with a 20 cm tail.
Reinforcing the Stem
For a firmer placemat stem, join rust yarn at its base.
Surface sl st along the center to the tip.
Turn.
Surface sl st back toward the leaf.
Fasten off.
The double surface line adds thickness without making the stem substantially wider.
Adding More Rib Texture
The ivory sections in the photograph contain strong parallel stitch lines.
To increase that effect, work selected lobe rows in BLO.
Alternate one ordinary sc row with one BLO sc row.
Do not use BLO on the final serration row because the point edges need full-loop stability.
The resulting ridges should run toward the eyelet vein rather than horizontally across the complete leaf.
Correcting the Center Lobe
Lay the leaf on a flat surface before adding the rust border.
Measure from the stem junction to the center point.
Then measure from the same junction to each upper side point.
The center lobe should remain visibly longer.
If a side lobe reaches the same height, remove its final serration row and shorten the terminal section by approximately 1–2 cm.
Correcting a Star-Shaped Leaf
A maple leaf should not have five evenly spaced identical points.
If the motif resembles a star, reduce the lower lobe lengths first.
Next, deepen the valleys between the center and upper side lobes.
Finally, increase the width of the upper side lobes rather than their height.
These three corrections restore the broad maple silhouette.
Correcting Ruffled Edging
Rust edging will ruffle if too many stitches are placed along the ivory perimeter.
Remove one border stitch from every second shallow valley.
Keep increases only at actual points.
Lay the leaf flat after every major lobe.
If the edge rises more than approximately 5 mm from the table, correct the stitch distribution before continuing.
Blocking the Leaf
Blocking determines the final geometry of this project.
Dampen the finished leaf according to the yarn manufacturer’s care directions.
Place it on a blocking mat.
Pin the stem junction first.
Pull the center point upward and pin it.
Pin the two upper side points at matching angles.
Set the two lower lobes last.
Pin every rust-edged serration individually.
Do not stretch the eyelet holes until they become round; the photograph uses narrow, elongated openings.
Using the Leaf as a Placemat
For table use, cotton or cotton-blend yarn provides useful stitch definition and moderate heat resistance, subject to the yarn manufacturer’s specifications.
The leaf should lie completely flat after blocking.
Do not use dimensional bobbles or thick surface cords on the main eating surface because they can destabilize plates and glasses.
For decorative centerpiece use, those restrictions are less important.
Making a Smaller Leaf
Use sport yarn and a 3 mm hook for a smaller version.
Reduce the center-lobe foundation from 31 chains to approximately 23.
Reduce each upper side lobe proportionally.
Shorten the lower lobes last.
Make one complete sample before producing a matching set because changing yarn weight affects both width and point definition.
Making a Larger Centerpiece
Use worsted #4 cotton and a 4–4.5 mm hook.
Increase each lobe foundation proportionally rather than adding extra rows only around the perimeter.
A current placemat-scale maple-leaf reference reaches approximately 42 × 52 cm, demonstrating that the shape can be expanded well beyond appliqué dimensions.
For a large version, make the center lobe first and use its blocked length to calculate the four remaining sections.
Autumn Color Variations
The ivory-and-rust combination keeps the eyelet veins highly visible.
For a stronger autumn palette, replace ivory with mustard, pumpkin orange, burgundy or muted sage.
Keep the contrasting outline at least several shades darker than the body.
A dark edge defines the serrations, especially when the leaf sits on a patterned tablecloth.
For a monochrome version, use surface texture rather than a second color to separate the perimeter.
Assembly
- Crochet the 12-stitch central junction and mark the five lobe attachment zones.
- Make the 31-chain center lobe first and establish its eyelet vein before shaping the point.
- Crochet the matching upper-left and upper-right lobes with shorter foundations and mirrored serrations.
- Make the two lower lobes shorter again so the finished silhouette widens near the stem instead of becoming star-shaped.
- Arrange all five sections around the central junction and check their angles before joining adjacent inner edges.
- Fill only unintended gaps while leaving the five eyelet vein lines open.
- Work the rust border around every valley, serration and major point without adding excess stitches to straight edges.
- Crochet the long rust stem from the lower junction and reinforce its center with surface slip stitches.
- Weave all tails into same-color sections on the wrong side without crossing the open vein holes.
- Block the center point, side lobes, lower lobes, serrations and stem to their final measured positions.
The completed motif should show five unequal major lobes, clearly radiating eyelet veins, multiple secondary points, a continuous rust outline and a narrow reinforced stem.
7 Technical Tips
- Keep the center lobe longest. If either upper side point finishes within approximately 5 mm of the center point, shorten it before adding the border or the leaf will lose its maple profile.
- Space vein eyelets about 1–1.5 cm apart. Large irregular gaps make the central vein appear broken instead of continuous.
- Pin every major point before blocking the small serrations. Setting minor points first can pull a major lobe several degrees away from its intended axis.
- Watch the rust border in the valleys. One unnecessary stitch in several consecutive valleys produces a ruffle that can rise more than 5 mm from the table.
- Measure mirrored lobes before joining. A 1 cm difference between left and right upper lobes becomes much more obvious after the contrasting border is added.
- Keep the stem narrow. Expanding it beyond roughly one-third of the lower junction width makes the stem dominate the two small lower lobes.
- Block the eyelets lengthwise. Stretching them sideways changes the photographed narrow vein openings into round lace holes and weakens the directional structure.
Yarn Planning
Small published maple-leaf appliqués use roughly 9–18 m of yarn depending on size and construction. That figure should not be treated as placemat yardage.
For this larger crochet maple leaf placemat pattern, make and block the center lobe first. Weigh it on a digital scale.
Use that measurement to estimate the remaining ivory sections, then add approximately 20 percent for joining and shape corrections.
Calculate the rust yarn separately because the continuous serrated perimeter is considerably longer than the leaf’s simple width measurement suggests.
Choosing Yarn
A smooth DK cotton makes the serrations and eyelet veins easier to read than a brushed fiber.
Sport yarn produces a smaller, more delicate table decoration. Worsted cotton increases the scale and creates a heavier placemat.
Use body and border yarns with comparable thickness. A substantially heavier rust yarn will pull the ivory perimeter downward and make the edge look corded rather than outlined.
Test the border yarn around one small lobe before working the complete perimeter.
Care and Storage
Follow the yarn manufacturer’s washing and drying directions.
After washing, reshape the leaf while damp and pin the five major points if necessary.
Store it flat rather than folding the center lobe across an eyelet vein.
For a set of placemats, stack the pieces with lightweight tissue between them so the rust serrations do not catch in neighboring eyelets.
Conclusion
This crochet maple leaf placemat pattern depends on proportion more than complicated stitches: one dominant center lobe, two shorter upper lobes, two spreading lower lobes, narrow eyelet veins, and a rust border that follows every serration. Crochet the center lobe first and use it as the scale reference before making the mirrored sections. Once all five pieces lie correctly around the stem junction, join them, outline the perimeter, and block each point individually. Save the finished leaf to Pinterest or share it on Instagram with #IvoryMapleLeafPlacemat. For this exact two-color design, would you keep the body ivory or switch it to autumn gold?









