Introduction
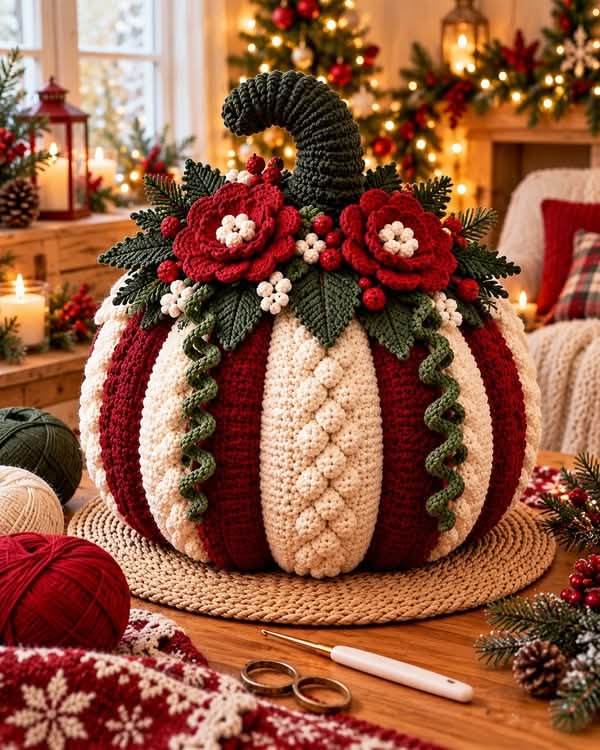
A Christmas pumpkin with alternating cranberry and ivory ribs needs its floral crown kept above the color changes or the striped structure disappears. This Christmas crochet pumpkin pattern uses worsted yarn, a 4.5–5 mm hook, fiberfill, sculpted ribs, flowers, berries, leaves, vines, and an oversized green stem. The intermediate project creates a large tabletop centerpiece with distinctly Christmas rather than autumn proportions and coloring.
The Design: What Makes This Christmas Pumpkin Different
The body combines two structural systems. A conventional 42-stitch stuffed form supplies the volume, while external shaping creates the broad vertical segments visible in the photograph. Selected ivory sections receive raised decorative clusters, giving the red and white crochet pumpkin additional relief without complicating the underlying body. The crown uses a second hierarchy: large dark-green leaves sit lowest, red layered flowers cover their inner edges, and berries fill the smaller spaces around them. Finally, an oversized curved stem rises above the arrangement and prevents the crochet Christmas centerpiece from reading as a low floral cushion. A frequent construction error is overstuffing before sculpting the ribs. When the body becomes rigid, shaping strands compress only the surface instead of forming deep, even pumpkin channels.
Project Information at a Glance
| Skill Level | Time | Reference Size | Hook | Best For |
|---|---|---|---|---|
| Intermediate | Multi-session | Published pillow reference: 30 × 23 cm | 4.5–5 mm | Christmas table, mantel or entry display |
The photographed centerpiece appears larger and taller once its stem and botanical crown are included. Its exact dimensions cannot be recovered reliably from one image, so the published measurement above is a technical scale reference rather than a claim about the photographed object.
Materials and Tools
Yarn
- Deep cranberry-red worsted #4 yarn — pumpkin sections, flowers and berries.
- Warm-ivory worsted #4 yarn — alternating pumpkin sections and white berry clusters.
- Dark forest-green worsted #4 yarn — oversized stem and evergreen-style foliage.
- Olive-green worsted #4 yarn — broad leaves and spiral vines.
Published 21–23 cm Aran pumpkins use approximately 82–103 g for the body, but this design is larger and includes extensive surface decoration. For a centerpiece-scale version, begin with substantially more red and ivory yarn and weigh the first completed body before calculating repeats.
Tools
- 4.5–5 mm crochet hook
- Polyester fiberfill
- Large tapestry needle
- Long upholstery needle
- Locking stitch markers
- Scissors
- Flexible measuring tape
- Rustproof pins
Abbreviations
- MR — magic ring
- sc — single crochet
- inc — 2 sc in one stitch
- dec — invisible decrease
- hdc — half double crochet
- dc — double crochet
- tr — treble crochet
- sl st — slip stitch
- ch — chain
- BLO — back loop only
- st/sts — stitch/stitches
For an invisible decrease, insert the hook through the front loops of the next two stitches, yarn over, draw through both front loops, then complete the single crochet.
Pattern — Step by Step
This is an original photo-inspired construction rather than a transcription of a commercial pattern. Work the body in a continuous spiral unless a section states otherwise.
Pumpkin Body
Yarn: cranberry red and warm ivory.
Begin with cranberry.
R1: 6 sc in MR. (6)
R2: inc × 6. (12)
R3: (sc, inc) × 6. (18)
R4: (2 sc, inc) × 6. (24)
R5: (3 sc, inc) × 6. (30)
R6: (4 sc, inc) × 6. (36)
R7: (5 sc, inc) × 6. (42)
R8–R27: sc around. (42)
Begin stuffing around R20. Keep the body firm enough to hold its form but compressible enough for the later shaping strands.
R28: (5 sc, dec) × 6. (36)
R29: (4 sc, dec) × 6. (30)
R30: (3 sc, dec) × 6. (24)
R31: (2 sc, dec) × 6. (18)
Add the final stuffing before the opening becomes narrow.
R32: (sc, dec) × 6. (12)
R33: dec × 6. (6)
Fasten off with a 35 cm tail and close the remaining opening.
Creating the Red and Ivory Segments
The photograph reads as alternating broad red and ivory pumpkin ribs. For a clean photo-inspired adaptation, create the main stuffed body in one foundation color and add wide contrasting surface panels before the final sculpting pass.
Ivory Surface Panels — Make 5
Yarn: warm ivory.
Ch 9.
Row 1: Starting in the second chain, sc across. (8)
Row 2: Ch 1, turn, sc across. (8)
Repeat Row 2 until the strip reaches from approximately 3 cm above the pumpkin bottom to approximately 3 cm below the crown.
Fasten off with a long sewing tail.
Make five matching panels.
Pin them vertically around the body with equal red sections visible between neighboring ivory panels.
Sew along both long edges of every panel.
Raised Ivory Cable Detail
Yarn: warm ivory.
Ch 31.
Starting in the second chain, sl st in each chain. (30)
Fasten off with a long tail.
Make a second matching cord.
Cross the two cords repeatedly down the center of one ivory panel to form a loose braided line.
Tack each crossing point to the panel.
Repeat on selected ivory ribs rather than every section so the body does not become visually overloaded.
Pumpkin Sculpting
Cut ten long strands in the color that best disappears against each groove.
Thread one strand through the upholstery needle.
Insert at the bottom center and exit at the top center.
Bring the strand down the outside between two adjacent color panels.
Return through the bottom center.
Pull gradually until a deep groove forms.
Tie securely.
Repeat around the pumpkin.
Work opposite grooves as pairs to keep the body centered.
Oversized Forest-Green Stem
Yarn: dark forest green.
R1: 6 sc in MR. (6)
R2: inc × 6. (12)
R3: (sc, inc) × 6. (18)
R4: (2 sc, inc) × 6. (24)
R5–R10: sc around. (24)
R11: (2 sc, dec) × 6. (18)
R12–R25: sc around. (18)
Stuff as you work. Use less stuffing in the upper third.
R26: 6 sc, 6 sl st, 6 sc. (18 worked positions)
R27: 5 sc, 8 sl st, 5 sc. (18 worked positions)
R28: 4 sc, 10 sl st, 4 sc. (18 worked positions)
R29: sc around. (18)
R30: 4 sc, 10 sl st, 4 sc. (18 worked positions)
R31–R33: sc around. (18)
R34: (sc, dec) × 6. (12)
R35–R37: sc around. (12)
R38: dec × 6. (6)
Fasten off and close the tip.
Curve the lightly stuffed upper portion forward to create the large hook visible above the floral crown.
Large Red Flower Centers — Make 2
Yarn: cranberry red.
R1: 6 sc in MR. (6)
R2: inc × 6. (12)
R3: (sc, inc) × 6. (18)
R4: (2 sc, inc) × 6. (24)
Fasten off with a long sewing tail.
Large Red Flower Petals — Make 16
Yarn: cranberry red.
Ch 9.
Starting in the second chain:
sl st, sc, hdc, dc, tr, dc, hdc, sc.
Ch 2 at the point.
Work the mirrored sequence down the opposite side.
Fasten off with a 15 cm tail.
Make eight petals for each flower.
Small Red Flower Petals — Make 12
Ch 7.
Starting in the second chain:
sc, hdc, dc, tr, dc, sc.
Ch 2.
Mirror the sequence along the opposite side.
Fasten off.
Use six small petals per flower.
Flower Assembly
Place eight large petals around one red center.
Overlap neighboring bases slightly.
Sew through the inner third of each petal.
Add six smaller petals as a second layer, positioning their points between the large petals.
Repeat for the second flower.
White Flower Centers — Make 10
Yarn: warm ivory.
Ch 3.
Work 4 dc together into the first chain to form a compact cluster.
Fasten off.
Sew five clusters into the center of each red flower.
Dark-Green Long Leaves — Make 8
Yarn: dark forest green.
Ch 17.
Starting in the second chain work:
sl st, sc, hdc, dc, dc, tr, tr, tr, dc, dc, hdc, sc, sc, sl st.
At the tip work:
(sc, ch 2, sc)
Work the mirrored sequence down the opposite side.
Fasten off with a 20 cm sewing tail.
Evergreen Sprigs — Make 6
Yarn: forest green.
Ch 21.
Starting in the second chain, sl st in 3 chains.
Ch 5, sl st back through 4 chains, then sl st into the next foundation chain.
Repeat along alternating sides of the foundation chain to create narrow branchlets.
Fasten off.
Red Berries — Make 12
Yarn: cranberry red.
R1: 6 sc in MR. (6)
R2: inc × 6. (12)
R3: sc around. (12)
Add a small amount of fiberfill.
R4: dec × 6. (6)
Fasten off with a 15 cm sewing tail and close.
White Berry Clusters — Make 6
Yarn: warm ivory.
Make three small berry knots for each cluster.
For each knot, ch 3 and work 4 dc together into the first chain.
Fasten off.
Sew three knots together at their bases.
Green Spiral Vines — Make 2
Yarn: olive green.
Ch 36.
Starting in the second chain, work 3 sc into each chain.
The repeated increases form the spiral automatically.
Fasten off with a 20 cm attachment tail.
Building the Christmas Crown
Sew the oversized stem into the top center first.
Use several passes through the 24-stitch base and pumpkin fabric because the finished stem carries substantial visual and physical weight.
Arrange four long leaves toward the front and four toward the sides.
Add the evergreen sprigs behind them so their narrow tips extend beyond the floral arrangement.
Place one red flower to the left of the stem and the second to the right.
The flowers should overlap some leaf bases without covering the complete foliage layer.
Adding the Berries
Arrange red berries in irregular groups of two or three.
Position several near the flower edges and others between dark-green leaves.
Insert white clusters in the smaller spaces.
Avoid creating a continuous ring of berries around the crown.
Leaving small areas of green visible separates the red flowers from the red pumpkin sections underneath.
Adding the Spiral Vines
Attach one vine on each side of the crown.
Sew only the upper 2–3 cm firmly.
Allow the remaining curl to fall freely over an ivory or red pumpkin section.
If a spiral crosses directly over the raised ivory cable, move it sideways so both textures remain readable.
Making the Raised Ivory Decoration
The central ivory ribs in the image have a line of rounded relief elements in addition to the braided effect.
For a bobble alternative, join ivory yarn near the top of one ivory panel.
Work a 5-dc bobble.
Move approximately 2 cm downward.
Work another bobble through the panel fabric.
Continue vertically.
Alternate the bobbles slightly left and right to create a braided visual path.
Stop approximately 3 cm above the bottom.
Color Placement
Deep red should remain the dominant body color.
Ivory works as the structural highlight, not an equal background.
Keep the stem and major leaves in the darkest green available so the floral crown remains separate from the light body panels.
Use the same red family for the flowers and berries if possible.
The repeated color links the botanical crown back to the pumpkin without introducing another competing Christmas red.
Assembly
- Stuff and close the main pumpkin body, then attach the five ivory vertical surface panels.
- Create the external shaping grooves between the broad red and ivory sections.
- Add braided cords or bobble relief to selected ivory panels before attaching the crown.
- Sew the oversized curved green stem firmly into the top center.
- Arrange and attach the eight long leaves, followed by the six evergreen sprigs.
- Sew one layered red flower on each side of the stem while leaving most petal tips free.
- Position the red berries in irregular groups around the flowers and foliage.
- Add the white berry clusters in smaller gaps where red elements would otherwise merge visually.
- Attach one green spiral vine to each side and allow the lower curls to remain free.
- Weave every tail into a matching-color section and reshape the ribs, flower petals, foliage, stem and vines.
The completed centerpiece should retain alternating red and ivory vertical sections, deep pumpkin grooves, a dominant hooked stem, two layered red flowers, dark foliage, mixed berries and two freely hanging spiral vines.
7 Technical Tips
- Stop the body expansion at 42 stitches. Accidentally adding another six-stitch increase round changes the circumference and makes the planned decrease sequence incompatible.
- Keep the pumpkin compressible before sculpting. If finger pressure cannot depress the stuffed surface by approximately 1–2 cm, remove some fiberfill before adding the shaping strands.
- Measure every ivory panel against the same master strip. A difference greater than 1 cm in length creates visibly uneven top and bottom margins.
- Use less stuffing in the upper third of the stem. An overfilled 18-stitch tube resists the asymmetric slip-stitch sections and will stand upright rather than form a hook.
- Leave at least half of each red petal unattached. Sewing the full perimeter turns the dimensional flower into a flat disk and hides the rear foliage.
- Pin the entire crown before sewing. Shifting one large flower by only 2–3 cm changes the space available for several berry clusters and leaves.
- Keep spiral-vine attachment points under 3 cm long. Sewing farther down the curl removes the free spring shape produced by working three single crochets into each foundation chain.
Yarn Planning
Published data for Aran pumpkins around 21–23 cm wide falls near 82–103 g for the main body. A decorated centerpiece of the scale suggested by this photograph requires considerably more because it includes five surface panels, a large stem, two flowers, sixteen primary petals, foliage, berries and vines.
For accurate planning, weigh the completed undecorated pumpkin.
Next, weigh one ivory panel, one finished flower, one long leaf and one berry.
Multiply each sample by its required quantity.
Add the stem separately, then add approximately 15 percent for sewing tails, shaping strands and gauge variation.
Making a Larger Version
Yarn thickness is the simplest way to increase scale while preserving the stitch structure.
Using bulky yarn with a proportionally larger hook creates a larger body from the same 42-stitch plateau.
If extra worsted-weight circumference is required, continue after 42 stitches with:
Next round: (6 sc, inc) × 6. (48)
Later decreases must reverse through 42, 36, 30, 24, 18, 12 and 6 stitches.
Increase the plateau length as well. Adding circumference without additional height produces a flatter pumpkin.
Choosing Yarn
Smooth #4 worsted or Aran yarn gives the strongest definition to the pumpkin grooves, raised ivory details and flower petals.
Acrylic keeps a centerpiece of this scale relatively light and makes the curved stem easier to support.
Cotton gives sharper leaves but adds more weight to the crown.
A cotton-acrylic blend can work well when the same yarn range contains cranberry, ivory and several greens.
Use comparable yarn thicknesses for red and ivory. Different diameters can make one set of body panels stand noticeably higher than the other.
Care and Storage
Follow the care instructions on the selected yarn label.
Lift the centerpiece from underneath the pumpkin body rather than by its stem or flowers.
Store it upright in a container tall enough to accommodate the hooked stem without forcing it flat.
Place lightweight tissue around the flowers if other decorations share the container.
After storage, reshape the vines around a large crochet hook for several minutes if their curls have relaxed.
Conclusion
This Christmas crochet pumpkin pattern combines a 42-stitch stuffed foundation with contrasting ivory panels, sculpted grooves, raised decoration, an oversized evergreen stem, layered red flowers, berries and curling vines. Complete the body and all five ivory sections first, then pin the entire crown before permanently attaching a flower or leaf. That dry layout is the most useful next step because the two large flowers determine the remaining berry and foliage positions. Save the finished centerpiece to Pinterest or share it on Instagram with #ChristmasFloralPumpkin. For this specific pumpkin, would you keep the ivory ribs warm cream or change them to snow white?









