Introduction
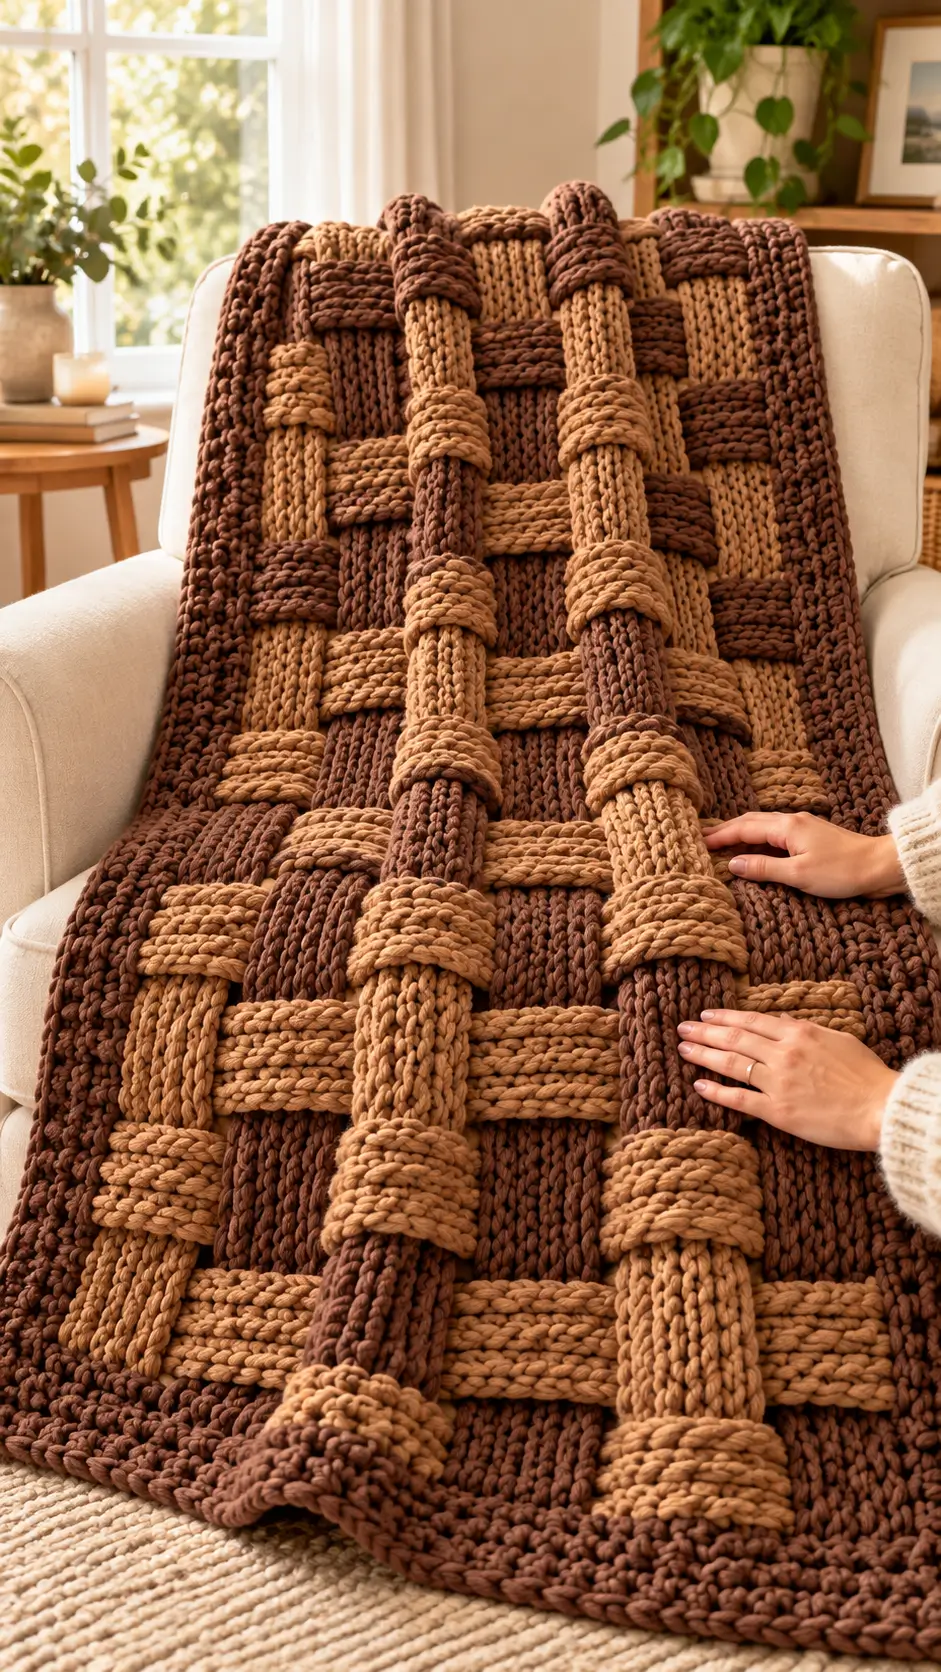
Those caramel bands actually disappear beneath the chocolate bands at alternating intersections, which changes the construction completely. This chunky basket weave crochet blanket pattern uses separate super-bulky crochet strips rather than relying only on front- and back-post stitches. With #6 yarn and an 8 mm hook, the photo-inspired throw targets approximately 104 × 136 cm. The modular method also makes individual strips easier to measure before the blanket is assembled.
The Design: What Makes This Basket Weave Different
The blanket is built as an actual lattice. Long vertical strips establish the foundation, while shorter horizontal strips pass alternately over and under them. That construction produces much deeper intersections than a conventional chunky crochet blanket made with front-post and back-post double crochet. Two related decisions control the finished geometry: every strip needs the same width, and each horizontal strip needs enough length to cross the full vertical panel without pulling it inward. Alternating chocolate and caramel sections strengthens the woven illusion because neighboring bands remain visually separate. The most common error in a woven crochet blanket is inconsistent strip gauge. A strip only 1 cm narrower than its neighbors creates progressively larger openings through an entire column, so the first finished strip becomes the measuring template for all remaining pieces.
Project Information at a Glance
| Skill Level | Time | Target Finished Size | Hook | Best For |
|---|---|---|---|---|
| Intermediate | Multi-session project | Approx. 104 × 136 cm | 8 mm | Large throw or sofa blanket |
The 104 × 136 cm measurement comes from a comparable strip-woven super-bulky blanket construction. The exact blanket pictured cannot be measured from the photograph, so use the dimensions as a practical project target rather than a specification for the photographed item.
Materials and Tools
Yarn
- Chocolate-brown Super Bulky #6 yarn — approximately half of the strip yardage plus border allowance.
- Caramel-brown Super Bulky #6 yarn — approximately half of the strip yardage.
For a heavily interlaced blanket of approximately 104 × 136 cm, plan roughly 2,400–3,000 yards total as a working estimate. Actual consumption changes substantially with yarn density, strip width and gauge. Crochet and weigh one vertical strip and one horizontal strip before buying additional yarn.
Tools
- 8 mm crochet hook
- Large-eye yarn needle
- Sharp scissors
- Flexible measuring tape
- Locking stitch markers
- Blocking mats
- Rustproof pins
Abbreviations
- ch — chain
- sc — single crochet
- hdc — half double crochet
- dc — double crochet
- sl st — slip stitch
- BLO — back loop only
- st/sts — stitch/stitches
- RS — right side
- WS — wrong side
If a decrease is required while adjusting a strip, work through the front loops of two adjacent stitches to reduce surface bulk.
Construction Overview
This photo-inspired blanket uses 12 long vertical strips and 16 horizontal strips.
The strips are crocheted independently.
After they are checked against a master measurement, the vertical pieces are arranged side by side.
Each horizontal strip is then threaded through the vertical strips in an alternating over-under sequence.
The following horizontal strip reverses that sequence.
The process creates the large interlocking blocks visible in the reference image.
Gauge and Master Swatch
Before making the first full strip, crochet a 15 × 15 cm swatch in half double crochet.
Wash or block it according to the yarn label.
Measure the center 10 cm rather than the edges.
The exact stitch count is less important than producing a dense but flexible fabric.
If the swatch is stiff enough to stand upright, move up one hook size.
If large gaps appear between stitches, move down one hook size.
Master Vertical Strip
Yarn: chocolate brown.
Ch 13.
Row 1: Starting in the second chain from the hook, hdc across. (12)
Row 2: Ch 1, turn, hdc across. (12)
Repeat Row 2 until the strip measures approximately 136 cm.
Fasten off with a 25 cm tail.
Lay the strip flat without stretching it.
Measure its width at the beginning, middle and end.
The three measurements should differ by no more than approximately 5 mm.
Vertical Strips — Make 12
Make 12 strips using the master-strip instructions.
Alternate colors:
Strip 1: Chocolate brown
Strip 2: Caramel brown
Strip 3: Chocolate brown
Strip 4: Caramel brown
Continue alternating through Strip 12.
Every strip should contain 12 hdc per row and finish at the same blocked length.
Do not weave the strips together until all 12 have been measured.
Optional Ribbed Vertical Strip
The photograph has pronounced longitudinal texture. To exaggerate that effect, work the strips in BLO hdc instead of ordinary hdc.
Row 1: Hdc across. (12)
Row 2 onward: Ch 1, turn, hdc in BLO across. (12)
Repeat to the required length.
Use the same stitch treatment on all vertical strips. Mixing ordinary hdc and BLO hdc changes their finished widths.
Master Horizontal Strip
Yarn: caramel brown.
Ch 13.
Row 1: Hdc in the second chain from the hook and across. (12)
Row 2: Ch 1, turn, hdc across. (12)
Repeat Row 2 until the strip measures approximately 104 cm.
Fasten off with a 25 cm tail.
The horizontal strip must cross the complete width of the arranged vertical panel without being stretched.
Horizontal Strips — Make 16
Make 16 cross strips using the master horizontal-strip instructions.
Alternate chocolate and caramel so the finished blanket does not develop large uninterrupted color zones.
For the strongest photo-style contrast, begin with caramel and alternate:
Caramel, chocolate, caramel, chocolate.
Continue through all 16 pieces.
Blocking the Strips
Block every strip before assembly.
Pin the vertical pieces to the same 136 cm measurement.
Pin the horizontal pieces to the same 104 cm measurement.
Do not stretch one color more strongly than the other.
Super-bulky yarn can hide small gauge differences until the strips are interlaced, so compare matching pieces directly after drying.
Preparing the Vertical Foundation
Lay the 12 vertical strips on a large flat surface.
Place them parallel with approximately equal gaps between neighboring strips.
Align all upper edges.
Use locking markers to temporarily connect the strips across the top.
Add another temporary line of markers approximately halfway down the blanket.
Add a third line near the bottom.
These markers prevent the vertical strips from shifting while the horizontal pieces are threaded through them.
Weaving Horizontal Strip 1
Begin at the left edge.
Pass Horizontal Strip 1:
over Vertical Strip 1
under Vertical Strip 2
over Vertical Strip 3
under Vertical Strip 4
Continue alternating across all 12 vertical strips.
Leave an equal amount extending beyond both side edges.
Do not sew the intersections yet.
Weaving Horizontal Strip 2
Place the second horizontal strip below the first.
Reverse the sequence:
under Vertical Strip 1
over Vertical Strip 2
under Vertical Strip 3
over Vertical Strip 4
Continue across.
This reversal locks the visual lattice together.
Horizontal Strips 3–16
Continue alternating the two weaving sequences.
Odd-numbered horizontal strips follow the same route as Strip 1.
Even-numbered strips follow the route of Strip 2.
After every fourth strip, measure the blanket width.
If the sides begin drawing inward, the horizontal pieces are being pulled too tightly.
Redistribute the strip before proceeding.
Spacing the Basket Blocks
The photograph uses broad rectangular woven sections rather than narrow traditional basketweave checks.
After all horizontal strips are inserted, spread them vertically until the spaces between intersections appear consistent.
Measure from the upper edge of one horizontal strip to the upper edge of the next.
Use that measurement throughout the blanket.
A difference greater than approximately 1 cm becomes visible across several columns.
Securing the Intersections
A physically woven blanket needs hidden anchor points so the strips do not migrate during use.
Thread a yarn needle with matching yarn.
At every outer-edge intersection, make two or three small stitches through both strips.
Across the interior, tack selected intersections from the wrong side.
Place the needle through the back loops or inner fibers rather than through the complete thickness of the raised band.
The attachment should not be visible from the front.
Securing the Top and Bottom
Align the ends of all 12 vertical strips.
Using chocolate yarn, work a temporary line of surface stitches or whipstitches across the strip ends.
Repeat along the bottom.
This prevents individual bands from sliding before the border is added.
Securing the Side Edges
Align the ends of all 16 horizontal strips.
Check that the left and right overhangs are equal.
Whipstitch through the strip ends along each side.
Do not pull the stitching tightly enough to gather the edge.
Chocolate Outer Border
Yarn: chocolate brown.
The dark border in the image frames the lighter caramel bands and hides the exposed strip ends.
Border Round 1
Join chocolate yarn at one corner.
Ch 1.
Work sc evenly around the complete blanket.
Where a strip end meets the edge, crochet through both the strip and the securing stitches underneath.
At each corner work:
(sc, ch 2, sc)
Join with a sl st.
Border Round 2
Ch 1.
Sc in each stitch around.
At each ch-2 corner space work:
(2 sc, ch 2, 2 sc)
Join.
Border Round 3
For a thicker rope-like finish, work reverse single crochet around the complete perimeter.
Keep the stitches relaxed.
Join and fasten off.
Alternative Raised Border
For a border closer to the heavy edge visible in the photograph, add one round of hdc before the reverse-sc finish.
Work hdc evenly around.
Place three hdc in each corner space.
Check the blanket on a flat surface after completing each side.
If the border begins curling inward, add stitches gradually rather than forcing the edge flat later.
Why Separate Strips Work Better for This Image
Traditional crochet basketweave is normally made with groups of front-post and back-post double crochet stitches. Those stitches push blocks forward and backward, creating the illusion of woven fabric.
The reference image shows a more exaggerated structure. Entire bands appear to disappear underneath perpendicular bands before emerging again.
Separate crochet strips reproduce that geometry more closely.
They also allow chocolate and caramel bands to remain uninterrupted across several intersections, which strengthens the large-scale lattice.
Traditional Basketweave Alternative
If you prefer one-piece construction, use front-post and back-post double crochet instead of separate strips.
Published versions commonly use a multiple of 8 plus 4.
After a foundation row of dc, work four FPdc followed by four BPdc across.
Repeat that orientation for several rows.
Then reverse the blocks so the former FPdc sections become BPdc sections.
This produces classic basketweave texture, but it will be flatter than the physically interlaced design.
Making the Blanket Wider
Add vertical strips in pairs.
Adding two instead of one preserves the alternating over-under sequence at both side edges.
Make each added strip the same 136 cm length as the originals.
Recalculate the horizontal-strip length only after arranging the expanded vertical panel.
Do not estimate the extra width from chain count alone because interlacing changes the usable measurement.
Making the Blanket Longer
Add horizontal strips in pairs.
Each pair contains one Strip-1 weaving sequence and one Strip-2 sequence.
This keeps the lattice balanced.
Measure the vertical distance occupied by one completed pair and multiply that value by the number of additional pairs required.
Two-Color Placement
The supplied image uses related warm browns rather than extreme contrast.
Chocolate establishes the darkest structural lines.
Caramel highlights selected bands and makes the over-under crossings easier to read.
For a close visual balance, keep the colors near a 50/50 ratio through the body while reserving additional chocolate yarn for the border.
Do not alternate colors at every intersection by cutting yarn. Each strip should remain one uninterrupted color from end to end.
Assembly
- Crochet one full vertical master strip and record its blocked width and length.
- Make 11 additional vertical strips to match the master, alternating chocolate and caramel.
- Crochet one horizontal master strip to the measured width of the vertical panel.
- Make the remaining 15 horizontal strips with matching width and alternating colors.
- Block all 28 strips and reject or correct any piece that differs by more than approximately 1 cm in length.
- Arrange the 12 vertical strips parallel and temporarily connect them with locking markers.
- Weave the 16 horizontal strips through the vertical bands, reversing the over-under sequence on every row.
- Square the lattice, equalize the spacing and tack selected intersections from the wrong side.
- Secure every strip end around the four outside edges and work the chocolate border over those attachment points.
- Lay the complete blanket flat, correct any twisted bands and perform a final light blocking if the yarn permits it.
The completed blanket should show uninterrupted chocolate and caramel bands, alternating over-under intersections, square openings and a stable dark outer frame.
7 Technical Tips
- Measure strip width in three places. A difference greater than 5 mm between the beginning and end indicates changing tension and will distort the lattice.
- Block all 28 strips before weaving. Correcting a 3 cm length difference after a strip has passed through 12 intersections requires partially dismantling the blanket.
- Reverse every horizontal weaving sequence. Repeating the same over-under order twice creates stacked bands instead of a locked basket structure.
- Check blanket width after every four cross strips. A reduction greater than approximately 2 cm means the horizontal pieces are being pulled too tightly.
- Tack intersections from the wrong side. Sewing through the full thickness compresses the raised bands and creates visible flat spots on the front.
- Keep all strip ends aligned within 1 cm. Larger differences create a wavy border even when the final sc rounds have correct stitch counts.
- Weigh one vertical and one horizontal strip. Multiplying those measurements by 12 and 16 gives a more reliable yarn requirement than estimating from blanket area alone.
Yarn Planning
Super-bulky basketweave is yarn intensive. Published conventional basketweave blankets use approximately 1,200–1,760 yards, while a comparable physically interlaced strip design gives a working estimate of roughly 2,400–3,000 yards.
The difference is structural. A strip that passes over another band contains fabric that contributes thickness rather than additional visible blanket area.
For the most accurate calculation, weigh one completed vertical strip and multiply by 12.
Then weigh one horizontal strip and multiply by 16.
Add the two totals.
Finally add approximately 15 percent for the border, securing stitches, gauge differences and swatching.
Choosing Yarn
Super Bulky #6 yarn creates the oversized woven geometry visible in the reference image. Published #6 basketweave blankets use hooks from approximately 9 to 11.5 mm, while a comparable strip-woven construction uses 8 mm.
Choose the hook according to the actual yarn rather than the category number alone.
Smooth polyester or acrylic displays the interlacing clearly and reduces total weight compared with dense cotton.
Chenille produces thicker, softer bands but can vary considerably in diameter. Make the master strip before committing to all 28 pieces.
Both colors should come from yarns with comparable thickness and stretch. If caramel stretches more than chocolate, the finished rectangles will gradually become uneven.
Fixing Twisted Strips
A twisted strip normally results from threading one end through the lattice without checking its orientation.
Do not attempt to rotate it while it remains woven through several crossings.
Pull the strip backward until the twist is free.
Lay the entire loose section flat.
Then weave it through again while checking the right side at every intersection.
Fixing Uneven Openings
First check strip width.
If all strips match, the problem is spacing rather than crochet gauge.
Place the blanket on a flat surface and measure between adjacent horizontal bands.
Redistribute the strips until the repeated spaces match.
Only after that adjustment should the intersections be permanently tacked.
Do not use sewing tension to force an oversized opening smaller because the surrounding strips will buckle.
Care and Storage
Follow the yarn manufacturer’s washing instructions. A large super-bulky blanket becomes substantially heavier when wet, so support its full weight during handling.
Dry flat when required by the fiber label.
For storage, fold the blanket along the horizontal bands rather than sharply across raised intersections.
Do not compress it beneath heavy objects for extended periods because flattened crossings reduce the pronounced over-under structure.
Conclusion
This chunky basket weave crochet blanket pattern reproduces the photograph’s oversized lattice by physically weaving 12 vertical crochet strips with 16 horizontal bands instead of relying only on post stitches. Make one vertical and one horizontal master strip first, block both, and record their dimensions before producing the remaining pieces. That measurement controls the final rectangle more reliably than chain count alone. Alternate every cross strip’s over-under route, secure the intersections only after the lattice is square, then cover the strip ends with the chocolate border.
Save the finished blanket to Pinterest or share it on Instagram with #ChunkyBasketWeaveBlanket. For this specific two-brown design, would you keep the chocolate border or switch it to caramel?









