Introduction
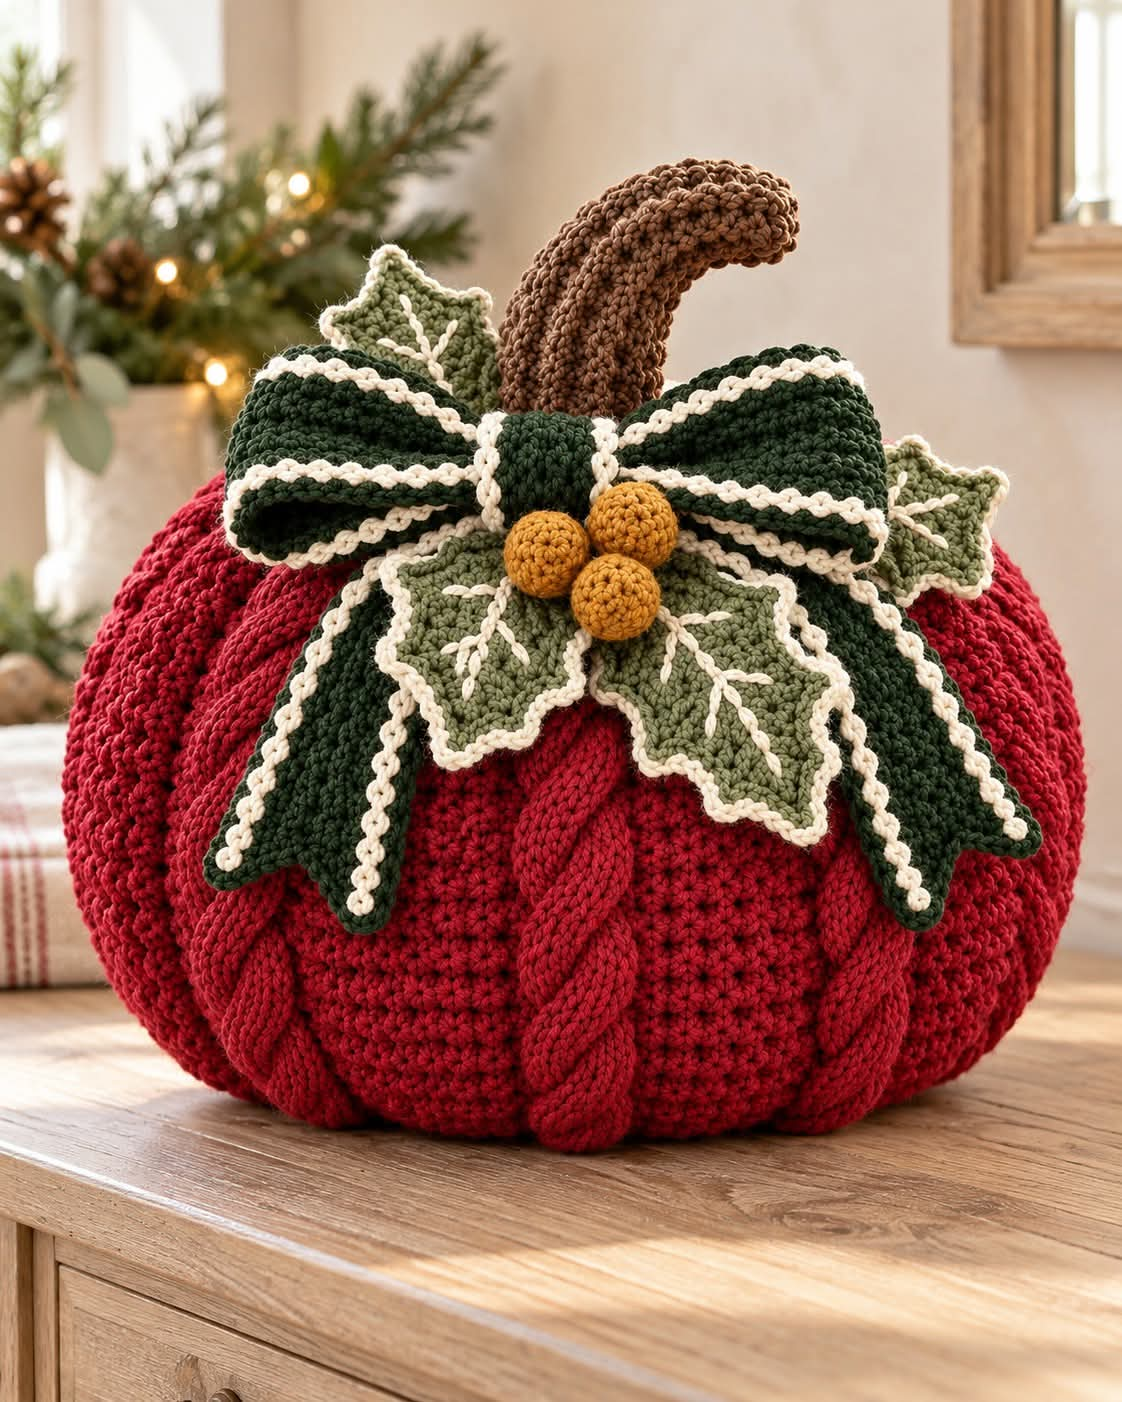
A Christmas pumpkin needs more than red yarn: its ribs must remain visible beneath a bow, holly leaves, berries, and an oversized curved stem. This Christmas crochet pumpkin pillow pattern uses worsted yarn, a 5.5 mm hook, stuffing, and separately made botanical details. The large 42-stitch body is an intermediate project designed as a tabletop centerpiece or structured holiday cushion rather than a conventional autumn pumpkin.
The Design: What Makes This Christmas Pumpkin Different
The body is deliberately simple underneath its decoration: a stuffed red sphere with controlled increases and decreases provides the stable foundation. Applied braided ribs then exaggerate the pumpkin segmentation without forcing shaping yarn through an already dense pillow. Above that body, two leaf types create separate visual levels. Dark forest-green leaves form the lower collar, while shorter sage holly leaves sit closer to the bow and berries. The crochet pumpkin with leaves therefore remains readable even beneath a substantial topper. A cream-edged forest-green bow supplies the strongest horizontal line and balances the tall brown stem. One common error with a stuffed crochet pumpkin is overfilling before the ribs are positioned; excess stuffing makes the body spherical and reduces the grooves between sections.
Project Information at a Glance
| Skill Level | Time | Reference Size | Hook | Best For |
|---|---|---|---|---|
| Intermediate | Multi-session project | Published reference: 11 in wide × 4 in thick | 5.5 mm | Christmas centerpiece or decorative pillow |
The published 11-inch size is a technical reference, not a claim about the photographed pumpkin. The photo-inspired version below can finish larger because yarn choice, stuffing, applied ribs, leaves, bow, and stem all change the final dimensions.
Materials and Tools
Yarn
- Cranberry red worsted #4 yarn — body and raised ribs; start with at least 2 skeins for a large decorative version.
- Forest-green worsted #4 yarn — dark leaves and bow.
- Sage-green worsted #4 yarn — holly leaves.
- Cream worsted #4 yarn — bow edging, leaf edging, and embroidered veins.
- Medium-brown worsted #4 yarn — curved stem.
- Mustard-gold worsted #4 yarn — three berries.
A published 11-inch pumpkin pillow uses one 170.1 g skein of medium-weight yarn for its main pumpkin color. Treat that as a reference only; the additional ribs and larger proportions shown here can require substantially more yarn.
Tools
- 5.5 mm crochet hook
- Polyester fiberfill
- Large tapestry needle
- Locking stitch markers
- Scissors
- Flexible measuring tape
- Long upholstery needle for final shaping if required
Abbreviations
- MR — magic ring
- sc — single crochet
- inc — 2 sc in one stitch
- dec — invisible decrease
- hdc — half double crochet
- dc — double crochet
- sl st — slip stitch
- ch — chain
- BLO — back loop only
- st/sts — stitch/stitches
For an invisible decrease, insert the hook through the front loops of the next two stitches, yarn over, pull through both front loops, then complete the single crochet.
Pattern — Step by Step
Work the pumpkin body in a continuous spiral unless a section states otherwise. The body follows standard amigurumi increase mathematics with a 42-stitch plateau appropriate to this large photo-inspired construction.
Pumpkin Body
Yarn: cranberry red — construction based on standard 6-stitch amigurumi math.
R1: 6 sc in MR. (6)
R2: inc × 6. (12)
R3: (sc, inc) × 6. (18)
R4: (2 sc, inc) × 6. (24)
R5: (3 sc, inc) × 6. (30)
R6: (4 sc, inc) × 6. (36)
R7: (5 sc, inc) × 6. (42)
R8–R24: sc around. (42)
Begin stuffing after R18. Add stuffing in small sections and distribute it toward the outer wall rather than packing the center into a hard ball.
R25: (5 sc, dec) × 6. (36)
R26: (4 sc, dec) × 6. (30)
R27: (3 sc, dec) × 6. (24)
R28: (2 sc, dec) × 6. (18)
Add final stuffing while the opening remains accessible.
R29: (sc, dec) × 6. (12)
R30: dec × 6. (6)
Fasten off with a 30 cm tail. Thread through the front loops of the final six stitches and close the opening.
Raised Pumpkin Ribs — Make 8
Yarn: cranberry red.
Ch 37.
Row 1: Starting in the second ch from hook, sc across. (36)
Row 2: Ch 1, turn, sc in BLO across. (36)
Row 3: Ch 1, turn, sc in BLO across. (36)
Fasten off with a 40 cm sewing tail.
Fold the strip lengthwise and whipstitch its long edges loosely together to create a rounded cord. Make eight matching cords.
Position them vertically around the pumpkin at equal intervals. Each rib should run from near the bottom center to approximately 3–4 cm below the top opening.
Sew through the underside of each cord without flattening its raised profile.
Optional Braided Front Ribs — Make 4 Sets
Yarn: cranberry red.
For each set, make three cords using the rib instructions above but begin with ch 33.
Secure the three cords together at one end.
Braid with relaxed tension.
Sew the opposite ends together.
Attach the braid vertically over selected body grooves, concentrating the most visible braided ribs across the front half of the pumpkin.
Brown Curved Stem
Yarn: medium brown.
R1: 6 sc in MR. (6)
R2: inc × 6. (12)
R3: (sc, inc) × 6. (18)
R4–R15: sc around. (18)
Stuff lightly as the stem grows. Do not fill as firmly as the pumpkin body.
R16: 6 sc, 6 sl st, 6 sc. (18 worked positions)
R17: 5 sc, 8 sl st, 5 sc. (18 worked positions)
R18: sc around. (18)
R19: 5 sc, 8 sl st, 5 sc. (18 worked positions)
R20–R22: sc around. (18)
The short slip-stitch sections pull one side inward and begin the curve.
R23: (sc, dec) × 6. (12)
R24: dec × 6. (6)
Fasten off and close the tip. Shape the stuffed stem into a gentle forward curve.
Dark Green Long Leaves — Make 4
Yarn: forest green.
Ch 19.
Starting in the second ch from hook, work:
sc, hdc, dc in next 2 sts, tr in next 8 sts, dc in next 3 sts, hdc, sc, sl st.
Ch 2 at the point.
Work down the opposite side of the foundation chain using the mirrored stitch sequence.
Join at the base.
Work one round of sc around the leaf, placing 3 sc at the point.
Fasten off with a 25 cm tail.
Cream Leaf Veins
Yarn: cream.
Surface sl st from the base of each dark-green leaf toward its tip.
Add two or three short diagonal branches on either side of the central vein.
Keep the embroidery loose enough that the leaf remains flat.
Sage Holly Leaves — Make 3
Yarn: sage green.
Ch 15.
Starting in the second ch, work sc, hdc, dc, tr, dc, hdc, sc across the first half, then repeat the height sequence toward the tip as space permits.
Ch 2 at the point.
Work down the opposite side of the foundation chain.
For the holly contour, alternate:
(sc, ch 2, sc)
at three evenly spaced positions along each outer edge.
Fasten off.
Cream Holly Edging
Yarn: cream.
Join at the leaf base.
Sl st around the perimeter, placing:
(sl st, ch 1, sl st)
at every pointed section.
Fasten off.
Surface-crochet one cream central vein and two short branches on each side.
Gold Berries — Make 3
Yarn: mustard gold.
R1: 6 sc in MR. (6)
R2: inc × 6. (12)
R3–R4: sc around. (12)
Add a small amount of stuffing.
R5: dec × 6. (6)
Fasten off with a 20 cm sewing tail. Close the opening.
Forest Green Bow Loops — Make 2
Yarn: forest green.
Ch 31.
Row 1: Starting in second ch, hdc across. (30)
Rows 2–8: Ch 1, turn, hdc across. (30)
Fasten off.
Fold each rectangle so the short ends meet at the center back. Sew those ends together.
Flatten the loop with the seam centered at the back.
Cream Bow Edging
Yarn: cream.
Join cream to the outside edge of each bow loop.
Work sl st evenly around the complete perimeter.
Fasten off.
Bow Center
Yarn: forest green.
Ch 9.
Row 1: Sc in second ch and across. (8)
Rows 2–10: Ch 1, turn, sc across. (8)
Fasten off with a long tail.
Add cream slip-stitch edging along both long sides.
Stack the two bow loops horizontally, pinch their centers, and wrap the center strip around both loops. Sew securely at the back.
Optional Bow Tails — Make 2
Yarn: forest green.
Ch 25.
Row 1: Hdc in second ch and across. (24)
Rows 2–5: Ch 1, turn, hdc across. (24)
On the final row, taper the outer end by replacing the final 4 hdc with 2 sc and 2 sl st.
Fasten off.
Add cream slip stitches around the outer edge.
Positioning the Holiday Topper
Place the stem first. Its base should sit in the center of the pumpkin with the curve leaning slightly forward or to one side.
Arrange the four dark-green leaves around the stem so their points extend beyond the bow.
Layer the three sage leaves above the darker leaves.
Position the bow horizontally across the front.
The bow should conceal most leaf bases without hiding the leaf tips.
Finally, arrange the three gold berries in a compact triangular cluster immediately below the bow center.
Assembly
- Finish and stuff the red pumpkin body, keeping the top and bottom centers identifiable.
- Position the eight raised ribs at equal intervals and sew them from bottom toward the top.
- Add the optional braided ribs over selected front grooves without compressing the body.
- Sew the stuffed brown stem firmly into the top center using several passes through the pumpkin fabric.
- Arrange the four dark-green leaves around the stem and attach only their inner thirds.
- Layer the three sage holly leaves above the darker leaves and secure their bases.
- Place the finished forest-green bow horizontally across the front of the stem and leaves.
- Sew the bow through its center wrap and inner loop layers rather than around its complete perimeter.
- Attach the three gold berries directly below the bow center in a triangular arrangement.
- Weave every remaining tail into the underside of the topper and reshape the pumpkin ribs, leaves, bow, and stem.
The completed pumpkin has eight visible body segments, a stable curved stem, layered foliage, a dimensional bow, and three firmly attached berries.
7 Technical Tips
- Mark R1 before continuing the body. Losing the beginning of a continuous round can shift the decrease sequence and place the top opening off center.
- Stop increasing at 42 stitches. Adding another six-stitch increase round changes this body from the selected large amigurumi plateau and reduces the tall pumpkin profile.
- Do not pack the stuffing into a hard sphere. If the fabric stretches enough to expose filling between stitches, remove stuffing before adding the ribs.
- Space eight ribs approximately 45 degrees apart. Unequal spacing produces one broad flat section and several narrow sections instead of balanced pumpkin segmentation.
- Keep stem stuffing below maximum firmness. An overfilled 18-stitch stem resists the short-stitch shaping and tends to stand vertically rather than curve.
- Pin every leaf before sewing. A leaf base shifted 2 cm toward the front can interfere with the bow and hide one of the three gold berries.
- Weave tails away from the topper center. Concentrating the stem, bow, leaf, and berry tails in the same 2–3 cm area creates a hard lump at the crown.
How to Make the Pumpkin Look Ribbed
The photographed pumpkin has much stronger segmentation than a plain crocheted sphere. Applied cords provide that depth while allowing the underlying body to remain structurally simple.
Make all eight ribs before attaching the first one. Lay them around the stuffed pumpkin and mark their positions with locking markers.
Attach opposite ribs as pairs: front and back first, then left and right, followed by the four intermediate positions. This sequence distributes tension more evenly.
If deeper grooves are required, pass a separate length of red yarn from the bottom center to the top between two neighboring ribs. Pull only until a shallow indentation forms, knot securely inside the topper area, then repeat at the next groove.
Making a Larger Christmas Pumpkin
For a substantially larger pillow, changing yarn thickness is preferable to arbitrarily adding body rounds. Published pumpkin pillows demonstrate this clearly: super-bulky yarn with an 8 mm hook produces large pieces using relatively simple constructions, while worsted-weight versions use smaller hooks and denser fabric.
If maintaining worsted yarn, continue the mathematically consistent increase sequence beyond 42 stitches: the next round would be (6 sc, inc) × 6 for 48 stitches. Any later decrease section must reverse those increases in six-stitch steps.
Recalculate rib length after changing the body. A rib designed for the 42-stitch version should not be stretched over a much larger pumpkin because it will compress the stuffing and distort the top and bottom.
Color Planning
Cranberry red establishes the Christmas identity before any accessories are attached. Forest green supplies the darkest contrast, while sage separates the leaf layers. Cream edging traces the bow and foliage against both greens.
Keep the berries mustard or antique gold rather than bright yellow if matching the photographed palette. Their purpose is to create three compact points of contrast beneath the bow, not to compete with the red body.
The stem should remain medium to dark brown. Using green for the stem reduces separation between the botanical topper and the central vertical element.
Yarn Planning
A published worsted-weight pumpkin throw pillow uses a 170.1 g main-color skein for an 11-inch-wide construction. Another published super-bulky family of pumpkin pillows uses approximately 120 g for small, 200 g for medium, and 300 g for large versions.
The safest calculation for this decorated version is sample-based. Weigh the finished red body before attaching ribs. Then weigh one rib, one dark leaf, one sage leaf, one berry, and the completed bow. Multiply each component by its required quantity and add approximately 15 percent for tails, swatching, and tension differences.
Care and Storage
Follow the care instructions printed on the yarn label. A stuffed decorative pumpkin should be supported from underneath when moved rather than lifted by the stem or bow.
For storage, avoid compressing the stem into the berries. Place the pumpkin upright in a container large enough for the curved stem and leaf tips to remain unbent.
If the bow loops flatten during storage, reshape them by hand before display. Do not pull on the cream surface edging because it is decorative rather than structural.
Conclusion
This Christmas crochet pumpkin pillow pattern separates the project into a stable 42-stitch body and removable-looking decorative layers: raised red ribs, a curved brown stem, dark and sage foliage, a cream-edged bow, and three gold berries. Crochet the body first, record its stuffed dimensions, then make one rib and test its length before producing the remaining seven. That measurement is the most useful next step because stuffing firmness changes the pumpkin circumference. Save the finished centerpiece to Pinterest or share it on Instagram with #ChristmasCrochetPumpkin. For this specific pumpkin, would you keep the three gold berries or replace them with small red holly berries?









