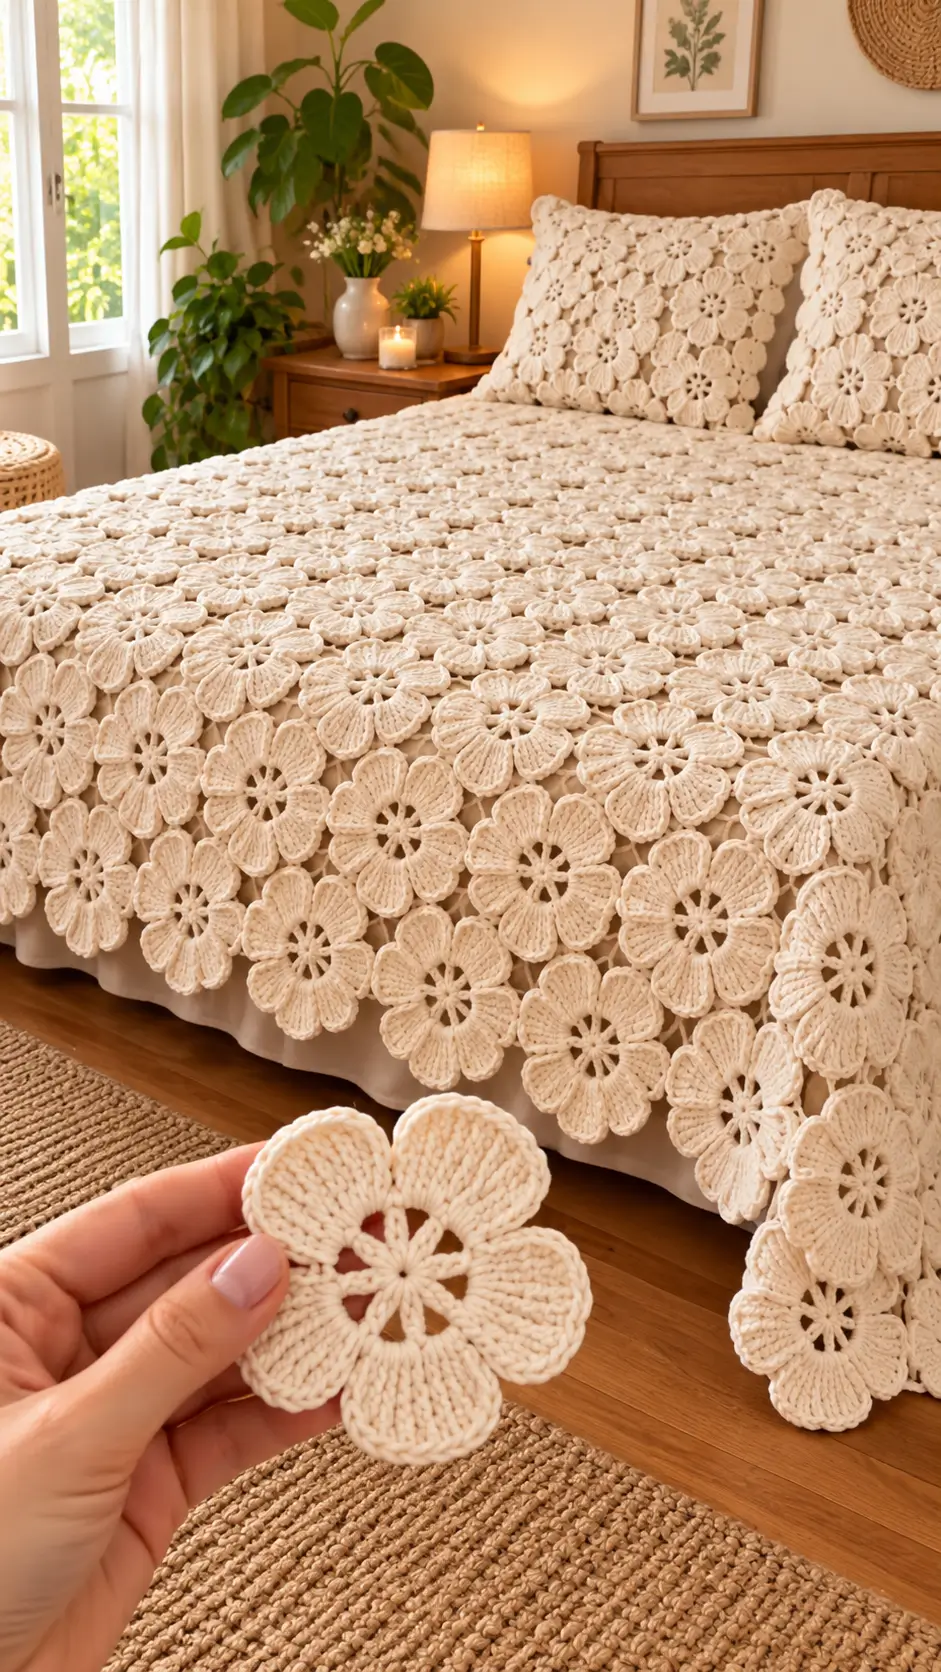
Five broad petals radiating from a small open center create the distinctive flower surface on this cream crochet bedspread. This photo-inspired crochet flower bedspread pattern uses fine cotton yarn, a 3.5 mm hook, and a repeated five-petal motif. The individual flowers are manageable for an intermediate crocheter; arranging and joining enough motifs for a bed requires more planning. A removable floral coverlet also makes it possible to vary the width and side drop.
The Design: What Makes This Flower Bedspread Different
The photograph shows separate rounded flowers rather than conventional granny squares. Each flower has an open, spoke-like center, a set of broad raised petals, and narrow spaces that let the bedding beneath remain visible. Those three details determine the construction. A firm ring anchors the petals without creating a heavy central disk; tall stitches form the rounded outer edges; and small chain spaces provide repeatable attachment points. The five-petal crochet flower motif is deliberately worked as a complete unit before assembly, because a five-sided shape does not make a neat square grid without gaps. Instead, staggered rows and short connectors give a more natural joined crochet flower blanket surface. One common error is pulling the petal joins so tightly that each flower folds into a cup. Flat blocking and limited stitching along the adjoining edges help preserve the floral outline.
Project Information at a Glance
| Skill Level | Working Time | Finished Size | Hook | Best For |
|---|---|---|---|---|
| Intermediate | Depends on motif count and joining method | Made to your measured bed; test the motif first | 3.5 mm (E/4) starting point | Decorative coverlet and matching pillow fronts |
Pattern status: This is an original, photo-inspired interpretation, not a transcription of an identified commercial pattern. Yarn type, hook, flower measurements, and joining structure cannot be confirmed from the photograph. The stitch counts below describe the motif written here, not a claimed reconstruction of unseen instructions.
Materials and Tools
Yarn
- Ivory or natural cream cotton, fine/sport weight (#2) — the main and only required color; choose a smooth 100% cotton yarn with visible stitch definition. A washable cotton suitable for home textiles is preferable to a fuzzy novelty yarn.
- Optional matching cotton sewing thread — for attaching the finished flowers to a separate fabric backing or reinforcing discreet contact points.
- Lightweight cotton backing fabric (optional) — cut to the desired coverlet dimensions if a supported overlay is preferred to a fully freestanding lace cover.
Do not buy a bedspread’s entire yarn quantity from a photograph-based estimate. Make and weigh one finished, blocked motif, then multiply its weight by the number of motifs in your measured layout. Add approximately 10–15% as a planning allowance for joins, edging, swatches, and waste. This percentage is a budgeting allowance, not a verified consumption figure.
Tools
- 3.5 mm crochet hook — a practical trial size for fine/sport yarn; adjust after measuring your sample.
- Tapestry needle — for securing ends and making flat sewn joins.
- Stitch markers — five removable markers help identify petal tips.
- Scissors, measuring tape, and digital kitchen scale — for accurate project calculations.
- Blocking mats and rust-resistant pins — for matching motif dimensions.
- Pillow insert and backing fabric — only if making matching cushion covers.
The Craft Yarn Council yarn-weight guide lists 3.5–4.5 mm crochet hooks as a general range for fine (#2) yarn. Gauge takes priority over the label recommendation.
Abbreviations and Stitch Notes
- ch: chain
- sl st: slip stitch
- sc: single crochet
- hdc: half double crochet
- dc: double crochet
- tr: treble crochet
- sp: space
- st/sts: stitch/stitches
- RS/WS: right side/wrong side
- rep: repeat
All instructions use US crochet terminology, with joined rounds rather than a continuous spiral. For a terminology reference, see the Craft Yarn Council abbreviation list. The turning chain in this pattern does not count as a stitch.
Before You Begin: Gauge and Layout
Work three flowers with the yarn and hook you plan to use. Block them according to the yarn label, keeping the five petal tips evenly spaced. Measure each from one outer petal tip to the farthest opposite point, and record the average. Do not force five-petal flowers into squares; their outline is intentionally irregular. Set the three motifs side by side with a little overlap, then test whether the petal edges remain flat when joined.
A motif around 10–12 cm across is a useful design target for a medium-scale floral texture, not a guaranteed result. Your finished flower may be larger or smaller. If the motif is too loose, try a hook 0.25–0.5 mm smaller; if the petals curl strongly upward, first inspect the round counts and blocking before changing tools.
Measure the bed from the desired outside edge on one side to the matching point on the other, and then from the head-end finish to the desired foot drop. For a rectangular base cover, include both side drops in the target width. A scalloped arrangement can extend beyond that line, so measure the actual joined panel rather than estimating from single-flower diameter.
Five-Petal Crochet Flower Motif: Step-by-Step Pattern
Make one sample flower first. Repeat it until you have the quantity determined by the layout swatch. Work into chain spaces, not individual chain loops, wherever the instructions specify a space.
Flower Center and Petal Framework (Make as Many as Needed)
Yarn: cream fine/sport cotton. Hook: 3.5 mm starting point.
- Foundation: Ch 5; sl st into the first ch to form an open ring. Avoid twisting the chain.
- Round 1: Ch 1, work 10 sc into the ring, and sl st to the first sc. (10 sc) The foundation opening remains visible at the center.
- Round 2: Ch 1, then rep [sc in next sc, ch 4, skip next sc] five times. Sl st to the first sc. (5 sc and 5 ch-4 spaces) You now have five evenly distributed arches.
- Round 3: In the first ch-4 space work (sc, hdc, 3 dc, 5 tr, 3 dc, hdc, sc), then sl st in the next sc of Round 2. Repeat this sequence in each remaining ch-4 space, placing one separating sl st into the following Round 2 sc each time. (75 petal stitches and 5 separating sl sts; 15 stitches in each petal)
- Round 4: Sl st into the first sc of a Round 3 petal; ch 1. Across that petal, work 1 sc in each of its first 7 stitches, (sc, ch 2, sc) in its 8th stitch, then 1 sc in each of its remaining 7 stitches. Skip the separating sl st at the petal base. Repeat over all five petals and sl st to the first sc of the round. (80 sc and 5 ch-2 tip spaces; 16 sc per petal)
- Finish: Fasten off, leaving a 20–25 cm tail if you intend to sew the flower into the coverlet. Weave in the foundation tail securely and leave the joining tail available until the layout is complete.
Stitch-count check: Each Round 3 shell contains 1 + 1 + 3 + 5 + 3 + 1 + 1 = 15 stitches. Five shells make 75; the five separating slip stitches are counted separately. Each Round 4 shell has 7 + 2 + 7 = 16 sc, producing 80 sc plus five ch-2 loops. If your count differs, correct the single motif before making the batch.
How to Keep the Petals Rounded
The tall treble stitches form the center of each petal; the double and half-double stitches slope down toward its base. Work the treble stitches at a consistent height. If a petal is noticeably narrower than its neighbors, check for a missing treble rather than stretching it during blocking.
Pin each tip space outward while the flower is damp, and allow it to dry flat. The shallow scallops between petals should remain visible after the pins are removed. Do not iron directly onto the raised petal surface, and follow the care directions for the particular yarn used.
How to Join the Flowers into a Bedspread
Option A: Freestanding Joined Lace
Choose this method when the crochet itself will form the complete coverlet. Lay out the flowers in staggered rows, rotating each until two or three petal edges naturally touch neighboring flowers. Keep the rounded flower outlines visible rather than trying to straighten every edge. Five-petal motifs leave uneven openings between groups; these gaps are part of the construction and may be bridged with short chains.
Thread a tapestry needle with a long tail or a separate length of matching yarn. At each planned contact, sew through corresponding back loops of approximately three to five edge stitches on the two touching petals. Secure the ends on the wrong side. Do not sew across an entire petal, because that changes its rounded profile and reduces the lace openings. The mattress-stitch principle—matching stitches from alternating sides to make a flat join—is described by Interweave’s crochet seaming tutorial.
When two petal tips nearly meet but no edges overlap, join matching ch-2 tip spaces with two or three loose chain stitches and a slip stitch. If a gap is wider, make a short chain bridge sized to the actual opening, then connect it at a second point so the bridge cannot swivel. Test the first four-to-six-flower cluster before repeating this method. A chain connection that pulls the flowers into a ridge is too short and should be replaced.
The Interweave guide to joining motifs explains why the attachment arrangement should be chosen for the shape and intended openness of the fabric. A five-petal layout needs this planning more than a square-motif blanket.
Option B: Floral Overlay on a Cotton Coverlet
Choose a fabric-backed version when you want a stable bed cover or an easier way to reproduce the dense floral surface in the photograph. Hem a lightweight cotton base to the required size, wash it if the fabric is likely to shrink, and lay it flat. Arrange blocked flowers over the fabric with a small overlap at the petal edges. Pin the centers first, then adjust the petals so each flower lies flat.
Using matching sewing thread or a fine strand of cotton, tack the center and two to four discreet petal contact points of each flower to the base. Do not stitch down every raised petal edge. The fabric carries the weight; the flower layer remains visually dimensional. This is an optional construction choice, not a claim about how the bedspread in the reference photograph was made.
Calculating the Number of Flowers
For this crochet flower bedspread pattern, counting motifs by the area of one circular flower gives misleading results, because neighboring flowers overlap and five-petal shapes leave gaps. Instead, make a joined sample panel of four to six motifs across and three to four staggered rows. Measure its width and height without stretching it. Record the number of flowers per row, the average row-to-row advance, and whether the outer petals add an extra scalloped margin.
For example, suppose a tested row of six joined motifs spans 54 cm and four staggered rows cover 36 cm. A target approximately 216 cm wide and 225 cm long would begin with about four of those row widths and six-and-a-quarter of those row-height blocks. That suggests roughly 24 flowers across and 25 rows before adjusting the scalloped perimeter: about 600 flowers. These are sample calculations only; use your own swatch measurements and layout because the exact number depends strongly on overlap.
Weigh ten finished flowers and divide by ten to get average grams per flower. Multiply by the planned quantity, then allow extra yarn for the joining method and border. As a sample calculation, 600 flowers weighing 8 g each require 4,800 g for the flowers alone; a 15% planning allowance raises the budget to 5,520 g. The 8 g is hypothetical, not a sourced yarn requirement for the pictured blanket.
Matching Floral Pillow Covers
The photograph includes matching cream flower pillow fronts. For a coordinated cover, measure your insert rather than assuming a standard pillow size. Create a flower panel slightly larger than the visible front after assembly, then center it over a plain cotton front or join the motifs into a freestanding panel with a separate lining. A fabric backing is useful on pillow covers because it limits finger-catching gaps and reduces strain on the connections.
For an envelope-style back, cut two fabric pieces that overlap at the center by roughly 10–12 cm after hemming. Attach the flower front to the lined front panel with small hidden stitches, keeping the outermost petals clear of the seam allowance. Sew the front and back pieces together with right sides facing; turn and insert the pillow. If the finished motif panel has a scalloped outline, leave those petal tips free beyond the stitching line or choose a straight front edge before construction.
Assembly Order
- Complete and measure three sample flowers before buying the project’s full yarn quantity.
- Confirm the five petal arches and the Round 3 and Round 4 stitch totals on each sample.
- Block a test group and choose its final spacing, overlap, and staggered-row orientation.
- Measure the bed or pillow insert and calculate the target dimensions including the desired drop.
- Produce the required number of flowers in manageable batches, keeping yarn dye lots together.
- Arrange a test panel and decide whether to use sewn joins, chain bridges, or a fabric backing.
- Connect the centers and adjoining petal edges of the first row without tightening the seams.
- Add staggered rows, checking width, length, and flatness after every few rows.
- Finish the edges: leave the natural scallops visible, or reinforce the outer joins with matching thread.
- Weave in loose yarn tails, block the assembled piece as appropriate, and check every attachment point.
The completed coverlet should lie flat, with five distinct petal outlines visible on each flower and no strained connections between neighboring motifs.
Seven Technical Tips for Better Results
- Mark the arches: Place a stitch marker in each of the five ch-4 spaces after Round 2. A missing arch produces a four-petal flower even when the later stitches are worked correctly.
- Control the center opening: Keep the ch-5 foundation ring loose enough for ten single crochets. A ring pulled closed too tightly loses the spoke-like center visible in the reference design.
- Count the tall stitches: Each Round 3 petal contains exactly five treble crochets at its crown. Four trebles make one petal shorter and distort the flower’s balance.
- Match blocked dimensions: Compare finished samples before starting the full batch and separate motifs that differ by more than about 5 mm. Repeated mismatches can cause rippling across several joined rows.
- Limit seam length: Sew roughly three to five corresponding outer stitches at each petal-to-petal contact. A seam covering the whole petal removes the rounded separation that gives the bedspread its appearance.
- Test chain-bridge tension: Start with two or three chains for a narrow gap and measure the result while the panel lies flat. A tight bridge draws neighboring petals into a raised ridge.
- Secure joining tails: Run each tail through several stitches on the wrong side and reverse direction once before trimming. Cutting immediately beside a joining knot can let a heavily used coverlet separate during washing.
Care, Washing, and Finishing
Cotton flowers gain weight when wet, so support the full coverlet during washing rather than lifting it by a single corner. Follow the yarn label for temperature and agitation. For a fabric-backed project, confirm that the yarn, thread, and backing have compatible washing instructions; otherwise, the layers may shrink differently. Dry the article flat whenever practical, arranging the scalloped edges without stretching the petal centers.
This crochet flower bedspread pattern can become heavy when made as a large all-cotton lace bedspread. If it will be used as an everyday sleeping blanket rather than as a decorative coverlet, assess its weight and open spaces before committing to a full-size version. A separate backing changes the drape and ventilation, while freestanding lace requires stronger joins. Neither approach is automatically superior; the correct construction depends on how the finished piece will be handled.
Conclusion
This crochet flower bedspread pattern uses a repeatable five-petal motif, a firm open center, and selectively joined edges to reproduce the visual structure of a cream floral coverlet. Start with three test flowers, measure a small assembled panel, and calculate the yarn requirement from its actual weight. That approach makes the dimensions and budget more reliable than estimates taken from an image. Keep the outer edge scalloped for a petal-defined outline, or attach the flowers to a measured cotton coverlet for greater stability. Share a photograph of your finished arrangement on Pinterest or Instagram with #FivePetalFlowerBedspread. Would you leave the five-petal edges exposed along the foot of the bed or secure them to a fabric border?
Technique References
- Craft Yarn Council — Standard Yarn Weight System, for yarn and general hook categories.
- Craft Yarn Council — Crochet Abbreviations, for US stitch terminology.
- Crochet Seaming — Interweave Mattress Stitch Guide, for flat seaming technique.
- Motif Joining — Interweave Guide, for planning placement and joins.









