Introduction
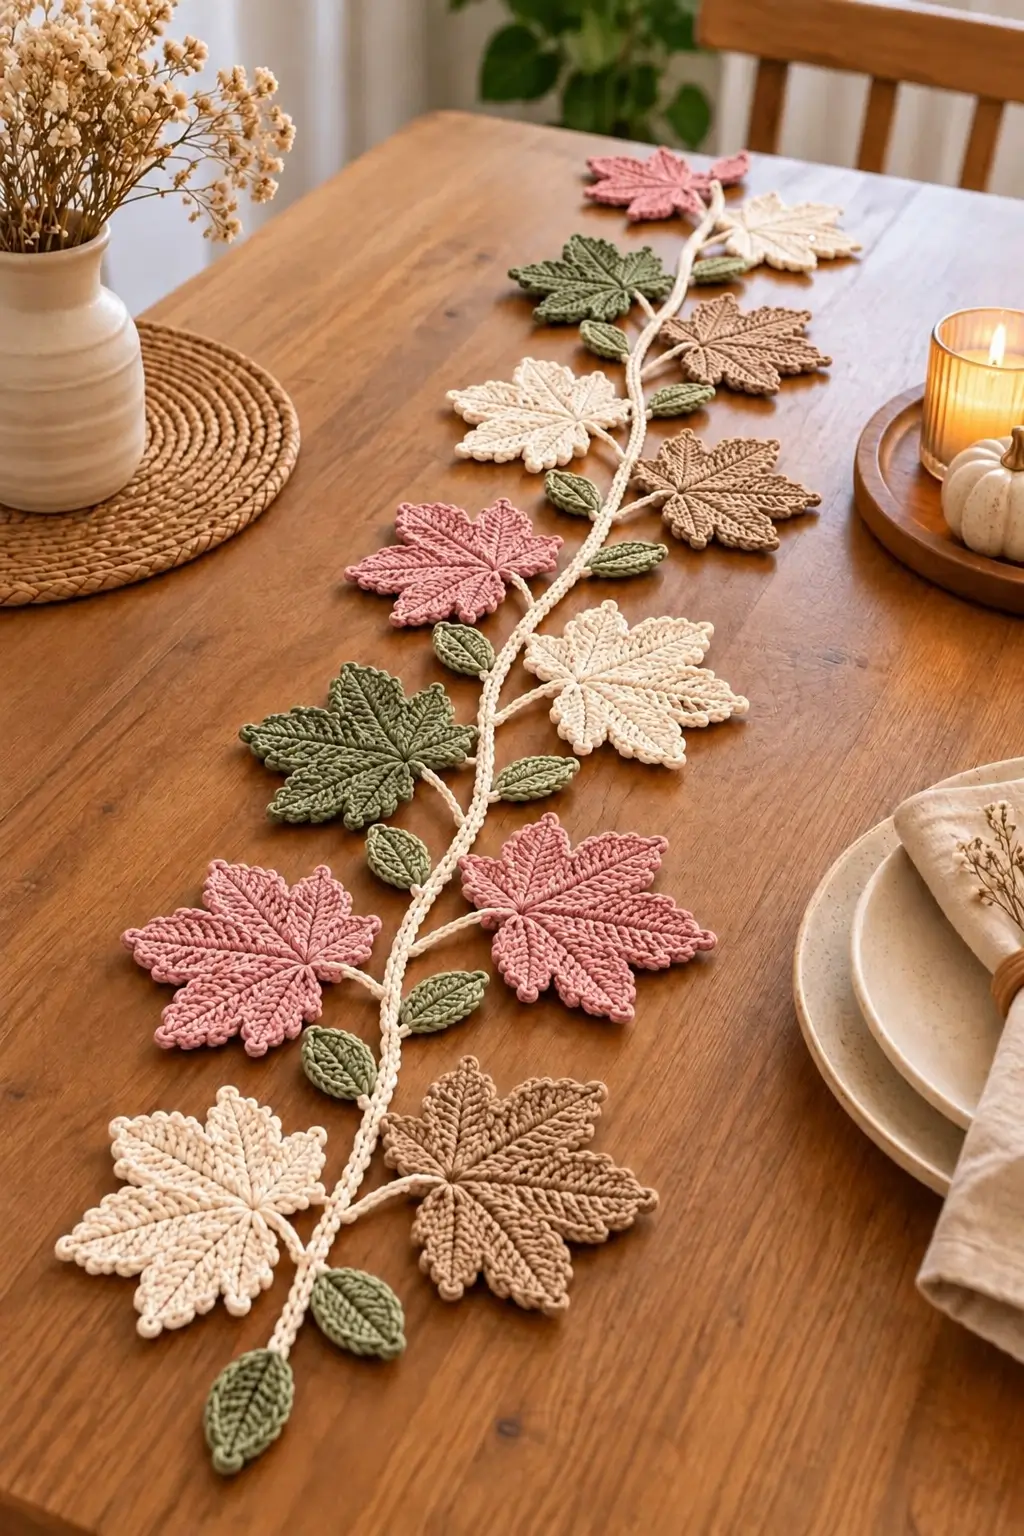
Nine maple leaves branch from one cream vine instead of hanging from a conventional straight bunting cord. This crochet maple leaf table runner recreates the photographed arrangement with dusty pink, olive, ivory and taupe leaves, smaller green foliage and a flexible central stem. Use DK cotton with a 3.5 mm hook for defined lobes and raised ribs. The modular construction also makes the runner easy to resize for different tables.
The Design: What Makes This Maple Leaf Runner Different
The central vine controls the composition. Large maple leaves alternate from side to side while smaller olive leaves fill the spaces between them. This staggered arrangement is more botanical than attaching identical motifs at fixed intervals along a straight garland.
Each large leaf needs five readable lobes, a longer center point and deep valleys. A raised central ridge adds structure without requiring a second sewn-on vein. Published crochet maple leaves vary considerably in scale: sport-weight examples can measure about 11.5 × 5 cm, while lightly worsted versions can reach approximately 12.5 × 14 cm. A DK autumn garland reference uses a 3.5 mm hook and leaves around 10–13 cm. 0
The main construction error is overcrowding the vine. Large leaves need visible gaps between neighboring motifs or their pointed silhouettes disappear.
Project Info at a Glance
| Skill Level | Time | Leaf Size | Hook | Best For |
|---|---|---|---|---|
| Intermediate | Approx. 6–9 hours | Approx. 10–13 cm | 3.5 mm | Dining tables, consoles and seasonal displays |
The photographed runner appears substantially longer than an individual hanging garland. For this version, make the central vine approximately 120–150 cm, then shorten or extend it to fit the table.
Materials and Tools
Yarn
- Warm ivory — DK/#3 cotton — approximately 60–80 g for leaves and central vine
- Dusty pink — DK/#3 cotton — approximately 40–50 g for maple leaves
- Muted olive — DK/#3 cotton — approximately 40–50 g for maple and small leaves
- Warm taupe — DK/#3 cotton — approximately 30–40 g for maple leaves
Published autumn leaf garlands commonly use DK cotton with a 3.5 mm hook because the combination produces enough structure for pointed lobes while remaining flexible enough for a garland. 1
Tools
- 3.5 mm crochet hook
- DK/#3 cotton or cotton-blend yarn
- Yarn needle
- Scissors
- Locking stitch markers
- Tape measure
- Blocking mat and pins
Abbreviations
- ch — chain
- sl st — slip stitch
- sc — single crochet
- hdc — half double crochet
- dc — double crochet
- tr — treble crochet
- dtr — double treble crochet
- BLO — back loop only
- st/sts — stitch/stitches
- sp — space
Crochet Maple Leaf Table Runner Pattern
This is an original construction developed from the visible structure of the uploaded image. Make all motifs separately before attaching them to the vine. That approach lets you adjust the spacing after seeing the complete color arrangement.
Large Maple Leaf — Make 9
For a layout close to the photograph, make approximately:
- 3 dusty pink leaves
- 2 olive leaves
- 2 ivory leaves
- 2 taupe leaves
The exact number can be changed when making a longer or shorter runner.
Maple Leaf Central Spine
Yarn: selected leaf color.
Foundation: Ch 16.
Beginning in the second chain from the hook:
Sl st in next ch, sc in next 2 ch, hdc in next 2 ch, dc in next 4 ch, hdc in next 3 ch, sc in next 2 ch.
Work 3 sc into the final chain.
Rotate the work and continue along the opposite side of the foundation chain.
Sc in next 2 ch, hdc in next 3 ch, dc in next 4 ch, hdc in next 2 ch, sc in next 2 ch, sl st at the upper end.
This narrow oval forms the central body and creates the raised spine visible through the middle of the finished motif.
First Small Lobe
Move approximately three stitches from the lower side of the leaf.
Ch 7.
Beginning in the second chain from the hook work:
Sl st, sc, hdc, dc, tr, tr.
Sl st securely into the central leaf body.
This produces the lowest side point.
First Large Side Lobe
Move approximately two stitches toward the top.
Ch 10.
Beginning in the second chain from the hook work:
Sl st, sc, hdc, dc, tr, dtr, tr, dc, hdc.
Sl st into the main leaf body.
The large side lobe should extend clearly beyond the first point.
Center Lobe
The center point must be the longest part of the motif.
Ch 12.
Beginning in the second chain from the hook work:
Sl st, sc, hdc, dc, tr, dtr, dtr, tr, dc, hdc, sc.
Sl st into the top-center attachment point.
Do not tighten the foundation chain excessively. A tight center lobe curves toward the front instead of lying flat.
Second Large Side Lobe
Mirror the first large side lobe.
Ch 10.
Beginning in the second chain work:
Sl st, sc, hdc, dc, tr, dtr, tr, dc, hdc.
Sl st into the central body.
Second Small Lobe
Mirror the first small point.
Ch 7.
Beginning in the second chain work:
Sl st, sc, hdc, dc, tr, tr.
Sl st into the body.
The motif now has five principal points.
Maple Leaf Edging
Continue with the same leaf color.
Work primarily sc around the outer edge.
At each major pointed tip work:
(sc, ch 2, sl st into second ch from hook, sc)
In the deepest valley between two lobes, work a tight sl st.
Continue around all five lobes.
Fasten off, leaving approximately 20 cm for attaching the motif to its branch.
Published maple leaf instructions similarly use compact stitches in the valleys and additional stitches or picots at the points to maintain the characteristic serrated outline. 2
Adding Raised Leaf Ribs
The photographed leaves contain strong lines running from the center toward each point. They can be emphasized with surface crochet.
Place the leaf right side up.
Join matching yarn at the lower center.
Work loose surface slip stitches along the central foundation toward the highest point.
Fasten off approximately 5–8 mm before the tip.
Join yarn to the central vein and work diagonally toward the first large side lobe.
Repeat toward the opposite large lobe.
Add shorter lines toward the two lower points.
Keep the surface stitches relaxed. Excess tension contracts the motif and causes the leaf to cup.
Small Olive Leaf — Make 10 to 14
The smaller leaves fill the spaces between the maple motifs and make the runner look like one branching vine.
Yarn: muted olive.
Foundation: Ch 11.
Beginning in second ch from hook:
Sl st in next ch, sc in next 2 ch, hdc in next 2 ch, dc in next 3 ch, hdc in next ch, sc in final ch.
Work 3 sc into the last chain.
Rotate and crochet along the opposite side:
Sc, hdc, dc in next 3 ch, hdc in next 2 ch, sc in next 2 ch, sl st at tip.
Fasten off.
Small Leaf Edging
Join olive yarn at the bottom point.
Sc evenly around the leaf.
At the upper tip work:
(sc, ch 2, sl st into second ch from hook, sc)
Continue around the second side and join at the base.
Fasten off with a 15 cm tail.
Small Leaf Central Vein
Use surface slip stitches from the lower point toward the upper tip.
Stop approximately 5 mm before the point.
The small leaf should measure approximately 5–7 cm long, depending on gauge.
Crochet Main Vine
Yarn: warm ivory.
The central stem in the photograph bends gently rather than remaining rigidly straight.
Foundation: Ch until the cord measures approximately 120–150 cm.
Starting in the second chain from the hook, sl st into every chain.
Fasten off.
A chain followed by a complete slip-stitch return creates a firmer cord than a single chain. A comparable published garland also uses a chained cord reinforced with slip stitches to reduce stretching. 3
Optional Thicker Botanical Vine
For a more substantial central branch, work a second pass.
Join ivory at one end of the finished cord.
Work one sc into each available slip stitch along the entire length.
Fasten off.
This produces a broader vine that can support heavier cotton leaves without twisting as easily.
If the runner is intended to curve naturally across the table, do not block the vine completely straight.
Side Branches for the Maple Leaves
Each large maple leaf should sit slightly away from the central vine rather than being sewn directly against it.
Join ivory yarn at the intended attachment position.
Short branch: Ch 8–10.
Starting in the second chain, sl st back along the chain.
Sl st into the main vine and fasten off.
For a longer branch, ch 12–14 instead.
Alternate branch lengths throughout the runner. Identical branch lengths create a rigid ladder effect.
Attaching a Maple Leaf to a Branch
Position the base of the maple leaf over the branch tip.
Use the leaf-color tail or ivory yarn to sew through approximately 4–6 stitches at the base.
Do not sew through the entire lower lobe. The leaf should retain some movement when the runner is repositioned.
Rotate neighboring motifs slightly rather than placing every center vein perpendicular to the main vine.
Attaching the Small Olive Leaves
Place small leaves in the gaps between the large maple motifs.
Some can attach directly to the main vine. Others should sit at the base of a larger branch.
Use the olive tail to make 3–4 secure stitches through the lower end of each leaf.
A practical arrangement is one small leaf between most neighboring maple leaves, with occasional pairs where a larger visual gap remains.
Suggested Color Layout
Lay the complete vine on the table before sewing any motifs permanently.
For a runner close to the photograph, use a sequence such as:
| Position | Large Leaf Color | Side |
|---|---|---|
| 1 | Ivory | Left |
| 2 | Taupe | Right |
| 3 | Dusty pink | Left |
| 4 | Dusty pink | Right |
| 5 | Olive | Left |
| 6 | Ivory | Right |
| 7 | Dusty pink | Left |
| 8 | Taupe | Right |
| 9 | Olive | Left |
Avoid placing identical colors directly beside one another unless intentionally creating a paired focal point.
Spacing the Leaves Along the Runner
Begin with approximately 12–15 cm between the attachment points of neighboring large leaves.
That interval is also used in published horizontal maple garland guidance and provides enough room for individual leaf silhouettes to remain readable. 4
The physical edges of neighboring leaves can overlap slightly, but their centers should remain separated.
Reduce spacing near either end of the vine if you want the runner to taper visually. Increase spacing through the middle for a lighter arrangement.
Pin every motif in place before sewing. Moving one leaf after attachment often requires changing the positions of several neighboring motifs.
Blocking the Maple Leaves
Blocking has a major effect on five-point crochet leaves. Published maple leaf instructions specifically recommend blocking to define the lobes and keep the finished motifs flat. 5
Lightly dampen each motif according to the yarn care instructions.
Place it on a blocking mat.
Pin the center point first.
Pin the two large side lobes next, checking that their angles are approximately symmetrical.
Pin the two lower points.
Push the four valleys inward and pin them separately.
Allow the motifs to dry completely before attaching them to the vine.
Block the small olive leaves separately. Do not stretch them to the same width as the maple motifs.
Making the Runner Longer
The modular construction allows the runner to be extended without changing any leaf instructions.
For every additional 25–30 cm of central vine, make approximately two additional maple leaves and two or three small olive leaves.
Continue alternating the large motifs from left to right.
For a runner around 180 cm, approximately 12–13 large maple leaves provide a fuller arrangement.
Measure the actual dining table before selecting the final length. A table runner can terminate within the tabletop or extend beyond the ends depending on the intended display.
Making a Shorter Centerpiece
For a compact table decoration, make the vine approximately 75–90 cm.
Use five or six large maple leaves and approximately seven small olive leaves.
Keep the same 10–13 cm leaf size. Reducing both the vine and motifs can make the entire design look more like an appliqué than a branching centerpiece.
Arrange the largest leaves near the middle and use smaller foliage toward the two ends.
Assembly
- Crochet all large maple leaves in dusty pink, ivory, olive and taupe.
- Add the raised center and side veins before blocking each maple motif.
- Crochet 10–14 small olive leaves and add their central surface-crochet veins.
- Block every leaf individually, pinning the five maple points and their valleys.
- Crochet a 120–150 cm ivory central vine and add a second pass if a thicker branch is required.
- Lay the vine on the intended table and establish its natural curved position.
- Pin the large maple leaves alternately along the left and right sides.
- Add short ivory branches between the vine and each large leaf, varying their lengths.
- Position the small olive leaves in the remaining gaps and sew every motif securely.
- Weave all tails through matching colors, then lay the completed runner flat and correct any twisted branches.
The completed runner should form one continuous ivory branch with staggered five-point maple leaves and smaller olive foliage distributed through the open spaces.
7 Technical Tips for a Better Crochet Leaf Runner
- Keep the center maple lobe approximately 2 chains longer than the large side lobes. Equal-length points produce a star-like motif instead of the elongated maple silhouette visible in the photograph.
- Pin all five leaf tips during blocking. Leaving one lobe unpinned allows it to curl inward and makes the finished motif appear asymmetrical.
- Leave approximately 12–15 cm between major attachment points. Spacing the leaves more closely can hide the smaller olive motifs and make the center of the runner visually congested.
- Keep surface slip stitches looser than the surrounding crochet. Tight vein stitches act like a drawstring and cause the leaf to fold along its central ridge.
- Use at least four sewing passes at each large-leaf attachment. A single stitch creates a pivot point that lets a 10–13 cm cotton leaf rotate when the runner is moved.
- Vary side branches between approximately 8 and 14 chains. Making every branch the same length produces parallel rows instead of the irregular botanical arrangement shown in the image.
- Weave each tail through at least 5 cm of matching stitches. Short tails can migrate out when a flexible runner is folded, rolled or repositioned repeatedly.
Choosing Yarn for Defined Maple Leaves
Cotton and cotton blends work particularly well when the leaf outline matters. They produce readable stitch definition and respond well to wet blocking. The photographed motifs also have relatively crisp edges rather than a fuzzy halo.
There is considerable freedom in yarn weight. A Ravelry maple leaf by Nicole Riley uses sport-weight yarn with a 3 mm hook and measures approximately 11.4 × 5 cm, while another Irish-crochet maple leaf reference reports that lightly worsted yarn with a 3.25 mm hook can produce a leaf approximately 12.7 × 14 cm. 6
For this runner, DK cotton and a 3.5 mm hook provide a useful middle ground. More important than matching a specific yarn label is keeping all large motifs within the same approximate size range.
Keeping the Central Vine Flat
A long crochet cord can twist after dozens of motifs are attached. Work the return slip stitches with relaxed tension and lay the vine flat every 20–30 cm while crocheting.
When arranging the finished runner, curve the vine gradually. Avoid sharp bends between two attachment points.
If one section rotates after a heavy maple leaf is sewn on, add a small olive leaf on the opposite side. Its attachment can help balance the branch without changing the central cord.
For storage, roll the runner loosely around a cardboard tube or fold it with the maple leaves lying flat. Sharp folds through the middle of a blocked leaf can alter its lobe shape.
Finishing the Autumn Table Runner
Inspect the underside before placing the runner on a table. All attachment tails should remain within the crochet rather than extending between motifs.
Check each maple leaf by lifting it gently from its outer point. The branch attachment should remain stable without pulling the central vine out of alignment.
Arrange the smaller olive leaves last. They can point upward, downward or diagonally, but avoid placing every small leaf at the same angle.
If the runner will be washed, follow the care instructions for the specific yarn and reshape the maple lobes while damp. Dry the piece flat so the branch spacing does not stretch under its own weight.
Conclusion
Five pointed lobes establish the structure of this crochet maple leaf table runner, but spacing determines whether the finished piece reads as a branching vine. Make and block the large 10–13 cm leaves first, then crochet the ivory cord to the table’s required length. Arrange dusty pink, olive, taupe and ivory motifs at alternating angles before sewing anything permanently, and fill the remaining gaps with smaller green leaves. The next step is to measure the intended table and mark the vine at 12–15 cm intervals. Save the finished runner to Pinterest or share it on Instagram with #MapleLeafTableRunner. Would you keep the pastel autumn palette or replace the pink leaves with rust?









