Introduction
A rose handbag needs petals that project outward without pulling its granny squares out of alignment. This crochet rose granny square bag pattern combines dimensional pink flowers, ivory backgrounds, red borders, and green leaves into a structured handbag. Use DK cotton yarn, a 3.5 mm hook, and intermediate crochet skills to make a bag approximately 24 cm wide and 36 cm tall before handles. The modular construction allows damaged motifs to be replaced individually.
The Design: What Makes This Rose Handbag Different
Three structural decisions define this floral handbag. First, the raised roses are crocheted separately and stitched onto completed squares. This keeps the background flat while allowing individual petals to overlap.
Second, red borders frame ivory motifs, creating a consistent geometric grid. You can rotate the squares diagonally for a more decorative appearance, but their corners must remain aligned to prevent distortion.
Third, the handle attachments distribute weight across reinforced stitches rather than a single opening in the fabric. A 3D rose crochet bag carries additional surface weight because each flower contains multiple layers.
One common mistake in a crochet flower handbag is attaching large roses before blocking the squares. The flowers can conceal uneven dimensions, making assembly difficult. Block every square first, check its width, and attach the decorative elements only after the underlying geometry matches.
Project Info at a Glance
| Project Detail | Specification |
|---|---|
| Skill Level | Intermediate |
| Estimated Time | 20–30 hours |
| Target Finished Size | 24 cm wide × 36 cm tall |
| Hook Size | 3.5 mm |
| Yarn | DK cotton |
| Main Technique | Granny squares and dimensional roses |
| Construction | 12 squares, two panels, separate handles |
| Best For | Everyday handbag with fabric lining |
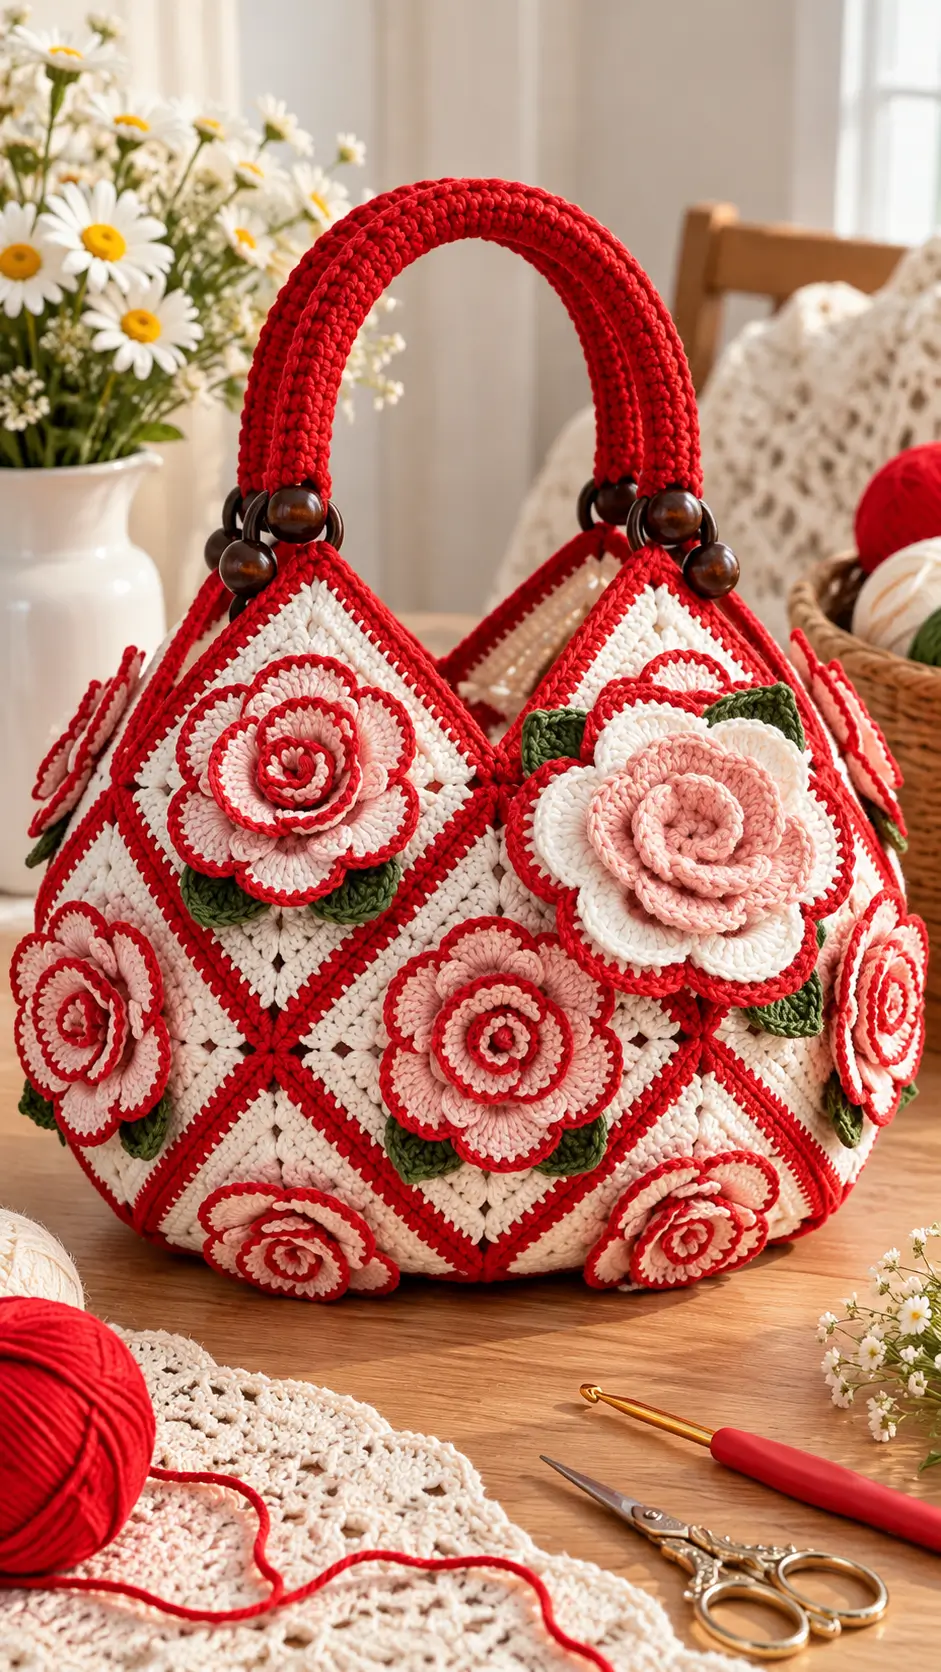
These specifications are design targets for this adaptation, not measurements of a finished sample. The photographed handbag has a rounded shape; the written pattern below produces a flatter rectangular bag.
Materials and Tools
Yarn
Use smooth cotton yarn with consistent thickness. Cotton has relatively little stretch, making it suitable for handbags that must hold their shape under load.
- Bright red DK cotton — 180 g: Suggested brand: Paintbox Yarns Cotton DK.
- Ivory DK cotton — 160 g: For square backgrounds and selected outer petals.
- Blush pink DK cotton — 100 g: For rose centers and inner petals.
- Pale pink DK cotton — 80 g: For alternating rose layers.
- Olive green DK cotton — 40 g: For leaves.
- Additional red DK cotton — 60 g: Allowance for handles, reinforcement, and joining.
These are estimated planning quantities. Allow approximately 10–15% extra yarn for tension differences, longer handles, and color changes. Record actual usage after completing the first motif.
Tools
- 3.5 mm crochet hook for motifs and flowers.
- 3.0 mm crochet hook for firm handle stitches, if required by gauge.
- Yarn needle with a large eye.
- Stitch markers for motif corners and handle placement.
- Scissors for trimming yarn ends.
- Measuring tape for gauge and finished dimensions.
- Blocking mat and rustproof pins for matching square sizes.
- Four wooden rings and four wooden beads, optional, for handle attachments.
- Cotton lining fabric, approximately 50 × 85 cm, subject to finished measurements.
- Matching sewing thread and a hand-sewing needle.
- Optional interfacing for additional structure.
Do not use polyester stuffing for the main bag. This is a fabric accessory rather than a stuffed amigurumi figure.
Crochet Abbreviations
All instructions use US crochet terminology.
| Abbreviation | Meaning |
|---|---|
| MR | Magic ring |
| ch | Chain |
| sc | Single crochet |
| hdc | Half double crochet |
| dc | Double crochet |
| inc | Two single crochet stitches in one stitch |
| dec | Single crochet decrease |
| sl st | Slip stitch |
| st(s) | Stitch(es) |
| BLO | Back loop only |
| RS | Right side |
| WS | Wrong side |
| rep | Repeat |
| FO | Fasten off |
An invisible decrease is worked through the front loops of two adjacent stitches and is useful for shaping small stuffed components, although this handbag pattern does not require it.
Gauge and Construction Notes
The original photographed bag has diamond-oriented squares and a rounded silhouette. This written adaptation uses a simpler rectangular arrangement with the same raised floral design, color palette, and arched handles.
The bag uses twelve 12 × 12 cm squares: six for the front and six for the back. Each panel is two squares wide and three squares high. The target is 24 × 36 cm before seam allowances and opening trim.
Make a sample square first. Its final blocked size determines the dimensions of the finished bag. If the sample measures 11 cm rather than 12 cm, twelve squares will produce a smaller bag.
The squares are worked in joined rounds. The rose decorations and leaves are crocheted separately. Handle bands are worked in rows, while the attachment tabs are reinforced with additional stitches.
Pattern note: This is an original construction proposal using standard crochet techniques. The pattern has not been physically test-crocheted, so check gauge, stitch placement, and finished dimensions before making all components.
Free Crochet Rose Granny Square Bag Pattern — Step by Step
Part 1: Ivory Granny Square Foundation (Make 12)
Yarn: ivory DK cotton. Hook: 3.5 mm.
Each square begins with a magic ring and grows outward using double-crochet clusters.
R1: Make MR. Ch 3 (counts as first dc), 2 dc, ch 2. Work (3 dc, ch 2) three more times into ring. Join with sl st to top of beginning ch 3. (12 dc, 4 corner spaces)
R2: Sl st into first corner space. Ch 3, 2 dc, ch 2, 3 dc in the same corner. Work (3 dc, ch 2, 3 dc) into each remaining corner. Join. (24 dc, 4 corner spaces)
R3: Sl st into first corner space. Work (3 dc, ch 2, 3 dc) in each corner and 3 dc in each side gap between corners. Join. (36 dc, 4 corner spaces)
R4: Repeat the corner construction, placing 3 dc into each of the two side gaps between adjacent corners. Join. (48 dc, 4 corner spaces)
R5: Work (3 dc, ch 2, 3 dc) in each corner, with 3 dc in each of the three side gaps. Join. (60 dc, 4 corner spaces)
R6: Repeat with four side clusters between each pair of corners. Join. (72 dc, 4 corner spaces)
Check the blocked square size. Work another round using the same progression if the square is too small; omit the final round if it is too large. All twelve squares must have identical final stitch counts.
Fasten off and leave a 15 cm tail.
Part 2: Red Square Border (Make 12)
Yarn: bright red.
Join red yarn at any corner space of an ivory square.
R1: Ch 1. Work (2 sc, ch 2, 2 sc) into the corner. Work 18 sc evenly across the first side, excluding the corner stitches. Repeat the corner and side sequence around. Join with sl st. (88 sc, 4 corner ch-2 spaces)
R2: Work 1 sc into every sc and (sc, ch 2, sc) into each corner space. Join. (96 sc, 4 corner ch-2 spaces)
Fasten off and leave a 20 cm tail for joining.
The red border creates a visual division between adjacent ivory squares. Check that the corners remain square rather than rounding inward.
Part 3: Spiral Rose Center (Make 12)
Yarn: blush pink.
This rose uses a separate crocheted strip, rolled into a spiral and secured at the base.
Foundation: Ch 26. (26 ch)
Row 1: Work 2 dc into the fourth chain from the hook. Work 3 dc into each remaining chain across. (68 dc)
Row 2: Ch 1, turn. Work 1 sc into each dc. (68 sc)
Fasten off, leaving a 30 cm tail.
Starting at the shorter end of the strip, roll the crochet into a compact spiral. Keep the foundation edge aligned along the bottom.
Thread the tail through a yarn needle and stitch repeatedly through the bottom of the spiral. Do not sew across the visible upper edges.
The center should remain approximately 2–3 cm across. Adjust the rolling tension rather than adding extra stitches.
Part 4: Inner Rose Petals (Make 12 Strips)
Yarn: pale pink.
Foundation: Ch 31. (31 ch)
Row 1: Sc in the second chain from the hook and in each remaining chain. (30 sc)
Row 2: Ch 1, turn. Repeat [sl st in next st, 5 dc in next st, sl st in next st] ten times. (10 petal groups, 70 worked stitches)
Fasten off, leaving a 35 cm sewing tail.
Wrap the strip around the completed spiral center with the scalloped edge facing outward.
Overlap the first and last petal slightly. Sew the foundation edge around the center, keeping the upper edges free.
The completed inner rose should measure approximately 4–5 cm in diameter, depending on yarn tension.
Part 5: Outer Rose Petals (Make 12 Strips)
Yarn: ivory or pale pink, with red edging.
Foundation: Ch 43. (43 ch)
Row 1: Sc in the second chain from the hook and across. (42 sc)
Row 2: Ch 1, turn. Repeat [sl st in next st, 5 dc in next st, sl st in next st] fourteen times. (14 petal groups, 98 worked stitches)
Change to bright red yarn.
Row 3: Work 1 sl st into each accessible stitch along the upper scalloped edge, following the petal outline without adding increases.
The edging stitch count depends on whether the slip-stitch anchors are included at each petal junction. Work one edging stitch per exposed stitch and avoid doubling stitches at shared anchors.
Fasten off, leaving a 40 cm tail.
Wrap the outer strip around the assembled inner rose. Sew only through the lower edge of the strip.
Position the petals so their red outlines remain visible. The completed flower should measure approximately 7–9 cm across.
Repeat until twelve dimensional roses are completed.
Part 6: Green Leaves (Make 24)
Yarn: olive green.
Each flower receives two leaves positioned diagonally behind the petals.
Foundation: Ch 9. (9 ch)
Row 1: Sc in second ch from hook, hdc in next ch, dc in next 4 ch, hdc in next ch, 3 sc in final ch. Continue along the opposite side of the foundation chain: hdc in next ch, dc in next 4 ch, hdc in next ch, sc in final ch. (17 stitches)
Row 2: Ch 1. Work 1 sc in each stitch around the leaf. (17 sc)
Fasten off, leaving a 20 cm tail.
Pin two leaves behind each rose, with their pointed ends projecting beyond the outer petals.
The leaves should be visible without extending beyond the edges of the square. Stitch them to the background before attaching the rose.
Part 7: Optional Small Flower Accents (Make 2)
Yarn: blush pink.
These two small circular accents are optional decorative elements for the bag’s handle attachment points.
R1: 6 sc in MR. (6)
R2: Inc ×6. (12)
R3: (1 sc, inc) ×6. (18)
R4: (2 sc, inc) ×6. (24)
R5: (3 sc, inc) ×6. (30)
R6: (4 sc, inc) ×6. (36)
Fasten off, leaving a 20 cm tail.
These circles can cover the stitching beneath the handle tabs. They are not required for the primary floral construction.
Part 8: Attaching Roses to the Squares
Place one completed rose in the center of each blocked granny square.
Position the leaves first, then the flower. Check that the rose does not cover the red outer border.
Thread the sewing tail through a yarn needle and secure the flower at four points around its base. Stitch through the flower foundation and the square fabric, avoiding the visible petal surfaces.
Do not pull the stitches tightly enough to distort the background.
Repeat for all twelve motifs. Lay them flat and check that the flowers have consistent orientation.
Part 9: Joining the Front Panel
Arrange six squares into a rectangle two squares wide and three squares high.
Place adjacent squares right sides together. Join the matching edge stitches using red yarn and slip stitches through the outer loops.
First join the squares into three horizontal rows. Then join those rows along their long edges.
The completed front panel should measure approximately 24 × 36 cm before any adjustment for seams.
Repeat the same process for the back panel.
Keep all roses facing outward and position the leaves consistently across both panels.
Part 10: Joining the Bag Body
Place the front and back panels together with wrong sides facing outward.
Using red yarn, join the left side, bottom, and right side with slip stitches through corresponding border stitches.
Leave the top open.
For a stronger bottom, work an additional round of sc along the interior seam allowance before turning the bag right side out.
This creates a flat bag rather than the fully rounded photographed silhouette. A rounded gusset can be added as a separate customization, but its dimensions must be calculated from the actual panel edges.
Part 11: Reinforcing the Opening
Yarn: bright red.
Join yarn at one side of the opening.
R1: Work sc evenly around the complete top opening, placing one stitch into each available edge stitch and distributing extra stitches where row ends meet. Join.
R2: Ch 1. Work sc in each stitch around. Join.
R3: Repeat R2.
Fasten off and weave in the end.
Count the opening stitches after R1 and maintain that count for R2 and R3. Do not introduce increases unless the opening visibly contracts.
A reinforced opening reduces stretching when the bag contains personal items.
Part 12: Arched Crochet Handles (Make 2)
Yarn: bright red. Hook: 3.0–3.5 mm.
The photographed bag has thick arched handles. This adaptation uses folded, reinforced crochet bands.
Foundation: Ch 81. (81 ch)
Row 1: Sc in second ch from hook and in each remaining chain. (80 sc)
Rows 2–10: Ch 1, turn. Sc across. (80 sc each row)
Fasten off, leaving a 40 cm tail.
Fold the band lengthwise, bringing its long edges together. Stitch the edges closed with matching yarn.
Repeat for the second handle.
For additional rigidity, insert a narrow cotton webbing strip before closing the band. The webbing should be shorter than the crochet band by approximately 1 cm to avoid protruding at the ends.
Do not use wire or exposed metal reinforcement inside handles intended for frequent carrying.
Part 13: Handle Attachment Tabs (Make 4)
Yarn: bright red.
Foundation: Ch 9. (9 ch)
Row 1: Sc in second ch from hook and across. (8 sc)
Rows 2–12: Ch 1, turn. Sc across. (8 sc each row)
Fasten off, leaving a 30 cm tail.
Fold each tab around a wooden ring, then sew the two ends to the reinforced top edge of the bag.
Position two tabs on the front and two on the back, approximately 5 cm from the nearest side seam.
Attach each handle end to its corresponding ring. Stitch through several rows of the folded handle rather than securing it with a single strand.
Wooden beads may be sewn over the attachment points as decorative details. They should not carry the structural load.
Part 14: Optional Rose Accents at the Lower Edge (Make 2)
The reference photograph includes small roses near the bottom of the bag. These can be added without increasing the number of granny squares.
Use the spiral rose center instructions from Part 3 and the inner petal strip from Part 4.
Make two smaller roses without the outer petal layer. Secure them at the lower front corners, at least 2 cm above the bottom seam.
Position them so they do not touch the surface when the bag is placed upright. This reduces abrasion on the raised petals.
How to Assemble the Crochet Rose Handbag
- Block all twelve granny squares to matching dimensions, checking each corner with a measuring tape.
- Complete the rose centers and petal layers, sewing through the base of each flower.
- Attach the green leaves diagonally to each square before adding the roses.
- Sew the roses to the square centers, leaving the red borders exposed.
- Join six squares for the front panel and six for the back, matching corresponding edge stitches.
- Join the two panels along the side and bottom seams with the wrong sides facing.
- Reinforce the upper opening using three rounds of single crochet.
- Attach the handle tabs and rings, then stitch the reinforced handles into position.
- Measure and sew a fabric lining, leaving a seam allowance of approximately 1 cm, and attach it just below the opening.
- Weave in all yarn tails, inspect the handle attachments, trim loose fibers, and test the bag with a light load before regular use.
The completed bag contains twelve rose squares, twenty-four leaves, two reinforced handles, and an optional fabric lining.
7 Technical Tips for a Better Crochet Rose Handbag
- Prevent misaligned corners. Place stitch markers in all four corner spaces of every square, and compare diagonals before joining. A difference greater than 5 mm between matching squares should be corrected by reblocking or adjusting the motif.
- Avoid overfilling the bag. This handbag requires no stuffing, but heavy contents can stretch the top opening and distort the side seams. Use a fitted lining and test the handles with a 500 g load before carrying heavier items.
- Control invisible-decrease ridges. Invisible decreases are unnecessary for the main square construction, but may be used in optional shaped embellishments. Work through front loops only to reduce visible bumps on the outside of the fabric.
- Check decorative placement before sewing. Pin each rose at four points around its base and maintain at least 5 mm clearance from the red border. Sewing flowers too close to a joining seam can prevent the panels from lying flat.
- Avoid loose tension with plush yarn. Velvet or chenille yarn can obscure stitch definition and make petal edges difficult to count. If substituting velvet, make a separate test motif and measure it before committing to twelve squares.
- Pin the handles symmetrically. Measure each attachment point from the nearest side seam rather than estimating by eye. A difference of 1 cm between front and back placements can cause the bag to tilt when carried.
- Secure yarn tails against unraveling. Weave each tail through at least 4–5 cm of dense stitches, change direction, and weave back through another section. Handle attachment tails should be secured through reinforced fabric rather than hidden only beneath a wooden bead.
Customization Options
Change the Rose Colors
Color changes do not require alterations to the stitch counts. However, use yarns of similar thickness to keep all twelve motifs consistent.
For a more subdued design, replace the bright red border with burgundy or dark olive. For a higher-contrast handbag, retain the ivory square background and use red roses with darker green leaves.
Blush pink and ivory create a softer floral arrangement, while bright red edging emphasizes the shape of every petal.
Make the Bag Wider
To increase the width, add a third square to each horizontal row. This produces panels three squares wide and three squares tall.
At a 12 cm square gauge, the panel dimensions become approximately 36 × 36 cm.
A larger bag needs more yarn, a wider lining, and stronger handle attachments. Calculate additional materials from the weight of one finished square rather than relying on a fixed percentage.
Create a Rounded Base
The photographed handbag has a rounded bottom and a fuller silhouette than a standard flat tote.
A separate crocheted gusset can create this effect. Work a long rectangular strip in red single crochet, then attach it between the front and back panels along the side and bottom edges.
Measure the joined edge lengths before crocheting the gusset. Its long edges must match the corresponding bag-panel seam lengths.
A fabric lining with a matching gusset can help maintain the shape.
Add a Closure
A magnetic snap, zipper, or button loop can be fitted after the opening has been reinforced.
For a magnetic snap, attach the hardware to the lining and add a small interfacing patch behind each half.
For a zipper, measure the finished opening after the top trim has been completed. A zipper that is longer than the opening can create ripples, while one that is too short can pull the top corners inward.
Cleaning and Care
Cotton crochet handbags should be cleaned according to the yarn manufacturer’s care instructions.
Hand washing is a conservative option when the bag contains wooden rings, decorative beads, or multiple yarn types. Avoid prolonged soaking if the hardware is unfinished wood.
Press excess water out with a towel rather than wringing the fabric. Reshape the square panels while damp and dry the bag flat with the handles supported.
Raised petals can be repositioned by hand after drying. Avoid pressing them directly with a hot iron, which can flatten the dimensional texture.
Store the handbag empty or lightly filled with clean tissue to preserve the structure. Do not suspend a heavy bag by its handles for extended periods.
Frequently Asked Questions
Is this crochet rose handbag suitable for beginners?
The project is best suited to intermediate crocheters. You should already know how to make granny squares, work double crochet, join motifs, and sew dimensional crochet pieces together.
The individual stitches are common, but accurate assembly requires consistent tension and careful measurement.
How many granny squares are needed?
This adaptation uses twelve squares, six for the front and six for the back. A larger version can use eighteen squares arranged in two panels of nine.
The photographed handbag may use a different arrangement, including extra squares around the sides and bottom.
What yarn works best for a structured crochet handbag?
Cotton DK or worsted-weight yarn is a practical choice because it produces clearly defined stitches and has relatively little elasticity.
Acrylic can also be used, although a lining or stabilizer may be needed to control stretching.
Can I make the roses separately?
Yes. The roses in this pattern are assembled from crocheted strips and sewn to the completed granny squares.
This approach makes color placement easier and allows individual flowers to be replaced without remaking the entire square.
Does the bag need a lining?
A lining is strongly recommended if the bag will carry keys, pens, cosmetics, or other small objects.
Granny square openings can allow narrow items to pass through the fabric. A lining also reduces friction against the reverse side of the crochet.
How can I make the handles stronger?
Use a smaller hook for the handle bands, add cotton webbing inside them, and sew the ends through reinforced attachment tabs.
Decorative wooden rings and beads should not be the only elements holding the handles to the bag.
Conclusion
The crochet rose granny square bag pattern combines repeatable square construction with separately assembled dimensional flowers. Consistent motif sizing, secure petal stitching, and reinforced handle attachments are the main technical requirements. Before making all twelve squares, complete one sample, block it, and record its dimensions and yarn consumption. Adjust the hook if necessary, then repeat the verified gauge throughout the project.
Save the finished bag to Pinterest with a close-up of the rose construction, or share the completed handbag on Instagram using #CrochetRoseGrannySquareBag. Include the finished measurements and yarn details so other makers can compare results.
Would you choose ivory outer petals with red edging, or fully red roses for this handbag?