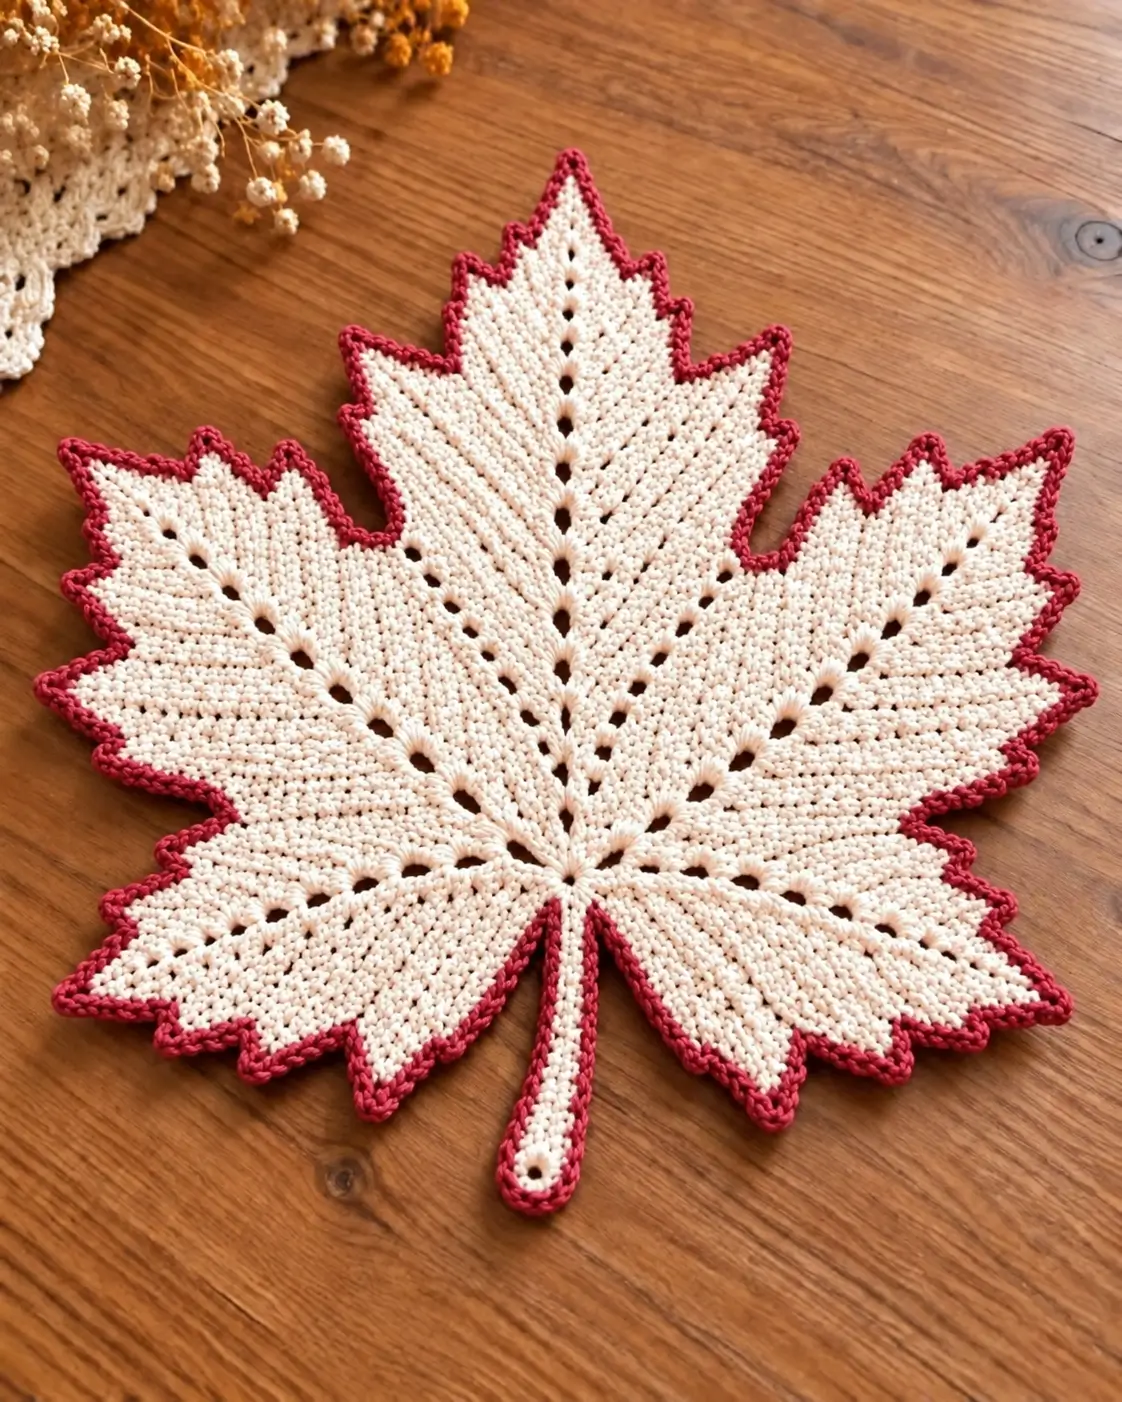
A maple leaf depends on its pointed lobes and radiating veins to read correctly in crochet. This crochet maple leaf pattern recreates that structure with a cream center, openwork vein lines, seven prominent sections, a narrow stem, and a burnt-orange border. The finished motif works well as an autumn table decoration, placemat, wall accent, or seasonal centerpiece. Use firm cotton yarn so the points hold their shape after blocking.
About This Crochet Maple Leaf
The design is built around a central vein with diagonal openings extending toward the outer lobes. Those open spaces separate the sections visually without making the finished leaf excessively lacy. The cream body provides the main structure, while the burnt-orange edging traces every point and indentation.
Unlike a simple round coaster, a crochet maple leaf needs controlled increases and decreases. Each lobe must widen before narrowing toward a defined point. The lower lobes also need enough width to balance the tall center section. A narrow crocheted stem finishes the shape and provides a practical hanging point if the leaf is used as seasonal decor.
Project Information
| Skill Level | Intermediate |
|---|---|
| Construction | Flat crochet motif |
| Main Color | Cream / natural |
| Border Color | Burnt orange / rust |
| Suggested Yarn | DK or light worsted cotton |
| Suggested Hook | 3.5–4.0 mm |
| Approximate Size | 28–34 cm including stem, depending on gauge |
| Best Uses | Table decor, placemat, wall decor, centerpiece |
Materials and Tools
Yarn
- Cream cotton yarn — DK or light worsted weight — approximately 60–90 g.
- Burnt orange cotton yarn — matching weight — approximately 15–25 g for the outer border.
Mercerized or tightly spun cotton produces clearly defined stitches and helps the pointed sections remain crisp. The two yarn colors should have similar thickness so the orange border does not pull or ruffle the cream body.
Tools
- 3.5–4.0 mm crochet hook
- Tapestry needle
- Scissors
- Stitch markers
- Blocking pins
- Blocking mat
- Tape measure
Abbreviations
- ch — chain
- sl st — slip stitch
- sc — single crochet
- hdc — half double crochet
- dc — double crochet
- tr — treble crochet
- sp — space
- st/sts — stitch/stitches
- RS — right side
Crochet Maple Leaf Pattern
This pattern is an original reconstruction inspired by the visible structure of the photographed leaf. The motif is worked flat. Stitch placement and blocking are more important than producing an exact finished measurement because cotton yarns can vary substantially in gauge.
Foundation Ring
Use cream yarn.
Ch 6. Join with a sl st to the first chain to form a ring.
Round 1: Ch 3, work 15 dc into the ring. Join with a sl st to the top of the beginning ch-3.
Do not tighten the center excessively. The small central opening acts as the point from which the leaf veins radiate.
Setting Up the Seven Leaf Sections
Round 2: Ch 3, dc in the same stitch, ch 2, 2 dc in the next stitch. Continue around, distributing seven increase groups as evenly as possible around the center.
The objective of this round is to create seven working directions: one tall center lobe, two upper side lobes, two middle/lower side lobes, and two smaller basal sections.
Place a stitch marker in each ch-2 space. These markers identify the main vein positions and make the shaping easier to track.
Center Maple Leaf Lobe
Use cream yarn.
Join yarn at the marker assigned to the top center section.
Row 1: Ch 3, 2 dc in ch-2 sp, ch 1, 3 dc in same sp.
Row 2: Ch 3, turn, dc in first st, dc across to ch-1 sp, (dc, ch 1, dc) in ch-1 sp, dc across, 2 dc in last st.
Row 3: Repeat Row 2.
Row 4: Ch 3, turn, dc across to center ch-1 sp, (2 dc, ch 1, 2 dc) in center sp, dc across.
Row 5: Ch 3, turn, dc across to center sp, (dc, ch 1, dc) in center sp, dc across.
Row 6: Ch 3, turn, skip first st, dc across to center sp, (dc, ch 1, dc) in center sp, dc across, leave final st unworked.
Row 7: Repeat Row 6.
Row 8: Ch 3, turn, skip first st, dc across to center ch-1 sp, dc in center sp, dc across, leave final st unworked.
Row 9: Ch 2, turn, skip first st, hdc across, leave final st unworked.
Row 10: Ch 1, turn, skip first st, sc across, leave final st unworked.
Final Point: Ch 3, sl st into the first chain to form a compact pointed tip.
Fasten off.
Upper Left Lobe
Join cream yarn at the next marked section to the left of the center lobe.
Row 1: Ch 3, 2 dc in marked sp, ch 1, 3 dc in same sp.
Row 2: Ch 3, turn, dc across, (dc, ch 1, dc) in center space, dc across.
Row 3: Ch 3, turn, 2 dc in first st, dc across to center, (dc, ch 1, dc) in center sp, dc across, 2 dc in last st.
Row 4: Ch 3, turn, dc across, working (dc, ch 1, dc) into the center space.
Row 5: Ch 3, turn, skip first st, dc across to center sp, (dc, ch 1, dc) in center, dc across, skip final st.
Row 6: Repeat Row 5.
Row 7: Ch 2, turn, skip first st, hdc across, leave final st unworked.
Row 8: Ch 1, turn, skip first st, sc across, leave final st unworked.
Tip: Ch 3 and sl st into first ch.
Fasten off.
Upper Right Lobe
Work the upper right lobe as a mirror of the upper left lobe.
Maintain the center ch-1 opening on each row. This creates the visible vein running from the center of the leaf toward the pointed outer edge.
Fasten off after completing the tip.
Middle Left Lobe
Join cream yarn at the next marked space on the left.
Row 1: Ch 3, 2 dc, ch 1, 3 dc in marked sp.
Row 2: Ch 3, turn, dc across, (dc, ch 1, dc) in center sp, dc across.
Row 3: Ch 3, turn, 2 dc in first st, dc across, (dc, ch 1, dc) in center sp, dc across, 2 dc in last st.
Row 4: Repeat Row 2.
Row 5: Ch 3, turn, skip first st, dc across, (dc, ch 1, dc) in center sp, dc across, skip last st.
Row 6: Repeat Row 5.
Row 7: Ch 2, turn, skip first st, hdc across, skip last st.
Row 8: Ch 1, turn, sc across while decreasing at both ends.
Tip: Ch 3, sl st into first ch.
Fasten off.
Middle Right Lobe
Repeat the instructions for the middle left lobe on the opposite side.
Compare both lobes before fastening off completely. Their outer tips should sit at approximately the same height when the motif lies flat.
Lower Left Lobe
Join cream yarn at the next lower-left marked space.
Row 1: Ch 3, 2 dc, ch 1, 3 dc in marked sp.
Row 2: Ch 3, turn, dc across, (dc, ch 1, dc) in center sp, dc across.
Row 3: Ch 3, turn, 2 dc in first st, dc across, (dc, ch 1, dc) in center sp, dc across, 2 dc in last st.
Row 4: Ch 3, turn, dc across, (dc, ch 1, dc) in center sp, dc across.
Row 5: Ch 3, turn, skip first st, dc across, (dc, ch 1, dc) in center sp, dc across, skip last st.
Row 6: Ch 2, turn, skip first st, hdc across, skip last st.
Row 7: Ch 1, turn, sc across while decreasing at both ends.
Tip: Ch 3, sl st into first ch.
Fasten off.
Lower Right Lobe
Repeat the lower-left instructions on the opposite side.
The two lower lobes should angle downward slightly rather than extending directly sideways. This placement creates the broad lower silhouette associated with a maple leaf.
Creating the Openwork Veins
The photographed design contains distinct open spaces running from the center toward each major point. If additional definition is required after completing the lobes, add surface crochet beside these openings.
Join cream yarn close to the center.
Work a line of loose surface slip stitches toward the tip of one lobe. Keep each stitch directly beside the existing ch-1 spaces.
Fasten off at the point and repeat for the remaining major lobes.
Do not pull the surface stitches tightly. Excess tension will fold the motif along the vein.
Shaping the Smaller Edge Points
The outer edge contains smaller teeth between the seven primary points. These can be formed while preparing the border.
Join cream yarn at any indentation.
Small Point: sc in next 2 sts, hdc in next st, dc in next st, (tr, ch 2, sl st in second ch from hook, tr) in next st, dc in next st, hdc in next st, sc in next 2 sts.
Repeat this shaping sequence where additional secondary points are required.
Work fewer stitches in narrow spaces between adjacent lobes. The objective is a clean zigzag outline rather than an identical stitch count around every section.
Burnt Orange Crochet Border
The orange border is one of the defining elements of this two-color crochet maple leaf. It should outline the existing geometry rather than create a separate scalloped shape.
Join burnt orange yarn at the base of the stem area.
Border Round: sc evenly around the entire leaf.
At each major point, work:
(sc, ch 2, sl st in second ch from hook, sc) into the tip stitch.
At smaller secondary points, work:
(sc, ch 1, sc) into the tip.
At deep indentations between lobes, work a sc decrease across the stitches immediately before and after the indentation.
This combination keeps the valleys narrow while making the points visibly sharper.
Continue around the entire leaf until reaching the stem position.
Do not fasten off if you want to crochet the orange stem border continuously.
Crochet Maple Leaf Stem
Begin with cream yarn if the stem has not already been formed.
Ch 26.
Row 1: sc in second ch from hook and across (25).
Row 2: ch 1, turn, sc across (25).
Row 3: ch 1, turn, sc across (25).
Fasten off cream.
Join burnt orange at the stem base.
Sc evenly down one long edge, work 3 sc around the rounded bottom, then sc evenly up the opposite edge.
Continue directly into the leaf border if desired.
Optional Hanging Hole
To reproduce the small opening visible near the bottom of the stem, replace the center stitch at the stem end with:
Ch 4, skip 2 sts, sc in next st.
On the following edging pass, work 5 sc into the ch-4 space. This produces a reinforced opening that can be used for hanging the finished leaf.
Joining and Finishing the Leaf
- Lay the completed cream motif on a flat surface and identify any lobe that twists or overlaps its neighbor.
- Weave in the cream yarn tails before adding the final border wherever possible.
- Attach the stem at the lower center so it aligns with the main vertical vein.
- Check that the upper center point sits directly above the stem.
- Work the burnt-orange border around every lobe, secondary point, and indentation.
- Use decreases in deep valleys if the border begins to flare outward.
- Add extra stitches only at the pointed tips if the orange edging pulls the cream fabric inward.
- Weave the orange yarn tails through the back of matching orange stitches.
- Wet-block or steam-block according to the yarn manufacturer’s care instructions.
- Pin every major and secondary point individually until the leaf is completely dry.
How to Block the Crochet Maple Leaf
Blocking determines the final geometry of this project. Place the damp leaf on a blocking mat with the wrong side facing down. Start by pinning the upper center point and the bottom of the stem so the central vein forms a straight vertical line.
Next, pull the upper-left and upper-right lobes outward by equal amounts. Repeat with the middle and lower lobes. Pin every orange point separately rather than stretching an entire edge with one pin.
Measure from the central ring to corresponding points on the left and right sides. Differences greater than approximately 1 cm can make the finished motif appear noticeably asymmetrical.
Allow cotton yarn to dry completely before removing the pins.
7 Technical Tips for a Cleaner Maple Leaf
- Keep the center vein straight. If the top point sits more than 1 cm away from the stem centerline, reposition the motif during blocking before pinning the side lobes.
- Do not tighten the chain spaces. Tight ch-1 spaces can close the decorative holes and make the vein openings inconsistent from the center to the outer points.
- Watch the orange border tension. A border worked more tightly than the cream body will cause the outer points to curl upward instead of lying flat.
- Use decreases inside deep valleys. Adding ordinary single crochet stitches to every available stitch can produce excess fabric between two lobes and soften the maple-leaf silhouette.
- Pin every major point individually. One misplaced point can change the apparent angle of an entire lobe, particularly on the long center section.
- Keep both yarns the same weight. A substantially heavier orange yarn creates a thick rim that can distort the thinner cream center.
- Secure the stem across several stitches. Attaching it at only one point allows the stem to rotate and breaks the visual line running through the center of the leaf.
Using the Finished Crochet Maple Leaf
A large crochet maple leaf pattern can serve several functions without changing the basic construction. Use one leaf as an autumn table centerpiece, make several smaller versions for placemats, or attach a hanging loop to the stem for wall and door decor.
For a table mat, cotton yarn is the practical choice because it produces defined stitches and a relatively flat surface. Avoid placing hot cookware directly on the motif unless the specific yarn is rated for that purpose.
The color combination can also be changed without altering the structure. Cream with burnt orange creates a restrained autumn palette, while rust, burgundy, mustard, forest green, or solid natural cotton produce distinctly different versions of the same leaf.
Final Check
Before trimming the final yarn tails, inspect the leaf from directly above. The center point should align with the stem, corresponding left and right lobes should extend to similar distances, and the orange edging should sit flat around every indentation.
If one section curls, correct the border tension before blocking rather than attempting to force a severe curl flat with pins. Once the shape is balanced, block the leaf to its final dimensions and allow it to dry completely.
The completed crochet maple leaf should have a cream openwork body, clearly separated vein lines, seven prominent pointed sections, a narrow stem, and a continuous burnt-orange outline that emphasizes the autumn leaf shape.