Introduction
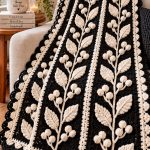
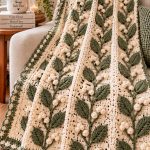
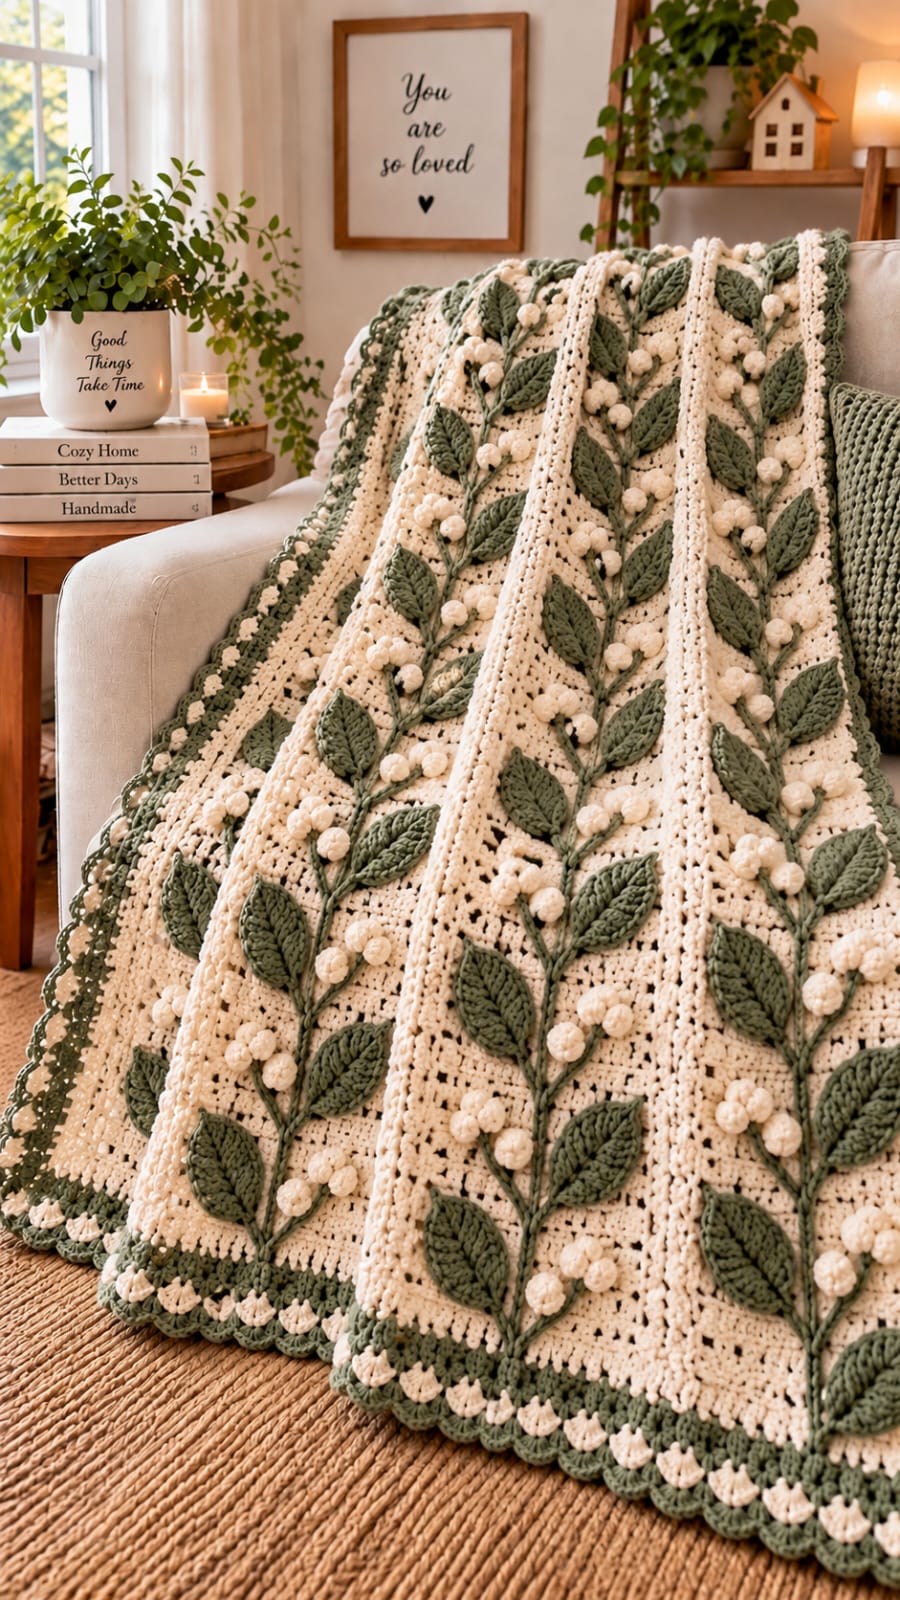
Rows of sage-green branches climb this blanket from hem to top, with paired leaves and ivory berry clusters breaking across the cream lace background. This botanical crochet blanket pattern uses separate textured panels, dimensional appliqués and a scalloped two-color border. Worked in worsted-weight yarn with a 5 mm hook, the photo-adapted throw measures approximately 125 × 155 cm and suits sofa, reading-chair or decorative bed use.
The Design: What Makes This Botanical Crochet Blanket Different
The blanket separates structural crochet from botanical decoration. Cream panels provide a stable openwork ground, while raised sage stems, leaves and ivory berries are attached afterward. This prevents the dimensional motifs from controlling the gauge of the main fabric.
Each botanical branch follows a vertical axis. Leaves alternate left and right rather than appearing in identical horizontal pairs, which keeps the repeat from looking rigid. Berry clusters occupy the spaces between selected leaves and introduce a second level of relief.
Narrow raised cream divisions separate neighboring botanical panels. A sage-and-ivory border then frames the entire throw without competing with the central branches. The main construction failure is attaching the stems before blocking the background. If the cream panels shrink or stretch later, the applied branches can buckle. Block the base first, then add the botanical work.
Project Info at a Glance
| Skill Level | Construction | Approx. Finished Size | Hook | Best For |
|---|---|---|---|---|
| Intermediate | Openwork panels with applied botanical motifs | Approx. 125 × 155 cm | 5 mm main; 4–4.5 mm appliqués | Sofa throw, decorative bed blanket, reading chair |
The dimensions are practical estimates for reproducing the proportions in the reference image. Gauge, yarn construction and the number of botanical panels will affect the final measurements.
Materials and Tools
Yarn
- Warm ivory worsted-weight yarn — approximately 1,300–1,600 g for the main blanket, panel divisions and border accents.
- Muted sage green worsted-weight yarn — approximately 450–600 g for leaves, stems and border.
- Ivory yarn reserved for berries — approximately 120–160 g from the main yarn quantity.
Tools
- 5 mm crochet hook for the blanket panels
- 4.5 mm crochet hook for leaves
- 4 mm crochet hook for berry motifs
- Yarn needles
- Locking stitch markers
- Scissors
- Tape measure
- Blocking mats and rust-resistant pins
Abbreviations
- MR — magic ring
- ch — chain
- sl st — slip stitch
- sc — single crochet
- hdc — half double crochet
- dc — double crochet
- tr — treble crochet
- inc — increase
- dec — decrease
- sp — space
- st / sts — stitch / stitches
Keep all openwork chains relaxed and consistent. Tight chain spaces shorten a panel vertically and can distort the straight botanical branches applied later.
Botanical Crochet Blanket Pattern
The photographed throw can be reproduced as five main botanical panels separated by narrower cream strips. Making the sections individually reduces the amount of fabric held on the hook and makes placement of the dimensional motifs easier.
Main Cream Botanical Panel — Make 5
Yarn: warm ivory.
Each panel should finish at approximately 21–22 cm wide after blocking.
Foundation: Ch 43.
Row 1: Dc in fourth ch from hook and in each remaining ch. Turn. (40 dc)
Row 2: Ch 3, dc in next 2 sts, *ch 1, skip 1 st, dc in next 3 sts*. Repeat across, adjusting the final repeat if required. Turn.
Row 3: Ch 3, dc in each dc and 1 dc in each ch-1 sp across. Turn. (40 dc)
Row 4: Ch 3, dc in next st, *ch 1, skip 1 st, dc in next 2 sts*. Repeat across. Turn.
Row 5: Ch 3, dc across, working 1 dc in every ch-1 sp. (40 dc)
Rows 6–95: Repeat Rows 2–5, ending after a solid dc row.
Fasten off.
Measure the first completed panel before making the remaining four. Add or remove complete four-row repeats if a different blanket length is required.
Raised Side Edges for Each Panel
The photograph shows strong cream vertical lines separating the botanical sections.
Join ivory yarn to the lower corner of one long panel edge.
Row 1: Work sc evenly along the complete edge. Aim for approximately three stitches for every two dc rows.
Row 2: Ch 1, turn, sc in each st across.
Row 3: Ch 1, turn, sl st loosely in each st across.
Fasten off.
Repeat on the opposite long edge.
These narrow strips create enough definition to separate the cream background from the raised botanical branches.
Joining the Five Panels
Block all five panels to matching measurements before joining.
Place two panels side by side with the raised edge strips touching.
Using ivory yarn, work a flat slip-stitch join through corresponding edge stitches.
Do not pull the joining yarn tightly.
Repeat until all five panels form one rectangular blanket.
Lay the complete base flat and measure diagonally from corner to corner. Both diagonal measurements should be approximately equal before the botanical motifs are attached.
Sage Crochet Branch Stem — Make 5
The long central stem on each panel can be worked as a narrow crochet cord and sewn to the blanket.
Yarn: sage green.
Foundation: Ch approximately 150–165, or enough to extend from roughly 6 cm above the lower border to 6 cm below the upper border.
Row 1: Starting in second ch from hook, sl st loosely in every chain.
Fasten off with a 40 cm tail.
The resulting cord should lie flat without twisting.
For a thicker stem, work one row of surface slip stitches over the cord after it has been attached.
Large Sage Crochet Leaf — Make Approximately 50
The photographed blanket uses repeated pointed leaves with a pronounced central vein.
Yarn: sage green.
Foundation: Ch 15.
Starting in second ch from hook work:
Sl st, sc, hdc, dc, dc, tr, tr, dc, dc, hdc, hdc, sc, sc, sl st.
At the tip work:
Ch 3, sl st in first ch.
Rotate the work and crochet into the unused loops on the opposite side of the foundation chain:
Sl st, sc, sc, hdc, hdc, dc, dc, tr, tr, dc, dc, hdc, sc, sl st.
Sl st at the base.
Fasten off with a 25 cm sewing tail.
Leaf Edging and Vein
For a stronger outline, join sage yarn at the leaf base.
Work one loose round of sl st around the perimeter.
At the pointed end, work ch 2, sl st in second ch from hook before continuing around the second side.
Fasten off.
Use a matching or slightly darker sage strand to surface-stitch from the base to the tip along the original foundation chain.
This line creates the raised central vein visible in the botanical design.
Small Sage Crochet Leaf — Make Approximately 20
Smaller leaves can be placed near berry clusters and at the ends of branches.
Foundation: Ch 10.
Starting in second ch from hook work:
Sl st, sc, hdc, dc, tr, dc, hdc, sc, sl st.
At the tip work a ch-2 picot.
Rotate and mirror the stitch sequence along the second side.
Fasten off with a 20 cm tail.
Ivory Crochet Berry — Make Approximately 90
The berries in the photograph are dimensional but compact. They can be worked as tiny stuffed balls or dense bobble-style motifs.
Yarn: ivory. Use the 4 mm hook.
R1: 6 sc in MR. (6)
R2: Inc ×6. (12)
R3: Sc around. (12)
Add a very small amount of fiberfill or several short yarn scraps.
R4: Dec ×6. (6)
Fasten off with a 15 cm sewing tail.
Close the opening with the yarn needle.
Alternative Flat Berry Bobble
For a blanket that will be used frequently rather than displayed, flatter berries reduce bulk.
Insert the hook at the desired position.
Work five incomplete dc stitches into the same location.
Yarn over and pull through all loops.
Ch 1 to lock the bobble.
This method creates a raised berry without a separately stuffed component.
Building the First Botanical Branch
Lay one blocked panel flat.
Mark its vertical center with removable stitch markers.
Place the sage cord along that line, beginning approximately 6 cm above the bottom.
Allow the upper end to finish approximately the same distance below the top.
Pin the cord every 8–10 cm.
Sew it down with small matching stitches approximately every 2 cm.
Do not stretch the cord while sewing.
Leaf Placement
Begin near the bottom of the branch.
Position one large leaf on the left side with its tip angled upward approximately 30–45 degrees.
Place the next leaf several centimeters higher on the right.
Continue alternating sides.
Allow approximately 8–11 cm between major leaf positions.
Not every pair needs to sit at exactly the same height. Small differences make the branch appear less geometric while maintaining a controlled repeat.
Use approximately 9–11 large leaves per botanical panel.
Attaching the Leaves
Pin all leaves on one branch before sewing any of them permanently.
Sew through the central vein from the leaf base to approximately two-thirds of its length.
Leave the outer third of the tip unattached.
Add one hidden stitch at the lower outer edge if the leaf rotates.
Do not stitch completely around the perimeter. The free edges create the dimensional botanical surface visible in the photograph.
Making Ivory Berry Clusters
Group berries in clusters of three, four or five.
Thread the sewing tails through a common point.
Secure the berry bases together without pulling them into one tight ball.
Some berries should sit slightly higher than neighboring berries.
Prepare approximately 4–6 clusters per botanical branch.
Attaching Berry Clusters
Place the clusters between selected leaves rather than beside every leaf.
Position most clusters close to the central stem.
Several can extend on short side branches.
Sew through each berry base and into the cream background.
Avoid attaching only the cluster’s center. Individual berries can rotate or sag if they are not anchored separately.
Short Side Stems
For berry clusters that extend away from the central branch, embroider or surface-crochet a short sage stem first.
Begin at the main stem.
Work approximately 4–7 cm diagonally outward.
Attach the berry cluster at the end.
Add one small leaf beside the cluster where additional foliage is required.
Repeating the Botanical Panels
The five branches should share the same overall structure without becoming exact copies.
Keep the main leaf spacing consistent.
Move individual berry clusters up or down by several centimeters on neighboring panels.
Reverse the first leaf direction on alternate panels.
This produces a coordinated repeat while avoiding five mechanically identical branches.
Lower Sage Border
Once all panels are joined, work around the complete blanket perimeter.
Yarn: sage green.
Round 1: Join sage yarn at any corner. Ch 1 and sc evenly around.
At each corner work 3 sc in the corner stitch.
Join with sl st.
Round 2: Ch 3, dc in every st around, working 5 dc in each corner stitch.
Join.
Round 3: Ch 1, sc around, working 3 sc in each corner.
Join.
Ivory Shell Accent Round
Switch to ivory yarn.
Round 4: Ch 1. *Skip 2 sts, 5 dc in next st, skip 2 sts, sc in next st.* Repeat around.
At the corners, adjust the skipped stitches so a shell sits directly over each corner.
Join with sl st.
The ivory shells create the light repeating marks visible inside the darker outer border.
Final Sage Scalloped Border
Switch back to sage green.
Round 5: Sl st to the center dc of the first ivory shell. *7 dc in next sc, sl st in center dc of next shell.* Repeat around.
Adjust the final repeat as necessary at each corner.
Round 6: Ch 1. Work sc around each scallop. At the center of every 7-dc scallop work ch 2, sl st in second ch from hook to create a small point.
Fasten off and weave in the tail.
Assembly
- Crochet five matching ivory background panels and add the narrow raised strips along their long edges.
- Block every panel to the same length and width, then join the five sections with flexible ivory slip-stitch seams.
- Make five long sage stem cords and pin one down the vertical center of each botanical panel before sewing.
- Crochet all large and small sage leaves, add their center veins and arrange them alternately along the five stems.
- Sew each leaf through its center line while leaving the outer tip and most perimeter stitches free.
- Make the ivory berries, assemble them into irregular clusters and position the clusters between selected leaf groups.
- Add short sage side stems where berry clusters extend away from the main vertical branches.
- Work the sage foundation rounds around the complete blanket perimeter after all five botanical panels are finished.
- Add the ivory shell round followed by the final sage scalloped border, checking all four corners for equal fullness.
- Weave in remaining tails, reshape the dimensional leaves and berries, then give the completed blanket a final light blocking without flattening the appliqués.
The completed throw should remain flat through the cream background while its sage leaves and ivory berries project slightly above the surface.
How to Keep the Vertical Branches Straight
Do not judge stem alignment while the blanket is draped over furniture.
Lay the blanket completely flat and measure each panel.
Mark the center at the bottom, middle and top.
Run the stem through all three reference points.
Pin it before sewing.
After attaching approximately one-third of the stem, stop and measure again. Long crochet cords can shift sideways during sewing even when their starting position is correct.
How to Keep the Leaves Dimensional
The leaves need enough attachment to survive normal handling without becoming flat appliqués.
Sew along the central vein rather than around the perimeter.
Secure the base firmly.
Continue the seam through approximately 60–70 percent of the leaf length.
Leave the pointed end free.
If a leaf curls too far away from the blanket, add one small hidden stitch approximately 1 cm inside an outer edge.
This limits movement while preserving the raised outline.
Controlling Berry Bulk
Stuffed berries add substantial texture. They also increase the thickness of a blanket when it is folded.
Use only a small amount of filling in each berry.
The finished shape should remain compressible between two fingers.
For a blanket intended for daily use, replace some stuffed berries with flat bobbles.
A practical combination is one or two stuffed berries surrounded by two or three bobbles in each cluster.
Making a Smaller Botanical Throw
Use three botanical panels instead of five.
Keep the panel length unchanged for a narrow sofa throw, or remove complete four-row pattern repeats for a shorter lap blanket.
Do not reduce leaf size unless the panel width is also reduced.
The foliage needs enough open cream background around it for each branch to remain readable.
Making a Larger Blanket
Add two additional botanical panels for a seven-panel version.
Because the design is modular, increasing width does not require recalculating the individual leaf patterns.
Make all seven background panels before starting the appliqués.
Measure them after blocking and reject or rework any panel that differs substantially in width.
Small width differences accumulate across multiple joins and can make a large blanket skew sideways.
Alternative Botanical Color Palettes
The ivory and muted sage combination produces the low-contrast botanical appearance shown in the photograph.
For stronger definition, use warm cream with forest green foliage.
A softer version can combine oatmeal with dusty eucalyptus green.
For an autumn adaptation, replace sage with olive and add a small number of rust-colored berries.
A winter version can retain the cream background while using deep evergreen stems and white berries.
Keep the stems and leaves in closely related colors if the goal is to preserve the continuous branch effect.
7 Technical Tips for a Botanical Crochet Blanket
- Block every background panel to the same width before joining. A difference of more than approximately 1 cm per panel can produce a visibly uneven blanket after five sections are assembled.
- Mark three center points for every long stem. Using only the top and bottom positions can allow the cord to bow several centimeters sideways through the middle.
- Leave the final 30–40 percent of each leaf unattached. Sewing the complete perimeter removes the raised botanical effect and makes the appliqué look flat.
- Use only a small pinch of filling per berry. Firmly packed berries create hard lumps when the blanket is folded or placed behind the user’s back.
- Space major leaves approximately 8–11 cm apart. Crowding the foliage hides the openwork cream background and makes the branch difficult to distinguish.
- Check the border after every complete round. A wavy edge indicates excess stitches, while corners that pull upward indicate insufficient corner increases.
- Weave appliqué tails through at least 4–5 cm of dense crochet. Short tails can loosen after repeated folding because dimensional leaves receive more movement than flat background stitches.
Blocking the Finished Blanket
The final blocking stage should correct the background and border without flattening the dimensional work.
Spread the blanket on a large clean surface.
Measure the width at the top, middle and bottom.
Pin the four corners first.
Shape the side borders into straight lines.
Arrange the scallops individually.
Do not pin through the centers of stuffed berries.
Reshape the leaf tips by hand and allow them to remain slightly raised.
Let the blanket dry completely before moving it.
Care and Storage
Follow the washing instructions for the selected yarn. Because the blanket contains dimensional appliqués, a mesh laundry bag or gentle hand washing is preferable when the yarn permits it.
Support the full weight of the wet blanket rather than lifting it by one panel.
Dry flat and reshape the botanical branches while damp.
For storage, fold along the cream spaces between major leaf groups where possible. Avoid compressing the same berry clusters under heavy objects for long periods.
Conclusion
Build the cream background first and treat matching panel dimensions as the controlling measurement for this project. Once the five sections are blocked and joined, mark each vertical centerline before attaching the sage stems. Alternate the raised leaves, distribute ivory berry clusters between selected leaf groups and keep the appliqué tips partly free so the botanical relief remains visible. Finish with the sage foundation border, ivory shells and final scallops. Save this botanical crochet blanket pattern to Pinterest and share the completed throw on Instagram with #BotanicalCrochetBlanket. Would you keep the berries ivory or change them to muted burgundy for an autumn version?