Introduction
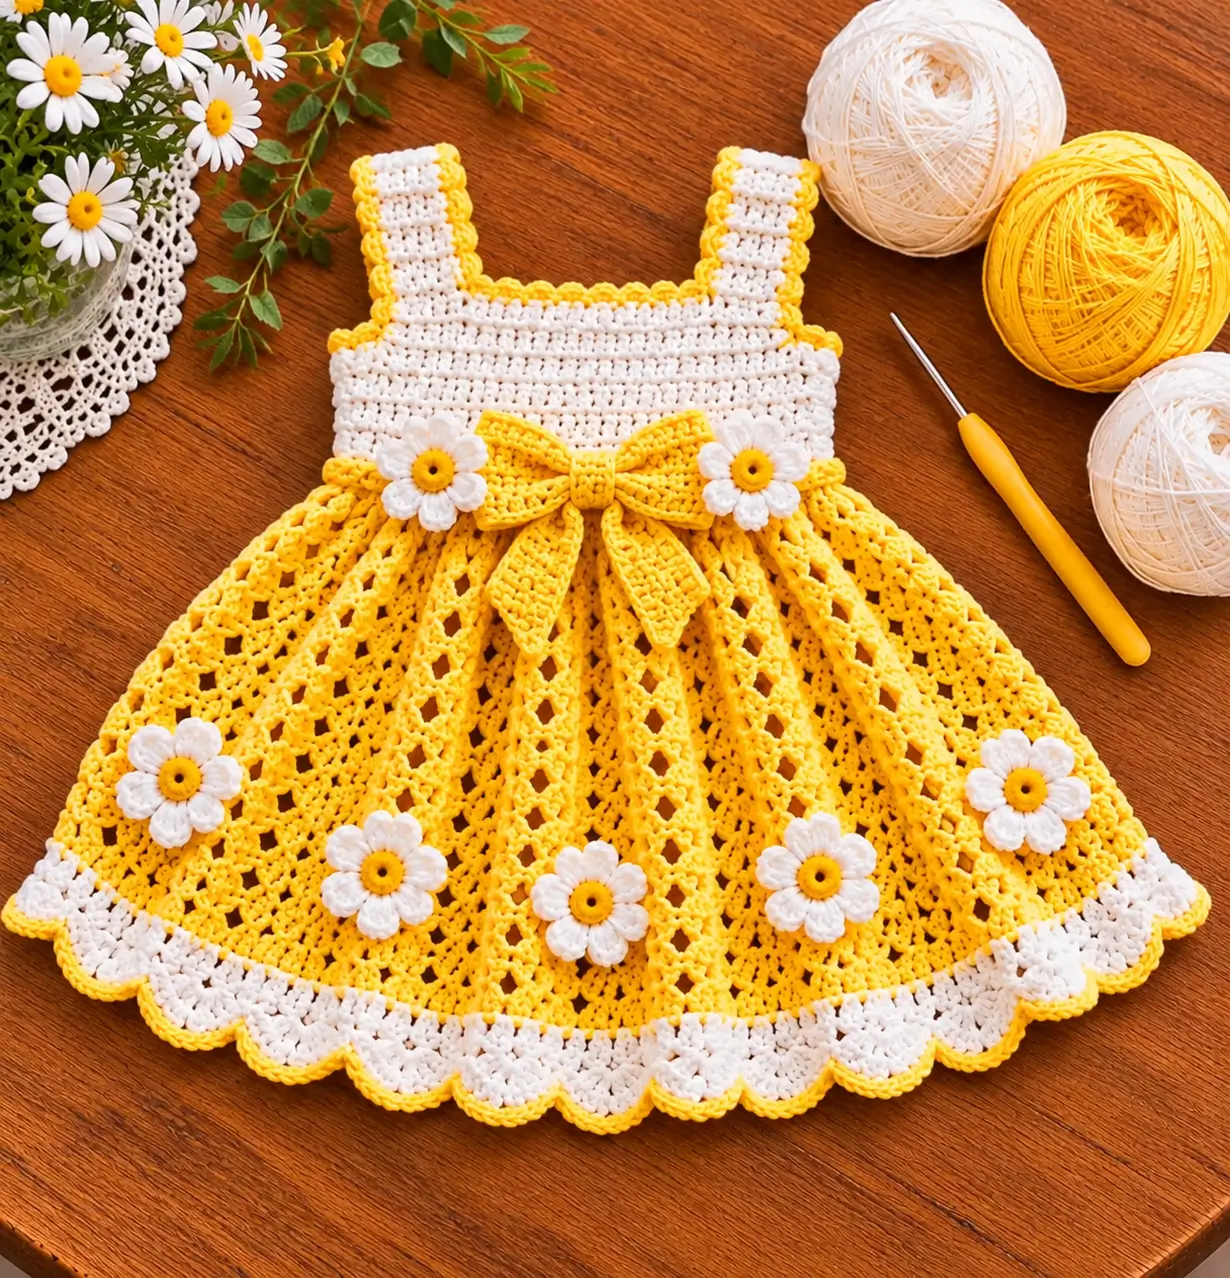
The center bow changes the waist construction: the skirt needs enough flare for its open lace panels while the bow remains flat against the fitted bodice. This yellow daisy crochet baby dress pattern combines a white sleeveless top, sunny-yellow lace skirt, dimensional daisies, decorative bow, and white scalloped hem. Use DK cotton or a soft cotton blend with a 3.0–3.5 mm hook for this intermediate photo-inspired project.
The Design: What Makes This Dress Different
The dress is divided into two contrasting structures. A dense white bodice provides stability around the chest, neckline, and shoulder straps. Below it, the yellow skirt expands into an open lace fabric with vertical eyelet sections that emphasize the flare.
A large yellow bow marks the center front waist. Two white daisies sit beside the bow, while additional flowers are distributed across the lower skirt. The hem changes back to white and finishes with large rounded scallops edged in yellow.
The critical construction point is the waist. The bodice should remain flat while the first skirt rounds add controlled fullness. Too many increases create bunching directly beneath the bow; too few produce a narrow skirt with insufficient drape. Crochet and block a gauge swatch before calculating the bodice.
Project Info at a Glance
| Skill Level | Construction | Hook | Yarn | Best For |
|---|---|---|---|---|
| Intermediate | Fitted bodice with flared lace skirt | 3.0–3.5 mm | DK #3 cotton or cotton blend | Baby and toddler dress |
Materials and Tools
Yarn
- White — DK #3 cotton or cotton blend — bodice, straps, daisies and hem
- Sunny yellow — DK #3 — skirt, bow, edging and daisy centers
Use yarns with matching fiber content and thickness. The yellow and white sections should produce the same gauge so the color changes do not alter the garment dimensions.
Tools
- 3.0–3.5 mm crochet hook
- Yarn needle
- Scissors
- Locking stitch markers
- Tape measure
- Blocking mats and pins
- Small buttons for an optional back opening
Abbreviations
- MR — magic ring
- ch — chain
- sl st — slip stitch
- sc — single crochet
- hdc — half double crochet
- dc — double crochet
- tr — treble crochet
- sp — space
- st/sts — stitch/stitches
- RS — right side
- WS — wrong side
- FO — fasten off
Sizing the Dress
Use the child’s actual chest circumference rather than selecting the foundation chain from age alone. Add approximately 4–6 cm of positive ease to the chest measurement.
For example, a 50 cm chest plus 5 cm of ease gives:
50 + 5 = 55 cm finished chest circumference.
Measure the desired length from the top of the shoulder to the hem. Record the shoulder-to-waist measurement separately because it controls the bodice depth.
Gauge Swatch
With white yarn, make a swatch at least 12 × 12 cm using hdc.
Wash and dry the swatch according to the yarn label.
Measure the central 10 cm and record the number of stitches and rows.
For the skirt, make a second small swatch using the lace repeat. This identifies how much the open fabric grows after washing.
Calculating the Bodice Foundation
Divide the stitch gauge by 10 to determine stitches per centimeter.
If the gauge is 18 stitches per 10 cm:
18 ÷ 10 = 1.8 stitches per cm.
For a 55 cm finished chest:
55 × 1.8 = 99 stitches.
Adjust the result to suit the chosen back opening and stitch repeat.
White Bodice
Work the bodice in white. A small center-back opening makes the dress easier to put on.
Foundation Row
Chain the calculated number of stitches plus turning chains.
Beginning in the appropriate chain, hdc across.
Turn.
Row 2
Ch 2.
Hdc in every stitch across.
Turn.
Following Rows
Repeat Row 2 until the lower bodice reaches the required underarm depth.
Count the stitches regularly. The two edges should remain straight.
Dividing the Upper Bodice
Use stitch markers to identify the right back, first armhole, front, second armhole, and left back.
The front section should be centered accurately.
Place the armhole markers at equal distances from the center front.
Front Section
Work hdc across the marked front stitches.
Continue in rows until the front reaches the required height.
The photo-inspired dress uses a relatively square neckline, so keep the upper front edge horizontal.
First Shoulder Strap
Join white yarn at one upper corner of the front.
Work enough hdc stitches to create a strap approximately 3–4 cm wide.
Turn and continue in hdc until the strap reaches the back section without stretching.
FO with a sewing tail.
Second Shoulder Strap
Repeat on the opposite side.
Use exactly the same stitch and row counts as the first strap.
Before sewing, place both straps flat and compare their finished lengths.
Back Opening
Work the two back sections separately.
Leave a center opening approximately 6–10 cm long, depending on the garment size.
Add a narrow sc band to each opening edge.
Small chain loops can be added to one side for buttons.
Yellow Bodice Edging
Join yellow yarn at the neckline.
Work sc evenly around the neckline and along the top edges of both straps.
For the small rounded effect visible in the design, use:
sc in next 2 sts, ch 2, sl st in first ch.
Repeat at regular intervals.
Keep the edging compact so it does not stretch the neckline.
Armhole Edging
Join yellow at the underarm.
Sc evenly around the armhole.
Repeat the same small decorative points used around the neckline if desired.
Work the second armhole identically.
Preparing the Waist
Join yellow yarn around the lower edge of the white bodice.
Work one complete round of sc.
Count the stitches and place markers at both side seams, center front, and center back.
Skirt Increase Round
A starting increase ratio of approximately 50% creates useful fullness for this style.
Repeat:
hdc in next st, 2 hdc in next st.
Continue around.
Join.
Place the dress flat immediately after this round. The lower edge should spread gently without forming tight ruffles.
Skirt Foundation Round
Ch 3.
Dc in each stitch around.
Join.
This solid round stabilizes the waist before the open lace begins.
Lace Skirt — Round 1
Ch 3.
Repeat around:
3 dc, ch 2, skip 2 sts.
Adjust the final section slightly if required to complete the round evenly.
Lace Skirt — Round 2
Work dc into the existing dc stitches.
Ch 2 over each ch-2 opening.
Keep the open spaces vertically aligned.
Lace Skirt — Round 3
Continue the established lace pattern.
Add evenly distributed increases within selected solid sections.
Do not increase inside every section on the same round.
Vertical Lace Panels
For the pronounced open columns visible in the skirt, select evenly spaced sections around the circumference.
Work:
dc, ch 2, skip 2 sts, dc.
On subsequent rounds, keep the ch-2 opening directly above the previous opening.
This creates a vertical ladder effect from waist toward hem.
Textured Panel Option
Work a front-post dc along each side of selected open columns.
Repeat those post stitches in the same positions on subsequent rounds.
The raised lines give the skirt stronger vertical definition.
Increasing the Skirt Gradually
Check the circumference every 4–5 rounds.
When additional flare is required, add one dc to selected solid sections.
Distribute the increases evenly around the entire skirt.
Avoid increasing at exactly the same locations on every increase round.
Skirt Length
Continue until the yellow skirt is approximately 4–6 cm shorter than the desired finished length.
The remaining length will be added by the white scalloped border.
Measure from the waist without stretching the openwork.
Preparing for the White Hem
Work one complete yellow round of sc.
This creates a stable transition between the lace and the heavier white scallops.
FO yellow.
White Hem — Round 1
Join white yarn.
Ch 1.
Sc evenly around.
Join.
White Hem — Round 2
Repeat around:
sc, ch 3, skip 2 sts.
Join.
The number of arches determines the number of scallops.
Large White Scallops
Sl st into the first ch-3 space.
Into each arch work:
sc, hdc, 4 dc, hdc, sc.
Repeat around.
Join.
Yellow Scallop Outline
Join yellow yarn at the beginning of the white border.
Work one relaxed sl st into each stitch around the scallops.
Alternatively, use sc if a more visible yellow outline is wanted.
Do not tighten this final round or the scallops will curl inward.
Daisy Appliqué — Make 7 or Desired Quantity
Make the daisies separately and attach them after blocking the dress.
Yellow Center — Round 1
With yellow yarn, make a MR.
Work 8 sc into the ring.
Join. (8)
Center — Round 2
Work 2 sc in each stitch around.
Join. (16)
FO yellow.
White Petal Foundation
Join white.
Repeat:
sc in next st, ch 5, skip 1 st.
Continue around to create eight loops.
Daisy Petals
Into each ch-5 loop work:
sc, hdc, 2 dc, tr, 2 dc, hdc, sc.
Repeat for all eight petals.
Join and FO, leaving approximately 15–20 cm for sewing.
Target Flower Size
A flower diameter of approximately 5–7 cm works well for many baby and toddler sizes.
Make one master daisy first.
Keep the remaining flowers within approximately 5 mm of its finished diameter.
Flower Placement
Place one daisy on each side of the center-front bow.
Arrange the remaining flowers across the lower skirt.
Stagger their heights rather than placing every flower on the same horizontal line.
Pin all flowers before sewing any of them permanently.
Attaching the Daisies
Sew securely around the yellow center.
Add one small stitch through the inner portion of each white petal.
Keep the outer half of the petal unattached.
This preserves the raised appearance while reducing snagging.
Large Yellow Waist Bow
The bow is constructed separately from three components: two loops, two tails, and a center band.
First Bow Loop
With yellow yarn, ch enough stitches to create a strip approximately 5–7 cm wide after working several rows.
Hdc across.
Turn.
Continue until the strip measures approximately 12–16 cm long, depending on dress size.
FO.
Second Bow Loop
Make a second identical strip.
Match both stitch count and row count.
Shaping the Bow
Fold each strip so the short ends meet behind the center.
Sew the ends together.
Flatten the two loops and position them side by side.
Pinch the inner edges together.
First Bow Tail
Ch enough stitches for a strip approximately 4–5 cm wide.
Work hdc rows until the tail measures approximately 12–18 cm.
Decrease slightly across the final rows if a tapered end is preferred.
FO.
Second Bow Tail
Repeat the first tail.
Both pieces should have identical measurements.
Angle the tails downward when assembling the bow.
Bow Center Band
Ch enough stitches to create a band approximately 2–3 cm wide.
Work several hdc rows until the strip wraps around the center of the bow.
Wrap it around the two loops and tail bases.
Sew securely at the back.
Attaching the Bow
Position the bow at the center front waist.
Sew the center band firmly to the dress.
Add several hidden stitches beneath each loop close to the center.
Attach the upper 2–3 cm of each tail while leaving the lower sections free.
Bow Proportion
The complete bow should not extend across the entire front bodice.
A useful target is approximately 35–45% of the finished front width.
Reduce the loop and tail measurements for smaller sizes.
Optional Smaller Bow
For a lighter version, make one rectangular strip approximately 6 × 18 cm.
Join the short ends to form a ring.
Flatten the ring, pinch the center, and wrap it with a narrow yellow band.
Add two separate tapered tails.
Checking the Finished Waist
Lay the dress flat after attaching the bow.
The bow should not pull the waist inward.
If the fabric gathers beneath the center band, remove the bow and reattach it with looser stitches.
Optional White Bodice Texture
For subtle texture, alternate hdc rows with BLO hdc rows.
Do not use heavily raised stitches directly beneath the bow or daisies because they make the appliqués harder to attach evenly.
Making the Dress Longer
Add complete lace rounds before beginning the white border.
Continue the established increase schedule only if more circumference is also required.
Length and width should be adjusted independently.
Making the Dress Shorter
Remove complete lace repeats.
Stop approximately 4–6 cm before the required finished length and begin the white border.
Color Variations
| Bodice | Skirt/Bow | Flower |
|---|---|---|
| White | Sage | White + Yellow |
| Cream | Dusty Pink | White + Mustard |
| Ivory | Lavender | Ivory + Yellow |
| White | Sky Blue | White + Golden Yellow |
| Cream | Peach | White + Mustard |
Estimating Yarn
Make and wash a measured swatch before purchasing the complete yarn quantity.
Weigh the swatch after it is fully dry. Use its area and weight to estimate the amount required for the selected garment dimensions.
Add approximately 10–15% to the calculated main-color quantity for swatching, finishing, and gauge variation.
The white bodice and border require a significant portion of the total yarn, while each daisy uses only a small amount.
Assembly
- Measure the child’s chest and shoulder-to-hem length, then make and wash a gauge swatch before calculating the bodice foundation.
- Crochet the white bodice, divide the upper section accurately, and make both shoulder straps to identical measured lengths.
- Complete the back opening, neckline, armholes, and yellow decorative edging before beginning the skirt.
- Work the waist foundation and distribute the skirt increases evenly so the fabric begins to flare without forming dense ruffles.
- Crochet the yellow lace skirt to the required length, checking its circumference and vertical lace alignment every 4–5 rounds.
- Add the white hem and yellow outline, then place the garment flat to confirm that every scallop spreads without overlapping.
- Make the yellow bow, check that its total width is proportional to the front bodice, and attach it securely at the center waist.
- Crochet all white daisies with matching yellow centers and keep their diameters within approximately 5 mm of the master flower.
- Pin every daisy to the blocked dress before sewing, then secure the centers and inner petal sections with matching yarn.
- Weave all remaining tails through dense stitches, wash according to the yarn label, reshape the lace and flowers, and dry the garment flat.
The completed dress should have a stable white bodice, balanced shoulder straps, an evenly expanding yellow lace skirt, a centered dimensional bow, secure daisy appliqués, and a flat white scalloped hem outlined in yellow.
7 Technical Tips
- Base the bodice on the actual chest measurement plus approximately 4–6 cm of ease. Age labels alone do not account for differences in child measurements or crochet gauge.
- Keep the two straps within approximately 5 mm of the same finished length. Unequal straps tilt the neckline and change the armhole depth on one side.
- Check the skirt immediately after the first increase round. Strong ruffling at the waist indicates excessive increases before the lace section has begun.
- Inspect the vertical lace columns every 4–5 rounds. A misplaced chain space shifts the open column and becomes increasingly visible toward the hem.
- Keep all daisies within approximately 5 mm of the master flower diameter. Unequal appliqués are most visible in the group surrounding the center-front bow.
- Attach the bow through its center and inner loop sections rather than around its complete perimeter. Sewing the full outline flat removes the dimensional bow shape.
- Test 20–30 cm of the scalloped hem before completing the border. Crowded shells create waves, while excessive spacing produces gaps and an irregular lower edge.
Care and Final Blocking
Follow the washing instructions for the selected yarn. Support the garment fully while wet and avoid lifting it by the straps, bow, or flower appliqués.
Lay the dress flat. Measure the bodice first, then arrange the skirt into an even semicircle without stretching the lace. Shape the white scallops and check that the yellow outline remains relaxed.
Arrange the bow loops and tails last. Lift each daisy petal gently after the garment is dry so the dimensional flowers retain their shape.
Conclusion
The contrast between the white fitted top and expanding yellow lace is the defining structure of this yellow daisy crochet baby dress pattern. Start from an accurate chest measurement, establish the bodice gauge, and add the skirt increases gradually so the waist stays flat beneath the decorative bow. Crochet the flowers and bow separately; attaching them after the garment is blocked gives much better control over placement and symmetry. The next step is to make a washed gauge swatch and record stitches and rows per 10 cm before calculating the foundation. Share the finished version on Pinterest or Instagram with #YellowDaisyBowDress. Would you keep the yellow bow or make it white with a small yellow center?









