Introduction
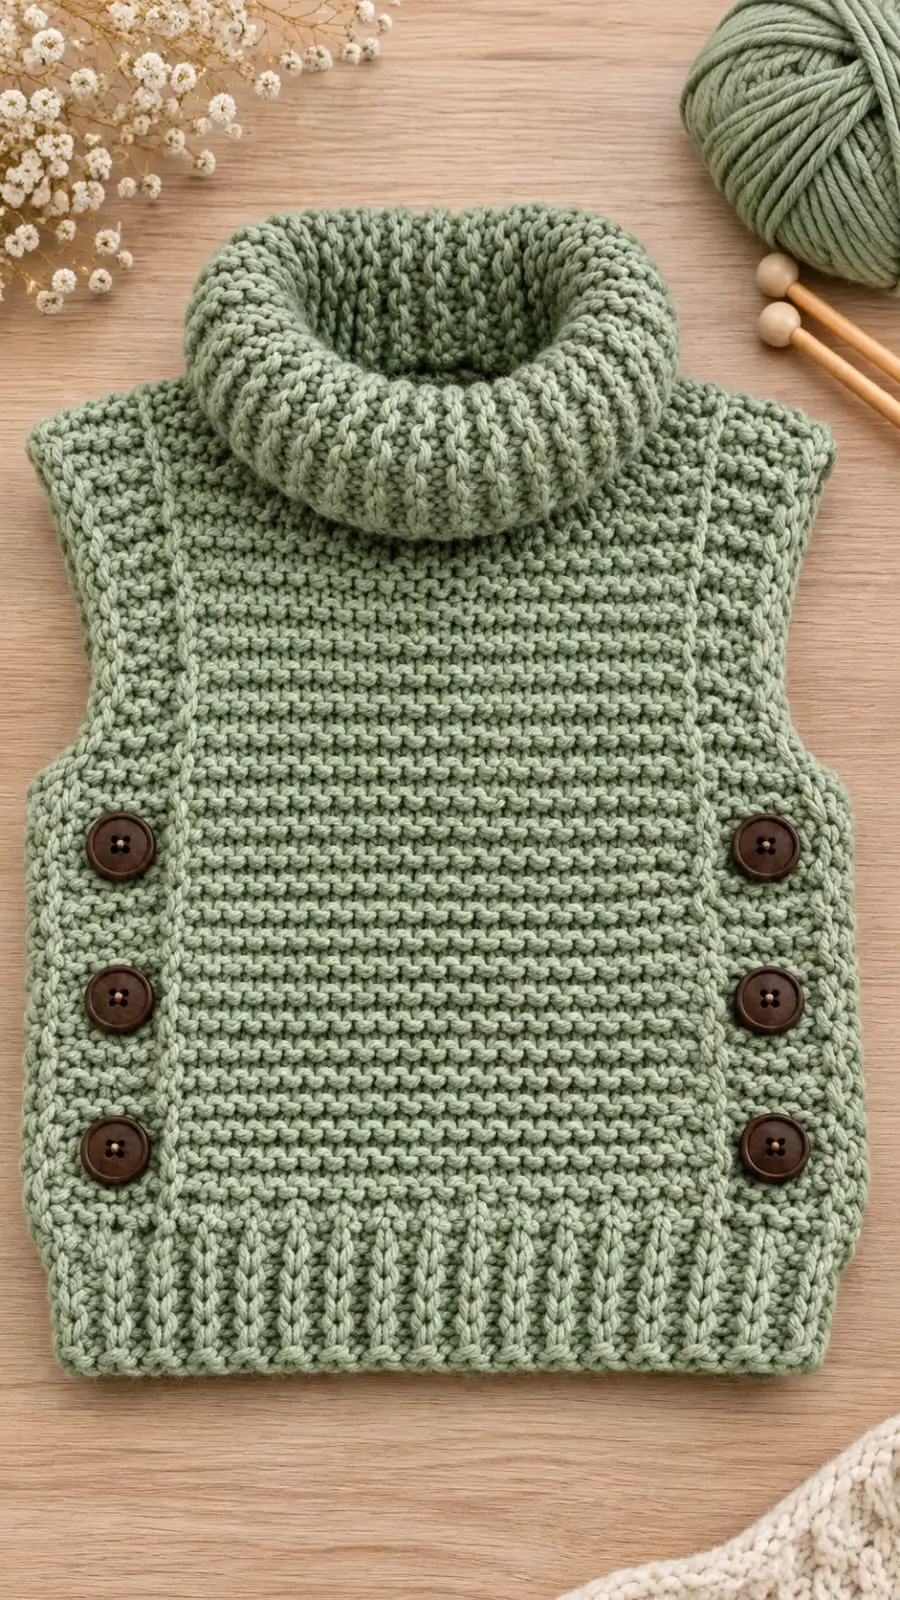
Three dark-brown buttons on each side punctuate the sage-green garter ridges of this vest. This side button cowl neck vest knitting pattern uses aran yarn, 4.5 mm needles, and a separate ribbed collar to produce a child-sized tabard measuring approximately 64 cm around the chest. An advanced beginner can make the flat panels before practicing neckline pickup. The detachable side closures accommodate layered clothing and make fitting checks easier.
The Design: What Makes This Sage Button Tabard Different
The central fabric uses garter stitch rather than stockinette, creating horizontal ridges that visually match the photograph and limit edge curling. Two rectangular panels retain the same stitch count from hem to shoulder, while the front neck begins twelve rows earlier than the back. This changes the neckline depth without altering the shoulder width. A folded, one-by-one rib collar adds height without a rigid seam around the head.
The most noticeable details are the paired side plackets. Their three evenly spaced buttonholes sit above separate front-panel buttons, creating a six-button closure without full-length sewn side seams. Makers frequently place these bands too high, reducing the armhole opening. The instructions below preserve approximately 15 cm of unfastened space above the bands. Narrow applied cords reproduce the raised vertical edge lines visible on the front.
Project Info at a Glance
| Detail | Specification |
|---|---|
| Skill Level | Advanced beginner |
| Estimated Time | 8–12 hours |
| Finished Chest | Approximately 64 cm |
| Body Length | Approximately 37 cm |
| Approximate Age | 4–5 years, depending on measurements |
| Main Needles | 4.5 mm |
| Ribbing Needles | 4 mm |
| Yarn Weight | Aran / Worsted |
| Construction | Flat panels with a circular-knit collar |
| Best For | Layering over long sleeves |
Important: The measurements are calculated targets for this original, photo-inspired knitting pattern. They are not measurements taken from the photograph. Actual size depends on the washed gauge, blocking and yarn selection.
Materials and Tools
Yarn
- Sage green aran/worsted yarn — approximately 300–350 g: Choose a smooth, softly twisted yarn that produces defined garter ridges. DROPS Nepal is one possible yarn to swatch.
- Accent yarn — 0 g: The reference vest uses one yarn color, with brown buttons providing contrast.
- Swatch allowance — approximately 20–30 g: Reserve enough yarn for gauge testing and possible adjustments.
The yarn quantity is an estimated buying allowance for this adaptation, not a verified consumption measurement. Purchase matching dye lots and retain the yarn label until the project is finished.
Tools
- 4.5 mm knitting needles for the main garter-stitch fabric.
- 4 mm circular knitting needles for the ribbed hem and collar.
- Six dark-brown four-hole buttons, approximately 20–25 mm in diameter.
- Tapestry needle for sewing and weaving in ends.
- Stitch markers for marking rows and button placement.
- Two stitch holders for the shoulder stitches.
- Scissors and measuring tape.
- Waste yarn for holding neckline stitches.
- Double-pointed needles for the optional I-cord trim.
- Blocking mat for shaping and measuring.
When making clothing for children, attach each button securely and inspect the fastenings regularly. Loose buttons can become a choking hazard.
Knitting Abbreviations
| Abbreviation | Meaning |
|---|---|
| CO | Cast on |
| BO | Bind off |
| k | Knit |
| p | Purl |
| st / sts | Stitch / Stitches |
| RS | Right side |
| WS | Wrong side |
| YO | Yarn over |
| k2tog | Knit two together |
| rnd | Round |
| rep | Repeat |
All body pieces are knitted flat in rows. Only the collar is worked in the round. Garter stitch means knitting every row, including wrong-side rows. On a buttonhole row, the yarn over and decrease balance each other, leaving the stitch count unchanged.
Gauge and Sizing: Check Before Casting On
Before beginning the garment, knit a gauge swatch measuring at least 15 × 15 cm. Wash and dry it according to the yarn’s care instructions.
Target gauge: 18 stitches and 34 rows = 10 × 10 cm in garter stitch.
Use 4.5 mm needles or adjust the needle size to achieve the stated gauge.
Each panel contains 58 stitches. At the target gauge, the approximate width is:
58 ÷ 18 × 10 = 32.2 cm
With the front and back panels aligned, the estimated chest circumference is approximately 64.4 cm, before variations from blocking and overlap.
The body includes 110 garter-stitch rows above a 16-row ribbed hem. At the target row gauge, the garter portion measures approximately 32.4 cm, while the ribbed hem contributes about 4–5 cm.
Compare these measurements with an existing garment that fits the intended wearer. Allow enough room for a long-sleeved shirt beneath the vest. Check that the finished collar stretches comfortably over the wearer’s head.
Side Button Cowl Neck Vest Knitting Pattern — Step by Step
Back Panel (Make 1)
Yarn: Sage green. Needles: 4 mm for the hem and 4.5 mm for the body.
Cast on 58 stitches.
Hem — Rows 1–16: *K1, p1* across every row (58 sts).
Change to 4.5 mm needles.
Body — Rows 1–98: Knit every stitch on every row (58 sts).
Place removable markers along both outer edges at body rows 20 and 60. These indicate the approximate button-band zone.
Row 99 (RS): Knit 13 stitches. Place the middle 32 stitches on waste yarn. Join a second strand of yarn and knit the remaining 13 stitches.
Rows 100–110: Work each 13-stitch shoulder separately in garter stitch (13 sts per shoulder).
Leave each group of 13 shoulder stitches on a stitch holder. Keep the 32 center neckline stitches on waste yarn.
Do not join the side edges. The rear neckline is approximately 12 garter rows deep.
Front Panel (Make 1)
Yarn: Sage green. The front panel uses the same width as the back panel but a deeper neckline.
Cast on 58 stitches with 4 mm needles.
Hem — Rows 1–16: *K1, p1* across every row (58 sts).
Change to 4.5 mm needles.
Body — Rows 1–86: Knit every stitch on every row (58 sts).
Row 87 (RS): Knit 13 stitches. Place the middle 32 stitches on waste yarn. Attach a second strand and knit the remaining 13 stitches.
Rows 88–110: Continue working each shoulder separately in garter stitch (13 sts per shoulder).
Leave the two groups of 13 shoulder stitches live on stitch holders.
Both panels contain 110 garter rows above the hem. The front neckline begins 12 rows earlier, producing a lower front opening.
Left Side Button Placket (Make 1)
Yarn: Sage green. Needles: 4.5 mm. Work flat in garter stitch.
Cast on 12 stitches.
Rows 1–9: Knit across (12 sts).
Row 10 — First buttonhole: K1, k2tog, YO, k9 (12 sts).
Rows 11–29: Knit across (12 sts).
Row 30 — Second buttonhole: K1, k2tog, YO, k9 (12 sts).
Rows 31–49: Knit across (12 sts).
Row 50 — Third buttonhole: K1, k2tog, YO, k9 (12 sts).
Rows 51–60: Knit across (12 sts).
Bind off loosely.
At the target garter gauge, the 60-row placket measures approximately 17.6 cm long and 6.7 cm wide.
Pin the placket along the lower side edge of the back panel, with its free edge overlapping the front panel.
Right Side Button Placket (Make 1)
Yarn: Sage green. The buttonholes are mirrored to match the opposite side.
Cast on 12 stitches.
Rows 1–9: Knit across (12 sts).
Row 10 — First buttonhole: K9, YO, k2tog, k1 (12 sts).
Rows 11–29: Knit across (12 sts).
Row 30 — Second buttonhole: K9, YO, k2tog, k1 (12 sts).
Rows 31–49: Knit across (12 sts).
Row 50 — Third buttonhole: K9, YO, k2tog, k1 (12 sts).
Rows 51–60: Knit across (12 sts).
Bind off loosely.
Compare both side plackets before attaching them. The three buttonholes on each side should align horizontally when the front and back panels are positioned together.
Keep the upper side edges open to provide enough room for the arms.
Ribbed Cowl Collar (Make 1)
Yarn: Sage green. Needles: 4 mm circular needles. Work in the round after joining the shoulders.
Join the matching front and back shoulders using a three-needle bind-off or another flat shoulder-seaming method.
With the circular needle, collect stitches around the neckline as follows:
- 32 held stitches along the front neckline.
- 12 picked-up stitches along the first front-neck side.
- 6 picked-up stitches along the first back-neck side.
- 32 held stitches along the back neckline.
- 6 picked-up stitches along the second back-neck side.
- 12 picked-up stitches along the second front-neck side.
Total: 100 stitches.
Reposition the beginning-of-round marker at one shoulder.
Round 1: *K1, p1* around (100 sts).
Rounds 2–44: Repeat *k1, p1* around (100 sts per round).
Work carefully during the first two rounds to avoid twisting the collar.
Bind off loosely in rib pattern, allowing enough stretch for the wearer’s head.
Fold the completed collar outward. The folded ribbing produces the rounded, oversized cowl visible in the reference photograph.
Raised Vertical Front Trims (Make 2)
Yarn: Sage green. Optional applied I-cord detail.
Cast on 3 stitches using a double-pointed needle.
Knit all three stitches. Without turning the work, slide the stitches to the opposite end of the needle and bring the working yarn across the back.
Knit the three stitches again.
Repeat this process until the I-cord measures approximately 25–27 cm.
Cut the yarn, leaving a sewing tail. Pull the tail through the remaining three stitches.
Make a second identical cord.
Position one cord vertically along each side of the front panel, close to the side overlap. Sew the cords in place with small, even stitches.
Keep both trims parallel and avoid sewing through the buttonholes or closing the armhole openings.
Six Decorative and Functional Buttons
Materials: Six dark-brown four-hole buttons, approximately 20–25 mm in diameter.
Place three buttons on the left side and three on the right, matching the placket buttonholes at rows 10, 30, and 50.
The hole centers are separated by 20 garter rows, approximately 5.9 cm at the target row gauge.
With the plackets pinned in position, mark each button location on the front panel.
Sew the buttons securely using matching sewing thread or suitable yarn.
If the knitted fabric is thick, form a small thread shank beneath each button to provide enough clearance for fastening.
Fasten and unfasten all six buttons before weaving in the sewing threads.
How to Assemble the Knitted Vest
- Check the gauge. Wash and measure your swatch before confirming the size of the knitted panels.
- Prepare the back panel. Keep the 32 center neckline stitches and both 13-stitch shoulders on holders.
- Prepare the front panel. Check that the neckline begins 12 rows earlier than the back neckline.
- Join the shoulders. Align the front and back shoulders and join them with a flat, secure seam.
- Complete the collar. Collect 100 stitches around the neckline, work 44 rounds of ribbing, and bind off elastically.
- Attach the side plackets. Sew one long edge of each placket to the corresponding back side edge, immediately above the ribbed hem.
- Align the panels. Position the front and back so that the plackets overlap the front without pulling the fabric sideways.
- Sew the buttons. Attach three buttons to each side of the front panel, matching every buttonhole.
- Add the vertical trims. Sew the two I-cord strips to the front panel, keeping them symmetrical.
- Finish the garment. Weave in all ends, block the vest flat, check button security, and confirm that the collar and armholes fit the intended wearer.
The completed vest has a folded cowl collar, two garter-stitch panels, two side plackets and six functional buttons.
Seven Technical Tips for a Better Knitted Vest
- Check stitch gauge before knitting. At 19 rather than 18 stitches per 10 cm, a 58-stitch panel measures approximately 30.5 cm instead of 32.2 cm, reducing the finished chest width.
- Mark the neckline division rows. Splitting the back at row 99 and the front at row 87 creates the intended difference in neckline depth; an incorrect row changes the shoulder balance.
- Avoid twisting the collar. Spread all 100 neckline stitches around the circular needle before joining the first round, because a twisted first round cannot be corrected without undoing the collar.
- Use an elastic collar bind-off. A tight edge may prevent the cowl from passing over the wearer’s head, even when the ribbing itself stretches sufficiently.
- Match the buttonhole spacing. Place the buttonholes at rows 10, 30 and 50 on both plackets to prevent the side closures from pulling unevenly.
- Maintain the placket stitch count. Every buttonhole row must contain 12 stitches after the yarn over and decrease; an extra stitch changes the band width.
- Reinforce the button attachments. Each of the six buttons should be sewn through stable knitted stitches, and loose threads must be corrected before the garment is worn by a child.
Fit Adjustments and Troubleshooting
How to Make the Vest Wider
To increase the finished chest circumference, calculate the required number of stitches using the washed gauge.
Desired panel width in centimeters × 18 ÷ 10 = approximate cast-on stitch count.
For example, a panel measuring 35 cm requires approximately 63 stitches. You can round this to 64 stitches to maintain an even stitch count for the ribbed hem.
When changing the panel width, recalculate the neckline and shoulder stitch counts rather than retaining the original 13/32/13 division.
How to Make the Vest Longer
Add the same number of garter-stitch rows to both panels before the neckline divisions.
At the target row gauge, adding 20 rows increases the panel length by approximately 5.9 cm.
Adjust the placket length if necessary, but keep enough upper side space open for comfortable arm movement.
How to Make the Collar Roomier
Increase the neckline pick-up count in balanced pairs near the neck corners while keeping an even total for the 1×1 rib.
The final opening should stretch over the intended wearer’s head without pulling excessively on the neckline or shoulders.
How to Adjust Buttonhole Size
Test a buttonhole with the actual buttons before knitting both plackets.
A single yarn-over buttonhole may be too small for thick buttons or too loose for narrow ones. If the test does not hold securely, work a suitable two-stitch buttonhole and use the same modification on both sides.
How to Prevent Uneven Garter-Stitch Edges
Keep the first and last stitches of every row at consistent tension.
A tightly pulled edge may become shorter than the center of the panel and cause the vest to distort after assembly.
Measure both panels before sewing. Their lengths should match even though the neckline shaping begins on different rows.
How to Maintain Comfortable Armholes
Keep the upper side edges unfastened above the button plackets.
The target opening is approximately 15 cm, although the final depth should be checked against the wearer’s measurements.
Test the vest over a long-sleeved shirt. If arm movement is restricted, reduce the fastened portion or reposition the upper button before finishing the seams.
Conclusion
This side button cowl neck vest knitting pattern translates the photograph’s defining construction into a repeatable child-sized project: two flat garter panels, a deep ribbed collar, mirrored side plackets, and six brown fasteners. Before making another size, record your washed gauge, the actual finished chest measurement, and any changes to button placement. Those three measurements support more reliable resizing than changing needle diameter alone. Photograph the finished vest flat and buttoned, then share the result on Pinterest or Instagram using #SageButtonTabardVest. Link back to the pattern when posting process images. Would you retain the photographed arrangement of three buttons per side, or shift the upper pair lower to create a larger armhole opening?
Pattern note: This is an original photo-inspired adaptation, not a reproduction of the original designer’s instructions. Stitch counts have been calculated but the garment has not been physically test-knitted. Swatching and fit checks are recommended before making it for a child.









