Introduction
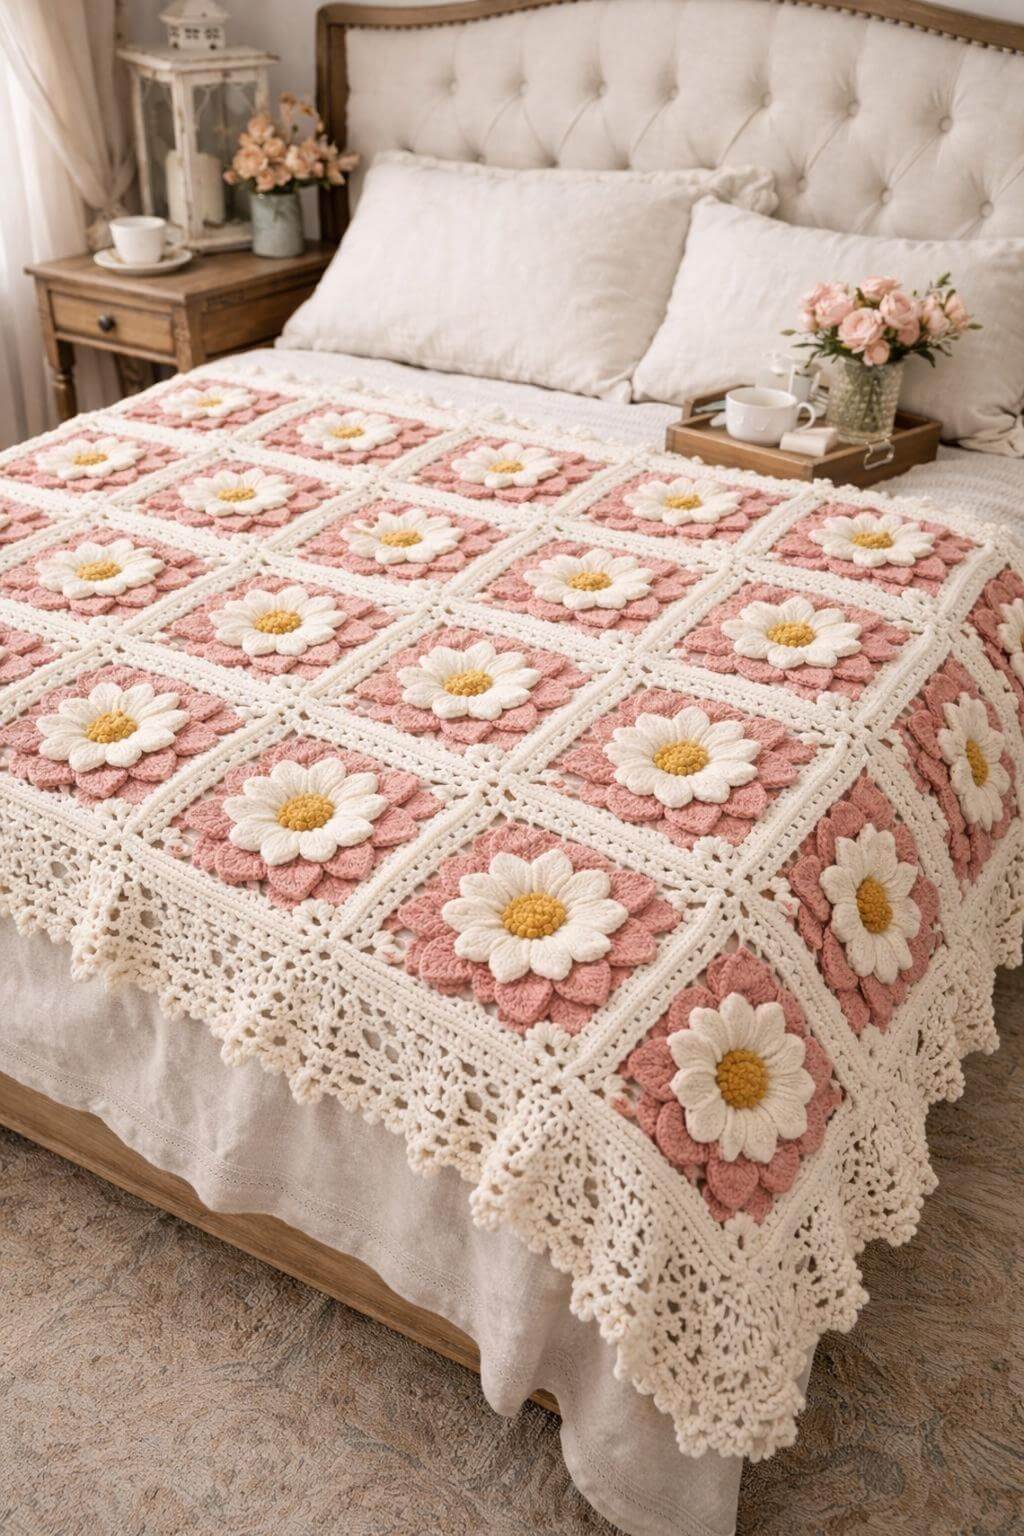
A white daisy loses its definition quickly when the petals sit directly against a cream crochet background. This pink daisy granny square crochet bedspread solves that problem with a dusty-pink petal layer behind each white flower, a golden raised center, and a structured ivory lace frame. The modular construction can be adjusted for different bed sizes while keeping every flower the same proportions.
The Design: What Makes This Bedspread Different
The bedspread is constructed from individual floral squares rather than one continuous panel. Each square combines three visual levels: a raised white daisy, a dusty-pink floral foundation, and an ivory structural frame. Separating those layers prevents the dimensional petals from becoming part of the joining seam.
The golden center is compact and slightly raised. White petals form the dominant daisy, while the larger pink petals underneath create contrast against the ivory lace. Open spaces near the corners reduce the weight of the finished bedspread and provide flexible joining points. A deep cream lace border finishes the lower edge.
The main technical risk is distortion. If the flower center or pink petal foundation is worked too tightly, the surrounding square will cup instead of lying flat.
Project Info at a Glance
| Skill Level | Construction | Target Motif Size | Hook | Best For |
|---|---|---|---|---|
| Intermediate | Joined dimensional floral squares | Approximately 20–22 cm | 4.0–4.5 mm | Bedspread, throw, pillow cover |
The measurements below are project targets based on the photographed style. Make and block one complete sample before calculating the number of motifs required for your bed.
Materials and Tools
Yarn
- Warm ivory or cream — DK or light worsted cotton/cotton blend — square frames, joins and border
- Dusty pink — DK or light worsted — lower flower petals
- White — DK or light worsted — daisy petals
- Golden yellow — small quantity — flower centers
Tools
- 4.0–4.5 mm crochet hook
- Yarn needle
- Scissors
- Stitch markers
- Blocking mats
- Rust-resistant pins
- Tape measure
Abbreviations
- MR — magic ring
- ch — chain
- sc — single crochet
- hdc — half double crochet
- dc — double crochet
- tr — treble crochet
- sl st — slip stitch
- st/sts — stitch/stitches
- sp — space
- BLO — back loop only
- RS — right side
Pattern Construction
Each bedspread unit is made separately and blocked before joining. The flower is worked first, followed by the cream structural rounds that convert the circular floral motif into a square.
Complete one master square before making the full quantity. Record its blocked width, yarn weight, and flower diameter. Those three measurements are more useful than relying on a fixed yarn quantity.
Golden Daisy Center
With golden yellow yarn, make an MR.
Round 1: Work 8 sc into MR. Join with sl st. (8 sts)
Round 2: Ch 1, work 2 sc in each stitch around. Join. (16 sts)
Round 3: Ch 1, work 1 sc in each stitch around. Join. (16 sts)
For a more raised center, work Round 3 through the back loops only. This creates a small ridge around the face of the flower.
Fasten off.
White Daisy Petals
Join white yarn behind the golden center.
Petal Foundation
Round 1: *Sc in next 2 sts, ch 6.* Repeat 8 times. Join with sl st. (8 petal loops)
Petal Round
Into each ch-6 loop work:
sc, hdc, 2 dc, 2 tr, 2 dc, hdc, sc.
Repeat in all eight loops.
The result is an eight-petal white daisy. If your yarn produces narrow petals, add one extra dc before and after the treble stitches. Use the same modification on every flower.
White Petal Definition
To produce the rounded, slightly raised petal edges visible in the reference style, work one loose surface round.
Join white yarn at the base of a petal.
Work sc evenly along the first side.
At the tip work:
(sc, ch 2, sc).
Continue down the opposite side and move directly to the next petal.
Repeat around all eight petals.
Fasten off.
Dusty-Pink Lower Petal Layer
The pink layer needs to extend beyond the white daisy without hiding the open lace framework.
Turn the flower over and identify eight evenly spaced attachment positions behind the white petals.
Join dusty-pink yarn.
Foundation: *Sc into the next attachment position, ch 8.* Repeat 8 times. Join.
Into each ch-8 loop work:
sc, hdc, 2 dc, 3 tr, 2 dc, hdc, sc.
Repeat around.
Arrange each pink petal between two white petals. This offset placement makes both layers visible from the front.
Optional Second Pink Layer
For a fuller flower, add another dusty-pink layer behind the first.
Create eight ch-9 loops positioned between the previous pink petals.
Into each loop work:
sc, hdc, 2 dc, 4 tr, 2 dc, hdc, sc.
Keep this layer relatively flat. Excessive height will make the finished bedspread heavy and can prevent the square from folding naturally over the mattress edge.
Cream Foundation Behind the Flower
Turn the motif to the wrong side.
Identify eight evenly distributed attachment positions behind the final pink layer.
Join cream yarn.
Foundation Round: *Sc into attachment point, ch 6.* Repeat 8 times. Join.
Mark every second chain space. The four marked spaces will become the corners of the square.
Turning the Flower into a Granny Square
Square Round 1
In each marked corner space work:
2 hdc, 2 dc, 2 tr, ch 3, 2 tr, 2 dc, 2 hdc.
In each unmarked side space work:
2 hdc, 4 dc, 2 hdc.
Join with sl st.
At this stage, the motif should show four clear corners. Place it on a flat surface before continuing.
Square Round 2
Ch 3.
Work dc evenly across each side.
In every corner ch-3 space work:
2 dc, ch 3, 2 dc.
Repeat around and join.
Open Lace Round
Ch 1.
Across each side work:
*sc in next stitch, ch 3, skip 2 stitches.*
Repeat toward the corner.
In every corner space work:
sc, ch 5, sc.
Adjust the final repeat near each corner if required so all four sides remain symmetrical.
Lace Expansion Round
Work into each regular ch-3 space:
sc, ch 3, sc.
Into each corner ch-5 space work:
sc, ch 3, 2 dc, ch 3, 2 dc, ch 3, sc.
Repeat around.
Structural Ivory Frame
The last rounds should create a firm, repeatable edge for joining.
Frame Round 1
Work hdc evenly around the square.
At each corner work:
2 hdc, ch 2, 2 hdc.
Frame Round 2
Work sc in each stitch.
At each corner:
sc, ch 2, sc.
Frame Round 3
Work hdc around.
At each corner:
2 hdc, ch 2, 2 hdc.
Fasten off and weave the tail into the dense cream stitches.
Blocking the Master Square
Block the first motif before starting a large batch.
Pin all four corners first. Next pin the midpoint of each side.
Shape the motif to approximately 20–22 cm square, or use the natural dimension produced by your yarn and gauge.
Measure both diagonals. A difference greater than approximately 5 mm usually indicates uneven corners or tension.
The white and pink petals should remain free from the outer 1.5–2 cm of the square. That clearance is required for clean joining.
Bedspread Size Planning
Suppose the blocked master square measures 21 cm. The approximate motif area would be:
| Layout | Approximate Size Before Border |
|---|---|
| 5 × 6 squares | 105 × 126 cm |
| 6 × 8 squares | 126 × 168 cm |
| 8 × 10 squares | 168 × 210 cm |
| 9 × 11 squares | 189 × 231 cm |
| 10 × 12 squares | 210 × 252 cm |
The lace border can add considerable width and length, so include its planned depth when calculating the final drop over the sides and foot of the bed.
Estimating Yarn
Dimensional floral motifs consume more yarn than flat granny squares. Weighing a completed master square gives a more reliable estimate.
For example, if one blocked motif weighs 65 g and you need 80 motifs:
65 g × 80 = 5,200 g.
Add the yarn required for joining and the outer border, then include an allowance for swatching and normal variation.
The example is a calculation method, not a fixed yarn requirement.
Making the Squares Efficiently
Once the master square is approved, work the motifs in stages.
Make all golden centers first. Follow with the white daisies, then complete the dusty-pink petal layers. Add the cream structural sections last.
After every five or six motifs, compare them with the blocked master square. A small tension change repeated across dozens of squares can create several centimeters of difference in the completed bedspread.
Arranging the Bedspread
Lay all blocked squares on a clean surface before joining.
Orient the daisies consistently if the petals have a noticeable directional shape.
Check the pink color distribution under natural light. Even yarn from the same color family can show visible differences between dye lots.
Place slightly larger motifs near the outside edges rather than the center if minor variations remain after blocking.
Joining the Granny Squares
Flat Slip-Stitch Method
Place two motifs with corresponding sides aligned.
Using cream yarn, work relaxed slip stitches through matching outer loops.
Do not tighten the joining stitches. A tight seam shortens the edge and causes the bedspread to form ridges.
Join individual squares into complete rows first. Connect the rows after checking their lengths.
Decorative Single Crochet Join
For a slightly raised grid, work sc through matching stitches of neighboring squares.
Keep the seam on the right side.
This method creates stronger visible lines between the pink floral blocks.
Small Flowers at the Intersections
The intersections between four squares can be decorated with small cream or pink flowers.
With golden yarn:
Round 1: 6 sc in MR. Join. (6 sts)
Change to pink or white.
Into each stitch work:
sl st, ch 3, 2 dc, ch 3, sl st.
Repeat six times.
Fasten off.
Sew only the center of the small flower to the intersection so the petals remain raised.
Deep Lace Border
The border is a major structural element of this bedspread. Work several foundation rounds before beginning the larger lace sections.
Border Round 1
With cream yarn, work sc evenly around the complete joined bedspread.
At each corner:
sc, ch 2, sc.
Border Round 2
Work hdc around.
At each corner:
2 hdc, ch 2, 2 hdc.
Border Round 3
Work another sc round.
This dense section supports the open lace that follows.
Open Diamond Lace
Work:
*sc, ch 5, skip 3 stitches.*
Repeat around each side.
Adjust the spacing only near corners so the arches are evenly distributed.
On the following round, work:
sc into ch-5 space, ch 5.
Repeat around.
For a deeper mesh, repeat another arch round while shifting the attachment points slightly. This produces a more open lattice instead of stacked vertical holes.
Decorative Fan Round
Into selected chain spaces work:
sc, hdc, 2 dc, 3 tr, 2 dc, hdc, sc.
Work one sc in the next space.
Repeat around.
Test three complete fans before continuing. They should hang freely without overlapping.
Final Cream Scallops
Work into each suitable border arch:
sc, hdc, 3 dc, hdc, sc.
For a deeper lower edge, use:
sc, hdc, 2 dc, 3 tr, 2 dc, hdc, sc.
Use the same shell sequence consistently along each side.
Optional Picot Finish
For additional definition at the scallop tips, work a picot at the center of each shell:
ch 3, sl st into the first chain.
Keep the picots small. Oversized points can make the lower edge look irregular after washing.
Matching Pillow Cover
The same floral square can be used for coordinating pillows.
A four-square front made from two motifs across and two motifs high creates a useful starting point for a large decorative cushion when the squares measure approximately 20–22 cm.
Join the four motifs with cream yarn.
Add one or two cream framing rounds.
For the back, crochet two overlapping cream hdc panels to create an envelope opening, or make one solid panel and add a zipper.
Finish the pillow with a reduced version of the bedspread scalloped border.
Alternative Color Combinations
- Lavender + ivory + golden yellow — replace dusty pink with lavender.
- Sage + cream + mustard — use sage for the lower petals and cream for the daisy.
- Burgundy + ivory + gold — creates stronger flower contrast.
- Powder blue + white + yellow — keeps the traditional daisy center while changing the foundation color.
- Peach + warm cream + mustard — produces a softer low-contrast version.
Assembly
- Make one complete golden, white, pink and cream floral square and block it to establish the master dimensions.
- Produce the remaining flowers, keeping all eight white petals and eight pink foundation petals consistent.
- Add the cream square framework to every flower and compare each completed motif with the master square.
- Block all motifs, checking that both diagonals differ by no more than approximately 5 mm.
- Arrange the squares in the complete bed layout and correct any visible orientation or color-balance problems before joining.
- Join motifs into horizontal or vertical rows using relaxed cream slip stitches or single crochet.
- Connect the completed rows and add optional miniature flowers at selected four-square intersections.
- Work the dense cream foundation rounds around the complete bedspread.
- Add the open lace, fan and scalloped sections while checking the border every 30–40 cm for rippling.
- Weave in the remaining tails, wash according to the yarn label, shape the border and allow the finished bedspread to dry flat.
The completed piece should have a stable square grid, raised white daisies, visible dusty-pink lower petals and a cream lace border that hangs freely from the mattress edge.
7 Technical Tips
- Leave 1.5–2 cm of clear space between the pink petals and the joining edge. Petals entering the seam become compressed and can force neighboring squares apart.
- Mark all four corners before beginning the first square round. One misplaced corner changes the geometry of every later lace round and produces a diamond-shaped motif.
- Measure both diagonals after blocking. If the difference exceeds about 5 mm, reshape the square before joining it to the bedspread.
- Check the flower diameter every five motifs. A tension change of only 5–8 mm per flower becomes obvious when several squares are placed side by side.
- Keep slip-stitch joins loose. A seam that is shorter than the blocked square edge produces a raised ridge across the finished bedspread.
- Test at least three consecutive border fans. Overlapping fans indicate too many stitches or insufficient spacing, while stretched fans indicate the opposite problem.
- Weave structural yarn tails through 4–6 cm of dense crochet. Do not finish important joining tails inside open chain arches because those areas receive more movement during washing and use.
Care and Final Blocking
Follow the washing instructions for the selected yarn.
Support the weight of the bedspread when wet. Do not lift a saturated piece by one edge because the open lace sections can stretch.
Shape the main rectangle first. Align the joining lines, then arrange the outer lace border.
Reshape each white daisy by hand while damp. Lift the white petals slightly above the dusty-pink layer rather than pressing the flower completely flat.
Allow the piece to dry fully before measuring it.
Conclusion
This pink daisy granny square crochet bedspread combines an eight-petal white daisy, golden center, dusty-pink foundation petals and an ivory lace square that carries the structural seams. Begin with one master motif, block it, and use its actual measurement to calculate the bedspread grid. The most important next step is testing the complete square and at least one section of border before purchasing yarn for the full project. Save the finished design to Pinterest and share your version on Instagram with #PinkDaisyCrochetBedspread. For your version, would you keep the dusty-pink lower petals or replace them with sage green?









