Introduction
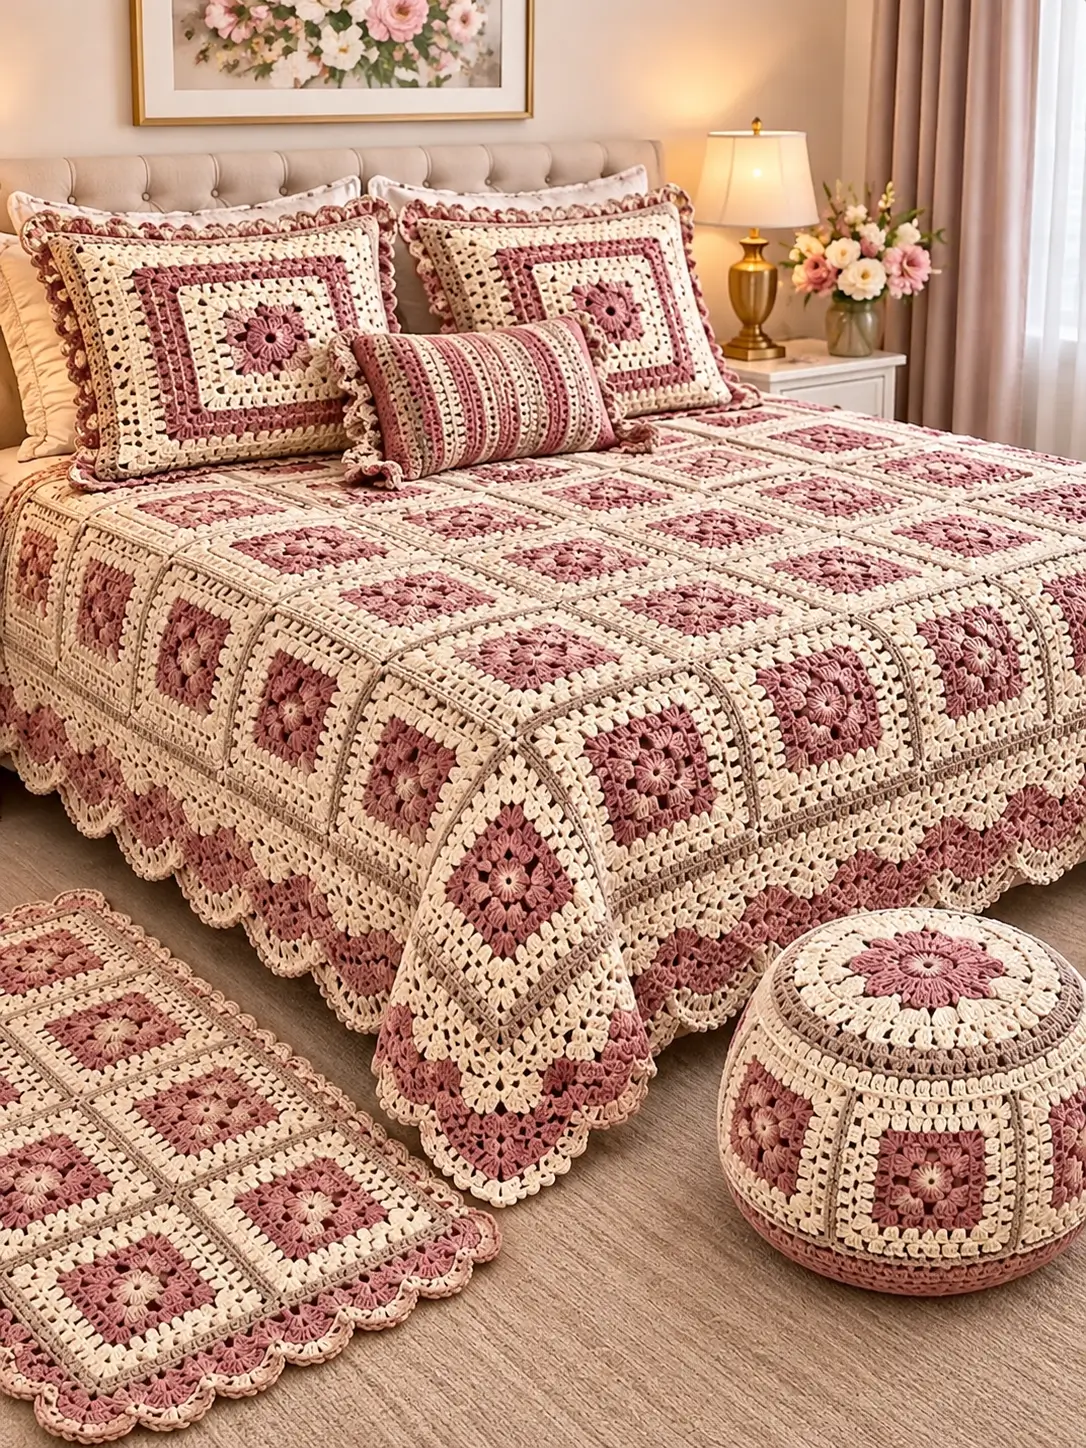
The flower center has to stay visually centered while four straight sides grow around it without turning the motif into a circle. This floral granny square crochet bedspread pattern uses dusty rose, warm cream, and taupe to build repeating flower-centered squares, a wide lace border, and coordinated pillow covers. The photo-inspired construction is designed for intermediate crocheters using DK or light worsted yarn with a 4.0–4.5 mm hook.
The Design: What Makes This Bedspread Different
Each unit begins with a compact floral center rather than a conventional three-double-crochet granny cluster. Dusty-rose petals create the focal point, cream rounds open the motif, and narrow taupe accents separate the decorative center from the structural outer frame.
The bedspread depends on repetition. Every square must finish at the same blocked measurement because even a small difference becomes visible when several motifs meet across the mattress. The outer border repeats the three-color palette with open lace bands and rounded scallops.
The matching pillow shams use enlarged versions of the same square concept. This keeps the bedspread and pillows visually connected without requiring a separate motif system.
Project Info at a Glance
| Skill Level | Construction | Target Square | Hook | Best For |
|---|---|---|---|---|
| Intermediate | Joined floral squares | 18–20 cm after blocking | 4.0–4.5 mm | Bedspread, throw, pillow shams |
Materials and Tools
Yarn
- Dusty rose — DK #3 or light worsted — flowers and border accents
- Warm cream — matching weight — square backgrounds and main border
- Soft taupe — matching weight — narrow framing rounds and joins
- Ivory — small quantity — optional flower centers
Tools
- 4.0–4.5 mm crochet hook
- Yarn needle
- Scissors
- Locking stitch markers
- Tape measure
- Blocking mats and rust-resistant pins
Abbreviations
- MR — magic ring
- ch — chain
- sl st — slip stitch
- sc — single crochet
- hdc — half double crochet
- dc — double crochet
- tr — treble crochet
- sp — space
- st/sts — stitch/stitches
- FO — fasten off
Make a Master Square First
Complete one entire motif before beginning production. Wash or lightly wet-block it, allow it to dry completely, and record its width, height, and weight.
A practical target for this design is approximately 18–20 cm square. Treat that measurement as a project target rather than an exact dimension taken from the photograph.
Once the master square is correct, use the same hook, yarn, tension, and round counts for every remaining motif.
Floral Granny Square
Round 1 — Flower Center
With ivory or dusty rose, make a MR.
Ch 1 and work 8 sc into the ring.
Join with a sl st. (8 sts)
Round 2 — Petal Foundations
Join dusty rose.
Repeat around:
sl st in next st, ch 4.
Join to the beginning. You should have 8 ch-4 loops.
Round 3 — Dusty Rose Petals
Into each ch-4 loop work:
sc, hdc, 3 dc, hdc, sc.
Repeat around to create eight petals.
Join and FO dusty rose.
Building Behind the Flower
The next round is worked behind the petals. Turn the motif slightly and identify the spaces between adjacent petal bases.
Join cream into one of these spaces.
Round 4 — Cream Foundation
Repeat eight times:
sc around the space between petal bases, ch 4.
Join.
This produces eight cream attachment arches behind the flower.
Beginning the Square Shape
The eight arches now need to become four sides and four corners. Mark every second arch as a corner arch.
Round 5 — First Squaring Round
In each marked corner arch work:
2 dc, ch 2, 2 dc.
In each unmarked side arch work:
4 dc.
Ch 1 between groups.
Repeat around and join.
At this point the motif should clearly have four corners.
Cream Openwork Round
Round 6
Sl st to the first corner space.
In the corner work:
2 dc, ch 2, 2 dc.
Across each side, work:
ch 1, skip 1 st, dc in next st.
Continue the open pattern to the next corner.
Repeat on all four sides.
Join.
Dusty Rose Accent Round
Round 7
Join dusty rose in a corner.
Work:
2 hdc, ch 2, 2 hdc in each corner.
Across each side, work one hdc into each stitch and one hdc into each chain space.
Join.
This narrow solid round frames the lighter openwork center.
Second Cream Frame
Round 8
Join cream.
Work:
2 dc, ch 2, 2 dc in each corner.
Across each side, repeat:
dc in next 3 sts, ch 1, skip 1 st.
Adjust only at the center of a side if the repeat does not divide exactly. Keep all four sides identical.
Taupe Structural Round
Round 9
Join taupe at any corner.
Work:
sc, ch 2, sc into each corner.
Sc evenly across every side.
Join and FO.
This round provides a stable joining edge and visually separates adjacent motifs.
Final Cream Round
Round 10
Join cream into a corner.
Work:
2 hdc, ch 2, 2 hdc in each corner.
Hdc in every stitch across each side.
Join and FO.
Blocking the Master Motif
Pin the square to the selected target measurement, approximately 18–20 cm.
Measure both diagonals. They should differ by no more than approximately 5 mm.
If one diagonal is substantially longer, inspect the corner tension and stitch distribution before making additional squares.
Optional Raised Flower Version
For a more dimensional center, add a second petal layer behind Round 3.
Join dusty rose behind the existing flower and make eight ch-5 loops.
Into each loop work:
sc, hdc, 2 dc, 2 tr, 2 dc, hdc, sc.
Keep this second layer relatively flat so the finished bedspread remains practical.
Planning the Bedspread Size
Measure the mattress and decide how far the crochet should fall over the sides and foot.
Use the blocked master-square measurement to calculate the motif grid.
| Grid | Approximate Size Using 19 cm Squares |
|---|---|
| 6 × 8 | 114 × 152 cm before border |
| 8 × 10 | 152 × 190 cm before border |
| 9 × 11 | 171 × 209 cm before border |
| 10 × 12 | 190 × 228 cm before border |
| 11 × 13 | 209 × 247 cm before border |
Add the planned border width to these measurements before selecting the final grid.
Color Arrangement
The photograph uses dusty rose as the dominant decorative color and cream as the structural background.
For the closest visual balance, keep the same color order in every square:
- Small center — ivory or dusty rose
- Flower — dusty rose
- Inner background — cream
- Accent frame — dusty rose
- Outer background — cream
- Structural accent — taupe
- Joining edge — cream or taupe
Maintaining this order produces a continuous grid when the squares are assembled.
Making the Squares Efficiently
Batch production reduces color changes. Make all centers first, then complete the flower rounds, followed by the cream sections and framing rounds.
Keep one finished master square nearby for comparison.
After every five motifs, stack the squares together and compare the edges. Correct tension changes before producing another large batch.
Joining the Squares
Block all motifs before joining.
Arrange them on a clean surface in the final grid.
Photograph the layout before moving any pieces.
Flat Slip-Stitch Join
Place two squares side by side with right sides facing upward.
Using taupe or cream, insert the hook through corresponding edge loops.
Sl st through both motifs.
Continue across the complete edge without pulling the yarn tightly.
Join squares into horizontal rows first, then connect the rows.
Alternative Mattress-Stitch Join
For a less visible seam, place two blocked squares side by side.
Using a yarn needle, pass the joining yarn alternately through corresponding edge stitches.
Pull the yarn only until the edges meet.
Do not cinch the seam.
Checking the Joined Panel
After joining several squares, place the work on a flat surface.
The seams should not form ridges or pull the motifs into shallow bowls.
If the panel contracts along the joins, remake those seams with looser tension.
Bedspread Border — Foundation Round
Join cream at one corner of the completed bedspread.
Work sc evenly around the entire perimeter.
At each outer corner work:
sc, ch 2, sc.
Use the same stitch ratio along corresponding sides.
Border Round 2 — Taupe Frame
Join taupe.
Hdc around the complete perimeter.
At each corner work:
2 hdc, ch 2, 2 hdc.
Border Round 3 — Cream Openwork
Join cream.
Repeat:
dc in next 2 sts, ch 2, skip 2 sts.
At each corner work enough stitches to turn the 90-degree angle without pulling.
Border Round 4 — Dusty Rose Lace
Join dusty rose.
Work into each ch-2 space:
2 dc, ch 1, 2 dc.
Place one sc or sl st between neighboring groups if additional separation is required.
Border Round 5 — Cream Lace
Join cream.
Work:
sc in next space, ch 4.
Repeat around.
At each corner use a slightly larger ch-5 arch.
Final Scalloped Border
Into each regular ch-4 arch work:
sc, hdc, 3 dc, hdc, sc.
For the larger corner arch work:
sc, hdc, 5 dc, hdc, sc.
Repeat around.
FO and weave the tail through several dense stitches.
Optional Dusty Rose Scallop Accent
For a stronger pink edge, join dusty rose and work relaxed surface slip stitches along the base of the cream scallops.
Another option is to work a small dusty-rose picot at the center of every second scallop.
Keep this final accent loose enough that the perimeter remains flat.
Matching Square Pillow Sham
The large pillows can use the same floral motif on a larger scale.
Begin with one standard flower-centered square.
Continue adding cream, dusty-rose, and taupe framing rounds until the front panel reaches the required pillow dimensions.
For a 45 × 45 cm pillow insert, target a finished front close to the insert measurement rather than relying on a fixed number of rounds.
Pillow Back
A practical back can be worked as two overlapping cream rectangles.
Use hdc for a dense fabric.
Make each rectangle slightly wider than half the pillow height so the two pieces overlap at the center.
Attach the back panels around the outer edge of the decorative front.
Pillow Scalloped Edge
Join dusty rose or cream around the completed pillow.
Work one sc round.
Follow with:
ch 3, skip 2 sts, sc in next st.
Into each ch-3 space work:
sc, hdc, 3 dc, hdc, sc.
Matching Rectangular Cushion
The narrow decorative cushion shown with this style can be made as a striped companion rather than another large flower square.
Work a rectangle in alternating bands of cream, dusty rose, and taupe.
Alternate solid hdc rows with open rows such as:
dc, ch 1, skip 1 st.
Finish the short ends with small scallops to coordinate with the bedspread.
Optional Matching Floor Mat
The same square can also form a decorative bedside mat.
Use a grid such as 2 × 4 or 3 × 5, depending on the blocked motif measurement.
For a floor piece, choose a firm cotton yarn and add a suitable non-slip backing before use.
Estimating Yarn
Weigh the completely finished and blocked master square.
Multiply that weight by the number of squares required.
For example, if a finished motif weighs 45 g and the bedspread requires 120 motifs:
45 g × 120 = 5,400 g for the motif portion.
This is only an example calculation, not a fixed yarn requirement.
Add the actual yarn needed for joining and the border, then include approximately 10% extra for swatching, finishing, repairs, and normal variation.
Estimating Yarn by Color
For better accuracy, weigh each color before and after making the master square.
Record how many grams of dusty rose, cream, and taupe the square consumes.
Multiply each result separately by the planned number of motifs.
This method is more reliable than estimating color percentages visually.
Controlling Square Size
Measure every fifth motif against the master square.
A difference of 2–3 mm may be corrected during blocking. Larger differences usually indicate a tension change.
Do not depend on aggressive blocking to correct a motif that is substantially smaller or larger.
Keeping the Flower Center Flat
If the dusty-rose flower forms a cup, the petal foundation is too tight or the petals contain too many stitches for the available space.
If the flower ripples heavily, the petal loops may be too large.
Correct the master flower before making the full set.
Keeping the Corners Square
Mark all four corner spaces on the first squaring round.
Move the markers upward as each new round is completed.
Missing a corner increase causes one side to shorten and shifts the flower away from the visual center.
Border Width
A large bedspread can support a deeper border than a small throw.
A practical target is approximately 8–15 cm, depending on the final bed size and motif scale.
Measure the bedspread after joining before deciding how many border rounds to add.
Assembly
- Make one complete flower-centered master square, block it to the selected 18–20 cm target, and record its final dimensions and weight.
- Crochet the remaining motifs with the same yarn, hook, color sequence, and round counts, comparing every fifth square with the master.
- Weave in the internal color-change tails before blocking, leaving only tails that are deliberately required for finishing.
- Block every square to the same dimensions and check that the two diagonals differ by no more than approximately 5 mm.
- Arrange the motifs into the planned bedspread grid and photograph the complete arrangement before joining.
- Join the squares into horizontal strips, then connect the strips while keeping all intersections aligned.
- Measure the joined panel at several points and correct any seam that contracts the fabric before beginning the outer border.
- Work the cream, taupe, and dusty-rose border rounds around the complete bedspread, checking each corner after every round.
- Add the final scallops and make the coordinated pillow covers only after confirming the remaining yarn quantities.
- Wash the completed pieces according to the yarn label, reshape them flat, align the seams, and allow every section to dry completely.
The completed set should show a regular grid of centered dusty-rose flowers, consistent cream frames, flat taupe joins, square corners, and a scalloped perimeter that hangs without drawing the bedspread inward.
7 Technical Tips
- Keep blocked motifs within approximately 3 mm of the master-square measurement. A larger difference repeated across ten squares can shift an entire row by several centimeters.
- Mark all four corners from the first squaring round onward. Missing one corner increase produces a trapezoid and moves the flower away from the square center.
- Compare both diagonals after blocking. A difference greater than approximately 5 mm indicates uneven corner tension or stitch distribution.
- Keep joining stitches relaxed. A tight slip-stitch seam can shorten each square edge and produce raised channels across the finished bedspread.
- Test at least 30 cm of the outer border before completing a full round. Rippling indicates excess stitches, while an edge that curves inward needs additional spacing.
- Attach dimensional flower sections through their inner bases. Stitching the entire petal surface flat removes the relief that defines the floral center.
- Weigh the master square before estimating yarn. An error of only 5 g per motif becomes 500 g across a project containing 100 squares.
Care and Final Blocking
Wash according to the yarn manufacturer’s instructions. Support the full weight of the wet bedspread when moving it; lifting a large crochet piece from one corner can stretch seams and border stitches.
Lay the bedspread flat and straighten the joined grid first. Shape the outer border only after the square intersections are aligned.
Arrange the scallops individually and compare opposite sides. Pillow shams should be reshaped around their inserts only after the crochet fabric is completely dry.
Conclusion
The repeat accuracy of the squares determines the finish of this floral granny square crochet bedspread pattern. Begin with one blocked master motif, record its dimensions and yarn weight, then use those figures to calculate the bedspread grid before producing the remaining squares. Keep the flower centers identical, mark every corner, and block the motifs before joining so the dusty-rose and cream frames align across the bed. The next practical step is to crochet one complete test square and measure it after washing. Save the finished set to Pinterest or share it on Instagram with #DustyRoseFloralBedspread. Would you keep the taupe accent rounds or replace them with a darker dusty rose?









