Introduction
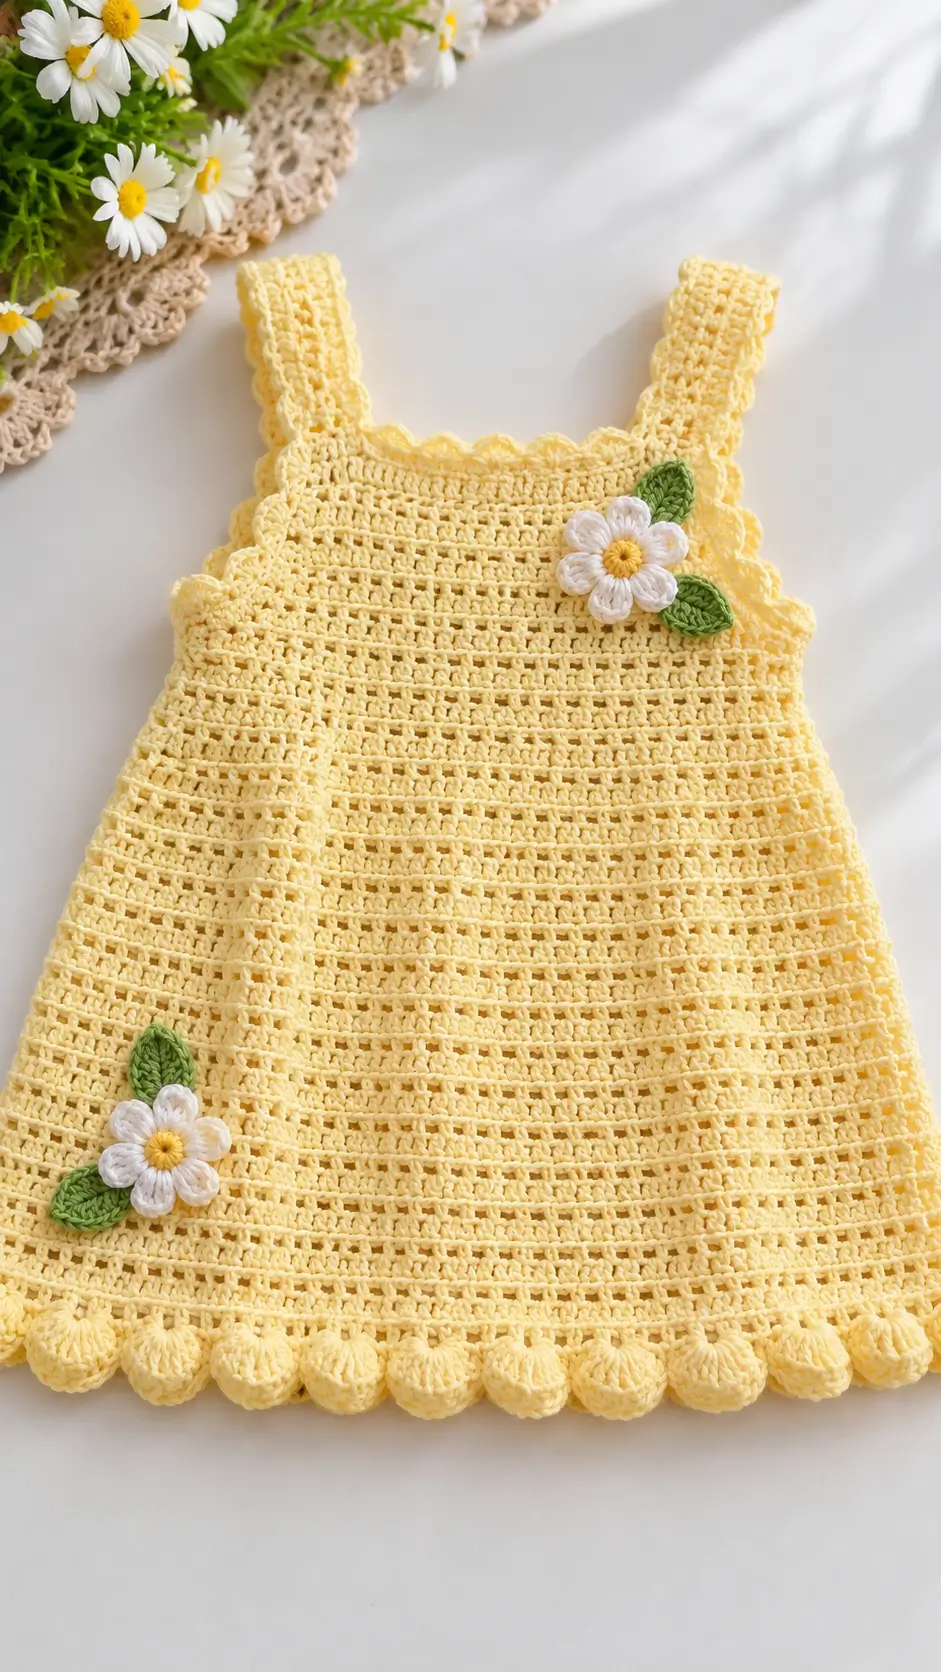
The hem of this dress is built around rounded shell sections rather than a conventional straight edge. This yellow crochet baby dress pattern combines a lightly textured bodice, wide shoulder straps, an A-line skirt, scalloped edging, and two dimensional daisy appliqués. Fine cotton or a cotton-blend yarn keeps the stitch definition clear. The construction is suitable for an intermediate crocheter who can adjust measurements for the intended child.
The Design: What Makes This Crochet Dress Different
The dress uses one dominant yellow shade instead of separating the bodice and skirt with contrasting colors. Visual interest comes from changes in stitch density. The upper section is relatively compact for coverage, while the skirt gradually opens into a lighter textured fabric.
The second structural feature is the controlled A-line expansion. Increases are distributed across the skirt rather than concentrated at the side seams, which helps the lower section flare without producing obvious wedges.
Finally, the scalloped hem is larger and denser than the small edging around the neckline and straps. Two white daisies with yellow centers and green leaves provide the only strong color contrast.
Project Info at a Glance
| Skill Level | Construction | Suggested Yarn | Hook | Style |
|---|---|---|---|---|
| Intermediate | Top-down bodice with A-line skirt | Sport / DK cotton | 3.0–3.5 mm | Sleeveless summer dress |
Materials and Tools
Yarn
- Soft yellow — sport or light DK cotton/cotton blend — main dress
- White — small amount — daisy petals
- Golden yellow — small amount — flower centers
- Leaf green — small amount — leaves
Tools
- 3.0–3.5 mm crochet hook
- Yarn needle
- Stitch markers
- Scissors
- Measuring tape
- Blocking mat and pins
- Small buttons for back closure if required
Abbreviations
- MR — magic ring
- ch — chain
- sc — single crochet
- hdc — half double crochet
- dc — double crochet
- tr — treble crochet
- sl st — slip stitch
- sp — space
- st/sts — stitch/stitches
- RS — right side
- WS — wrong side
Before You Start: Measure Instead of Relying on Age
Children of the same age can have substantially different measurements. Build the dress from the intended child’s measurements rather than treating an age label as a fixed size.
Record these measurements:
- Chest circumference
- Upper chest circumference
- Shoulder-to-waist length
- Desired total dress length
- Distance between straps
- Desired strap length
- Armhole depth
Add approximately 4–6 cm of positive ease to the chest measurement for a comfortable summer fit. The exact amount depends on yarn elasticity and the desired silhouette.
Gauge Swatch
Make a swatch at least 12 × 12 cm using the main yellow yarn and chosen hook.
Work several rows in the bodice stitch pattern, wash or damp-block the swatch as the finished garment will be treated, then measure the central 10 cm.
Calculate:
Required bodice stitches = finished chest circumference × stitches per cm.
For example, if the swatch produces 2.2 stitches per cm and the required finished circumference is 56 cm:
56 × 2.2 = approximately 123 stitches.
Adjust the result to match the stitch multiple required by your selected texture.
Bodice Construction
The photo-inspired bodice is rectangular with a nearly straight neckline and slightly shaped armhole corners. A compact stitch pattern is preferable because this section needs more coverage than the skirt.
Foundation
Chain according to the calculated chest measurement.
If the dress is worked in the round, check that the foundation chain lies flat before joining.
For a back-opening version, work the first section in turned rows and join only after the opening is long enough to pass comfortably over the child’s head.
Row 1
Ch 2, hdc across.
Turn.
Row 2
Ch 1, sc across.
Turn.
Row 3
Ch 2, hdc across.
Turn.
Row 4 — Subtle Texture
Work:
*sc in next st, ch 1, skip next st.*
Repeat across, finishing with sc when required.
Row 5
Work sc into each sc and each ch-1 space.
Repeat the basic sequence until the bodice reaches the measured height from the waist to the upper chest.
Creating the Armhole Area
Lay the bodice flat and mark the positions of the two straps.
The central neckline section should remain open between the straps. Both straps must sit the same distance from the center.
Before fastening off the bodice, work one firm row of sc around the upper edge. This creates a stable foundation for the straps and decorative edging.
Shoulder Straps — Make 2
The straps in the design are wide enough to remain flat rather than behaving like cords.
Row 1
Join yellow yarn at the marked strap position.
Work approximately 6–10 sc, depending on yarn thickness and required strap width.
Rows 2 onward
Ch 1, turn, sc across.
Continue until the strap reaches the measured shoulder length.
Fasten the opposite end securely to the back bodice.
Repeat for the second strap.
Measure both straps before finishing. A difference of even 1 cm can make the neckline sit unevenly.
Decorative Strap Edging
Join yellow yarn along the outside of a strap.
Work small shells:
*sl st in next suitable space, 4 dc in next space.*
Repeat along the outer edge.
Use fewer stitches around tight corners so the edging remains flat.
Repeat on the second strap.
Neckline Edging
Work a small decorative shell around the neckline:
*sc in next 2 sts, 3 dc in next st.*
Repeat as evenly as the neckline permits.
At the inside corners beside the straps, replace a shell with one sc if the fabric begins to ripple.
Beginning the A-Line Skirt
Join yellow yarn around the lower edge of the bodice.
The skirt should not receive all of its extra width in one row. Spread the increases across several stages.
Skirt Round 1
Work hdc evenly around the lower bodice.
Distribute approximately 8–12 increases around the round.
The exact number depends on the chest measurement and yarn gauge.
Skirt Round 2
Work one hdc in each stitch.
Skirt Round 3 — Open Texture
Work:
*dc in next st, ch 1, skip next st.*
Repeat around.
Skirt Round 4
Work:
*dc in dc, ch 1 over ch-1 space.*
Repeat around.
Building the Skirt Texture
The photographed skirt has narrow vertical lines interrupted by small openings. A simple alternating mesh produces a similar lightweight structure without making the fabric excessively transparent.
Use the following four-round repeat:
Texture Round A
Hdc around.
Texture Round B
*dc, ch 1, skip 1.* Repeat around.
Texture Round C
Work dc into each dc and ch 1 over each previous ch-1 space.
Texture Round D
Hdc around, placing increases at the marked expansion points when required.
Repeat these rounds until the skirt approaches the required length.
Controlling the Skirt Flare
Place 8 stitch markers evenly around the skirt.
On an increase round, work an additional stitch near each marker.
Do not increase on every round. A useful starting interval is one increase round every 4–6 rounds.
After each increase section, lay the garment flat.
If the skirt develops waves, the expansion rate is too high. Work more plain rounds before adding another increase.
If the skirt hangs almost vertically, reduce the distance between increase rounds.
Length Adjustment
Stop the main yellow skirt approximately 3–5 cm shorter than the required finished length. The lower scalloped border adds additional depth.
Measure from the top of the shoulder strap to the current hem rather than measuring the skirt alone.
This is particularly important when adapting the construction to different sizes.
Large Scalloped Hem
The rounded lower border is one of the strongest visual details in this dress.
Preparation Round
Work one round of sc around the entire hem.
Adjust the stitch count so the shells can be distributed evenly.
Shell Round
Work:
*skip 2 sts, 7 dc in next st, skip 2 sts, sc in next st.*
Repeat around.
If your stitch count does not divide correctly, adjust the skipped stitches slightly across several repeats rather than forcing the final shell into a small space.
Definition Round
For a thicker rounded edge, work around each shell:
sc in first dc, hdc in next, 2 dc in next, 3 dc in center dc, 2 dc in next, hdc in next, sc in last dc.
Sl st into the sc between shells.
Repeat around.
White Daisy Appliqué — Make 2
Each daisy has a compact yellow center and rounded white petals.
Daisy Center
With golden yellow yarn, make an MR.
Work 8 sc into the ring.
Pull closed and join.
Round 2: work 2 sc in each stitch. (16 sts)
Fasten off.
Daisy Petals
Join white yarn.
For each petal work:
ch 5, tr in same base area, 2 dc, hdc, sc, sl st into the next attachment point.
Repeat around to create approximately 8 rounded petals.
Keep the petals similar in length and tension.
Fasten off, leaving a long sewing tail.
Green Leaves — Make 4
Each flower receives two small leaves.
With green yarn, ch 8.
Starting in the second chain from the hook work:
sc, hdc, dc, 2 tr, dc, hdc.
Work 3 sc into the final chain.
Continue along the opposite side of the foundation chain:
hdc, dc, 2 tr, dc, hdc, sc.
Sl st to finish.
Leave a long tail for sewing.
Attaching the Upper Daisy
Position the first flower near one upper side of the bodice rather than directly in the center.
Place two green leaves underneath at slightly different angles.
Pin all three pieces before sewing.
Sew around the leaf centers first, leaving the outer edges slightly raised.
Attach the daisy through its center and inner petal bases.
Avoid stitching every millimeter of the petals to the dress. Slightly raised petals preserve the dimensional appearance.
Attaching the Lower Daisy
Position the second daisy toward the opposite lower side of the skirt.
This diagonal placement balances the upper flower without making the dress look mechanically symmetrical.
Check the flower position while the dress is hanging vertically. An appliqué that appears level on a table can shift visually once the skirt flares.
Optional Back Opening
If the neckline cannot pass comfortably over the intended child’s head, add a short back opening.
Work the upper bodice flat rather than in the round for approximately 6–10 cm.
Edge both sides of the opening with sc.
On one side make one or two small chain loops.
Sew matching flat buttons to the opposite side.
Buttons must be attached securely. For garments intended for babies or very young children, consider a construction without detachable small components.
Alternative Pullover Construction
A wider neckline can eliminate the need for buttons.
Before attaching the straps permanently, test the head opening measurement.
The neckline must pass over the head without excessive stretching while remaining small enough to sit correctly on the shoulders.
Suggested Size Planning
| Measurement | How to Determine It |
|---|---|
| Chest | Actual chest measurement + desired ease |
| Bodice height | Upper chest to waist |
| Strap length | Front upper chest over shoulder to back |
| Skirt length | Waist to desired hem minus border depth |
| Hem width | Controlled through evenly distributed increases |
Yarn Quantity
Yarn requirements vary considerably with size, gauge, fiber, skirt fullness, and hem depth. The most reliable method is to calculate consumption from the actual project rather than assigning a fixed amount to an age.
After completing the bodice, weigh it.
Then crochet approximately 10 cm of skirt and weigh the garment again. The difference provides a practical estimate for the remaining skirt length.
Add extra yellow yarn for the straps and large scalloped hem, plus a reserve for swatching and finishing.
The white, green, and golden-yellow appliqué sections require only small quantities compared with the main dress.
Making the Dress More Lightweight
Use fine cotton and a smaller hook while preserving the same measurements.
Increase the number of stitches according to the new gauge rather than following the original stitch count.
The open skirt rounds can also be repeated more frequently, producing a lighter fabric while the bodice remains compact.
Making the Skirt Fuller
For a more pronounced flare, distribute additional increases across the lower half of the skirt.
Do not place all extra stitches in one round.
Add a controlled increase round, work several rounds without increases, then reassess the circumference.
A skirt that lies flat in a full circle has substantially more fabric than the gentle A-line shape shown here.
Color Variations
The same construction works with several combinations:
- Soft yellow dress, white daisies, green leaves
- Turquoise dress, white flowers, green centers
- Blush pink dress, ivory flowers, sage leaves
- Lavender dress, white flowers, yellow centers
- Ivory dress, dusty rose flowers, olive leaves
Keep the flower centers distinct from the petals so the appliqués remain readable from a distance.
Assembly
- Make and block a gauge swatch, then calculate the bodice circumference from the intended child’s measurements.
- Crochet the yellow bodice to the required upper-body height.
- Mark the strap positions and crochet two equal shoulder straps.
- Add the neckline and strap edging, checking that all edges remain flat.
- Join yarn at the lower bodice and begin the skirt with evenly distributed increases.
- Continue the textured A-line skirt, adding expansion rounds only when additional width is required.
- Stop the main skirt short of the finished length and crochet the large rounded hem.
- Make two white daisies, two yellow centers, and four green leaves.
- Pin and sew the floral appliqués to the upper bodice and opposite lower skirt section.
- Weave in every yarn end, block the dress to measurements, and inspect all appliqué and closure stitches before use.
The finished garment should have a stable upper bodice, equal straps, a gradually widening skirt, an even scalloped hem, and two securely attached floral motifs.
7 Technical Tips
- Measure both straps to within 5 mm before attaching the second ends. Unequal strap lengths will tilt the neckline even when the bodice stitch count is correct.
- Watch for rippling immediately after every skirt increase round. Visible waves indicate too many increases, so work additional plain rounds before expanding again.
- Keep the neckline shell edging smaller than the hem shells. Large neckline shells can reduce the usable opening and push the straps outward.
- Stop the main skirt 3–5 cm before the target length. Forgetting the depth of the scalloped border can make the finished dress noticeably longer than planned.
- Pin each daisy before sewing it permanently. Place the lower flower far enough above the hem that its petals do not overlap the large scallops when the garment hangs.
- Check the chest circumference after blocking the swatch. Cotton stitches can settle after washing, and using the unblocked gauge can produce a bodice several centimeters off target.
- Secure appliqué centers through multiple structural stitches. A flower attached only through one center loop can rotate or pull away from the dress during washing.
Blocking and Finishing
Wash or dampen the finished dress according to the yarn manufacturer’s care instructions.
Lay it flat and shape the bodice to the required chest measurement.
Align the straps and confirm that they are equal.
Spread the skirt naturally without stretching it into a full circle.
Shape every hem shell individually while damp.
Arrange the flower petals and green leaves last, then allow the garment to dry completely before moving it.
Care
Follow the care instructions for the selected yarn. A washable cotton or cotton blend is practical for children’s clothing.
Place the garment in a laundry bag when machine washing is permitted. Gentle handling protects the raised flower petals and scalloped edging.
Dry flat when possible so the skirt does not lengthen under its own wet weight.
Conclusion
This yellow crochet baby dress pattern combines a compact sleeveless bodice with wide straps, a gradually flared openwork skirt, oversized scalloped edging, and two dimensional daisy-and-leaf appliqués. Start by measuring the intended wearer and making a blocked gauge swatch; those two steps determine the bodice stitch count and final length more reliably than an age label. After completing the dress, photograph the finished version flat and worn, then share it on Pinterest or Instagram with #YellowDaisyCrochetDress. For this specific design, would you keep the two-flower arrangement or add a row of smaller daisies around the lower skirt?









