Introduction
A sheep this round stops looking like a sheep if the white fleece creeps across the beige muzzle. This sheep amigurumi crochet pattern uses worsted yarn, a 3.75 mm hook, 10–12 mm eyes, a 42-stitch body, short brown hooves, and a separate layer of raised white wool clusters. The finished lamb measures approximately 22–25 cm high and works well as a substantial tabletop or nursery amigurumi.
The Design: What Makes This Sheep Different
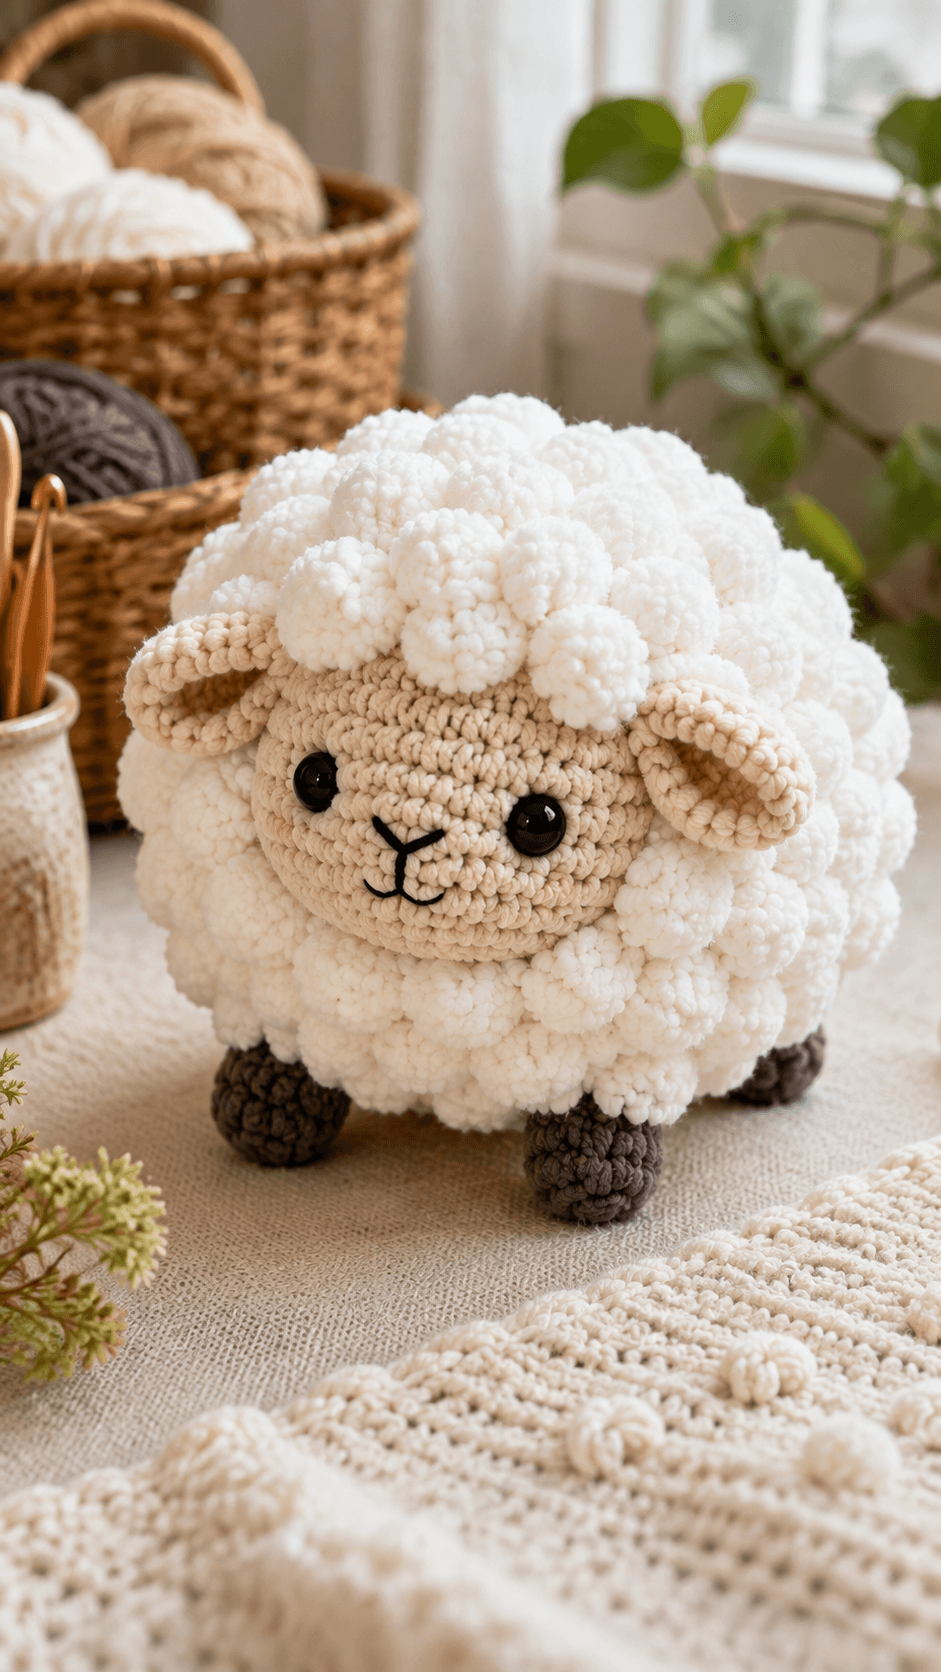
The underlying body is deliberately simple because the fleece changes its apparent proportions. A 42-stitch sphere forms the core, then a dense layer of white bobbles increases the visual diameter without requiring a larger stuffed body. The beige head remains smoother and slightly smaller at 36 stitches, allowing it to sit inside the surrounding wool rather than project like a separate ball. Short brown legs keep the fluffy sheep crochet pattern close to the ground, while horizontal ears break the circular silhouette at eye level. The wool clusters are larger around the crown and body sides than immediately beside the face. That variation keeps the facial opening clear. One common failure is covering the entire head uniformly with texture. When bobbles reach the eyes and muzzle, the face loses its oval outline and the sheep reads as a white sphere with features attached.
Project Info at a Glance
| Skill Level | Time | Finished Size | Hook | Best For |
|---|---|---|---|---|
| Intermediate | 10–14 hours | Approx. 22–25 cm high | 3.75 mm | Nursery display, farm-animal set, textured amigurumi |
Materials and Tools
Yarn
- White — worsted #4 or soft textured yarn — approximately 180–230 g — body shell and fleece clusters
- Warm beige / oatmeal — worsted #4 — approximately 55–70 g — head, muzzle area, and ears
- Dark brown — worsted #4 — approximately 35–45 g — four hooves
- Black embroidery yarn — small amount — nose and mouth
Tools
- 3.75 mm crochet hook
- 4.0 mm hook optional for the fleece layer
- 10–12 mm safety eyes ×2
- Polyester toy stuffing
- Large-eye yarn needle
- Locking stitch markers
- Straight pins
- Sharp scissors
Replace plastic safety eyes with securely embroidered eyes when making the sheep for a child under three years old.
Abbreviations
MR — magic ring
sc — single crochet
inc — increase, 2 sc in one stitch
dec — invisible decrease
sl st — slip stitch
ch — chain
hdc — half double crochet
dc — double crochet
BO — bobble stitch
BLO — back loop only
For the invisible decrease, insert the hook through the front loops of the next two stitches, draw up one loop, then finish both stitches together as one single crochet.
Pattern — Step by Step
Work all stuffed parts in continuous spirals unless stated otherwise. The instructions below are an original photo-matched construction based on standard six-stitch amigurumi shaping.
Head
Yarn: warm beige — standard amigurumi math.
R1: 6 sc in MR (6)
R2: inc ×6 (12)
R3: (sc, inc) ×6 (18)
R4: (2 sc, inc) ×6 (24)
R5: (3 sc, inc) ×6 (30)
R6: (4 sc, inc) ×6 (36)
R7: sc around (36)
R8: sc around (36)
R9: sc around (36)
R10: sc around (36)
R11: sc around (36)
R12: sc around (36)
Insert 10–12 mm safety eyes between R9 and R10, approximately 8 visible stitches apart.
R13: (4 sc, dec) ×6 (30)
R14: (3 sc, dec) ×6 (24)
R15: (2 sc, dec) ×6 (18)
Stuff firmly around the eye washers and lightly across the muzzle.
R16: (sc, dec) ×6 (12)
R17: dec ×6 (6)
Fasten off and close.
Body
Yarn: white — standard amigurumi math.
R1: 6 sc in MR (6)
R2: inc ×6 (12)
R3: (sc, inc) ×6 (18)
R4: (2 sc, inc) ×6 (24)
R5: (3 sc, inc) ×6 (30)
R6: (4 sc, inc) ×6 (36)
R7: (5 sc, inc) ×6 (42)
R8: sc around (42)
R9: sc around (42)
R10: sc around (42)
R11: sc around (42)
R12: sc around (42)
R13: sc around (42)
R14: sc around (42)
R15: sc around (42)
Begin filling. Keep the body round rather than tall.
R16: (5 sc, dec) ×6 (36)
R17: (4 sc, dec) ×6 (30)
R18: (3 sc, dec) ×6 (24)
Add more stuffing through the side walls.
R19: (2 sc, dec) ×6 (18)
R20: (sc, dec) ×6 (12)
R21: dec ×6 (6)
Fasten off and close.
Front Legs — Make 2
Yarn: dark brown for hoof, then white.
R1: 6 sc in MR (6)
R2: inc ×6 (12)
R3: (sc, inc) ×6 (18)
R4: sc around (18)
Change to white.
R5: sc around (18)
R6: sc around (18)
R7: (sc, dec) ×6 (12)
R8: sc around (12)
R9: sc around (12)
Stuff the brown hoof firmly and the white upper section lightly.
Fasten off with a 30 cm sewing tail.
Back Legs — Make 2
Yarn: dark brown for hoof, then white.
R1: 6 sc in MR (6)
R2: inc ×6 (12)
R3: (sc, inc) ×6 (18)
R4: sc around (18)
R5: sc around (18)
Change to white.
R6: sc around (18)
R7: sc around (18)
R8: (sc, dec) ×6 (12)
R9: sc around (12)
Stuff firmly.
Fasten off with a 30 cm sewing tail.
Ears — Make 2
Yarn: warm beige. Work flat.
R1: 6 sc in MR (6)
R2: inc ×6 (12)
R3: (sc, inc) ×6 (18)
Fold the circle slightly to form a shallow oval.
Sc through both layers across approximately 6 stitches along the attachment side.
Fasten off with a 30 cm sewing tail.
Muzzle Patch
Yarn: warm beige.
R1: 6 sc in MR (6)
R2: inc ×6 (12)
R3: (sc, inc) ×6 (18)
Fasten off with a long sewing tail.
Do not stuff.
Pin low on the face so the upper edge sits below the safety eyes.
Cheek Patches — Make 2
Yarn: warm beige, one shade lighter if available.
R1: 6 sc in MR (6)
Fasten off with a sewing tail.
These patches should remain subtle and may be omitted if the selected beige yarn already produces enough facial dimension.
Tail
Yarn: white.
R1: 6 sc in MR (6)
R2: inc ×6 (12)
R3: sc around (12)
R4: dec ×6 (6)
Stuff lightly.
Fasten off with a 20 cm tail.
Bobble Fleece Clusters
Yarn: white — applied texture.
For one bobble:
Yarn over, insert hook into the target stitch, yarn over and draw up a loop. Yarn over and draw through two loops. Repeat that partial double crochet four more times in the same stitch. Yarn over and draw through all remaining loops. Ch 1 to lock the bobble.
Work the fleece as a separate surface layer after the sheep is assembled.
Start at the crown behind one ear.
*Sl st into one body or head stitch, ch 2, BO in the same or next nearby stitch, sl st 1–2 stitches away.*
Repeat across the upper head and body.
Keep neighboring bobble centers approximately 1–1.5 cm apart.
Leave a clear oval around the beige face approximately 9–11 cm wide.
Large Crown Wool Clusters
For the oversized wool visible across the crown, make selected bobbles with six partial dc instead of five.
Place approximately 8–12 larger clusters over the top of the head.
Mix them with normal bobbles so the fleece edge remains irregular.
Face Embroidery
Yarn: black.
Embroider a short inverted Y-shaped nose at the center of the muzzle patch.
Add one curved mouth line on each side.
Keep the completed nose and mouth area approximately 2.5–3 cm wide.
Assembly
- Pin the beige head to the front-upper portion of the white body, keeping the eye line horizontal and the face slightly forward rather than directly on top.
- Sew the head firmly to the body with two passes through the lower head edge, then bury the joining tail inside the body.
- Attach the muzzle patch below the eyes and embroider the black nose and split mouth before the fleece is added around the face.
- Pin both ears horizontally at the sides of the upper head, approximately level with or slightly above the safety eyes.
- Attach the two front legs low on the chest and the back legs toward the rear sides, checking that all four brown hooves touch the table.
- Sew the small white tail to the back of the body, positioned just above the rear-leg line.
- Add the first fleece clusters around the crown and behind the ears, keeping at least 8–10 mm of open beige space around each eye.
- Continue the bobble fleece down the shoulders, sides, back, and lower body until the smooth white base is mostly hidden.
- Fill visible gaps with smaller bobbles, but keep the brown hooves, beige ears, and complete facial oval uncovered.
- Trim and weave every tail, rotate the sheep on a flat surface, reshape the fleece by hand, and correct any leg that prevents all four hooves from sitting evenly.
The completed sheep should appear almost spherical, with the beige face recessed inside a thick white fleece frame and four compact brown hooves visible below the body.
7 Technical Tips
- Face disappearing into fleece: Bobbles worked closer than approximately 8 mm to the safety eyes can cover the expression. Mark a 9–11 cm facial oval before beginning the surface wool.
- Body becoming oversized: Dense bobbles add several centimeters to the apparent diameter. Stop the stuffed core at 42 stitches rather than increasing to 48 unless the target sheep is larger than about 25 cm.
- Fleece gaps: Spacing bobble centers more than roughly 1.5 cm apart exposes the smooth white body underneath. Add smaller filler bobbles rather than pulling existing clusters sideways.
- Hooves disappearing: White texture carried too far down the legs hides the dark feet. Leave the complete brown R1–R4 or R1–R5 section free of fleece.
- Ear burial: Bobbles stitched directly over the ear bases can make the ears look undersized. Keep a clear 5–8 mm line along the front edge of each beige ear.
- Uneven stance: One leg positioned more than about 1 cm higher than its opposite pair makes the spherical body tilt. Pin all four legs and test them on a hard surface before completing the seams.
- Loose bobbles: A surface cluster anchored through only one yarn strand can twist outward. Pass the joining slip stitch through a complete base stitch and pull the locking chain snugly against the body.
Why the Fleece Is Added After Assembly
The photograph depends on fleece placement more than raw stitch count. Adding all the bobbles before assembling the sheep would hide the stitches needed for accurate ear, head, and leg placement.
Build the smooth core first.
Once the proportions are fixed, the fleece becomes a controlled surface treatment. It can be made thicker at the crown, shoulders, and sides while remaining thinner around the face and legs.
This method also allows individual clusters to overlap the head/body seam, hiding construction lines that would otherwise remain visible.
Keeping the Face Recessed
The face should look surrounded by wool rather than pasted onto its surface.
Attach the beige head before adding any white clusters. Then place the first fleece row around the upper and side boundaries of the face.
Work several bobbles partly over the white body/head seam. Those clusters create a shadow line around the beige section and make the face appear deeper.
Do not add white bobbles directly to the center of the muzzle.
The eye region, nose, and mouth need a smooth stitch field so their alignment remains visible.
Controlling the Spherical Body
The underlying 42-stitch body is intentionally smaller than the final visual volume.
After R15, compare height and width before decreasing. The body should already be close to spherical.
Pack the middle firmly but avoid stretching the stitches.
Once the bobble layer is added, the apparent circumference can grow by several centimeters. Overstuffing the core makes the completed woolly sheep amigurumi too rigid and reduces the shadow between fleece clusters.
Positioning the Short Legs
The legs are structural rather than decorative.
The supplied sheep stands close to the ground with only the dark hoof sections clearly visible beneath the wool.
Attach the front pair slightly wider than the muzzle. Position the rear pair far enough back to counterbalance the heavy textured front.
Before sewing, pin all four and place the toy on a table.
If the sheep rocks diagonally, alter the leg position rather than adding more stuffing to one side of the body.
Building a Natural Wool Edge
A perfectly straight row of bobbles looks artificial.
Use normal five-part bobbles through most of the body and mix in occasional six-part clusters around the crown and upper sides.
Vary the vertical placement by one stitch.
A few clusters can overlap neighboring bobbles slightly, while others leave a narrow shadow between them.
The objective is dense coverage without a visible grid.
This uneven outer line is especially important around the face, where the wool should resemble a soft irregular frame rather than a circular border.
Choosing Yarn for the Fleece
Published sheep patterns use loop stitch, fuzzy fibers, bobbles, or chenille to reproduce wool. Current Ravelry competition includes a 2026 bubble-stitch sheep, while Etsy also lists new loop-stitch designs. :contentReference[oaicite:20]{index=20}
The photo is closer to large separate clusters than long loops.
A smooth worsted white yarn creates sharply defined bobbles. A slightly fuzzy worsted or light chunky yarn softens the edges.
Avoid very long eyelash yarn for this version because it can obscure the face and remove the visible cluster structure.
Eye and Muzzle Placement
The eyes sit fairly close together inside the facial oval.
Positioning them approximately eight visible stitches apart provides enough room for the nose while keeping both eyes well inside the fleece frame.
The muzzle patch should sit below the eye line and overlap the lower-center head slightly.
Add the nose after sewing the patch. A black inverted Y gives a clearer sheep profile than a large plastic nose and remains close to the reference.
Estimating Yarn Quantity
Published sheep patterns show large differences in yarn consumption because fleece methods vary. Argo uses roughly 80 yd of its main worsted yarn plus 30 yd contrast, while a 2026 bubble-stitch sheep uses 50 g each of white and brown cotton for a different construction. :contentReference[oaicite:21]{index=21}
The dense applied fleece in this design requires more white yarn than the smooth core alone.
Weigh the completed untextured body first.
Then work fleece over one quarter of the body and weigh again. Multiply the fleece difference by four, add the head clusters, and reserve approximately 10% for gap filling.
This produces a more accurate figure than scaling from a smooth sheep pattern.
Competition Gap
Current sheep crochet competition includes loop-stitch fleece, bubble stitch, chenille plushies, scarves, standing lambs, slim-legged characters, and small nursery toys. A current 23 cm pattern uses a fleece coat, while the March 2026 Ravelry bubble-stitch sheep reaches approximately 35 cm. :contentReference[oaicite:22]{index=22}
The supplied reference differs through its proportions. The body is almost a ball. Legs are extremely short. The beige face sits inside a thick frame of separate oversized white clusters, and no clothing or accessory interrupts the fleece.
That makes the strongest content angle a bobble stitch sheep crochet or round fluffy lamb rather than a generic farm-animal pattern.
Finishing Checks
Place the completed sheep on a hard surface.
All four brown hooves should touch without the body rocking forward.
View the face from directly in front. Both eyes need an equal amount of beige fabric around them, and the muzzle should sit on the vertical centerline.
Check the ears next. Their tips should remain visible outside the fleece rather than disappearing behind crown bobbles.
Rotate the sheep through 360 degrees. Add small wool clusters wherever smooth white foundation stitches remain exposed, but leave natural narrow shadows between neighboring bobbles.
Conclusion
Build the smooth 42-stitch body before adding any fleece, because the surface bobbles substantially increase the apparent size of this sheep amigurumi crochet pattern. Attach the beige face, ears, and four short legs first, then mark a clear facial oval and work the white clusters outward from that boundary. The next practical step is to make one test bobble and record its width so the spacing stays consistent across the body. Share a close-up of the recessed face on Pinterest and the completed lamb on Instagram with #WoollyBobbleSheep. Would you make the hooves dark brown again or switch them to warm gray?









