Introduction
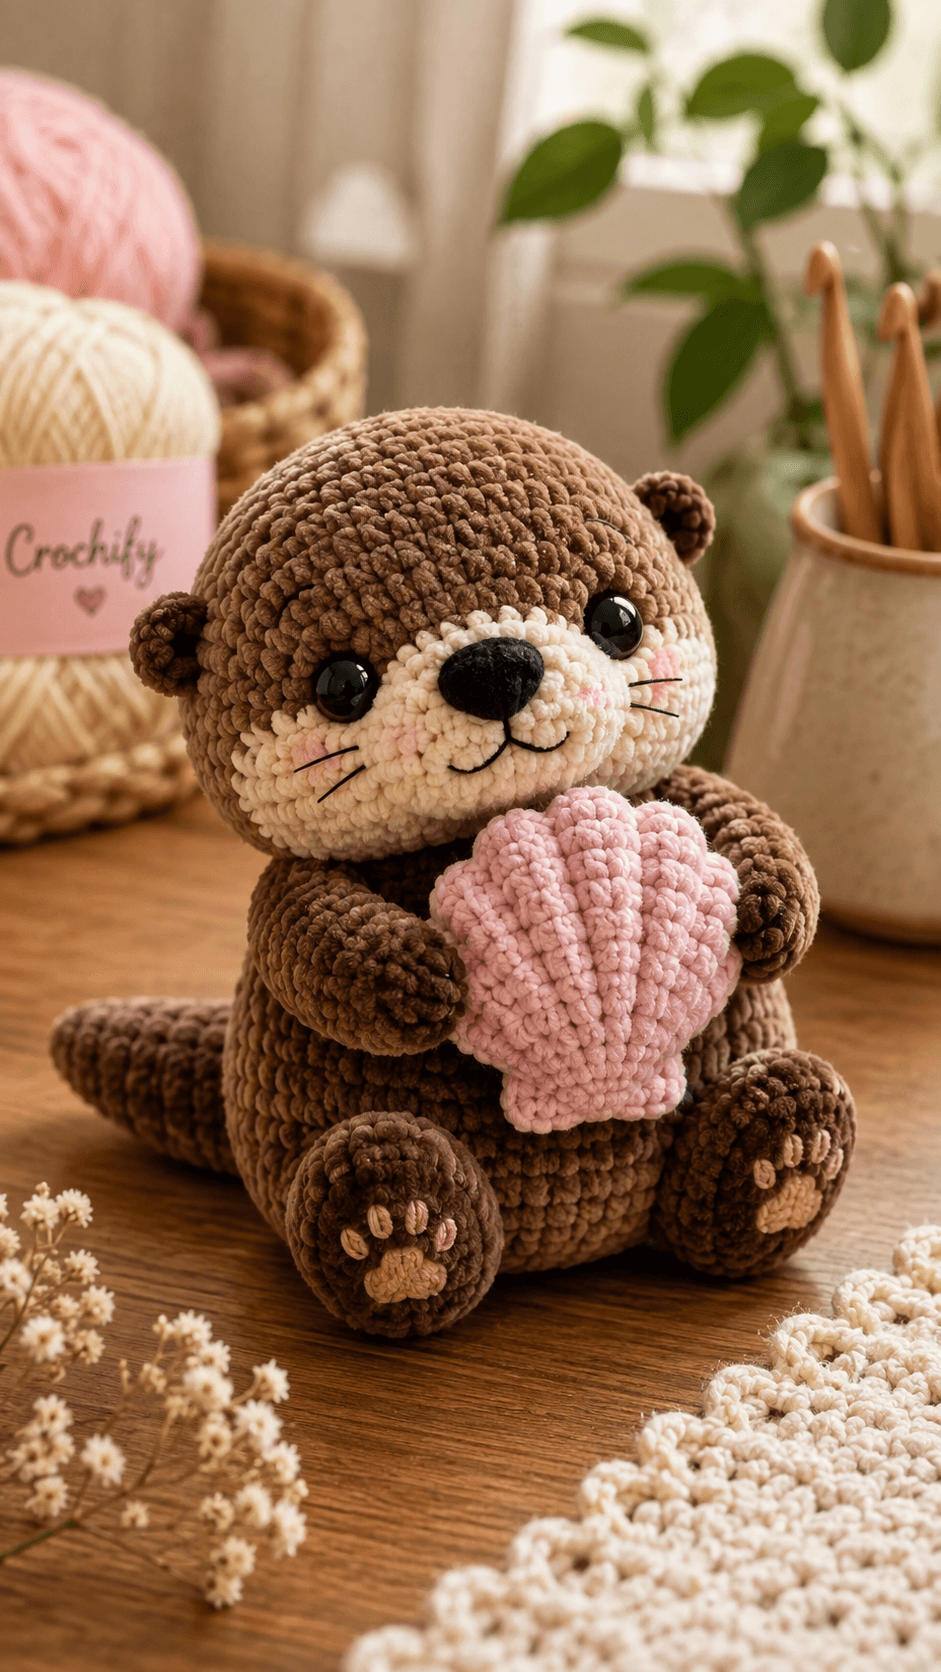
An otter’s flattened tail, broad whiskered muzzle, and compact ears must still read correctly when the animal is posed upright. This otter amigurumi crochet pattern uses chunky chenille, a 5.5 mm hook, and a 36-stitch medium body to produce a figure near 22 cm tall. The project suits an intermediate maker familiar with spiral rounds. Its large pink shell also fixes both front paws in a stable display position.
The Design: What Makes This Otter Different
The head reaches 36 stitches before holding its diameter, giving the muzzle enough width to sit below large safety eyes without turning the animal into a bear shape. A separate cream muzzle projects from the face rather than relying only on a flat color patch; that projection is important because an otter has a broad nose and pronounced whisker area. The rear legs are wider than the arms so the finished plush otter amigurumi remains seated after the shell is attached. Its tail starts narrow, widens toward the body, and sits low behind the left side for visual balance. A frequent mistake in a chenille otter crochet pattern is placing the ears too high and too far forward. That placement makes the head resemble a teddy bear, while low lateral ears maintain the otter profile.
Project Info at a Glance
| Skill Level | Time | Finished Size | Hook | Best For |
|---|---|---|---|---|
| Intermediate | Not specified by verified reference | Approx. 22 cm | 5.5 mm | Chunky chenille plush display figure |
The 22 cm reference size and 5.5 mm hook are based on a comparable chunky chenille otter. Yarn substitution changes the final measurement, so treat height as a working target rather than a fixed gauge result.
Materials and Tools
Yarn
- Medium brown — chunky chenille or velvet — prepare one 100 g ball — Premier Parfait Chunky, YarnArt Dolce, Himalaya Dolphin Baby, or similar.
- Cream or ivory — matching chenille — prepare one 100 g ball; only a fraction is required for the muzzle and paw details.
- Pale pink — matching chenille — prepare one 100 g ball; the shell is the main accent component.
- Black — fine cotton or embroidery yarn — small amount for whiskers, mouth, and facial embroidery.
- Tan or blush pink — small amount for toe marks and cheek patches.
Tools
- 5.5 mm crochet hook
- 20 mm black safety eyes, 2
- Black safety nose around 18–20 mm, or embroidered nose
- Polyester fiberfill
- Tapestry needle
- Stitch markers
- Straight pins
- Scissors
Chenille yarn can hide individual stitch tops, so keep the marker in the first stitch of every round rather than moving it by eye after several rounds.
Abbreviations
MR — magic ring
sc — single crochet
inc — 2 sc in one stitch
dec — decrease over 2 stitches
sl st — slip stitch
ch — chain
BLO — back loop only
FLO — front loop only
st/sts — stitch/stitches
R — round or row, as stated
For an invisible decrease, insert the hook through the front loops of the next two stitches, draw up a loop, then complete one single crochet through the remaining loops.
Pattern — Step by Step
Unless a section states otherwise, work in a continuous spiral. The construction below is an original photo-matched interpretation using standard six-stitch amigurumi shaping rather than a transcription of any searched pattern.
Head
Yarn: medium brown. Source: standard amigurumi math; proportions matched to the supplied photo.
R1: 6 sc in MR (6)
R2: inc ×6 (12)
R3: (1 sc, inc) ×6 (18)
R4: (2 sc, inc) ×6 (24)
R5: (3 sc, inc) ×6 (30)
R6: (4 sc, inc) ×6 (36)
R7: 36 sc (36)
R8: 36 sc (36)
R9: 36 sc (36)
R10: 36 sc (36)
R11: 36 sc (36)
R12: 36 sc (36)
Insert the 20 mm safety eyes between R9 and R10, leaving approximately 7 visible stitches between the inner edges. Check the cream muzzle position before locking the backs.
R13: (4 sc, dec) ×6 (30)
R14: (3 sc, dec) ×6 (24)
R15: (2 sc, dec) ×6 (18)
Stuff the crown firmly first. Add smaller amounts near the face so the eye area stays rounded instead of bulging.
R16: (1 sc, dec) ×6 (12)
R17: dec ×6 (6)
Fasten off. Leave a 20 cm tail, thread it through the front loops of the final 6 stitches, pull closed, and bury the end.
Cream Muzzle
Yarn: cream. Source: standard amigurumi math with elongated finishing for the supplied otter face.
R1: 6 sc in MR (6)
R2: inc ×6 (12)
R3: (1 sc, inc) ×6 (18)
R4: 18 sc (18)
Add a thin layer of stuffing only. Too much filling projects the muzzle like a bear snout rather than an otter muzzle.
Fasten off. Leave a 30 cm sewing tail. Pin the muzzle centrally below the eyes, with its upper edge approximately one round below the eye line.
Ears — Make 2
Yarn: medium brown. Source: standard amigurumi math.
R1: 6 sc in MR (6)
R2: inc ×6 (12)
R3: 12 sc (12)
Do not stuff. Flatten each ear into a semicircle and work 6 sc through both layers (6). Fasten off, leaving a 20 cm tail.
Body
Yarn: medium brown. Source: standard amigurumi math; medium plateau = 36 stitches.
R1: 6 sc in MR (6)
R2: inc ×6 (12)
R3: (1 sc, inc) ×6 (18)
R4: (2 sc, inc) ×6 (24)
R5: (3 sc, inc) ×6 (30)
R6: (4 sc, inc) ×6 (36)
R7: 36 sc (36)
R8: 36 sc (36)
R9: 36 sc (36)
R10: 36 sc (36)
R11: 36 sc (36)
R12: 36 sc (36)
R13: 36 sc (36)
R14: (4 sc, dec) ×6 (30)
R15: 30 sc (30)
R16: (3 sc, dec) ×6 (24)
R17: 24 sc (24)
R18: (2 sc, dec) ×6 (18)
R19: 18 sc (18)
R20: (1 sc, dec) ×6 (12)
Stuff the lower body more firmly than the upper chest. A dense base reduces backward tipping once the shell and tail are fitted.
Fasten off. Leave a 35 cm tail for attaching the head.
Front Arms — Make 2
Yarn: medium brown. Source: standard amigurumi math.
R1: 6 sc in MR (6)
R2: inc ×6 (12)
R3: 12 sc (12)
R4: 12 sc (12)
R5: 12 sc (12)
R6: 12 sc (12)
R7: dec ×6 (6)
Stuff only the lower two-thirds. Leave the shoulder end flexible so each arm can curve around the shell.
Fasten off. Leave a 25 cm tail for sewing.
Back Legs — Make 2
Yarn: medium brown. Source: standard amigurumi math.
R1: 6 sc in MR (6)
R2: inc ×6 (12)
R3: (1 sc, inc) ×6 (18)
R4: 18 sc (18)
R5: 18 sc (18)
R6: (1 sc, dec) ×6 (12)
R7: 12 sc (12)
R8: 12 sc (12)
Stuff firmly through R5, then more lightly near the attachment edge. Flatten the final opening so the foot points toward the viewer when sewn.
Fasten off. Leave a 30 cm tail.
Hind Paw Pads — Make 2
Yarn: tan or cream. Source: standard amigurumi math.
R1: 6 sc in MR (6)
R2: inc ×6 (12)
Fasten off with a 20 cm tail. Sew one flat circle onto the center of each hind foot. Add three short tan or pale-pink toe stitches above each pad, keeping the toe marks roughly 4–5 mm apart.
Tail
Yarn: medium brown. Source: standard amigurumi math; tapered otter-tail proportions matched to the photo.
R1: 6 sc in MR (6)
R2: inc ×6 (12)
R3: 12 sc (12)
R4: (1 sc, inc) ×6 (18)
R5: 18 sc (18)
R6: 18 sc (18)
R7: 18 sc (18)
R8: 18 sc (18)
Add only a narrow strip of stuffing in the first half. Keep the base flatter so the tail can lie against the table rather than projecting like a cylinder.
Flatten the opening and work 9 sc through both layers (9). Fasten off, leaving a 35 cm sewing tail.
Cheek Patches — Make 2
Yarn: pale pink. Source: standard amigurumi math.
R1: 6 sc in MR (6)
R2: inc ×6 (12)
Slip stitch to finish. Leave a 15 cm tail. For a closer match to the photograph, sew only the center portion of each circle down so the chenille edge stays softly rounded.
Nose and Mouth
Materials: black safety nose or black yarn. Source: photo-matched facial placement.
Center the nose on the upper third of the cream muzzle. If using yarn instead of a safety nose, work horizontal satin stitches across approximately 18 mm, then add a short vertical line beneath the center. Split that line into two shallow curved mouth stitches. Keep both curves below the muzzle midpoint so they do not collide with the whiskers.
Whiskers
Material: fine black cotton or embroidery thread. Source: photo-matched detail.
Add three whisker stitches on each side. Start each line beside the outer muzzle edge and angle the upper whisker slightly upward, the middle whisker nearly horizontal, and the lowest whisker slightly downward. Each visible whisker should measure about 20–25 mm.
Pink Scallop Shell — Make 2 Panels
Yarn: pale pink chenille. Source: original photo-matched accessory construction.
Work in rows. Turning chains do not count as stitches.
Row 1: ch 5; starting in second ch from hook, 4 sc (4)
Row 2: ch 1, turn, inc, 2 sc, inc (6)
Row 3: ch 1, turn, inc, 4 sc, inc (8)
Row 4: ch 1, turn, inc, 6 sc, inc (10)
Row 5: ch 1, turn, inc, 8 sc, inc (12)
Row 6: ch 1, turn, inc, 10 sc, inc (14)
Row 7: ch 1, turn, inc, 12 sc, inc (16)
Row 8: ch 1, turn, inc, 14 sc, inc (18)
Row 9: ch 1, turn, inc, 16 sc, inc (20)
Fasten off the first panel. Make the second panel but keep the yarn attached.
Place both panels together with the row edges aligned. Work sc through both layers around the outer curved edges, adding two sc at each upper corner to prevent pulling. Insert a thin layer of stuffing before closing the final 3 cm. The shell should remain flatter than the otter’s body.
Shell Ribs
Yarn: same pale pink. Source: photo-matched surface detail.
Mark the bottom center of the shell. Surface-slip-stitch five lines from that point toward the top edge, spreading the lines outward like a fan. Keep approximately 8–10 mm between adjacent ribs near the shell’s widest edge. A sixth rib can be added if the chosen chenille is thinner than the sample texture.
Assembly
- Pin the head to the 12-stitch neck opening so the face points directly forward. Sew around the opening twice, adding a small plug of stuffing before the last few stitches.
- Attach the body beneath the head with the broadest part of the belly facing forward. Check the figure from the side before knotting the sewing tail.
- Pin the cream muzzle below the eyes and sew around its edge. Attach or embroider the black nose before closing the final section if the backing must sit inside the muzzle.
- Add the mouth, whiskers, and pink cheek patches. Position the cheeks beside the lower outer corners of the eyes rather than directly beneath them.
- Sew the ears low on the sides of the head, approximately level with the upper half of the eyes. Angle each opening slightly forward.
- Attach the hind legs to the lower sides of the body. Rotate the feet forward and slightly outward so both paw pads remain visible from the front.
- Sew the tail to the lower back and direct it toward one side. The broad base should touch both the body and the work surface.
- Center the pink shell in front of the belly. Tack its lower back edge to the body with two or three hidden stitches so its weight cannot pull the arms downward.
- Wrap the front arms around the left and right sides of the shell. Sew the shoulder ends to the body first, then add one small hidden stitch where each paw contacts the shell.
- Check the toy from the front, side, and back. Bury all remaining tails through stuffed sections and trim only after each end has been drawn back into the chenille.
The completed figure should sit on both hind legs with the tail acting as a third rear support point and the shell centered between the front paws.
7 Technical Tips
- Stitch-marker drift: Missing one chenille stitch can move the round start by several millimeters and twist facial placement. Put the marker through both loops of the first stitch and recount every increase or decrease round.
- Understuffed base: A loose lower body allows the 22 cm figure to tip backward after the shell is added. Pack the bottom third until it resists light thumb pressure, while leaving the upper chest slightly softer.
- Visible decrease gaps: Standard decreases can expose fiberfill between bulky chenille stitches. Work every shaping decrease through the two front loops and keep the closing loop the same height as neighboring single crochets.
- Late eye placement: Once R13 of the head begins, access to the eye backs becomes restricted. Test both 20 mm eyes between R9 and R10 before locking either washer in place.
- Loose velvet tension: A 5.5 mm hook paired with 5 mm chenille should create a dense fabric without large holes. If openings wider than about 2 mm appear when the fabric is stretched lightly, drop one hook size.
- Unpinned limb rotation: Sewing a hind leg directly from the yarn tail can rotate the paw pad underneath the body. Pin each leg at three points and confirm that the circular pad faces forward before making the first permanent stitch.
- Short woven tails: Chenille ends can work free when only 2–3 cm is buried. Leave at least 15 cm after final fastening, pass it through the stuffed section in two different directions, then trim the returned end close to the surface.
Conclusion
The finished otter depends on three measurements more than decorative detail: a 36-stitch head and body plateau, low lateral ear placement, and hind feet positioned far enough forward to support the shell. After assembly, photograph the figure at eye level to check whether the cream muzzle, nose, tail, and shell remain readable from the front. The next practical step is to record your yarn brand, hook size, final height, and eye diameter beside the pattern before making a second version. Share the finished project on Pinterest and Instagram with #PinkShellOtter. For your next otter amigurumi crochet pattern, would you keep the scallop shell pink or match it to a natural cream shell color?









