Introduction
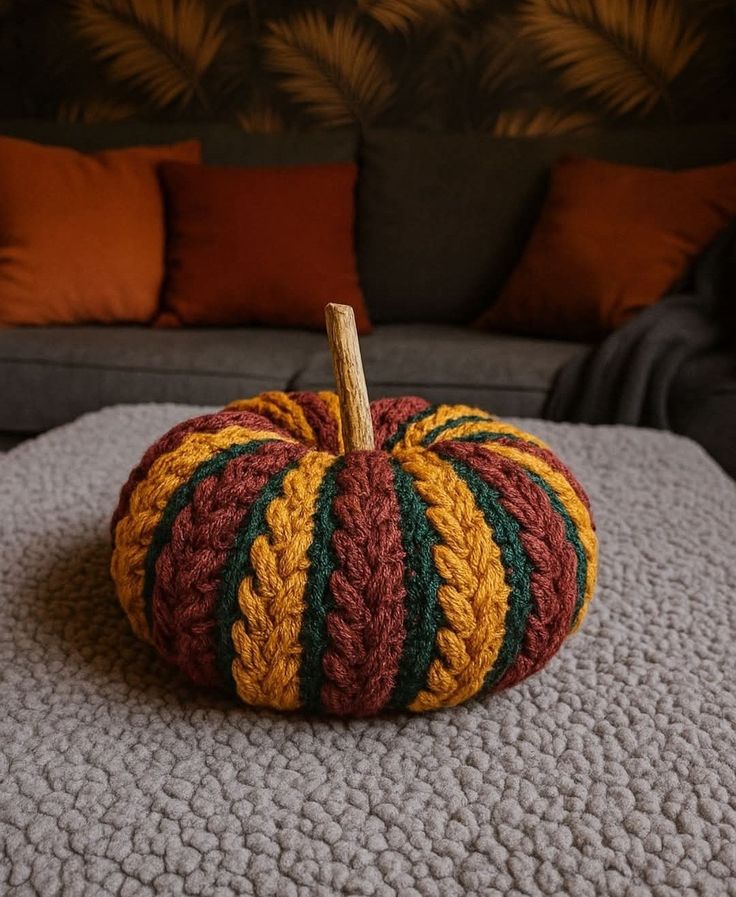
The green lines on this pumpkin are only one rib wide, yet losing them would merge the burgundy and mustard sections into a completely different design. This striped ribbed crochet pumpkin pattern uses worsted yarn, a 5 mm hook, a 28-stitch flat panel, and six repeated color sequences. Finished at roughly 27–31 cm wide, it creates a broad autumn decoration with pronounced vertical texture and a tall central stem.
The Design: What Makes This Pumpkin Different
The body is intentionally flatter and wider than a spherical amigurumi pumpkin. A long ribbed rectangle becomes the circumference after its short edges are joined, which lets every crochet row run vertically from crown to base. Color placement follows that geometry: burgundy and mustard occupy four-row bands, while forest green uses only one row between them. Those narrow separators are what distinguish this multicolor crochet pumpkin from a random striped project. Six external sculpting passes compress the finished tube into broad sections after stuffing. The crown is gathered tightly around a straight stem, with no leaves, vine, bow, or flower added. One frequent error with a ribbed pumpkin crochet pattern is changing colors across the stitch width instead of between rows. That creates horizontal stripes after assembly and does not match the photographed vertical layout.
Project Info at a Glance
| Skill Level | Time | Finished Size | Hook | Best For |
|---|---|---|---|---|
| Intermediate | 5–7 hours | Approx. 27–31 cm wide × 18–21 cm including stem | 5.0 mm | Autumn centerpiece, mantel, shelf, Thanksgiving décor |
Materials and Tools
Yarn
- Rust burgundy — Aran / worsted #4 — approximately 110–140 g — primary rib sections
- Mustard gold — Aran / worsted #4 — approximately 80–110 g — secondary rib sections
- Forest green — Aran / worsted #4 — approximately 25–40 g — narrow separator ribs
- Medium brown — Aran / worsted #4 — approximately 10–15 g — optional crochet stem
Tools
- 5.0 mm crochet hook
- Polyester fiberfill
- Large-eye yarn needle
- Long upholstery needle
- Strong burgundy or brown sculpting yarn
- Locking stitch markers
- Sharp scissors
- Measuring tape
- Optional natural wood stem, approximately 9–12 cm long
Abbreviations
ch — chain
sc — single crochet
hdc — half double crochet
sl st — slip stitch
BLO — back loop only
FO — fasten off
RS — right side
WS — wrong side
BLO means working beneath only the back loop of the stitch; leaving the front loop unused creates the raised horizontal ridge that becomes vertical after the pumpkin panel is assembled.
Pattern — Step by Step
The body is crocheted flat because this method best matches the vertical ribbing and controlled striping visible in the photograph. Keep all color changes along the same long edge so the carried or woven ends remain concentrated near one seam.
Body Panel
Hook: 5 mm. Begin with burgundy.
Ch 29.
Row 1: hdc in second ch from hook and in each ch across (28).
Ch 1 and turn.
Row 2: hdc BLO across (28).
Ch 1 and turn.
Row 3: hdc BLO across (28).
Continue working every subsequent row as 28 hdc BLO.
Color Sequence
Use the following ten-row sequence:
Rows 1–4: burgundy (28)
Row 5: forest green (28)
Rows 6–9: mustard gold (28)
Row 10: forest green (28)
Repeat this ten-row sequence six times for a total of 60 rows.
The final panel therefore contains:
- 24 burgundy rows
- 24 mustard rows
- 12 forest-green rows
Do not fasten off after every row if the yarn can be carried neatly along the edge. With four-row bands, however, cutting and weaving the wider-color sections usually creates a cleaner seam than carrying yarn through several rows.
Checking the Flat Panel
Lay the rectangle on a table without stretching it.
The 28-stitch dimension should measure approximately 23–26 cm depending on gauge.
The 60-row edge should measure approximately 55–62 cm.
Width becomes pumpkin height after gathering. Length becomes circumference.
If the panel is shorter than approximately 54 cm around the row edge, add one complete ten-row color repeat rather than adding isolated rows.
Joining the Body
Place the first and last rows together with RS facing inward.
Using burgundy or the color closest to both seam edges, sl st through corresponding stitches along the complete 28-stitch edge.
Do not make the join tighter than the panel rows.
Turn the tube RS out.
Closing the Bottom
Cut approximately 100 cm of strong matching yarn.
Thread the yarn needle.
Run the strand through the end stitches around one open edge of the tube, picking up approximately one stitch at every rib.
Pull gradually until the opening closes.
Pass through the gathered center twice.
Knot firmly on the inside.
Stuffing the Pumpkin
Place the gathered side downward.
Add polyester filling in small handfuls.
Fill the outer circumference first, then the center.
The side wall should feel firm while the top remains compressible enough to gather.
Do not make the pumpkin spherical. Press the upper and lower surfaces toward one another while stuffing so the body remains approximately half as high as it is wide.
Closing the Crown
Thread another 100 cm length of strong matching yarn.
Run the needle through the upper edge stitches around the complete opening.
Pull until the opening reduces to approximately 2–3 cm.
If using a natural stem, insert the stem before closing the final gap.
Tighten the gathering yarn firmly around its base.
Pass across the opening twice and knot securely.
Sculpting the Six Pumpkin Sections
Cut a strong yarn strand approximately 180–200 cm long.
Insert the long needle through the bottom center and bring it out beside the stem.
Run the strand down the outside of the pumpkin in a natural rib valley.
Re-enter through the bottom center and pull until the first groove becomes visible.
Create the second groove directly opposite the first.
Add the third and fourth at approximately 90 degrees to the first pair.
Position the final two grooves between the existing channels so six broad sections surround the body.
Adjust each strand gradually. One groove pulled to full depth before the others are established can shift the stuffing off center.
Optional Crochet Stem
Yarn: medium brown.
R1: 6 sc in MR (6)
R2: inc ×6 (12)
R3: BLO sc around (12)
R4: sc around (12)
R5: sc around (12)
R6: sc around (12)
R7: sc around (12)
R8: sc around (12)
R9: sc around (12)
R10: sc around (12)
Stuff lightly.
Fasten off with a 35 cm tail.
Sew the 12-stitch opening over the gathered crown.
Why the Panel Method Fits This Pumpkin
The photograph has long vertical structures that resemble knitted cables or pronounced crochet ribs.
Working a traditional sphere in continuous single crochet would orient most stitch rows horizontally around the body. A flat ribbed rectangle changes that relationship.
Every BLO row creates a raised ridge. Once the short ends are joined, those ribs run from bottom to top.
The same construction also makes intentional color control easier. Four burgundy rows become one broad burgundy region; one green row becomes a narrow dividing line; four mustard rows form the next large region.
This method is supported by current ribbed pumpkin patterns that use rectangles, seaming, gathering, and post-stuffing shaping. :contentReference[oaicite:14]{index=14}
Controlling the Three-Color Repeat
Lay the panel flat every ten rows.
Each completed sequence should contain two broad color bands separated by green.
Do not alternate colors every row. That would make the green, gold, and burgundy equally dominant.
The supplied pumpkin instead uses green as a narrow outline.
A practical repeat is:
4 burgundy + 1 green + 4 mustard + 1 green.
Six repeats give 60 rows and preserve the same color rhythm through the complete circumference.
If adding a seventh repeat for a larger pumpkin, add all ten rows. Partial repeats create an obvious mismatch at the seam.
Creating Strong Knit-Look Ribs
BLO half double crochet is effective because the unused front loops form raised lines across the flat fabric.
Current published ribbed pumpkin patterns also use third-loop hdc, BLO stitches, linked slip stitches, and combinations of ribbing with puff stitches. :contentReference[oaicite:15]{index=15}
For this version, BLO hdc keeps the color bands clean and makes 60 rows manageable.
Maintain the same hook angle throughout the panel.
If one row is worked significantly tighter, that rib can pull inward once the tube is stuffed. The problem becomes particularly visible in single-row green sections.
Choosing Yarn Weight
A current Ravelry ribbed pumpkin uses Aran yarn and a 5 mm hook with a published gauge of 12 stitches and 9 rows per 10 cm in hdc. Another 2025 pattern moves to bulky yarn and a 6 mm hook, while super-bulky farmhouse versions use 8 mm. :contentReference[oaicite:16]{index=16}
The photographed texture sits between fine amigurumi and oversized chenille.
Worsted or Aran yarn with a 5 mm hook keeps individual stitches readable while creating enough volume for a pumpkin close to 30 cm wide.
If using very dense wool, a 5.5 mm hook may prevent the panel from becoming stiff.
Getting the Low, Broad Silhouette
The reference pumpkin is much wider than it is tall.
That proportion comes from both panel dimensions and stuffing.
The 28-stitch edge controls vertical height. The 60-row edge controls circumference.
Do not keep adding stitches to make the pumpkin larger. Add complete color repeats to the row count instead.
A longer tube increases circumference without making the body taller.
After stuffing, place one hand at the crown and one beneath the base. Compress the form slightly before the upper opening is fully secured.
This redistributes filling outward and creates the squat silhouette.
Stuffing Without Losing the Ribbing
Too little stuffing lets the fabric fold between color bands. Too much stretches the ridges until the BLO texture nearly disappears.
Add filling in small portions.
Rotate the pumpkin after every few handfuls and check the exterior.
The rib valleys should remain visible without exposing holes between stitches.
If the 28-stitch rows stretch enough to reveal filling, stop adding volume and redistribute what is already inside.
The final body should compress slightly under hand pressure but recover its shape when released.
Sculpting the Sections
The crochet ribbing alone produces fine vertical texture. Sculpting yarn adds the much deeper pumpkin channels.
Six channels work well for a body approximately 30 cm wide.
Place each sculpting pass inside or immediately beside an existing rib valley. This hides the strand and prevents it from crossing the raised color texture.
Tighten opposite grooves in pairs.
Check the pumpkin from above after each pair. The central stem should stay roughly in the middle rather than drifting toward one side.
If one section becomes much narrower than its neighbors, release tension before tying the final knot.
Natural Stem or Crochet Stem
The reference uses a straight woody stem approximately one-third to one-half the visible body height.
A dry branch segment gives the closest visual result.
Choose one approximately 2–3 cm in diameter and 9–12 cm long. Remove loose bark and sharp edges before inserting it.
A crochet stem is the washable alternative.
The 12-stitch tube should be stuffed only lightly. Overfilling creates a perfectly cylindrical shape, while the photograph shows a stem with slight natural irregularity.
Estimating Yarn
Published super-bulky farmhouse pumpkins use roughly 20–95 yards depending on size. Smaller worsted ribbed designs can use approximately 50–60 yards for a small pumpkin, so a 30 cm three-color version requires considerably more yarn. :contentReference[oaicite:17]{index=17}
Because color bands have fixed row proportions, the main-color estimate can be divided mathematically.
Burgundy occupies 24 of 60 body rows.
Mustard also occupies 24.
Green occupies 12.
That gives an approximate body ratio of:
40% burgundy / 40% mustard / 20% green by row count.
Actual grams can vary because green yarn may differ in density or twist.
Making the Seam Disappear
The first and final panel rows should belong to compatible parts of the color sequence.
This pattern begins at the start of a burgundy block and ends on a green separator.
When seaming, position the joint toward the back of the pumpkin.
Slip stitch through matching edge loops without pulling.
After stuffing and sculpting, place one deep channel directly over or beside the seam. That hides the slight difference in rib spacing created by joining the rectangle.
Adjusting the Size
Keep the row width and circumference as separate controls.
For a smaller pumpkin, use approximately 22–24 hdc per row and four or five complete color repeats.
For the photographed medium-large scale, use 28 hdc and six repeats.
For a larger centerpiece, use 32–34 hdc and seven or eight complete repeats.
Do not change only the hook size to resize the project. A significantly larger hook changes rib definition and may expose stuffing.
Competition Gap
Current ribbed crochet pumpkin patterns commonly focus on one solid fall color, neutral farmhouse shades, self-striping yarn, cinnamon-stick stems, or multi-size sets. A newer 2025 design explicitly supports color changes but combines them with puff-stitch texture. :contentReference[oaicite:18]{index=18}
The supplied reference uses a more controlled graphic arrangement: broad rust and mustard ribs alternate around the body while forest green appears only as a narrow separator.
There are no leaves, flowers, bows, or vines competing with that three-color pattern.
That creates a useful search position for a striped ribbed crochet pumpkin pattern aimed specifically at retro autumn palettes and textured home décor.
Assembly
- Complete all 60 ribbed body rows and confirm that every ten-row repeat contains four burgundy, one green, four mustard, and one green row.
- Measure the relaxed panel; aim for approximately 23–26 cm across the 28-stitch edge and 55–62 cm along the striped row edge.
- Bring the first and final rows together and slip-stitch the complete seam without shortening it by more than approximately 1 cm.
- Gather the bottom opening with strong yarn, pull it fully closed, secure the center twice, and turn the body RS out.
- Add fiberfill gradually while pressing the top and bottom toward each other until the body becomes broad rather than spherical.
- Gather the upper opening to approximately 2–3 cm, insert the natural or crocheted stem, and tighten the crown securely around its base.
- Pass sculpting yarn from bottom center to crown and form the first deep groove along an existing rib valley.
- Create the opposite groove next, then divide the remaining circumference until six broad pumpkin sections have comparable widths.
- Position the visible seam inside one sculpted channel, adjust the stuffing through gentle external pressure, and tighten all six channels to matching depth.
- Knot and bury the sculpting yarn at the base, trim any visible color-change tails, and place the pumpkin on a flat surface to confirm that the bottom remains level.
The completed pumpkin should be substantially wider than tall, with six broad sculpted sections and narrow green lines clearly separating the burgundy and mustard rib groups.
7 Technical Tips
- Horizontal-looking stripes: Color changes made across stitches rather than between rows turn the palette sideways after assembly. Change yarn only at row ends so every color band runs from crown to base.
- Green bands becoming too wide: Two or three forest-green rows can compete with the major colors. Keep each separator to exactly one 28-stitch row for the photo-matched proportion.
- Contracted seam: Tight slip stitches can shorten the joined edge and create one narrow pumpkin section. The seam should measure within approximately 1 cm of the unjoined 28-stitch panel height.
- Weak rib definition: Working through both loops removes the raised BLO line. Insert the hook under the back loop only on every ribbed body row.
- Spherical body: Packing stuffing into the vertical center can make the pumpkin too tall. Push filling toward the circumference and compress the crown-to-base distance to approximately half the final diameter.
- Off-center stem: Tightening six channels one after another in clockwise order can pull the crown sideways. Sculpt opposite channels in pairs and check the stem position after every two grooves.
- Visible sculpting strands: Yarn placed over a raised rib sits on top of the fabric. Run each strand inside a rib valley and match the sculpting yarn to the darkest neighboring color.
Finishing Checks
Place the completed pumpkin on a level table and view it from directly above.
The stem should sit close to the geometric center.
Six primary channels should divide the circumference without one section becoming conspicuously narrow.
Check the color sequence next. Burgundy and mustard need similar visual weight, while forest green should remain a narrow dividing accent.
Look at the side profile. The body should be noticeably wider than tall and should not taper into a ball shape.
Finally, rotate the pumpkin so the joining seam sits toward the rear or inside a deep sculpted groove.
Conclusion
Work one complete ten-row color repeat before committing to the full striped ribbed crochet pumpkin pattern, because that sample establishes rib height, color proportions, and the final circumference calculation. Continue to six complete repeats, seam the rectangle without tightening it, then shape the stuffed tube into a low profile before sculpting six channels. The next practical step is to measure your first ten rows and confirm that six repeats will reach at least 55 cm. Share a close-up of the green separator ribs on Pinterest and the finished autumn display on Instagram with #StripedRibbedPumpkin. Would you keep the forest-green dividers this narrow or make them two ribs wide?









