Introduction
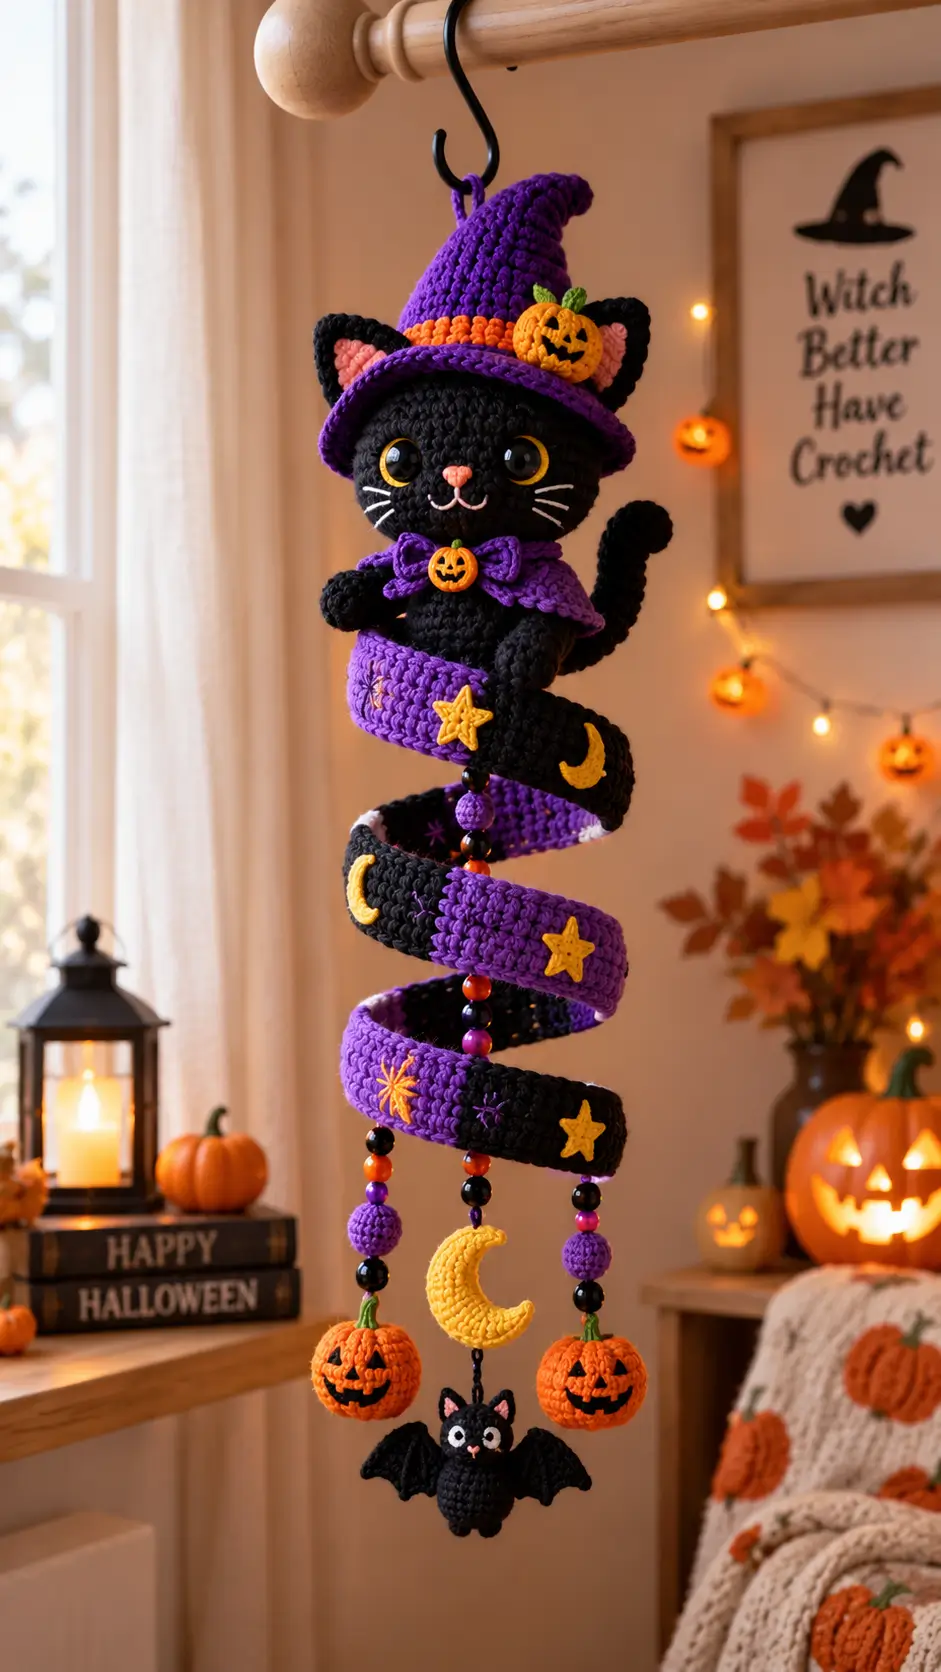
A black cat suspended from a purple witch’s hat needs its tail and triangular ears to remain readable even inside a crowded Halloween mobile. This witch cat amigurumi crochet pattern uses sport-weight yarn, a 2 mm hook and a medium 22–24 cm cat format for intermediate makers. The separate spiral hanger turns the figure into vertical seasonal décor rather than another shelf-standing amigurumi.
The Design: What Makes the Witch Cat Different
The head is wider than the torso so the black ears, amber eyes and small pink muzzle remain visible beneath an oversized purple brim. A 36-stitch head plateau gives enough width without pushing the piece into the proportions of a large plush. The Halloween cat crochet pattern also uses a 30-stitch body, keeping the torso narrow enough for the cape and spiral hanger to remain separate visual layers.
The tail needs a second structural decision: it curves upward rather than resting behind the body. A lightly stuffed tube can hold that silhouette after sewing. The hat is intentionally tall because a short cone reads as a party hat once it sits between two pointed cat ears.
One frequent black cat amigurumi error is losing the facial landmarks in dark stitches. High-contrast eyes, a pink nose and pale embroidered whiskers correct that problem.
Project Info at a Glance
| Skill Level | Time | Finished Size | Hook | Best For |
|---|---|---|---|---|
| Intermediate | 7–10 hours for cat; longer with mobile | Cat approx. 22–24 cm | 2.0 mm | Hanging Halloween décor |
The 2 mm hook and sport-weight baseline are based on comparable published witch-cat amigurumi specifications. Finished dimensions increase with the larger stitch geometry used in this photo-based interpretation.
Materials and Tools
Yarn
- Black — sport-weight cotton — approximately 70–90 g — choose a firm mercerized or matte cotton with clear stitch definition.
- Purple — sport-weight cotton — approximately 40–50 g — for the hat, cape, spiral and hanging balls.
- Orange — sport-weight cotton — approximately 20–30 g — for pumpkins and the hatband.
- Gold/yellow — sport-weight cotton — approximately 10–15 g — for stars and crescent moons.
- Pink — sport-weight cotton — approximately 5 g — for inner ears, nose and optional cheek patches.
- Green — sport-weight cotton — approximately 5 g — for pumpkin stems and leaves.
- White — embroidery thread or fine cotton — small quantity for whiskers and miniature facial details.
Tools
- 2.0 mm crochet hook
- 14–16 mm safety eyes
- Polyester stuffing
- Tapestry needle
- Stitch markers
- Scissors
- Pins
- Strong hanging cord
- Decorative beads — optional
Safety note: This design is intended as hanging seasonal décor. Safety eyes, beads and long hanging cords make the completed mobile unsuitable for babies or unsupervised young children.
Abbreviations
- MR = magic ring
- sc = single crochet
- inc = 2 sc in one stitch
- dec = single-crochet decrease
- sl st = slip stitch
- ch = chain
- BLO = back loop only
- hdc = half double crochet
- dc = double crochet
For an invisible decrease, insert the hook through the front loops of the next two stitches before completing one single crochet.
Pattern — Step by Step
Work in a continuous spiral unless a joined round is specifically stated. The stitch sequences below are an original construction calculated for the photographed witch-cat mobile.
Head
Yarn: black — standard 6-stitch amigurumi geometry.
R1: 6 sc in MR (6)
R2: inc ×6 (12)
R3: (sc, inc) ×6 (18)
R4: (2 sc, inc) ×6 (24)
R5: (3 sc, inc) ×6 (30)
R6: (4 sc, inc) ×6 (36)
R7–R13: sc around (36)
R14: (4 sc, dec) ×6 (30)
R15: (3 sc, dec) ×6 (24)
Fit the eyes between R9 and R10, approximately 8 stitches apart. Embroider the pink nose between them before the opening becomes small.
R16: (2 sc, dec) ×6 (18)
R17: (sc, dec) ×6 (12)
Stuff firmly, keeping the face broad rather than spherical.
R18: dec ×6 (6)
Fasten off and close the opening.
Body
Yarn: black — standard 6-stitch amigurumi geometry.
R1: 6 sc in MR (6)
R2: inc ×6 (12)
R3: (sc, inc) ×6 (18)
R4: (2 sc, inc) ×6 (24)
R5: (3 sc, inc) ×6 (30)
R6–R11: sc around (30)
R12: (3 sc, dec) ×6 (24)
R13–R15: sc around (24)
R16: (2 sc, dec) ×6 (18)
R17: sc around (18)
R18: (sc, dec) ×6 (12)
Stuff the lower half firmly and the neck moderately.
R19: dec ×6 (6)
Fasten off. Leave a 25 cm tail for joining the body beneath the head.
Arms / Front Legs — Make 2
Yarn: black.
R1: 6 sc in MR (6)
R2: inc ×6 (12)
R3–R5: sc around (12)
R6: (sc, dec) ×4 (8)
R7–R10: sc around (8)
Stuff only the paw and lower half.
Flatten the opening and work 4 sc through both layers (4). Fasten off, leaving 20 cm for sewing.
Back Legs — Make 2
Yarn: black.
R1: 6 sc in MR (6)
R2: inc ×6 (12)
R3: (sc, inc) ×6 (18)
R4–R5: sc around (18)
R6: (sc, dec) ×6 (12)
R7–R9: sc around (12)
R10: dec ×6 (6)
Stuff before R10. Fasten off and leave a 20 cm sewing tail.
Outer Ears — Make 2
Yarn: black.
R1: 6 sc in MR (6)
R2: (sc, inc) ×3 (9)
R3: (2 sc, inc) ×3 (12)
R4: (3 sc, inc) ×3 (15)
R5: sc around (15)
Do not stuff. Flatten each ear into a triangle and leave 20 cm for sewing.
Inner Ears — Make 2
Yarn: pink.
Ch 5. Starting in the second chain from the hook: sc, hdc, dc, 4 dc in final chain; work down the opposite side with dc, hdc, sc.
Fasten off with a 12 cm tail. Stitch each pink insert onto an outer ear before attaching the ear to the head.
Tail
Yarn: black.
R1: 6 sc in MR (6)
R2: inc ×6 (12)
R3–R18: sc around (12)
R19: (2 sc, dec) ×3 (9)
R20–R26: sc around (9)
Add very small amounts of stuffing every four or five rounds. Bend the finished tube into an upward hook while sewing it to the rear-right side of the body.
Fasten off with a 25 cm tail.
Cheek Patches — Make 2
Yarn: pink.
R1: 6 sc in MR (6)
R2: inc ×6 (12)
Sl st to the first stitch and fasten off.
The photographed cat does not show strong circular cheeks, so these pieces are optional. For the closest photo match, omit them and retain only the pink nose and inner ears.
Witch Hat
Yarn: purple with orange band.
R1: 6 sc in MR (6)
R2–R3: sc around (6)
R4: inc ×6 (12)
R5–R6: sc around (12)
R7: (sc, inc) ×6 (18)
R8–R9: sc around (18)
R10: (2 sc, inc) ×6 (24)
R11–R12: sc around (24)
R13: (3 sc, inc) ×6 (30)
R14: (4 sc, inc) ×6 (36)
R15: sc around in orange (36)
Change to purple for the brim.
R16: BLO (5 sc, inc) ×6 (42)
R17: (6 sc, inc) ×6 (48)
R18: (7 sc, inc) ×6 (54)
Sl st and fasten off. Curve the top third of the cone toward one side and secure the bend with several hidden stitches.
Pumpkin Hat Appliqué
Yarn: orange and green.
R1: 6 sc in MR (6)
R2: inc ×6 (12)
R3: (sc, inc) ×6 (18)
R4: sc around (18)
R5: (sc, dec) ×6 (12)
R6: dec ×6 (6)
Stuff lightly. Close the opening, then pass orange yarn vertically around the pumpkin four times to form the lobes. Embroider a black jack-o’-lantern face and add a short green stem.
Cape and Bow
Yarn: purple.
Ch 25.
Row 1: starting in second ch, 24 sc (24)
Row 2: ch 1, turn, (3 sc, inc) ×6 (30)
Row 3: ch 1, turn, (4 sc, inc) ×6 (36)
Row 4: ch 1, turn, 36 sc (36)
Row 5: ch 1, turn, (5 sc, inc) ×6 (42)
Fasten off.
For the bow, ch 13 and work 12 sc for four rows. Fasten off, pinch the center and wrap it with purple yarn. Sew the bow beneath the chin and add a miniature orange pumpkin button if desired.
Spiral Mobile Ribbon
Yarn: alternating purple and black.
Ch 121.
Row 1: work 3 dc into the third chain from the hook and 3 dc into every remaining chain.
The dense increase forces the strip to coil. Work a second strip in black for the two-tone appearance, then stitch the two coils together at spaced intervals rather than crocheting them into one heavy tube.
Attach gold stars, crescent moons and embroidered spider motifs at irregular but balanced positions.
Hanging Pumpkins — Make 2
Yarn: orange.
R1: 6 sc in MR (6)
R2: inc ×6 (12)
R3: (sc, inc) ×6 (18)
R4–R6: sc around (18)
R7: (sc, dec) ×6 (12)
R8: dec ×6 (6)
Stuff before closing. Add green stems and embroidered black jack-o’-lantern faces.
Crescent Moon
Yarn: gold/yellow.
Ch 13. Starting in the second chain: sl st, sc, 2 hdc, 4 dc, 2 hdc, sc, sl st. Work back along the opposite side with increases concentrated through the central six stitches so the strip bends into a crescent.
Fasten off and block flat before suspending it from the center cord.
Mini Bat-Cat
Yarn: black with pink and white embroidery.
R1: 6 sc in MR (6)
R2: inc ×6 (12)
R3: (sc, inc) ×6 (18)
R4–R6: sc around (18)
R7: (sc, dec) ×6 (12)
R8: dec ×6 (6)
Stuff and close. Crochet two tiny triangular ears from 6-stitch rings and flatten them.
For each wing, ch 7, then work sc, hdc, dc, dc, hdc, sc back across. Add three chain loops along the lower edge to suggest bat-wing points.
Embroider white eyes and a pink nose. Suspend the miniature bat-cat beneath the moon.
Assembly
- Sew the stuffed head centrally to the body, checking the eye line from the front before knotting the joining yarn.
- Position the ears between approximately R3 and R7 of the head, leaving enough central space for the witch hat.
- Finish the face with the pink nose, mouth and white whiskers. Add the optional cheek circles only if a stronger pink accent is wanted.
- Pin the front legs beside the upper torso and the back legs across the lower front, matching the seated pose.
- Attach the tail to the rear of the body and tack its upper curve to the body once if the tube drops under its own weight.
- Fit the witch hat over the ears, stitch it at four concealed points, then add the orange pumpkin appliqué to the front-right side of the cone.
- Place the cape around the shoulders and stitch the bow directly below the chin so its weight cannot rotate the collar.
- Sew the cat securely to the upper section of the spiral, passing attachment thread through the body rather than through a single crochet stitch.
- Suspend the pumpkins, crescent moon and mini bat-cat from separate cords. Knot every cord independently.
- Run the main hanging cord through the hat, head and upper body so the cat’s stuffed structure carries the load instead of the hat brim alone.
The completed structure should hang vertically with the cat centered above the spiral and the three lower ornaments separated.
7 Technical Tips
- Control stitch-marker drift. Moving the marker several stitches during the 36-stitch head plateau can rotate the decrease line into the face. Mark the first stitch of every round and recount at R6, R13 and R18.
- Watch head stuffing firmness. Packing the head until it becomes spherical hides the broad feline silhouette. Stop when the 36-stitch sides remain slightly flatter across the eye line.
- Prevent visible decreases. Ordinary two-stitch decreases can leave gaps in black yarn where pale stuffing shows. Use front-loop invisible decreases throughout R14–R18 of the head.
- Install the eyes at the correct stage. Waiting until after R16 leaves too little room for the washers and fingers. Fit both eyes before the head opening falls below 24 stitches.
- Correct loose dark-yarn tension. Gaps become especially visible when the mobile hangs in front of a window or lamp. If stuffing appears between stitches, reduce the hook by 0.25 mm rather than pulling every stitch excessively tight.
- Pin both legs before sewing. A 5 mm difference in back-leg height can make the seated cat appear twisted once suspended. Inspect the figure while it is hanging before permanently attaching the legs.
- Reinforce the raised tail. An upright tail places leverage on its attachment point. Weave the 25 cm sewing tail through at least three separate body rows and reverse direction twice before trimming.
Conclusion
The finished display combines a medium black cat, pointed purple hat and layered hanging ornaments rather than treating the character as a conventional shelf toy. Before mounting it, check every suspension knot, confirm that the spiral clears the cat’s tail and measure the mobile against its intended hanging space. Your next step is to crochet the 36-stitch head first; its finished diameter determines whether the hat and 14–16 mm eyes remain proportionate. Save this witch cat amigurumi crochet pattern to Pinterest and share the finished mobile on Instagram with #WitchCatHalloweenMobile. Which detail will you keep closest to the photographed cat: the pumpkin hat badge, raised tail or dangling crescent moon?









