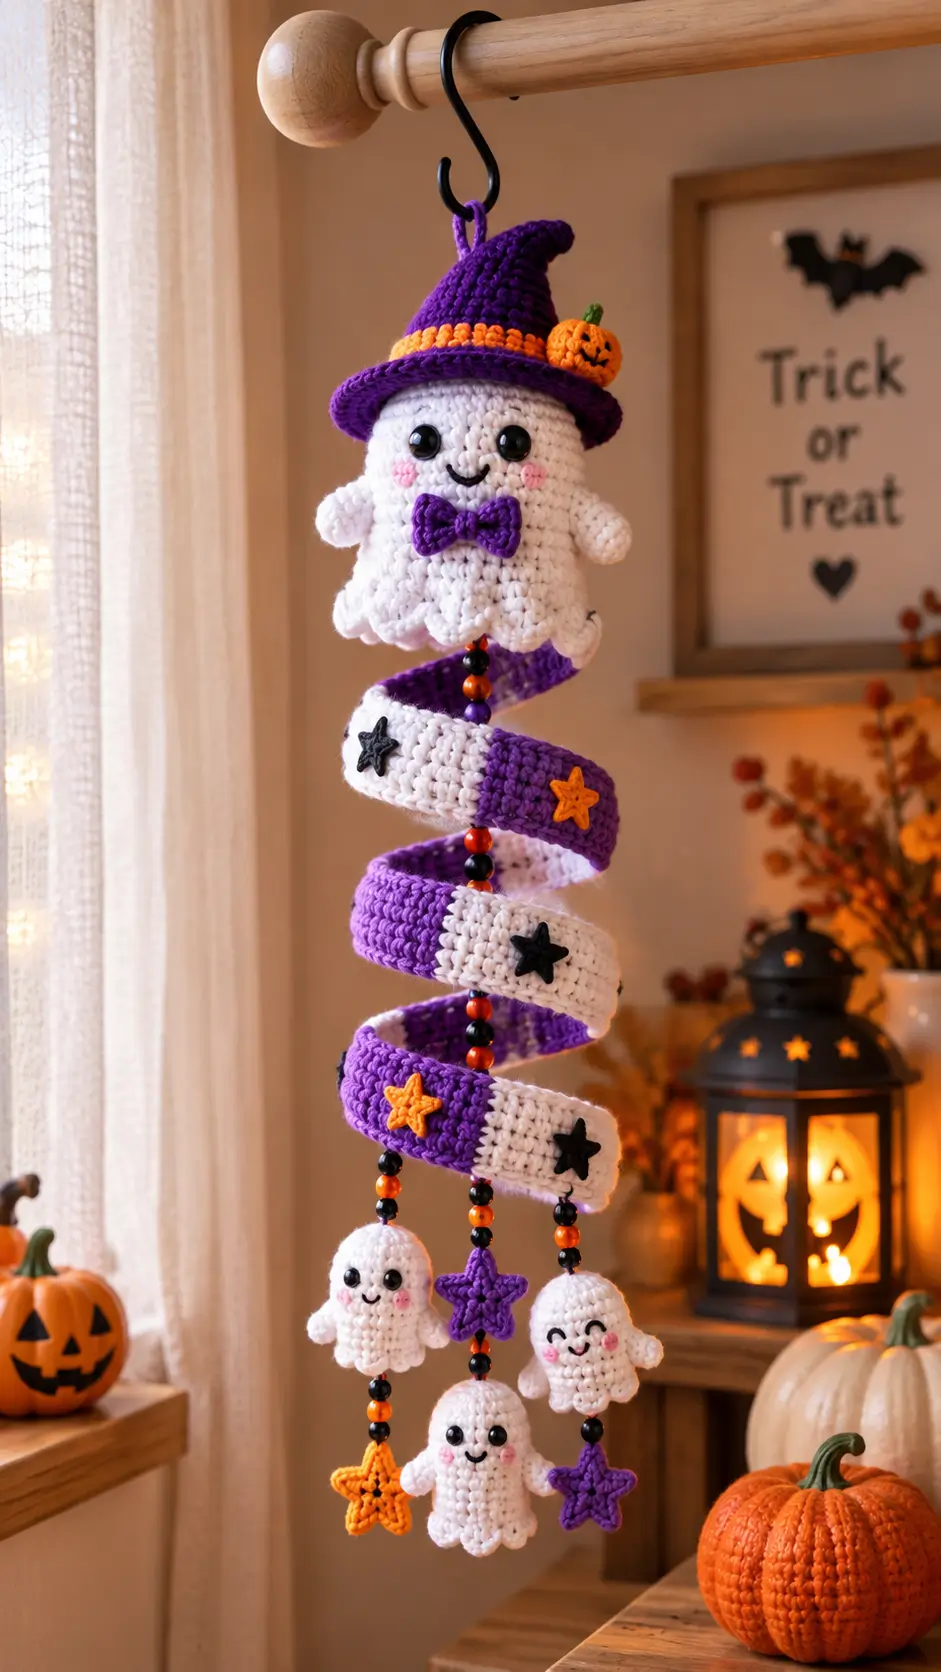
A ghost wearing a pointed purple witch hat needs its widest crochet section below the eyes, not at the crown. This ghost amigurumi crochet pattern uses Aran-weight yarn, a 3.5 mm hook and an approximately 11 cm main figure, with intermediate-level assembly. The scalloped body, pumpkin, bow, spiral streamer and miniature ghosts turn one stuffed figure into a vertical Halloween decoration for a hook, wall peg or display rail.
The Design: What Makes This Witch Ghost Different
The main ghost uses a 36-stitch head plateau so the face stays broad enough for two 10 mm eyes without becoming spherical. Its body repeats that maximum circumference, then finishes with separate scallops instead of tapering to ordinary feet; that choice reproduces the floating silhouette visible in the reference image.
The crochet ghost with witch hat also needs a firm brim. A soft brim collapses over the eyes once the pumpkin and hat band add weight, so the brim is worked as a separate flat disc and stitched to the cone. The long streamer changes the balance again: the suspension point should run through the hat and main ghost rather than relying on the hat seam alone.
A frequent mistake in a Halloween ghost crochet pattern is placing the face too low. That leaves the bow, cheeks and scalloped hem visually compressed into the lower half.
Project Info at a Glance
| Skill Level | Time | Finished Size | Hook | Best For |
|---|---|---|---|---|
| Intermediate | 5–7 hours for full mobile | Main ghost approx. 11 cm | 3.5 mm | Hanging Halloween décor |
The 11 cm size is a published benchmark for a comparable cotton ghost, while 3.5 mm is documented for Aran-weight Halloween ghost patterns.
Materials and Tools
Yarn
- White — Aran/worsted — approximately 20–30 g for the main ghost plus extra for mini ghosts — cotton or smooth acrylic
- Purple — Aran/worsted — approximately 15–20 g for hat, bow, streamer and stars
- Orange — Aran/worsted — approximately 5–10 g for hat band, pumpkin and stars
- Black — Aran/worsted or embroidery yarn — small amount for mouths and star appliqués
- Pink — Aran/worsted or embroidery yarn — small amount for cheeks
- Green — scrap yarn — pumpkin stem
A comparable 11 cm ghost uses approximately 20 g of white yarn and around 5 g of additional-color yarn for its hat and pumpkin, making those useful minimum benchmarks.
Tools
- 3.5 mm crochet hook
- 10 mm safety eyes for the main ghost
- 6–8 mm safety eyes for mini ghosts, or embroidered eyes for a child-safe decorative version
- Polyester stuffing
- Tapestry needle
- Stitch markers
- Scissors
- Pins
- Black embroidery thread
- Optional orange and black craft beads
- Strong hanging cord
Safety note: Safety eyes and loose beads are not suitable for items intended for children under three because detached components can present a choking hazard.
Abbreviations
- MR — magic ring
- sc — single crochet
- inc — 2 sc in one stitch
- dec — single-crochet decrease
- sl st — slip stitch
- ch — chain
- BLO — back loop only
- FLO — front loop only
- hdc — half double crochet
- dc — double crochet
For an invisible decrease, insert the hook through the front loops of the next two stitches, yarn over and complete one single crochet through both loops.
Ghost Amigurumi Pattern — Step by Step
Work in continuous spiral rounds unless a section specifically states otherwise. Place a stitch marker in the first stitch of every round.
Head
Yarn: white — independently drafted with standard six-stitch amigurumi expansion.
R1: 6 sc in MR (6)
R2: inc ×6 (12)
R3: (1 sc, inc) ×6 (18)
R4: (2 sc, inc) ×6 (24)
R5: (3 sc, inc) ×6 (30)
R6: (4 sc, inc) ×6 (36)
R7–R12: 36 sc (36)
Insert 10 mm safety eyes between R9 and R10, approximately 7 stitches apart. Check the expression before attaching the washers.
R13: (4 sc, dec) ×6 (30)
R14: (3 sc, dec) ×6 (24)
R15: (2 sc, dec) ×6 (18)
Stuff firmly, adding small portions rather than one large wad.
R16: (1 sc, dec) ×6 (12)
R17: dec ×6 (6)
Fasten off. Leave a 25 cm tail for assembly.
Body
Yarn: white — standard amigurumi math.
R1: 6 sc in MR (6)
R2: inc ×6 (12)
R3: (1 sc, inc) ×6 (18)
R4: (2 sc, inc) ×6 (24)
R5: (3 sc, inc) ×6 (30)
R6: (4 sc, inc) ×6 (36)
R7–R11: 36 sc (36)
R12: (4 sc, dec) ×6 (30)
R13: 30 sc (30)
R14: (3 sc, dec) ×6 (24)
Stuff the upper two-thirds firmly. Keep the bottom slightly softer so the scallops can curve downward.
R15: (2 sc, dec) ×6 (18)
R16: (1 sc, dec) ×6 (12)
R17: dec ×6 (6)
Fasten off. Leave a 30 cm tail.
Ghost Hem Scallops
Yarn: white — decorative edging.
Join white yarn at the lower-body seam.
R1: Work evenly around the lower circumference with 30 sc (30).
R2: (sl st in next st, 5 dc in next st, sl st in next st) repeat around as evenly as possible.
The ghost has multiple rounded points rather than legs. Space five or six scallops around the bottom and adjust the final slip-stitch spacing rather than forcing a distorted final shell.
Fasten off. Weave in the tail.
Arms — Make 2
Yarn: white.
R1: 6 sc in MR (6)
R2: inc ×6 (12)
R3–R5: 12 sc (12)
R6: dec ×6 (6)
Add only a small pinch of stuffing to the rounded end. Flatten the open edge.
Fasten off. Leave a 20 cm sewing tail. The finished arms should angle slightly downward instead of extending horizontally.
Cheek Patches — Make 2
Yarn: pink.
R1: 6 sc in MR (6). Sl st to the first sc.
Fasten off. Leave a 12 cm tail. Flatten each patch and stitch one below the outer edge of each eye. For a subtler result, substitute three short pink embroidery stitches per cheek.
Witch Hat Cone
Yarn: purple.
R1: 6 sc in MR (6)
R2–R3: 6 sc (6)
R4: inc ×6 (12)
R5–R6: 12 sc (12)
R7: (1 sc, inc) ×6 (18)
R8–R9: 18 sc (18)
R10: (2 sc, inc) ×6 (24)
R11–R12: 24 sc (24)
R13: (3 sc, inc) ×6 (30)
R14–R15: 30 sc (30)
R16: (4 sc, inc) ×6 (36)
R17: 36 sc (36)
Do not stuff the tip. Bend the upper section gently to one side after assembly.
Fasten off. Leave a 25 cm tail.
Witch Hat Brim
Yarn: purple.
R1: 6 sc in MR (6)
R2: inc ×6 (12)
R3: (1 sc, inc) ×6 (18)
R4: (2 sc, inc) ×6 (24)
R5: (3 sc, inc) ×6 (30)
R6: (4 sc, inc) ×6 (36)
R7: (5 sc, inc) ×6 (42)
Sl st to finish. Fasten off and leave a 30 cm tail. Place the cone centrally on the brim and sew around the bottom of the cone.
Orange Hat Band
Yarn: orange.
Ch 37.
Row 1: Starting in second ch from hook, 36 sc (36).
Fasten off. Leave a 20 cm tail. Wrap the band around the base of the cone immediately above the brim and stitch the ends together at the back.
Mini Pumpkin
Yarn: orange.
R1: 6 sc in MR (6)
R2: inc ×6 (12)
R3: (1 sc, inc) ×6 (18)
R4–R5: 18 sc (18)
R6: (1 sc, dec) ×6 (12)
Stuff firmly.
R7: dec ×6 (6)
Fasten off with a 30 cm tail. Run the tail vertically around the pumpkin four to six times, pulling each pass lightly to create ribs.
For the stem, attach green yarn, ch 3, sl st back along the chain, then fasten off. Embroider a small black jack-o’-lantern face to match the hanging witch ghost.
Purple Bow Tie
Yarn: purple.
Ch 7.
Row 1: 6 sc (6)
Rows 2–5: ch 1, turn, 6 sc (6)
Fasten off. Make a second rectangle the same way. Pinch both pieces toward the center, then wrap purple yarn around the middle six to eight times and secure it at the back.
The completed bow should measure roughly 4–5 cm across and sit directly below the mouth.
Spiral Streamer
Yarn: alternate purple and white.
Ch 101.
Row 1: Starting in the second chain, 2 hdc in each ch across (200).
The doubled stitch density forces the strip to curl. For alternating blocks similar to the pictured mobile, change between purple and white approximately every 16–20 stitches rather than attempting identical block lengths after the curl forms.
Fasten off. Leave 25 cm tails at both ends.
Black and Orange Star Appliqués
Yarn: black or orange.
R1: 10 sc in MR (10).
For each of five points: sl st in next stitch, ch 4, sl st in second ch from hook, sc in next ch, hdc in next ch, sl st in next base stitch.
Repeat until five points are formed. Fasten off with a 15 cm sewing tail and attach the stars to selected sections of the spiral.
Mini Ghosts — Make 3
Yarn: white.
R1: 6 sc in MR (6)
R2: inc ×6 (12)
R3: (1 sc, inc) ×6 (18)
R4–R7: 18 sc (18)
Fit 6–8 mm eyes between R5 and R6 or embroider the eyes.
R8: (1 sc, dec) ×6 (12)
R9: 12 sc (12)
Stuff lightly.
R10: dec ×6 (6)
Fasten off. Leave a 20 cm tail.
For each miniature hem, rejoin white yarn at R9 and work three evenly spaced shell groups of 5 dc with slip stitches between them.
Mini Ghost Arms — Make 6
Yarn: white.
R1: 6 sc in MR (6)
R2–R3: 6 sc (6)
Do not stuff. Fasten off and leave a 12 cm tail. Sew one arm to each side of every mini ghost.
Hanging Stars — Make 3
Yarn: purple and orange.
R1: 10 sc in MR (10).
For each point: sl st in next stitch, ch 5, sl st in second ch from hook, sc, hdc and dc along the remaining chain, then sl st in the next base stitch.
Repeat five times to create five points.
For a thicker charm, make a second matching star and sew both layers together around the perimeter. Do not stuff heavily.
Fasten off. Leave a 20 cm hanging tail.
Hanging Cord
Yarn: purple or strong matching cord.
Ch 30.
Sl st into the first chain to form a loop. Work 30 sl st around the chain loop for extra thickness.
Fasten off with a 35 cm tail. Pass this tail through the hat and anchor it into the stuffed head rather than attaching the entire weight of the decoration to the hat brim.
Assembly
- Pin the head centrally to the body. Sew through full stitches around both pieces, keeping the neck seam horizontal.
- Attach the body firmly enough that its weight cannot rotate below the head. Add a second reinforcing pass through the rear half of the seam.
- Complete the face by embroidering a shallow black smile between the eyes, then attach the two pink cheek patches below and slightly outside the eye line.
- Sew the arms to opposite sides of the upper body. Position their upper edges approximately 1–2 rounds below the head-body seam.
- Shape the scalloped hem, pinning each lobe downward before securing any sections that curl toward the body.
- Center the witch hat brim over the head and stitch it at four anchor points before sewing the complete contact line. Attach the cone, orange band and mini pumpkin.
- Sew the purple bow below the mouth. Keep its center aligned with the midpoint between the safety eyes.
- Attach the spiral streamer beneath the main ghost. Thread orange and black beads onto reinforced yarn between major sections if the decoration will be displayed out of children’s reach.
- Suspend the three mini ghosts and three stars from the lower streamer using separate reinforced strands. Vary the drop lengths so the pieces do not overlap.
- Run the hanging loop through the top of the hat and into the main head, secure it internally, then weave every remaining structural tail through at least 3 cm of stitches.
The completed decoration consists of one witch ghost, one spiral streamer, three mini ghosts and three star drops.
7 Technical Tips for a Cleaner Ghost Amigurumi
- Stitch-marker drift: Moving the marker one stitch early shifts the face and hat seam around the head. Count all 36 stitches at the end of every plateau round before continuing.
- Under-stuffing: A head that compresses more than about 1 cm when pinched can let the safety-eye posts tilt. Add stuffing behind and between the eyes before closing R15–R17.
- Visible decreases: Ordinary two-stitch decreases can create horizontal bars across the white surface. Work every shaping decrease through the front loops of two adjacent stitches.
- Late eye placement: Safety-eye washers cannot be fitted after the head reaches the final 12-stitch opening. Install both eyes after R12 and check their seven-stitch spacing before decreasing.
- Loose hat tension: A brim more than roughly 1 cm wider than the head on each side can sag over the eyes. Drop the hook by 0.25–0.5 mm for the brim if the purple yarn works looser than the white yarn.
- Unpinned accessories: Sewing the pumpkin directly onto a curved hat can pull the cone sideways. Pin the pumpkin at two contact points and inspect the hanging balance before making permanent stitches.
- Short woven tails: Hanging ornaments receive repeated tension at their suspension points. Weave structural tails through at least 3 cm of dense fabric, reverse direction once, then trim.
Finishing the Witch Ghost Hanging Mobile
Check the hanging balance before trimming the final structural tails: the pumpkin, bow and off-center hat tip can rotate the main ghost once the lower ornaments are attached. The next practical step is to pin the complete mobile to its suspension cord and adjust the three lower drop lengths before making permanent knots.
This ghost amigurumi crochet pattern can also be reduced to the main witch ghost when a shorter ornament is required. Save the finished layout to Pinterest and share the completed mobile on Instagram with #WitchGhostMobile.
When comparing your finished ghost with the reference design, which detail changed its silhouette most: the bent witch-hat tip, scalloped ghost hem or long spiral streamer?









