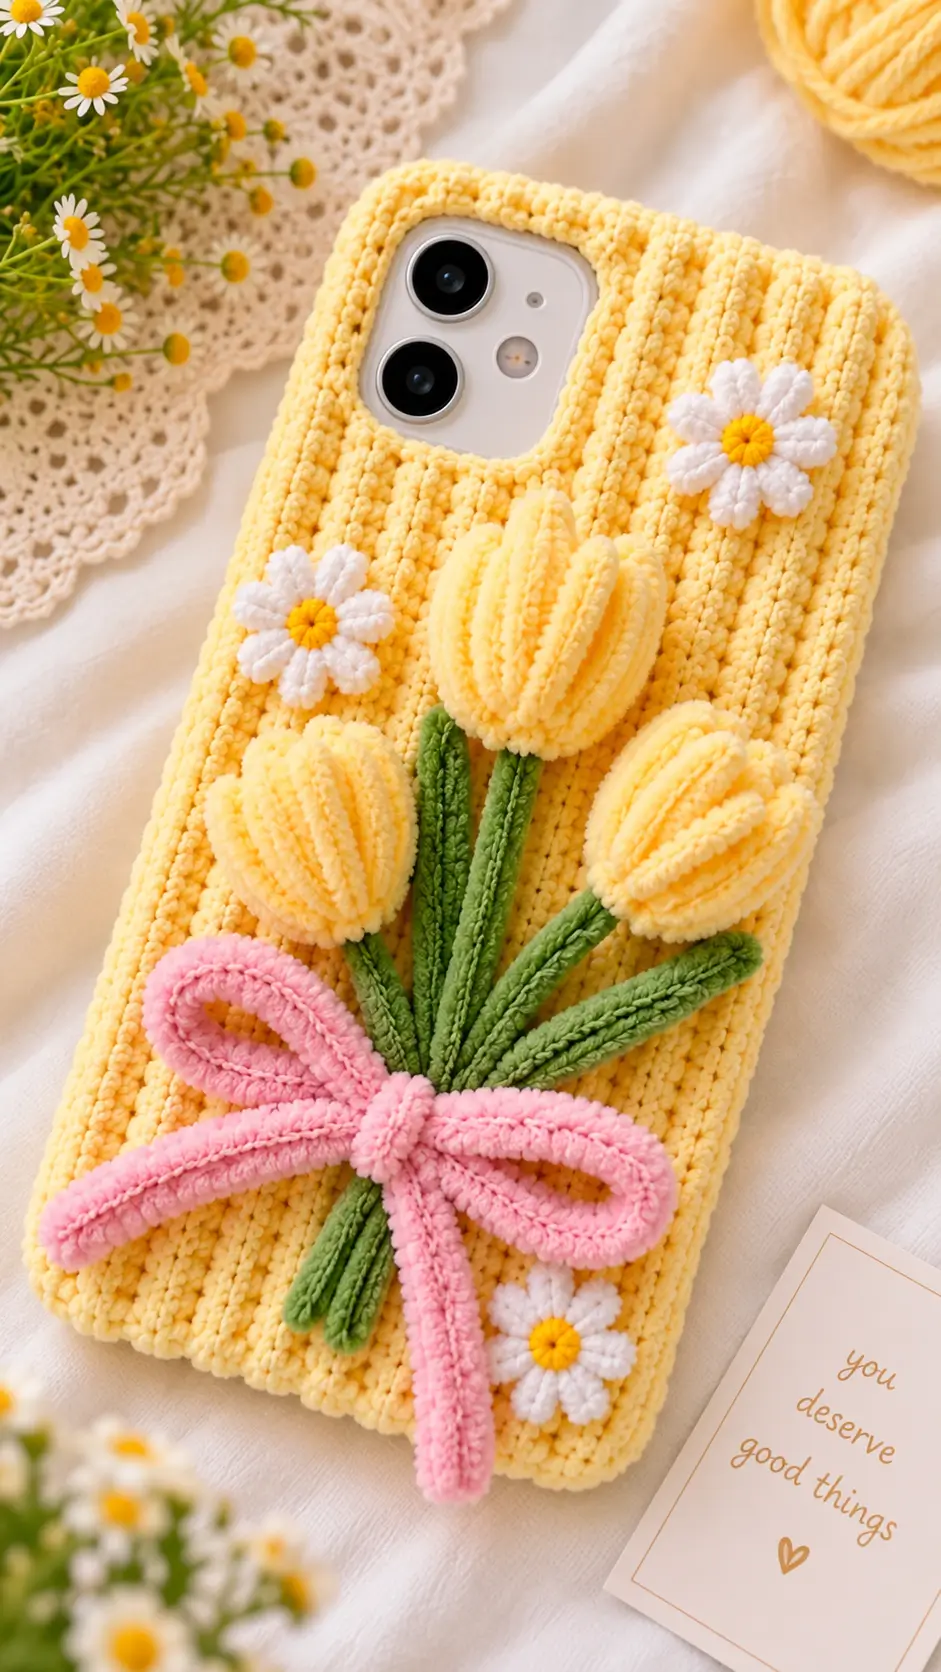
Three raised tulip heads have to fit below a phone camera without turning the cover into a lopsided bouquet. This crochet tulip phone case pattern uses a fitted yellow base, three-dimensional flowers, green stems, daisies and a pink bow. Work it with medium yarn and a 4 mm hook at roughly 8.9 × 17.8 cm, adjusting for your device. The project suits intermediate crochet skills and turns small yarn quantities into a fitted decorative cover.
The Design: What Makes the Tulip Case Different
The photographed case depends on relief rather than colorwork. Each tulip projects above the yellow background, while narrow stems keep the lower half visually open. A shallow padded flower head works better here than a full amigurumi tulip because excessive stuffing would make the phone unstable on a table.
The second structural decision is asymmetry. Three blooms sit at different heights, preventing the crochet flower phone case from reading like three identical appliqués in a row. Narrow green leaves then fill the spaces between those stems.
Finally, the bow crosses the stems near the lower third. That intersection hides several attachment points while copying the bouquet structure. A frequent mistake in a 3D crochet tulip phone design is sewing every component through both the decorative cover and a removable hard shell. Attach crochet to the crocheted outer layer before final mounting instead.
Project Info at a Glance
| Skill Level | Time | Finished Size | Hook | Best For |
|---|---|---|---|---|
| Intermediate | 4–6 hours | Approx. 8.9 × 17.8 cm | 4 mm | Phone cover / decorative shell |
The dimensions above provide a reference size. Always compare the crochet panel directly with the phone or hard shell because smartphone dimensions vary between models.
Materials and Tools
Yarn
- Butter yellow — #4 medium — about 30–35 g — smooth cotton, cotton/acrylic or tightly spun acrylic
- Tulip yellow — #4 medium — about 8–10 g
- Leaf green — #4 medium — about 6–8 g
- Pink — #4 medium — about 5–7 g
- White — #4 medium — about 3–4 g
- Golden yellow/orange — #4 medium — about 1–2 g
Actual yarn consumption changes with phone dimensions, gauge and surface texture. Keep extra yellow available if your device is larger than the reference size.
Tools
- 4 mm crochet hook
- Yarn needle
- Stitch markers
- Scissors
- Small amount of polyester stuffing
- Flexible tape measure
- Plain hard phone shell matching your device, if mounting the crochet panel
- Fabric-safe permanent adhesive, optional for shell mounting
Abbreviations
- MR — magic ring
- sc — single crochet
- hdc — half double crochet
- dc — double crochet
- inc — 2 sc in one stitch
- dec — single crochet decrease
- sl st — slip stitch
- ch — chain
- BLO — back loop only
- FLO — front loop only
- st/sts — stitch/stitches
For an invisible decrease, insert the hook through the front loops of the next two stitches, yarn over and complete one single crochet through both loops.
Crochet Tulip Phone Case Pattern — Step by Step
This construction is based on the visible components of the photographed phone case. Because phone dimensions vary substantially, the case foundation is adjustable rather than tied to one specific phone model.
Phone Case Base
Yarn: butter yellow
Measure the hard shell or phone rather than relying only on its advertised screen size.
Foundation: Chain until the foundation measures the phone width minus approximately 5 mm.
For an approximately 8.9 cm target width:
Row 1: Ch 17, sc in 2nd ch from hook and across (16)
Rows 2–29: Ch 1, turn, sc BLO across (16)
Continue adding or removing rows until the rectangle matches the full length of your phone without excessive stretching.
The BLO construction creates the narrow raised lines visible across the yellow background of the photographed case.
Do not fasten off.
Case Border
Yarn: butter yellow
Round 1: Ch 1. Work sc evenly around all four sides, placing 3 sc in each corner. Join with sl st.
Round 2: Ch 1, sc around, placing 3 sc in each corner. Join with sl st.
Fasten off. Leave approximately 20 cm of yarn if the panel will be sewn to another crocheted layer.
For the camera opening, position the completed rectangle against the correct phone shell and mark the exact camera module location. Do not estimate the opening from a photograph because camera dimensions and positions differ between devices.
Tulip Heads — Make 3
Yarn: tulip yellow
R1: 6 sc in MR (6)
R2: inc ×6 (12)
R3: (sc, inc) ×6 (18)
R4: (2 sc, inc) ×6 (24)
R5: (3 sc, inc) ×6 (30)
R6: BLO sc around (30)
R7: sc around (30)
R8: sc around (30)
R9: (3 sc, dec) ×6 (24)
R10: (2 sc, dec) ×6 (18)
Add only enough stuffing to round the front surface. Keep the back relatively flat so the tulip can be attached securely to the phone cover.
R11: (sc, dec) ×6 (12)
R12: dec ×6 (6)
Fasten off. Leave a 25 cm sewing tail.
Pinch the closed tulip vertically. Thread a separate strand of yellow yarn through a needle and take three or four long shaping stitches from the lower edge toward the top. Pull gently.
Repeat around the flower to create the pronounced vertical ribs visible in the reference design. The finished flower should have an oval profile rather than forming a round ball.
Green Stems — Make 3
Yarn: leaf green
Stem 1: Ch 30, sl st in 2nd ch and each ch across (29)
Stem 2: Ch 26, sl st in 2nd ch and each ch across (25)
Stem 3: Ch 23, sl st in 2nd ch and each ch across (22)
Fasten off each stem with approximately 15 cm of yarn remaining for sewing.
The different lengths position the center flower highest, the left flower lower and the right flower between those two heights.
Narrow Tulip Leaves — Make 3
Yarn: leaf green
Leaf 1: Ch 24. Starting in 2nd ch from hook, work sl st, 3 sc, 5 hdc, 9 dc, 4 hdc, sc (23).
Leaf 2: Ch 21. Starting in 2nd ch from hook, work sl st, 3 sc, 4 hdc, 8 dc, 3 hdc, sc (20).
Leaf 3: Ch 18. Starting in 2nd ch from hook, work sl st, 3 sc, 4 hdc, 6 dc, 2 hdc, sc (17).
Fasten off. Leave approximately 20 cm of yarn on each leaf for sewing.
The changing stitch heights produce a tapered botanical profile while keeping the leaves narrow enough for a phone-sized surface.
Daisy Centers — Make 3
Yarn: golden yellow/orange
R1: 6 sc in MR (6)
R2: inc ×6 (12)
Fasten off with a 15 cm sewing tail.
Keep each center flat. No stuffing is required.
White Daisy Petals
Yarn: white
Join white yarn to any stitch of the yellow center.
Petal 1: Ch 5. Starting in the second chain from the hook, work sl st, sc, hdc, dc. Sl st into the next available stitch of the center.
Repeat around the center until approximately 8–10 petals fill the circumference.
Fasten off and weave the white yarn end behind the flower.
Repeat the process to make three complete daisies.
Pink Bow Loops — Make 2
Yarn: pink
Ch 31.
Row 1: Starting in 2nd ch from hook, sc across (30).
Row 2: Ch 1, turn, sc BLO across (30).
Row 3: Ch 1, turn, sc across (30).
Fasten off with a 25 cm sewing tail.
Curve each strip into a long teardrop-shaped loop. Overlap approximately 1 cm at the ends and stitch them together.
Pink Bow Tails — Make 2
Yarn: pink
Ch 24.
Row 1: Starting in 2nd ch from hook, sc across (23).
Row 2: Ch 1, turn, sc BLO across (23).
Fasten off.
Keep the two pieces separate until assembly. Position one tail almost vertically and angle the second toward the lower-left side to reproduce the bouquet arrangement.
Bow Center
Yarn: pink
Ch 9.
Row 1: Starting in 2nd ch from hook, sc across (8).
Rows 2–4: Ch 1, turn, sc across (8).
Fasten off with a 30 cm sewing tail.
Wrap the rectangle around the crossed bow loops and tails. Sew firmly at the back.
Optional Raised Rib Overlay
Yarn: butter yellow
If the BLO base does not create enough texture, surface-crochet vertical slip-stitch lines along selected ridges.
Start at the lower edge and work toward the camera end. Keep each surface line under low tension. Tight surface crochet can shorten the panel and make the edges curl.
Do not add raised crochet across the camera opening or along any edge that needs to sit inside a hard phone shell.
Assembly
- Block the yellow panel to the measured dimensions of the phone or compatible hard shell. Keep the complete camera area unobstructed.
- Position the three green stems first. Place the longest stem in the center and spread the lower ends toward the future bow position.
- Pin the three tulip heads above the stems. Place the center tulip highest and position the two side flowers slightly lower.
- Sew each tulip around its flat back edge rather than stitching through the rounded front. Keep stuffing away from the seam.
- Arrange the three leaves between and outside the stems. Check that no leaf enters the camera clearance area.
- Position the three daisies in the remaining yellow spaces. Place one toward the upper side, another around the middle-left section and the third toward the lower corner.
- Cross the two pink bow loops over the green stems and position the two tails underneath. Secure the center wrap through the yellow base.
- Tack each stem to the background at intervals of approximately 15–20 mm. This prevents long sections from lifting away from the phone cover.
- Weave every yarn tail beneath existing stitches. When mounting the panel to a hard shell, complete all sewing before attachment and keep adhesive clear of lenses, buttons, speakers and charging openings.
- Insert the correct phone or mount the finished panel to its compatible shell. Check the camera, flash, buttons, microphone, speakers and charging port before use.
The completed cover should remain flat around its perimeter while the flowers project from the decorative surface.
7 Technical Tips for a Better Crochet Flower Phone Case
- Case curling: BLO rows can contract when the working yarn is pulled too tightly. Measure the rectangle every five rows and keep width variation below 3 mm.
- Bulky tulips: Excessive stuffing can make the phone rock on a flat surface. Keep each flower head to a shallow dome of roughly 15–20 mm projection.
- Misplaced flowers: Sewing before marking the camera boundary can position a petal in front of the lens or flash. Mark a minimum 5 mm clearance zone around the complete camera opening before pinning the flowers.
- Loose stems: A stem attached only at the top and bottom can catch on fingers or objects inside a bag. Add a hidden sewing tack approximately every 15–20 mm.
- Distorted bow: Pulling the center wrap too tightly can collapse the loops. Pin both loops to matching widths before sewing the 8-stitch center band around them.
- Visible fastening knots: Thick knots beneath the crochet create raised areas against a hard shell. Weave each yarn tail through at least 4–5 cm of matching stitches instead.
- Incorrect device fit: Advertised screen dimensions do not provide the complete dimensions of a phone or protective shell. Measure the actual object to the nearest 1 mm before finalizing the yellow foundation.
Choosing the Yarn and Hook
A 4 mm hook with #4 medium yarn gives the flower heads enough structure to retain their raised form while keeping the background fabric relatively firm. A loose gauge can produce stems that twist and tulips that lose their defined shape.
Thinner yarn can also be used, but the foundation chain and number of rows must then be recalculated. Do not rely on the stitch counts for the yellow panel when changing yarn weight.
Cotton and cotton-blend yarns are useful choices for the fitted background because they can produce a defined stitch surface. Acrylic can also work when crocheted at a firm gauge.
Gauge matters more than the fiber label. Finish and measure the yellow rectangle before making all of the decorative components.
How to Size the Crochet Phone Cover
The reference dimensions for this project are approximately 8.9 × 17.8 cm. These measurements are a starting point rather than a universal smartphone size.
Measure your own phone or hard case before crocheting the foundation.
For a device measuring 7.5 × 15.5 cm, for example, work toward those physical dimensions rather than forcing the 16-stitch width and 29-row length. Crochet fabric intended to stretch around a shell can be slightly smaller. A decorative panel attached directly to a rigid case requires more exact edge alignment.
The camera opening requires the most accurate positioning. Complete the yellow panel first, place it against the correct phone shell and mark the camera area from the back.
Finish and test that opening before attaching the upper tulip or daisy. Keep yarn, stuffing and adhesive away from the camera lens and flash.
Final Checks
Before using the case, inspect every dimensional component. Pull gently on each tulip, leaf, daisy, stem and bow loop. A loose appliqué should be sewn again before the phone is inserted.
Place the phone on a flat surface and check the depth of the tulip heads. Reduce stuffing if the flowers cause excessive rocking.
Inspect the perimeter next. The crochet should not interfere with buttons, speakers, microphones or the charging connector.
Finally, check the camera while taking a photograph with and without flash. No yarn or flower edge should appear inside the frame or block the flash.
Conclusion
A fitted base should be completed and checked against the actual device before any bouquet components are attached. That measurement prevents the camera opening, tulip heads and bow from competing for the same limited surface. Make all three tulips as one batch so their diameter and stuffing depth remain consistent, then pin the complete bouquet before sewing. Save this crochet tulip phone case pattern to Pinterest or share the finished version on Instagram with #TulipBouquetPhoneCase. Record your final stitch count and phone dimensions for the next cover. Which detail would you change first: the three yellow tulips, the white daisies or the oversized pink bow?









